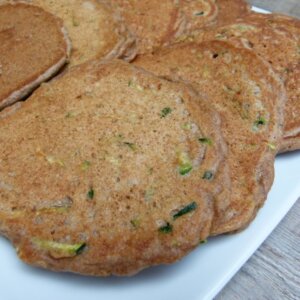
Lime-Soy Grilled Fish Recipe

Do you live in a house where everybody agrees on what should be served for dinner?  Where your favorites are his favorites are their favorites?  Are you that lucky?  No?  Consider your household normal, as is mine and the house I grew up in.  I remember as a child I was already not fond of meat.  Sometimes I could tolerate it if it didn’t seem like meat, such as a meatball or if it were cut into tiny pieces in a sauce or stew.  But if bones and skin were attached, I was out.  On the other hand, my youngest sister’s favorite food group was animal protein.  She would gnaw on a steak or lamb bone until it was dry.  I get nauseous thinking about it.  Of course my mother wanted to make everyone happy, so planning meals for our family was a balancing act of accommodating all of our likes and dislikes, except my father, who bless his heart, eats everything.

When I sit down to come up with our weekly meal plan, I think about the same thing.  I make sure there’s at least one item that Mr. Picky will eat each night, one Italian night for my husband, and one fish dinner to make me happy.  I’ve always liked fish, even as a child, and I still prefer it over chicken or beef.  The type of fish I eat has evolved over the years based on my maturity, but more importantly, based on what I have learned about the sustainability and safety of the fish that’s available.  My absolute favorite fish used to be swordfish.  It is meaty, mild and so versatile.  Unfortunately, it is also full of mercury and no longer a healthful option, according to my sources such as the Monterey Bay Aquarium’s Seafood Watch Guide.

This recipe today is inspired from the first cookbook I ever bought (in 1987!), The Loaves and Fishes Cookbook, and it called for swordfish.  It’s an absolutely delicious, tart and savory marinade which I have tweaked a bit over the years.  Funny enough, when I first started making this dish, I was probably 19 years old and not a very experienced cook.  The recipe called for lime zest which sounded like more trouble than it was worth, so I left it out for many years.  One day I came to my senses and took the time (all 3 minutes) to zest a lime, and it was a hundred times better with this one ingredient.  An ah-ha! moment for me for sure.  Sometimes laziness doesn’t pay off.

I am still making this recipe with minor modifications, such as the addition of a little maple syrup to sweeten it a tad, and using fish that aren’t red-flagged.  I typically make wild Alaskan salmon once per week, but other fish in the rotation include wild Alaskan halibut, mahi-mahi, and shrimp when my husband isn’t home for dinner.  What I love about this recipe, besides that fact that is has stood the test of time, is that this marinade is just as delicious on many other fish as it was on swordfish. I’ve shown it in these photographs with wild salmon above and halibut below, but mahi-mahi is great, too.  It’s also really simple to put together and quick to cook, making this a perfect weeknight dish.  I wanted to post this recipe this week in case you were looking for something to balance out the burgers on Father’s Day.  Dad can still “man” the grill and everyone’s happy!

5.0 from 1 reviews
Lime-Soy Grilled Fish
Author: 
Serves: 6
 
Ingredients
  • 2 Tablespoons Dijon mustard
  • ¼ cup shoyu or gluten-free tamari
  • Zest and juice of 2 limes (zest them before juicing)
  • ¼ cup unrefined olive oil or melted coconut oil + extra for brushing the grill
  • 1 Tablespoon 100% pure maple syrup
  • 2 small cloves garlic, minced
  • a few grinds of black pepper
  • 6 pieces of wild salmon, halibut or mahi-mahi, about 4-6 ounces each (keep the skin on, if possible)
Instructions
  1. To make the marinade, combine all ingredients except fish in a small bowl.
  2. Arrange the fish in a glass or non-reactive dish just large enough to hold the fish and the marinade. Pour HALF the marinade over the fish and allow to sit at room temperature for 10-45 minutes (depending on how much time you have.)
  3. Preheat the grill or broiler until hot. If using the grill, place some oil in a small bowl and use it to grease the grill. Place fish skin-side down and grill about 3-5 minutes on each side, depending on thickness. Discard marinade that the fish was sitting in. Cook fish until it starts to flake, but is still rare inside.
  4. Transfer to a serving platter and pour the reserved marinade over each piece of fish and cover with a piece of foil for 5 minutes.

Southwestern Quinoa Salad Recipe

Have you ever read a cookbook or food blog where an unbelievable, creative recipe was put together with “odds and ends” from the pantry or produce bin?  I am always in awe of people who can do that.  Those same people go grocery shopping without a list and simply buy what looks good and then create a meal around it.   I too can use bits of this or that and turn it into something fairly tasty, but it usually ends up as a frittata, Pantry Pasta, or some sort of fried rice dish.  Definitely enough to get an acceptable dinner on the table, but nothing that will win me any accolades.


One day a few years ago, I decided to try my hand at “throwing something together.”  I figured I had done this many a time at salad bars, I should be able to do this within the limitations of my own pantry and refrigerator.  Whereas I pride myself on keeping things simple,  on this particular day I got a little carried away.  It all started with some quinoa, corn and cilantro which sounded Southwestern to me.  Pretty soon I was dicing up red pepper, red onion and opening a can of black beans.  Just when I thought I was done, I spied a mango and that went into the mix, too. After squeezing in some lime juice, olive oil and cumin, I had myself one fresh and tasty salad that I could happily bring to a backyard barbeque or serve to guests, even that same day to my mother-in-law who is slightly skeptical of quinoa.

I’ve made this salad countless times since then and changed it up every time.  Red onion has been replaced with scallions or shallots.  Ripe avocado and toasted pumpkin seeds have found their way in on many an occasion.  When corn is crazy fresh and sweet, I just cut it off the cob raw and use it that way.  With Father’s Day coming up, I am thinking about including this on the menu, but I might just leave out the quinoa entirely since I made quinoa tabbouleh last year on Father’s Day.  Although my husband likes quinoa just fine, he doesn’t consider it very “manly.”  Please.  I keep trying to tell him how much protein it has — it’s like eating meat, but without the saturated fat and cholesterol.  But it’s his day and I aim to please!  So I think next weekend I’ll make this with extra corn and beans and thrown in some “manly” diced up grilled chicken.  Regardless, “creating” this salad was a good exercise for me in learning how to be flexible, but also gave me some confidence to use what I’ve got — in more ways than one.

5.0 from 1 reviews
Southwestern Quinoa Salad
Author: 
Serves: 6-8
 
Ingredients
  • 1 cup quinoa
  • 1 ½ cups cooked black beans, drained and rinsed if canned (1 can)
  • 1 ½ cups fresh or cooked corn (cut from 2 large ears)
  • ¾ cup diced red pepper (1 small pepper or ½ large)
  • ½ large red onion, diced (soaked in ice water if you want to cut the harsh onion flavor)
  • 1 jalapeno, seeded and minced (optional)
  • ¼ cup finely chopped cilantro
  • 1 teaspoon sea salt
  • ¾ teaspoon ground cumin
  • ⅓ cup fresh lime juice (about 1 ½ limes)
  • ⅓ cup unrefined, extra-virgin olive oil
Instructions
  1. Rinse quinoa in a bowl with water or place quinoa in a fine mesh sieve and rinse under cold water until water runs clear. Transfer to a saucepan and add a healthy pinch of sea salt and 1 ¾ cups of water. Bring to a boil and simmer until water is absorbed, about 15 minutes. Turn off the heat and place a kitchen towel over the pot. Place the lid over the towel and let sit covered for 5 -10 minutes.
  2. Transfer quinoa to a serving bowl, fluff with a fork and cool slightly. Add beans, corn, red pepper, onion, (optional) jalapeno and cilantro. Sprinkle with cumin and sea salt.
  3. In a small bowl combine lime juice and olive oil. Pour over salad and mix well. Taste for seasoning.
Notes
Options for substitutions/additions: Also delicious in this salad are sautéed zucchini, diced celery, diced fresh mango, sliced scallions, diced tomato or diced avocado.

Whole Wheat Carrot Cake with Dairy-Free Frosting Recipe

I was married almost 17 years ago, so I guess it’s not crazy that my husband would have forgotten what flavor our wedding cake was.  I’m just surprised, because he was very involved in all decisions.  I know you’re thinking that it sounds sweet to have your fiance interested enough in your wedding to have a say in everything, but trust me, kind of annoying.  Regardless, we were talking about our wedding cake the other day and my husband remembers it as carrot cake, which it was certainly not.  Of course, there’s nothing wrong with carrot cake for a wedding cake, but ours was a simple white cake with chocolate chocolate-chip buttercream filling.

He probably thinks it was carrot cake because we both love it so much.  And we both agree that carrot cake should be moist and dense and chock full of carrots and raisins and walnuts.  I remember many a date when we shared a large slice of carrot cake for dessert.  You know the kind.  Two or three layers of sweet, nubby cake sandwiched between even sweeter, creamy, tangy icing.  Sounds great until you learn that a huge piece of bakery or restaurant carrot cake contains about a entire day’s worth of calories.  And don’t think they’re using natural sweeteners, friends.  If I were 22 again and doing two hours of step aerobics every day, I could probably get away with it.  But not no more!

Fast forward two decades later when at least one of us is trying to consume desserts in moderation and bake them with less refined ingredients so we can make it to our 50th wedding anniversary and beyond.  Yes, that’s why I make carrot cake in a 13 x9-inch baking dish instead of as a layer cake.  I think it’s super delicious too, but for me at least, one square is plenty.  And before you think I’m no fun at all, don’t think I’m skimping on flavor here.  This carrot cake delivers the same sweet, spiced goodness that you would expect from the traditional.  Ok, maybe not the same sweetness.  When I got motivated to come up with a higher quality carrot cake, I went to my trusty Ina, who uses a whopping 2 cups of sugar in her cake.  Although in her defense, so does everyone else.  In my recipe I use coconut palm sugar and much less of it.  Listen, there’s a whole pound of carrots in this cake and carrots are sweet.  There are also raisins and even diced pineapple if you choose to use it.  And even if you don’t frost this cake, it’s plenty sweet.  Personally, I was happy as a clam with this cake unfrosted, but I knew my students would be expecting something more.  Of course I couldn’t go with a typical cream cheese frosting, because they don’t come to my kitchen for that.   So I am also offering you something very alternative, but perfectly yummy and thick and creamy and won’t make you sick to your stomach after you eat it.  And it’s vegan!

I’m thinking with Father’s Day coming up, this would be a fun dessert to make.  You can even do it in a muffin tin for individual cupcakes.  There are lots of ways you can adapt this recipe to make everyone happy.  Drop the pineapple if you wish.  Use pecans instead of walnuts.  Add some nutmeg or cloves.  Make Ina Garten’s cream cheese frosting if you don’t believe me that this one is great.  Just don’t ask me if you can make this cake without carrots because that question was already asked in my class last month and my answer is “no.”  Instead you have my blessing to go make the white butter cake with chocolate chocolate-chip buttercream filling that you really want.

Whole Wheat Carrot Cake with Dairy-Free Frosting
Author: 
Serves: makes a 13x9-inch or 2 9-inch round pans
 
Ingredients
  • 1 ¼ cups coconut palm sugar or granulated sugar
  • 1 ¼-1 ½ cups unrefined oil (I use melted coconut oil, but olive or high-oleic safflower is fine, too)
  • 3 extra-large eggs, at room temperature
  • 1 teaspoon pure vanilla extract
  • 2 ½ cups plus 1 Tablespoon whole wheat pastry flour, divided
  • 1 Tablespoon ground cinnamon
  • 2 teaspoons baking soda
  • 1 ½ teaspoons sea salt
  • 1 cup unsulphured golden raisins (or dark raisins if you prefer)
  • 1 cup walnuts, chopped
  • 1 pound carrots, shredded (about 4 cups)
  • ½ cup fresh pineapple, finely chopped (or frozen, thawed)
  • Raw Cashew Frosting (optional)
Instructions
  1. Preheat the oven to 350 degrees. Grease the bottom and sides of a 13”x 9” pan.
  2. Beat the sugar, oil and eggs together in the bowl of an electric mixer fitted with the paddle attachment until thick and sugar has dissolved a bit. Add the vanilla and stir to combine.
  3. In another bowl, whisk together 2 ½ cups flour, cinnamon, baking soda, and salt.
  4. Add the dry ingredients to the wet ingredients. In a small bowl, combine the raisins and walnuts with 1 Tablespoon of flour and add to batter. Fold in the carrots and pineapple and mix well.
  5. Pour batter into pan. It should be super thick. Bake for 45–55 minutes, or until a toothpick comes out clean. Allow cake to cool completely in pan over a wire wrack.
Notes
If you like things very sweet, you can increase the sugar to 1½ cups and the recipe will work fine. I also give a range for the oil. Use 1¼ cup if you plan to eat it all the same day it's made and if you like a lighter cake. Use 1½ cups if you like it a little heavier and if you want it to cake to stay moist for several days. I used 1½ cups in these photos and 1¼ cups in my classes.

Raw Cashew Frosting:

This is a lovely, just-sweet-enough frosting which you can use for lots of cakes and cupcakes. It is dairy-free and if you use maple or agave, it is also vegan. You cannot substitute another oil for the coconut oil, since that’s what helps the frosting become firm and spreadable once it has been refrigerated. I use Grade A maple syrup here, which is less mapley than Grade B.

2 cups raw cashews, soaked in water for at least 5 hours

½ cup unsweetened almond milk or water (water is just as good)

¼ cup unrefined coconut oil, melted

3 Tablespoons raw honey, Grade A maple syrup or agave

¾ teaspoon pure vanilla extract

pinch or 2 of fine grain sea salt


Process all ingredients in a food processor, scraping down the sides if necessary, until perfectly smooth. This can take 5-6 minutes. Or use a high powered blender like a Vitamix for about 45 seconds. Refrigerate to allow it to firm up enough to a spreadable consistency. Keep refrigerated until ready to use.


Chickpea Burger Recipe

If I had to pick one cuisine to stick with for the rest of my life, it would be a tough a call.  But I could easily live off of Mediterranean food every day.  I love the emphasis on fresh vegetables, olive oil, legumes and whole grains, cheeses and fish.  Whether it’s Italian, Greek, or Israeli, this way of eating is definitely my comfort zone.  And living in Southern California makes cooking Mediterranean-style quite easy with an availability of similar varieties of fresh produce, nuts, dates and olives.

As I’ve mentioned before, one of my favorite things to do is to take a not-so-healthful food that I love and turn it into something I can enjoy regularly.  Many years ago I decided to try making falafel (the deep-fried Middle Eastern chickpea nuggets) a little less “deep-fried.”  (Ok, not everything Mediterranean is healthful.)  Many iterations later I found myself with a delightful, substantial chickpea burger which in turn began my obsession with veggie burgers.  I don’t love meat and poultry so much, although I think they are excellent sources of protein if you can find organic, pastured varieties.  But I do love hearty, flavorful vegetarian food that makes me feel satisfied, especially anything bean-based which is loaded with low-fat protein and tons of insoluble fiber.  I also like having recipes like this for entertaining when I always like to offer a vegetarian option (you’d be surprised how many people choose not to eat meat these days.)

These chickpea burgers are a favorite of mine and my whole family, even Mr. Picky who I am pleased to announce tried one for the first time last week with ketchup.  Do what you’ve gotta do, friends.  They are definitely a far cry from falafel, though.  In fact, the only ingredients that falafel and these chickpea burgers have in common are chickpeas and cumin.  But if I do it right, they’re crispy on the outside, moist on the inside and with flavors that remind of falafel.  I usually eat veggie burgers sans bun since I find that they are plenty starchy without adding bread.  But when serving them to family and friends, I offer warmed, whole wheat pita halves and an array of yummy toppings including sprouts, avocado, tomato slices, lettuce, cooked onion and most importantly, a creamy and refreshing sauce.  In my opinion, it’s all about the condiments!

Chickpea burgers (and veggie burgers, in general) are fabulous for entertaining and for busy weeknights since they are best formed in advance and refrigerated so they firm up a bit.  Out of the fridge, they cook up in minutes on a hot griddle or skillet.  Once you realize how tasty these are, you’ll make a double batch and freeze half.  If you freeze them, just don’t forget to place a piece of wax or parchment in between each patty so that they don’t stick together (ask me how I know this.)  These burgers may not take you back to your last visit to the Mediterranean, but I hope they’ll keep you from visiting the freezer section of your supermarket!  Enjoy~


View this post on Instagram


A post shared by Pamela Salzman (@pamelasalzman)


4.8 from 5 reviews
Chickpea Burgers
Author: 
Serves: makes 8 patties
 
Ingredients
  • 4 cups cooked chickpeas, drained and rinsed if canned
  • 2 large eggs, preferably free-range
  • 2 cloves garlic, minced
  • 2 teaspoons sea salt
  • 2 teaspoon ground cumin
  • ½ teaspoon cayenne pepper (optional)
  • zest of 2 small or 1 super big lemon
  • ¼ cup flour (whole grain flour, cornmeal or almond meal all work)
  • 6 Tablespoons (or a heaping ⅓ cup) chopped parsley
  • 2 carrots, grated
  • ½ red onion, small dice
  • Oil or ghee for sautéing
  • Yogurt-Tahini Sauce
  • ¾ cup plain yogurt (full fat or low fat)
  • 3 Tablespoons tahini
  • 1½ Tablespoons lemon juice
  • ½ cup chopped parsley, mint or a combo (my favorite)
  • ¼ - ½ teaspoon sea salt
  • Oil or ghee for sautéing
  • 4 6½ -inch whole wheat pitas, halved and warmed, if desired
  • Suggested accompaniments: sprouts, avocado, tomato, lettuce, grilled onions
Instructions
  1. Place the chickpeas, egg, garlic, salt, cumin, cayenne, lemon zest, flour and parsley in food processor. Pulse until a coarse mixture forms that holds together. It should be moist and sticky.
  2. Place chickpea mixture in a bowl and mix in grated carrot and red onion. Take a ½ cup of the mixture and firmly press it into a patty about 3 ½ inches in diameter and ¼ inch thick. You can also form these into mini-patties for appetizers. Place on a plate or a baking sheet and refrigerate for at least 30 minutes and up to overnight. Cover if refrigerating for more than a few hours.
  3. Heat a couple tablespoons of oil or ghee in a large skillet over medium heat until hot, but not smoking. Add patties to the skillet (do this in batches, if necessary) and cook until crisp and golden brown on the underside, about 6 minutes. Carefully turn over and cook until golden brown on the other side, about 3-5 minutes more.
  4. Serve with or without a warmed pita half or a hamburger bun and suggested toppings.


Kale Pesto Recipe

When I was a child, my family ate pesto all the time in the summer and early fall.  In fact, to me the smell of basil, garlic and cheese in the food processor is synonymous with warm, lazy days at the beach or on my parents’ hammock under a big, breezy tree.  It was one of the few things my mom made without a recipe because she made it so often and could likely do it in her sleep.  Also, my father always planted way too much basil so Mom was forced to use it  up more quickly than it grew.  Traditional basil pesto is the only pesto that I ever knew until I started over-planting my favorite herb, parsley, and mixing it with basil for an ever better (in my opinion) pesto.

But it wasn’t until a few years ago that I heard about the huge spectrum of pestos out there not made from basil but from all sorts of herbs like cilantro and mint to leafy greens such as spinach and arugula and even peas or sun dried tomatoes.  The result is a brave new world of pesto-adorned dishes beyond pasta in the summertime.  The good news is that all pestos are super simple to make and help me make my boring meals more exciting.  “Another turkey sandwich?”  No, a turkey sandwich with pesto!  Oooh, ahhh.  “Grilled fish” doesn’t have the same appeal as “grilled salmon with cilantro pesto!”  Although when I introduced kale pesto to my family, they were skeptical.

Kale, which is my absolute favorite superfood, is more nutrient-dense than most any food on the planet, so I try to incorporate it into our meals however I can.  I love how hearty and flavorful kale is, but it can be a little bitter for the kids if I don’t try to work around that.  My standard pesto is made with pine nuts or pine nuts and walnuts.  Both are soft nuts that get ground very easily, but can be also be a tad bitter.  So I subbed blanched almonds to keep the pesto from getting too harsh and loved it, even though almonds don’t grind up quite as finely.  The only other change I made was to add a touch of lemon juice which brightens the whole thing up and again, cuts any bitterness.

I made kale pesto in two different ways.  The first with all kale and the second with mostly kale plus basil.  All kale pesto tastes reminiscent of broccoli which makes sense since they’re both in the cruciferous family.  It’s so totally yummy with a hearty whole wheat or spelt pasta, stirred into soups like lentil, mushroom-barley or minestrone or slathered on a quesadilla with leftover roasted veggies and cheese.  I imagine it would be great on a baked potato with veggies or in an omelet with goat cheese and mushrooms.  Then I made another version with mostly kale and some basil and it tastes much more like the version you’re used to, but more substantial and maybe with a little more bite.  So many people in my classes this month thought it was even better than an all-basil pesto.  In class we ate it poured on a grilled chicken paillard.  Sunday, I took some pasta with kale-basil pesto and chickpeas in Chinese takeout containers for a beach picnic and then used the leftovers yesterday on a grilled whole wheat pizza with ricotta, sauteed garlic spinach and fresh mozzarella.  Insane.

Feel free to use whatever kale you can find, but the curly green variety tends to get processed more finely in the food processor if that matters.  Although in these photos I did use the Dinosaur (Tuscan) variety because I typically have that on hand for salad and juicing.  However you try it, and I hope you do, pesto is a busy cook’s good friend anytime of year.  Tell me your favorite ways to enjoy it!

Kale Pesto
Author: 
Serves: makes just under 2 cups
 
Ingredients
  • ½ cup blanched almonds, walnuts, pine nuts or a combination (use sunflower seeds for a nut-free pesto)
  • 1 large garlic clove, smashed
  • 3 cups kale (dinosaur or curly green), stemmed and torn into large pieces (so it’s easier to measure)
  • 2 cups basil leaves (or use all kale)
  • ½ teaspoon fine grain sea salt
  • Freshly ground pepper to taste
  • 1 Tablespoon freshly squeezed lemon juice
  • ¾ cup unrefined, cold pressed, extra-virgin olive oil
  • ⅓ cup grated Pecorino or Parmigiano cheese
Instructions
  1. Toast nuts, stirring frequently, in a dry skillet over medium heat until lightly golden. If you are a “nut-burner,” just skip this step and put them in the food processor raw. Remove from heat and allow to cool. If you're using sunflower seeds, just use those raw.
  2. Place nuts and garlic in the bowl of a food processor fitted with the metal blade and process until very finely chopped.
  3. Add kale, basil, salt, pepper and lemon juice and pulse until chopped.
  4. With the food processor running, add olive oil in a steady stream until you achieve a smooth texture. Add cheese and process until well combined.
  5. Taste for seasoning and add additional olive oil to make a looser pesto.
Notes
*Pesto freezes really well!

Wheat Berry Salad with Lemon-Tahini Dressing Recipe

In a perfect world we would all be eating mostly whole foods, that is foods that came into this world a certain way and stayed that way.  Whole, unprocessed, unrefined foods are more recognizable by our bodies and better for our health.  Period.  I also talk a lot about limiting gluten, that pesky inflammatory protein found in wheat and to a lesser extent spelt, barley, rye and farro.  One of the problems with our overconsumption of wheat is that 99.9% of the time (I made up that statistic), it is in a processed form such as bread, pasta, baked goods, flour tortillas, pizza, etc.  And in the US, much of the processed wheat is refined too, which means anything good that was in there has been taken out.  Ugh.  I know all those foods are delicious and I am not telling you to never eat them again (although you would be better off), but it’s important to at least acknowledge how much processed wheat you’re eating and try a limit these foods to every once in a while.

So if you buy bread or pasta labeled “whole wheat,”  they are technically made from whole wheat and not actually whole wheat.  If you wanted to actually eat whole wheat, you would eat these little babies right here.  They are called wheat berries which is where wheat flour comes from.  They are a true whole grain because they’re still intact, as are their B vitamins, fiber, protein, even calcium.  Wheat berries remind me a lot of spelt, farro and even short-grain brown rice, but more chewy which makes them perfect in a salad.  My kids love them!  Truthfully you can use wheat berries in any recipe calling for spelt or farro, none of which, however is gluten free.  GF folks can sub brown rice or quinoa very successfully in this recipe.

In as much as I love wheat berries, though, this salad wouldn’t be as delicious without the creamy lemon-tahini dressing which I have been putting on everything lately.  If you have a jar a tahini in the fridge, it is likely because you used it to make hummus, the delicious and popular Middle Eastern chickpea dip.  Tahini is just ground up sesame seeds, plain and simple with lots of good fats, protein and calcium.  If you like hummus, you’ll love this dressing since it contains almost all the same ingredients.  It’s zingy, creamy and a little different from your standard vinaigrette.  I tend to make it a tad on the spicy side, because I love a little kick, but definitely feel free to leave it out if your family prefers things mild.  I took these photos after my class yesterday, when I made the recipe with some thinly sliced radishes, green onions and torn red leaf lettuce, but really the sky’s the limit here.  I have made this salad with blanched asparagus, radishes and spinach — delish!  I have also used cherry tomatoes, cucumbers, feta and parsley.  There’s a picture at the bottom of the post of one version I did with roasted eggplant, red peppers, red onion and parsley, although it vaguely reminded me of that fabulous Ina Garten roasted vegetable orzo dish that I made waaaaay too many times about 10 years ago.  Still great, but in my opinion the richness of the dressing works best with light, fresh vegetables and greens.

If I didn’t just make this salad A LOT this month, I would definitely be including it in the summer entertaining menu rotation.  For you organized, plan-ahead cooks, the day before or morning of I would cook the wheat berries and allow them to cool, prep the vegetables and make the dressing.  I would not, however, dress the salad until the day of otherwise the wheat berries will just soak up all the dressing.  I used wheat berries from Bob’s Red Mill, but I have also seen them in the bulk section of some natural food markets.  Whatever you make this weekend, have fun and keep it real!

Wheat Berry Salad with Lemon-Tahini Dressing
Author: 
Serves: 6
 
Ingredients
  • 1 ½ cups wheat berries -- I used soft white wheat berries (or 1 cup quinoa cooked with 1 ¾ cups water)
  • Dressing:
  • 3 Tablespoons fresh lemon juice
  • 1 garlic clove, minced or mashed to a paste
  • 2 Tablespoons tahini
  • 4 Tablespoons unrefined cold-pressed, extra-virgin olive oil
  • ¾ teaspoon sea salt
  • dash or two of cayenne pepper ( I use ¼ teaspoon to make it a little spicy)
  • freshly ground black pepper to taste
  • Salad: (these are suggestions ~ you can also go with cucumbers, tomatoes, green beans, chickpeas, asparagus, peas)
  • 2-3 green onions, thinly sliced
  • 2-3 radishes, sliced thinly or julienned
  • 2 big handfuls of tender greens (such as spinach, watercress, argula, or red leaf lettuce)
Instructions
  1. Put the wheat berries in a medium saucepan and fill the pan with cold water (as if you were making pasta.) Add a big pinch of salt (kosher is fine.) Bring the water to a boil and reduce to a simmer. Cook wheat berries until they are tender, about 50-60 minutes. Drain and transfer to a serving bowl to cool slightly.
  2. For the dressing: whisk all ingredients together in a medium bowl and season with salt, cayenne and black pepper to taste. Dip a piece of lettuce in the dressing to taste for seasoning.
  3. Combine green onions, radishes and greens with the wheat berries in the serving bowl. Toss with enough dressing to coat lightly.

Thai (Grass-fed) Steak Salad Recipe (or with Chicken)


Thai Steak (or Chicken or Salmon) Salad Recipe | Pamela Salzman


Oh people.  We are on the brink of my favorite time of year.  A time of backyard barbeques, picnics at the beach, sand between my toes, fresh tomatoes and basil, peach pie, and long nights under starry skies.  Ahhhh, summer.  Beyond better weather and my favorite produce, life is just easier when the kids are out of school.  No homework, tests or book reports.  Sure, two out of my three have a summer reading list, but they always wait until the last week of summer to crack those books open, so it’s smooth sailing until then.

Because we live at the beach, we entertain most weekends in the summer, starting with Memorial Day which, being the East Coaster that I am, is the unofficial start of “the season.”  One of my favorite things to do right about now is start planning a few menus that I can rotate during the summer.  Whenever I am thinking of the ideal food to prepare — make ahead, room temperature and easy all come to mind.  Very often, we’ll go to the beach for the afternoon, come back to the house to freshen up before lingering over dinner in the backyard.  This doesn’t give me too much time to cook for a crowd, so I look for recipes which allow me to prep in the morning or the night before so I can do more assembling than cooking.

This Thai Steak Salad has never appeared on any of my summer menus since I just taught it a few months ago in my classes, but it will definitely be a regular this season.  There are so many reasons I love this salad — it’s light, I can vary it with chicken or tofu (even shrimp) and change up the vegetables according to what looks good, and there’s lots of prep in advance that I can do.  Oh, forgot to mention that my family loves it, too!  The first time I told my kids and husband they were eating “Thai” steak salad, I saw a bunch of sad faces.  “We don’t like Thai food.  It’s too spicy.  Or sour.”  “Guess what?  You’ve never had Thai food in your life!”  I only call this a “Thai” Steak Salad because of the combination of sweet, sour and sort of spicy in the marinade/dressing, plus the addition of cilantro and/or mint.  I have a feeling I am taking a lot of liberties with the word “Thai.”  I could probably get away with it if I added some fish sauce to the marinade.  Next time.  However, if I were to rename this recipe, I would call it Yummy, Fresh, Tangy, Gluten-free, Dairy-free, Vegan-adaptable, Paleo-friendly, Perfect for Summer Salad.  If you’re debating whether or not to veer from the standard burger fare this holiday, I have two words for you:  Pink Slime.


If you’ve been hanging out with me for the last year, you probably remember my post on how to reduce carcinogens when you grill.  Now’s a good time for a refresher.  Whereas you can definitely grill the steak or chicken here (I did grill the chicken), I prefer a more healthful way to cook the steak.  It’s a method I picked up from Cook’s Illustrated and it’s especially good for cooking grass-fed beef, which can get dried out if you’re not careful.  The only downside is that it takes a few minutes longer than grilling, but it’s a really tasty result and likely less carcinogenic.  No matter how you make this salad, it will surely be a delicious way to welcome in summer!


5.0 from 1 reviews
Thai Steak Salad Recipe
Author: 
Serves: 6
 
Ingredients
  • Marinade/Dressing:
  • ½ cup freshly squeezed lime juice
  • ½ cup unrefined olive oil, divided
  • 2 Tablespoons shoyu (or gluten-free tamari)
  • 6 Tablespoons packed fresh cilantro or mint leaves, chopped (or a combo)
  • 1-2 small cloves garlic, minced
  • ¼ teaspoon chili flakes or ½ teaspoon chili-garlic sauce
  • 1 Tablespoon raw honey
  • freshly ground black pepper to taste
  • 1 ½ pounds grass-fed top sirloin or flank steak, about 1-inch thick
  • sea salt to taste
  • 1 Tablespoon unrefined coconut oil or olive oil
  • 8 heaping cups salad greens, about 6-7 ounces
  • 2 shallots, thinly sliced
  • a few handfuls of seasonal veggies*: thinly sliced cucumber or sweet bell pepper, sprouts, julienned carrots, fresh mint leaves, fresh Thai basil leaves
Instructions
  1. Combine lime juice, 6 Tablespoons oil, shoyu, cilantro, garlic, hot pepper, honey, and pepper to taste in a small bowl. Whisk together and set aside.
  2. If steak is thicker than 1 inch, place between two sheets of plastic wrap and pound on both sides. Remove wrap and place meat in a shallow nonreactive dish that is just small enough to hold the meat. Pour HALF the marinade (about ⅔ cup) over the meat. Cover and marinate in the refrigerator for at least 1 hour or up to 12 hours (longer is better). Take the reserved marinade in the bowl and add 2 Tablespoons olive oil. Set this aside as your salad dressing.
  3. Pull the steak from the refrigerator about 30-60 minutes before cooking it. Preheat oven to 275 degrees or preheat a grill.
  4. Insert a wire rack inside a baking sheet and place the meat on top of the rack and sprinkle with a pinch of salt. Bake for 20-30 minutes for medium to medium-well.
  5. Heat the oil in a heavy skillet, preferably cast iron, over high heat. Transfer the steak to the skillet and sear for 2-3 minutes on each side for medium to medium-well. Alternatively, grill over medium heat for about 10 minutes for medium doneness.
  6. Transfer meat to a carving board and allow to rest for 10 minutes, covered.
  7. Assemble the salad greens on a platter and drizzle with half the dressing (about ⅓ cup), tossing to coat. Drizzle the shallots and vegetables with half the remaining dressing (about 2 ½ Tablespoons). Toss to coat and arrange on top of the salad. Taste for salt and add as needed.
  8. Slice meat thinly against the grain on a diagonal. Arrange slices of meat on top of the greens and drizzle with remaining dressing.
Notes
* I used 1 whole red bell pepper and 2 Persian cucumbers.

To prep in advance, marinate steak or chicken the night before. Keep dressing refrigerated. Wash and cut all vegetables and keep refrigerated until ready to assemble.


How to Make Almond Butter

Why would you need to know how to make almond butter?  After all, you can buy it very easily at the supermarket or even via amazon.  You can pick your pleasure — with a hint of sea salt, lightly sweetened with honey or maple syrup, laced with chocolate, raw or roasted.  But what if you have an intense craving for a spoonful of this creamy, heavenly spread and you enter the kitchen only to see your younger daughter scraping the last bits of it from the jar?  Nooooo!  Don’t panic.  You’re organized.  You have a well-stocked pantry.  Except today.  Drat.

This was my sad reality a few weeks ago.  As my daughter scooped up the last drop of almond butter with a crisp wedge of apple, she very nonchalantly suggested, “Why don’t you just make some?  It’s just almonds, right?”  She had a point.  So I took out my Vitamix which can basically grind rocks into flour (don’t take my word on that one), and threw in some beautiful raw almonds from Organic Pastures.  Didn’t work.  All the ground almonds got stuck on the bottom of the blender.  Shoot.  So I transferred everything into my Cuisinart and with a lot of patience and optimism, I made almond butter!  And it was fantastic!  And I almost ate the whole cup!

We go through a lot of almond butter in this house, more so than any other nut butter.  We like it slathered on toast with jam, sliced bananas or a drizzle of honey.  It makes a high quality breakfast or snack spread on cut apples or stirred into oatmeal.  Almond butter has even found its way into some unexpected places such as flourless chocolate cake or these delicious cookies.  Besides the fact that almond butter is so yummy, it is also pretty good for you, way better than peanut butter (which is high in inflammatory Omega-6 fatty acids and very often contains a toxic mold called aflatoxin – yikes!).  Like all nuts, almonds are high in protein and fiber.  But unlike all nuts, almonds are alkalizing to the blood and cells and contain lots of Vitamin E, a powerful antioxidant.

But here’s the deal with nuts, and I hope this doesn’t send you over the edge:  nuts which haven’t been soaked or lightly roasted (at home) contain enzyme inhibitors which makes these suckers really rough on the digestive system.  In a perfect world, you would either soak the almonds overnight and dry them out in an oven on its lowest setting or in a dehydrator, then process them into almond butter.  Or you can lightly roast them on a baking sheet at 300 degrees for about 15 minutes and then process them into almond butter.  I don’t advise buying already roasted almonds from the supermarket as generally they have been roasted at way too high a temperature, damaging the natural fatty acids and oftentimes cooked with nasty refined oils.  Yuck.  Roasted almond butter tastes different from raw and has a richer, nuttier flavor.  Which brings me to my next tidbit of info about raw almonds.  Guess what?  The USDA allows nut producers to label almonds as RAW even if they’ve been steamed and pasteurized.  So unless you buy your almonds DIRECTLY from the nut grower, like I do from Organic Pastures at the farmer’s market, you’re not getting raw nuts no matter how big the lettering on the package.  Call me crazy, but I think that should be illegal.

If you don’t eat nut butters frequently or if you don’t notice digestive problems after eating nut products, then feel free to do what’s easy for you.  Sometimes when I mention soaking or sprouting in my classes, I here a few sighs and a comment like, “Pamela, please don’t tell us we have to do one more thing.  Isn’t it enough that we’ve gone from Jif to natural, organic peanut butter?”  The answer, of course, is yes.  Yes, it is.  I’m just here to provide food for thought and inspiration to have fun in the kitchen, not cause undo stress over something as scrumptious as almond butter.   If any of you have good internet sources for raw almonds or have fun ways to enjoy almond butter, please share!!

How to Make Almond Butter
Author: 
Serves: makes 1 cup
 
Ingredients
  • 2 cups almonds, either raw, soaked and dehydrated or roasted
  • optional add-ins: a pinch of sea salt, a spoonful of pure maple syrup or raw honey, ground flax seed, or a spoonful of raw cacao powder
Instructions
  1. Place almonds and optional add-ins in the bowl of a food processor fitted with a steel blade. Turn motor on and process, scraping down the sides occasionally until desired consistency is achieved. This can take up to 15 minutes, although roasted almonds take a little less time than raw. Keep in a covered glass container in the refrigerator.