This post is part of a series I am doing for Positively Positive.
Odds are you have noticed many new products at the supermarket touting themselves as “gluten-free,” or you’ve heard about this new arch enemy of digestive health discussed on talk shows. Have heard that switching to a gluten-free diet will help you lose weight, clear your complexion, or cure all of your maladies and bad habits? Has your favorite celebrity gone gluten-free? Are you intrigued?
Most people are not mind readers, so if you have a wish for the perfect Mother’s Day, you may need to drop a few hints. I used to dream of a day where I could relax in my bed for a few extra minutes, maybe with the newspaper and a fresh cup of tea. Then off to a rare workout or walk along the beach. I would wish for a little extra time to do my hair before having a yummy and healthful brunch with my favorite people in the world, my husband and my kiddos. Ha! Sometimes we moms keep doing for others and feel guilty about taking time for ourselves. You know what? We run around at 90 miles an hour every day of the year, it’s OK to have one day where you get put on a pedestal and your loved ones spend the day worshipping you.
But I’ll admit, I’ve never been very good at asking for things. Year after year, we would go out with my husband’s family for brunch to a crowded restaurant or hotel. The men spent a lot of money for average food and lots of noise and this wasn’t dreamy to me. Then two years ago my good friend Melissa told me that her Mother’s Day is spent at the home of her in-law’s and all the guys get together in the kitchen to make lunch for the ladies. LIGHT BULB! So last April, I made a few subtle suggestions and guess what? My husband can take a hint! He organized the troops to cook the loveliest lunch at our home. Never mind that the kitchen looked like something exploded in there, I didn’t have to lift a finger and my hair looked great.
This year we’re doing the same thing and I am totally excited. If this sounds good to you, but there isn’t enough advance warning for your family to mobilize, you can at least make a few suggestions for breakfast in bed…like these breakfast cookies! You can whip them together the day before and suggest that they be delivered bedside on a silver platter with a coffee or tea and some fresh fruit. A little bud vase with a beautiful flower would be nice too, but maybe we shouldn’t push it. These “cookies” are like having your oatmeal and toppings in a tasty and neat little package, and it kind of feels like you’re eating a cookie. Splurge! But look at the ingredients — totally clean and won’t offset that workout you’re going to get in!
If breakfast cookies aren’t your thing (really?), here are a few other ideas to give your family a little help:
Yogurt and Granola Parfait (make the granola during the week);
Spinach and Feta Strata (assemble the casserole the night before and have them pop it in the oven in the morning);
Muesli (make the night before and serve with fresh fruit.)
Happy Mother’s Day to all you beautiful women. I wish I could jump through the computer to give you a big hug. The world is a better place for all you do.
½ cup chopped nuts (I used walnuts and almonds, but pecans are great, too)
1 cup unsulphured dried fruit, chopped (I used dried dates and blueberries)
3 ripe bananas or 1 cup of unsweetened applesauce
¼ cup melted coconut oil
1 teaspoon pure vanilla extract
Instructions
Preheat oven to 350 degrees. Line 2 baking sheets with unbleached parchment paper.
In a large bowl, combine rolled oats, coconut, almond meal, cinnamon and salt. Add the nuts and dried fruit combine with the mixture, breaking up the dried fruit so it doesn’t clump together (I use my hands to mix this.)
In a medium bowl, mash the bananas and stir in the oil and vanilla.
Add wet mixture to dry mixture and stir to combine.
Take scoops of the batter either with a ⅓ cup or ¼ cup measuring cup and drop the batter onto the prepared baking sheets. Flatten with your hand to about ¾-inch thick. Bake for a about 20 minutes or until edges are golden brown. Transfer to a wire rack to cool. Store in the fridge after a few days or wrap and freeze.
Two wonderful things are happening right now: One is the abundance of glorious fresh strawberries and mangos on the scene right now, with cherries, stone fruits and berries on the way. The other is that the weather is getting warmer, which means I need that same fruit frozen for SMOOTHIE SEASON. Oh, yeah! Even in sunny Southern California, it isn’t always warm enough to warrant icy, cold shakes in the morning. Most school days, I prefer to get everyone started with a hot breakfast to keep toasty. But just about this time of year and throughout the dog days of summer, we pull out the blender and frozen fruit to whip up our favorite smoothies. Of course, frozen fruit also allows us to enjoy delicious crisps and crumbles in the off season for a very special treat.
Believe it or not, there is actually a method to freezing fruit. I’ll share with you here my tips and tricks for doing it right the first time so that you don’t end up with a big solid mass.
What can you freeze?
Anything you’ve seen in the freezer section at the supermarket is fair game, including:
berries
cherries
peaches and nectarines
pineapple
bananas
mangos
pears
papaya
fruit purees
How to freeze fruit:
wash and dry fruit;
remove any peels you don’t want to eat such as banana, mango, papaya and pineapple (if you don’t do this before freezing, you won’t be able to do it after — this is experience talking here);
remove stems from strawberries, cores from pears, and pits from stone fruits and mango;
cut fruit into chunks so it’s easier on your blender later;
arrange fruit in one layer on a baking sheet or dish that will fit in your freezer, making sure pieces of fruit aren’t touching each other;
freeze until completely firm and solid;
once frozen, transfer to container with a lid that is just large enough to hold your fruit or in a ziploc bag. Anything too big can result in freezer burn.
You can store frozen fruit for 6-12 months.
Freezing fruit does not affect its nutritional profile nor its enzymes. In fact, if freezing fruit immediately after harvest, the nutritional content is likely higher than fresh fruit that has been off the vine for a few days. Enjoy!
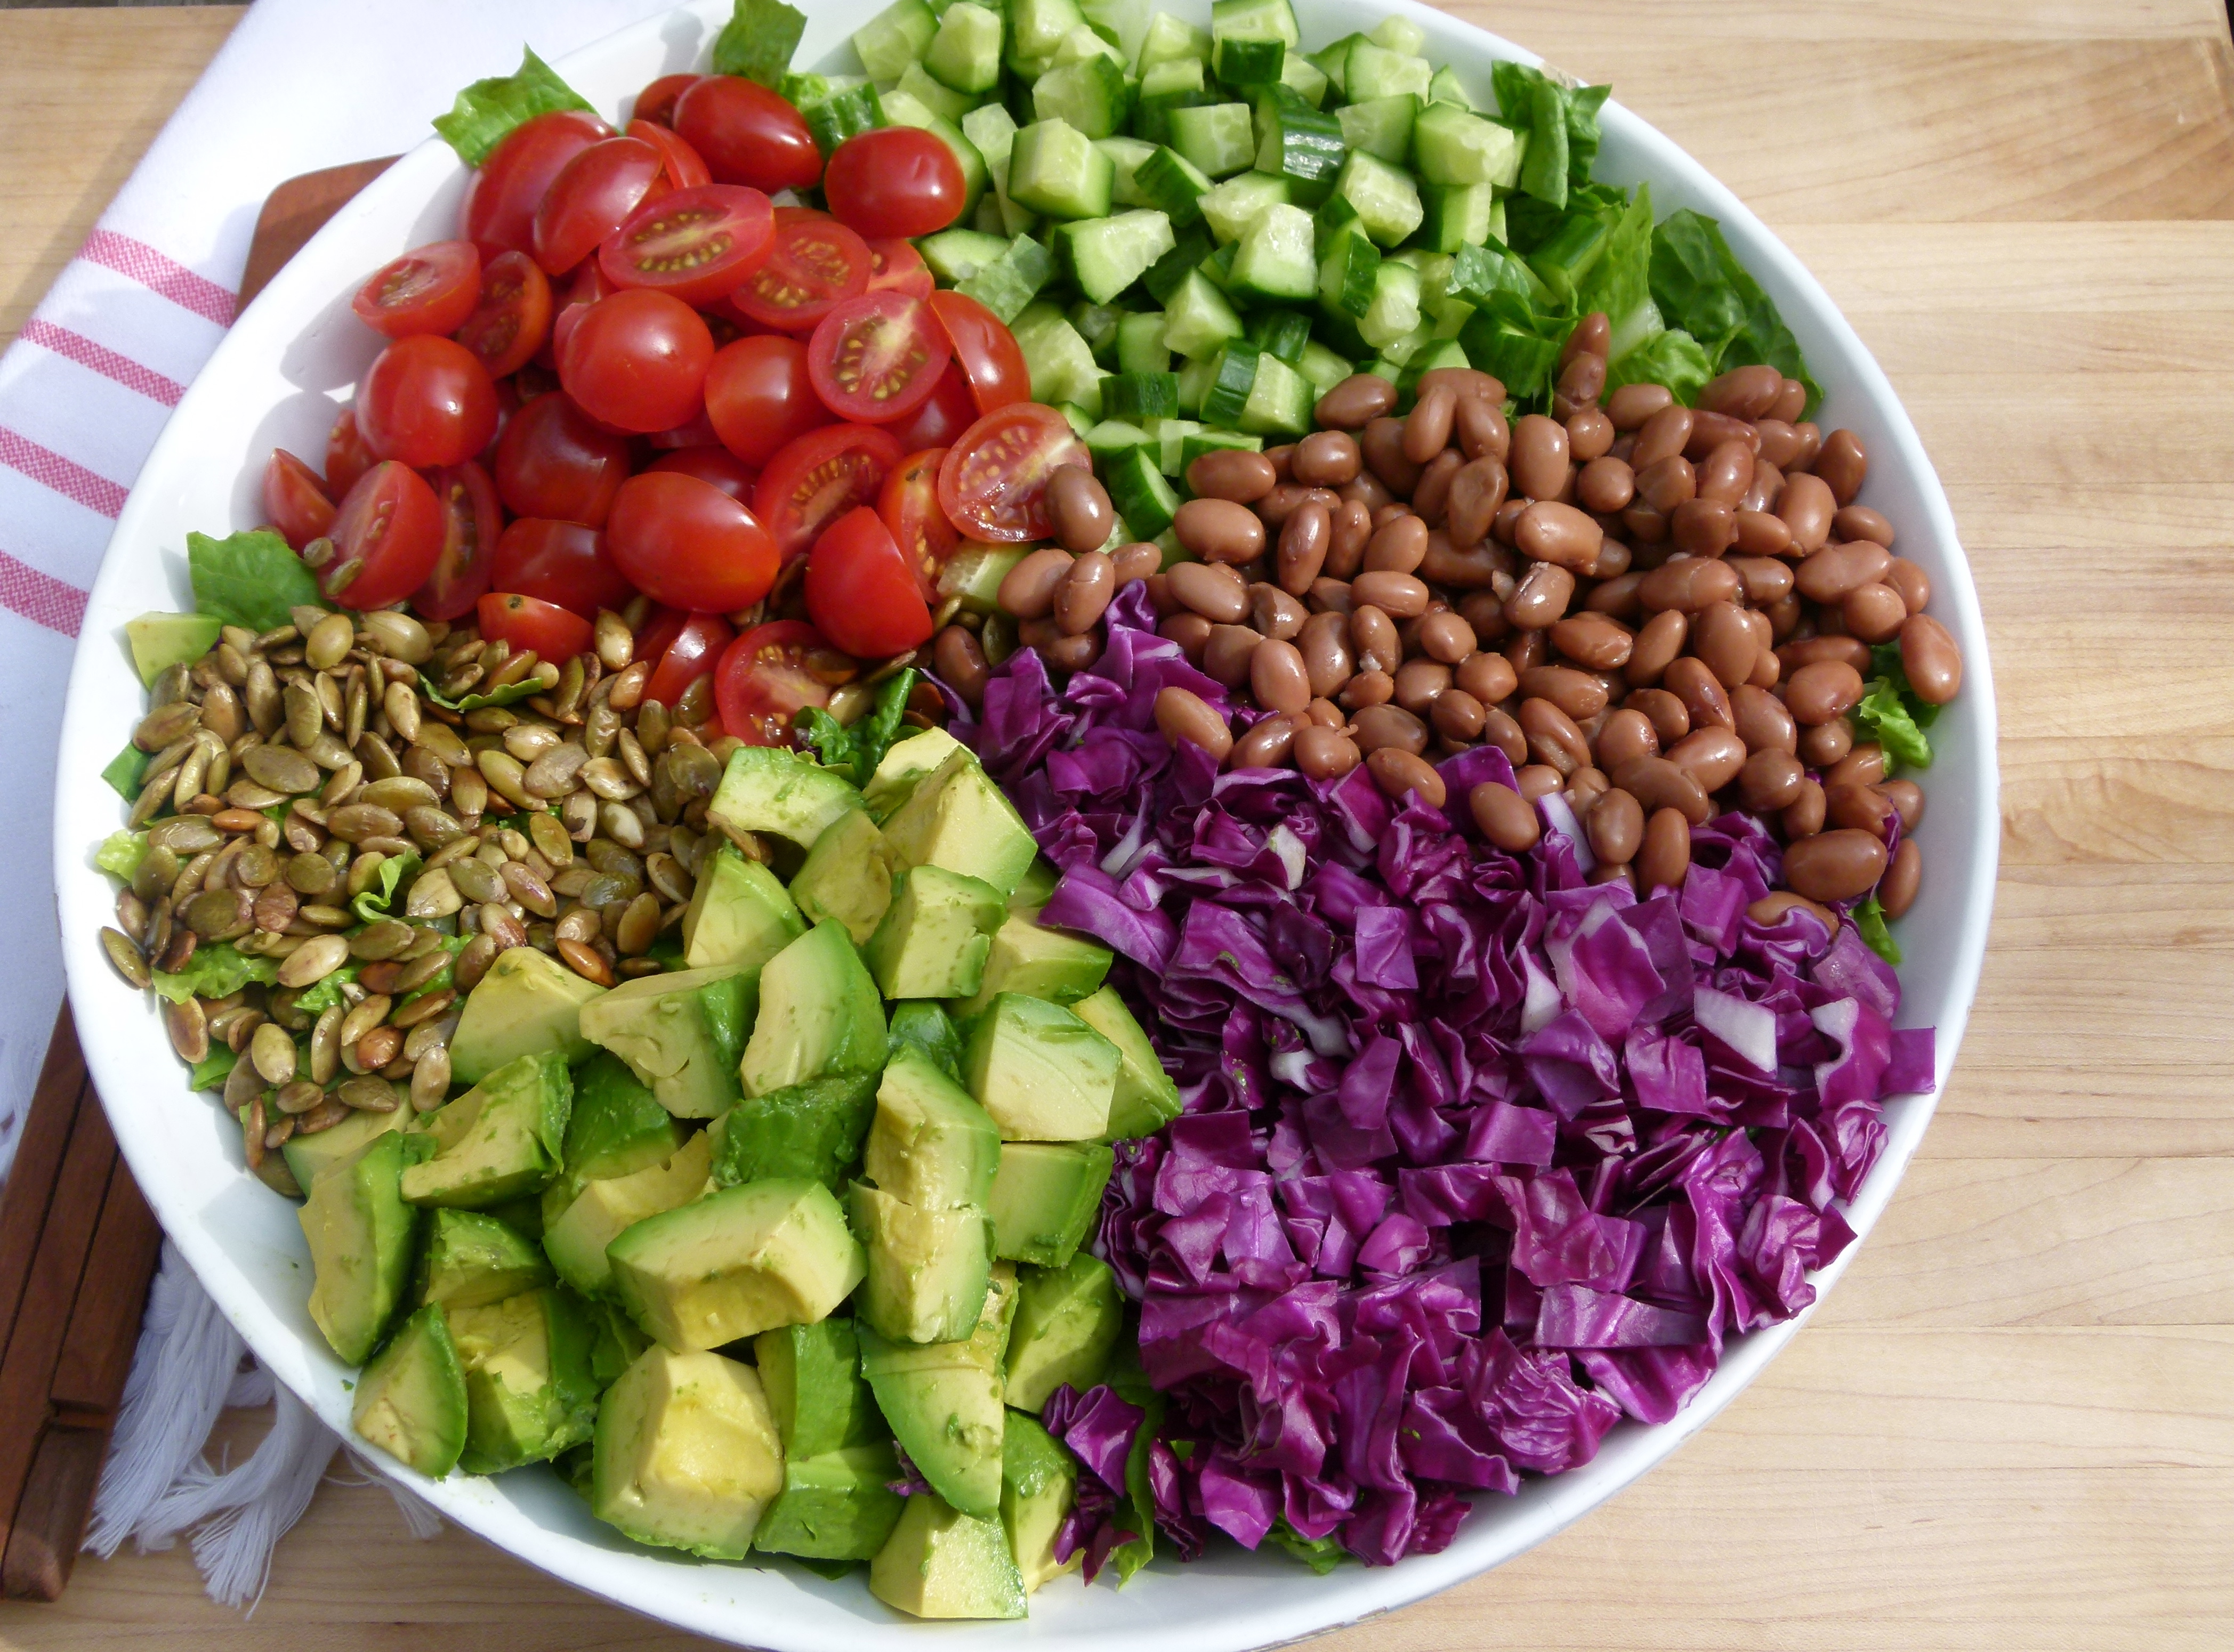
Very often I have an idea for a recipe and it takes me a few times to get it right. In fact, usually it takes me more than a few times! But once in a blue moon, I try something on the fly and I love it on the spot, like culinary love at first bite. That’s what happened with this salad. Last year I was putting together a Mexican-inspired menu for my April classes and I was trying to think of a fresh and easy salad to teach. I wanted something clean and healthful with all the ingredients I love to use when I make Mexican food, but without it tasting like a taco salad. I happen to adore chopped salads, so off I went with crisp romaine lettuce, red cabbage, cherry tomatoes, cucumbers, pinto beans, avocado and my favorite part, toasted pepitas (pumpkin seeds.) I made a very light dressing with apple cider vinegar, orange juice and enough cumin to give it that south-of-the-border flavor.
On that day of recipe testing at home last year, I nearly ate the entire salad. Whereas this salad may not win any awards for sophistication, what in the world is not to love? Not only does this salad look gorgeous, it is addictive and crunchy and juicy and creamy. You know how I love a crunchy-creamy combo. Since then, I have made this salad virtually every time we were invited to a pot luck or backyard barbeque. The beauty of this salad, besides being a giant bowl of antioxidants, vitamins and fiber, is that it can prepped almost entirely in advance. Chopped veggies go into a serving bowl with dressing in a jar and avocados to be cut just before serving. If you’re vegan, vegetarian or if you’re like me and you’re going to a party where you fear there might be non-organic meat, I think this can easily be a main course salad on it’s own. The pinto beans and pumpkin seeds offer more than enough protein. Although my husband is a bit of a carnivore and loves this salad with grilled chicken chopped in. Shrimp works great, too.
Fast forward a year later when I taught this salad again a few days ago. My assistant and I each grabbed a bit in a cup to go and crunched our way home, wishing we had had bigger cups. I know you’ll love this salad just as much as I do.
If you’re looking for more Cinco de Mayo inspiration, check out these favorites:
3 Tablespoons raw unpasteurized apple cider vinegar
¾ teaspoon ground cumin
1 ¼ teaspoons fine grain sea salt + additional to taste
a few grinds of black pepper
1 Tablespoon raw honey
½ cup unrefined, cold-pressed extra-virgin olive oil
1 head butter or romaine lettuce, chopped, about 8 cups
2 cups chopped red cabbage
1½ cups or 1 15-ounce can cooked pinto beans, drained and rinsed
2 cups diced cucumbers (I like Persian), unpeeled, large seeds scooped out
1 pint cherry tomatoes, halved
3 small avocados or 2 large, pitted, peeled and cubed
½ cup pepitas – toasted in a dry skillet and drizzled with ½ teaspoon olive oil and a sprinkle of sea salt
Instructions
Make the dressing: whisk first five ingredients in a small bowl. Add olive oil and whisk completely until emulsified. Season with additional salt and pepper to taste.
Combine lettuce and cabbage in a large bowl. Add pinto beans, cucumber and cherry tomatoes. Toss with enough dressing to coat lightly. Drizzle a little dressing on avocados and gently mix into the salad. Sprinkle pepitas on top. If you have additional dressing, save in the refrigerator for another time.
Notes
There's enough dressing that you can probably add a bit more cabbage or other veggies.
If you cut back on the oil by about 2-3 Tablespoons, the dressing makes a great marinade for grilled chicken or shrimp. Both would be nice on top of the salad, although there is adequate protein from the beans and pepitas.
I traditionally teach a Mexican-inspired menu during the month of April so that my students have some fun recipes to cook for their family and friends on Cinco de Mayo. I am obsessed with Mexican food, so I really look forward to this time of year. Of course, April has come to an end and sadly, so will my daily fish tacos. I wish it were Cinco de Mayo every month!
I usually have no problem coming up with an entree for a Mexican-inspired meal, but sometimes the sides stump me. Here’s a winner for Cinco de Mayo or any night. This green rice was originally inspired by a recipe in one of my favorite cookbooks, Sunday Suppers at Lucques. I’ve simplified the recipe a bit, but it is still unbelievably tasty and reminiscent of the green rice you may have had at a Mexican restaurant. The color is pretty subtle, unlike the the spinach risotto recipe I posted last month, but green enough that no one will know if you made it with brown rice or white. Pretty tricky!
There are so many things to love about this green rice. For one, it’s delicious! I adore basmati rice, which I think naturally tastes better than almost all other rices. But in my opinion it’s hard to beat rice with garlic, butter and salt. The flavor from the onions, pepper and cilantro are just a nice bonus. Green rice is also very versatile. Besides being the perfect side dish to fajitas, tacos or Mexican beans, this rice can easily be made into a vegetarian entree with the addition of some cooked pinto beans or sliced almonds. Combined with some protein, green rice makes a perfect school lunch. On the weekends, I’ll use leftovers in a burrito with beans. Yum! This recipe is also easy. Don’t let the blender discourage you. Think of it as a friend who will chop your cilantro and spinach into the bittiest pieces so you don’t have to. Last but not least, whole grain brown rice with spinach, herbs and garlic — are good for you!
If you have eaters in the house who are green-averse, see if they’ll be more inclined to eat the rice with corn tortilla chips crumbled on top. If not, add it to chicken and avocado soup, vegetable chili or freeze it for a rainy day. Of course, you can do what I do and eat it for breakfast with some eggs and guacamole!
Author: Pamela, inspired by Sunday Supper at Lucques
Serves: 4-6
Ingredients
½ heaping cup cilantro (leaves and tender stems)
1 cup tightly packed baby spinach leaves (stemmed if larger)
2 ¾ cups water, chicken stock or vegetable stock
1 ½ teaspoons sea salt
1 Tablespoon unrefined extra-virgin olive oil
2 Tablespoons unsalted butter
1 ½ cups long-grain brown basmati rice*
¼ cup green onion, finely chopped
3 garlic cloves, finely chopped
1 Poblano chili, stem and seeds discarded, diced (or if you have time, roasted, skin peeled, diced) or 1 green bell pepper, diced
Instructions
Put the cilantro, spinach, and 1 ¼ cups of water in a blender and blend until pureed. Add the remaining 1 ½ cups of water and salt and blend until well combined.
In a medium (3 qt) heavy-bottomed saucepan with a tight-fitting lid, heat oil and butter over medium heat. When butter is melted, add the rice and sauté, stirring about every 30 seconds, until it just begins to brown, 3-4 minutes. Add the onion, garlic and chili and cook 1-2 minutes, stirring constantly.
Add the contents of the blender, stir well, turn heat to high and bring to a boil. Cover the pan, turn the heat to low, and simmer for 50 minutes. Fluff with a fork, cover, and cook another 5 minutes.
Take the pan off the heat and let the rice steam in the covered pot for 10 minutes or until you are ready to serve.
Notes
If you use white rice, reduce cook time to 20 minutes.
I think you should have a Cinco de Mayo party! Wouldn’t that be fun? Even if you’re not up for hosting a bunch of people next Saturday night, you at least need to prepare some delicious Mexican-inspired food for your family. Who needs to go to the local overcrowded Mexican restaurant and eat greasy, over-sauced, heavy food in the presence of too many inebriated partyers? Not me, friends! Although I don’t need it to be Cinco de Mayo to make Mexican food. My family requests Mexican about as much as anything else and I am happy to oblige with fresh, healthful and easy-to-prepare recipes.
The Mexican dishes I like to make and eat are perfect for busy weeknights, but even better for entertaining because they’re always crowd pleasers and often it’s all about the toppings and allowing everyone to make their own. I love this for many reasons — it gives kids more control in what they’re eating and really encourages them to try new things, it’s less work for me, and it’s fun!
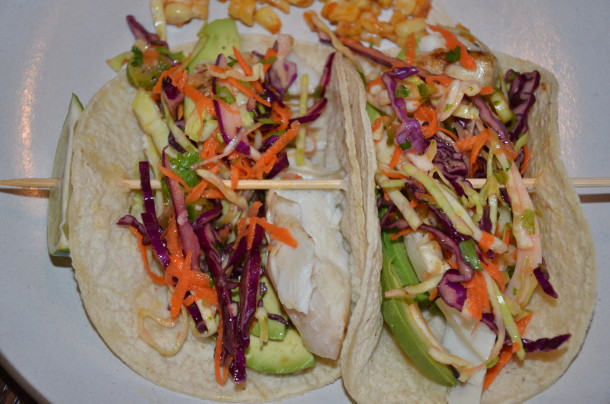
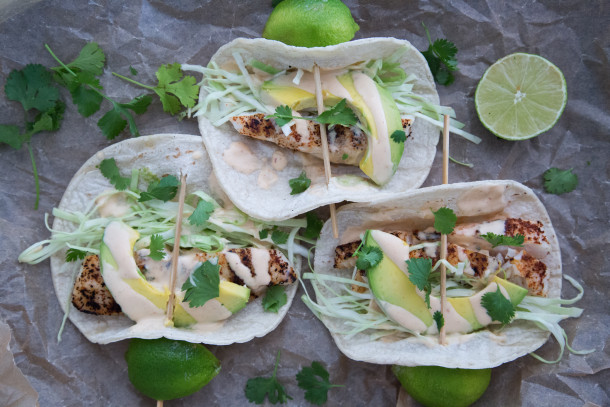
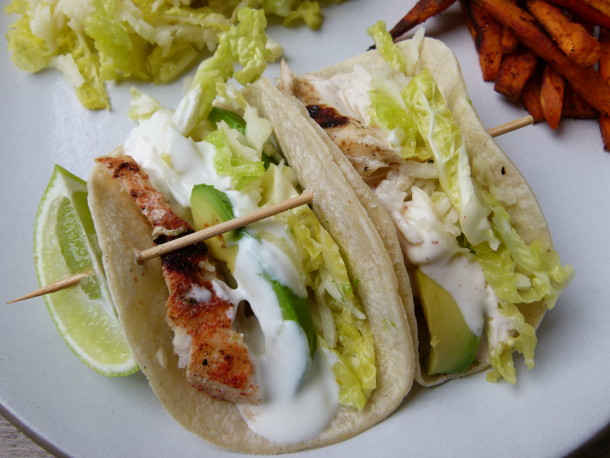
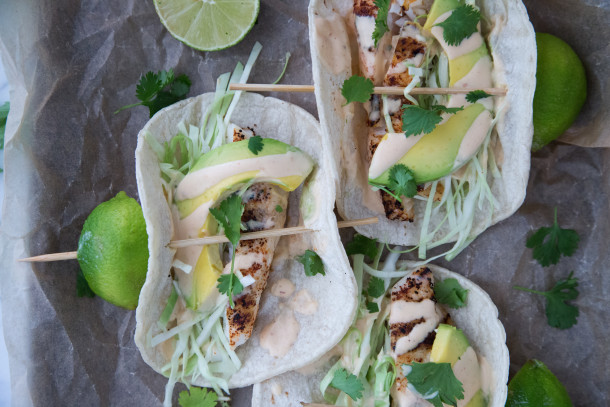
One of my favorite Mexican dishes is fish tacos. Not only do I make them all the time at home, but I find myself ordering them whenever I can especially on vacation (what vacation?). I’ve been known to eat fish tacos every single day for a week and not tire of them. I love changing the toppings each time to keep it different. Sometimes I’ll even use a Savoy cabbage leaf instead of a corn tortilla. In my house we’re split down the middle as to the preferred fish preparation, so in my classes this month and on my blog post, I decided to demonstrate two delicious methods. I prefer a lime juice-based marinade and my husband likes the dry rub better, but you can’t go wrong with either. Where you can go wrong is not putting together a great assortment of condiments, because this is the KEY to building a perfect fish taco.
I went on a reconnaissance mission to Wahoo’s Fish Tacos in Manhattan Beach to see what a restaurant with the words “fish tacos” in its name does with fish tacos. Wow. Major disappointment. A piece of grilled fish in a soft corn tortilla with a pinch of thinly sliced cabbage. Ok so far. Plus shredded cheddar cheese. Huh? Fish and cheese? No. And then a tiny scoop of pico de gallo (fresh tomato salsa) on the side. People, we can do so much better! A delicious and satisfying fish taco has a balance of different tastes and textures (and no cheese!) Here’s what you need:
creamy: I personally can’t even eat a fish taco without the white sauce I’ve shown here and/or some sliced avocado or guacamole.
crunchy: thinly sliced cabbage or a firm lettuce, even a good slaw like this Cilantro-Lime Slaw.
spicy: even just a little kick makes it better. Try adding a little heat to your sauce, slaw, dry rub or salsa.
tangy: a tart, acidic flavor helps keep everything fresh and balanced. You can squeeze fresh lime over everything or incorporate it in a marinade, slaw or salsa.
6 Tablespoons mayonnaise (I like soy-free Vegenaise)
6 Tablespoons whole unsweetened yogurt
1 Tablespoon freshly squeezed lime juice
1 teaspoon hot sauce or ¼ teaspoon ground chipotle powder (optional) (taco on the left has sauce with chipotle powder, taco on the right has sauce without)
pinch of sea salt
Marinade:
¼ cup freshly squeezed lime juice
2 Tablespoons unrefined olive oil
½ teaspoon ground cumin
sea salt and freshly ground black pepper
OR
Dry Rub
2 teaspoons paprika
1 teaspoon garlic powder
1 teaspoon chili powder
½ teaspoon sea salt
1 pound firm white fish, such as halibut or mahi mahi
Oil (for brushing grill)
8 6-inch corn tortillas, warmed either on grill or heated griddle pan until pliable
Suggested Accompaniments:
Sliced avocado, guacamole, pickled red onion or radishes, shredded napa, savoy or green cabbage or slaw,
fresh pico de gallo (salsa), fresh lime cut into wedges
Instructions
Whisk together ingredients for white sauce and refrigerate until ready to use.
Combine lime juice, oil and cumin in a shallow nonreactive dish small enough to just hold the fish. Add fish and turn to coat in the marinade. Season with salt and pepper and marinate fish at room temperature for 30 minutes. OR mix dry rub spices together and sprinkle on both sides of fish.
Preheat grill to medium-hot. Brush grill grate with oil. Grill fish until just cooked through, about 3-5 minutes per side. Break fish into large pieces.
Fill tortilla with fish and desired accompaniments. Drizzle with white sauce and squeeze fresh lime wedges over tacos.
Have you ever eaten a piece of fruit and said, “this is the best darn [insert name of fruit here] I ever had”? I’ve been saying that daily with strawberries and every time I do, my kids roll their eyes with that look like, “here we go again.” It’s just that when strawberries are so deep red, fragrant, juicy and sweet as they have been, I get emotional. I also want to take a minute to enjoy them since their season doesn’t last forever.
I hadn’t made dessert for the kids in a while. So I thought it would be fun to surprise them with something special after dinner on Sunday, and I wanted to incorporate strawberries. One of the easiest and quickest desserts to make is fruit shortcakes. The classic is strawberry shortcake, but I have used blueberries, raspberries, blackberries, nectarines and (my favorite) peaches. I do not exaggerate when I say that you will have your biscuits on the pan ready to be baked before your oven is preheated. For that reason, it’s an especially fun dessert to make with your kids. They can knead the dough, cut out the biscuits, brush the tops with cream and sprinkle them with sugar. I had a great time baking these with Mr. Picky, who was very proud when he announced to everyone that he made dessert. The kids love strawberry shortcake because they can assemble their own and pile on as much fruit and whipped cream as they want. I like it because it is a very low sugar dessert, maybe 1 1/2 teaspoons per person which doesn’t even get a sugar nazi like me worked up. So many fruit desserts call for silly amounts of sugar which is unnecessary if the fruit tastes good to start. I want the dessert to taste like the fruit I am using and not just sweet.
Traditionally strawberry shortcake is just a barely sweetened biscuit split with whipped cream and fresh fruit piled onto the bottom half of the biscuit. But who wants to stick with tradition all the time? Besides mixing it up with different fruits, we have also had fun using toppings other than whipped cream. Have you tried my favorite way? A biscuit with yogurt, strawberries and sliced almonds? Freakin’ delicious. When the kids were much younger, I used to do mini-shortcakes which are great for little ones or for a party . You can add mini-chocolate chips to the dough or shave some dark chocolate on top of your berries and cream. If whipped cream and yogurt aren’t your thing, try putting a can of coconut milk in the fridge for a few hours and scoop the top out and use that instead. However you slice it, strawberry shortcake is a classic dessert that is always welcome!
2 cups flour (I like 1 cup whole wheat pastry and 1 cup all-purpose)
¾ teaspoon fine sea salt
1 Tablespoon aluminum-free baking powder
3 Tablespoons granulated sugar + additional for sprinkling on top
½ cup (1 stick) unsalted butter, cut into 8 pieces
1 cup heavy cream, half and half or whole milk
Whipped cream, whole yogurt or coconut milk cream
Fresh sliced strawberries or other seasonal fruit
Whipped Cream:
1 cup heavy cream
1 Tablespoon granulated sugar
1 teaspoon pure vanilla extract, optional
Instructions
Preheat oven to 400 degrees. Line a baking sheet with parchment paper.
Place the flour(s), salt, baking powder and sugar in the bowl of a food processor fitted with the steel blade. Pulse a couple times to blend. Add the butter and pulse until the mixture resembles small peas or pebbles. Transfer mixture to a large bowl.
Add the cream and blend with a fork until just combined.
Turn the dough onto a lightly floured surface and knead a couple times to bring the dough together. Roll out to a ¾-inch thick disc and cut into 2 ½ -inch circles with a round cookie cutter or small glass dipped in flour. Gather the scraps, roll again and cut more rounds until you have used up all the dough. Transfer the dough pieces to the prepared pan and space evenly apart.
This is optional, but it creates a light golden color: remove 1 Tablespoon of cream from the cup for whipped cream and use that to brush the tops of the shortcakes. Sprinkle with granulated sugar. Bake 17 minutes, or until puffed and lightly browned.
Cool the shortcakes slightly on a wire rack.
Whip the heavy cream with sugar until soft peaks form. Dollop on a split shortcake and serve with fresh berries.
I have two things on my mind this week — eating anything that was forbidden during Passover (like grains) and being mindful of our consumption of limited resources with Earth Day coming up on April 22nd. “How will she ever revert this to a pancake recipe?” you ask. Stay with me, peeps.
Passover, which occurred last week, is a mighty 8-day abstinence from eating all grains, except wheat turned into matzoh. Giving up bread, pasta and most starches isn’t such a big deal to me, but my hubby and the kids start groaning after about Day 3. “How much loooooonger?” “How come we can’t have rice? Jack’s family eats rice during Passover.” “What??!! It ends on Saturday night? I thought it ended on Friday!” And so on and so forth. Same spiel every year. Yawn. So on sundown of the 8th day, my people were freed from bondage, ordered pizza and ravaged it like contestants on “Survivor.” As for me, I will admit, I was missing oatmeal for breakfast. Sunday morning I made an extra-large batch thinking everyone craved it as much as I did. Wrong! Everyone was craving bagels. That brings me to my other thought for the week which is being efficient with resources and limiting waste. I needed a creative way to use that leftover oatmeal!
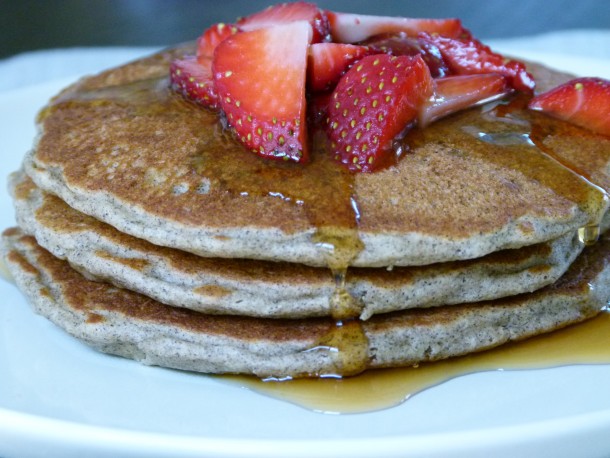
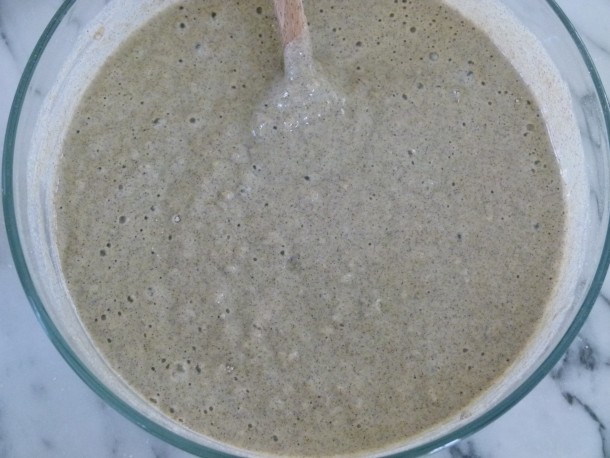
By now you know I am serious about pancakes. I make them twice per week, very often varying the flours or even adding pumpkin and spices to the mix. I love that everyone has fun customizing his or her own with fruit, nuts or chocolate chips. Yesterday I made a a lovely batch of oatmeal pancakes with some of the leftovers from Sunday’s excess. I added a good cup’s worth of steel cut oatmeal to gluten-free oat flour and buckwheat flour, which gave the pancakes these fantastic tiny little chewy bites. I am a big fan of texture and whole grain flavors, so I adore these pancakes. If you’ve never tried buckwheat flour, it has a great wholesome earthiness, but it does lend an odd, grey color to the batter. By the way, buckwheat has no wheat in it and isn’t even related to wheat. In fact, it is a relative of the rhubarb family, which is why it’s gluten-free.
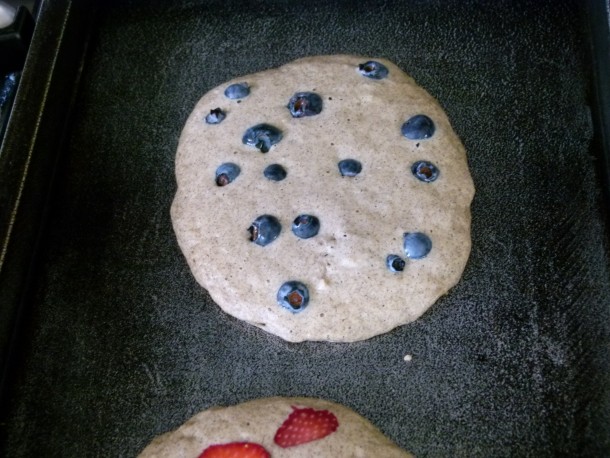
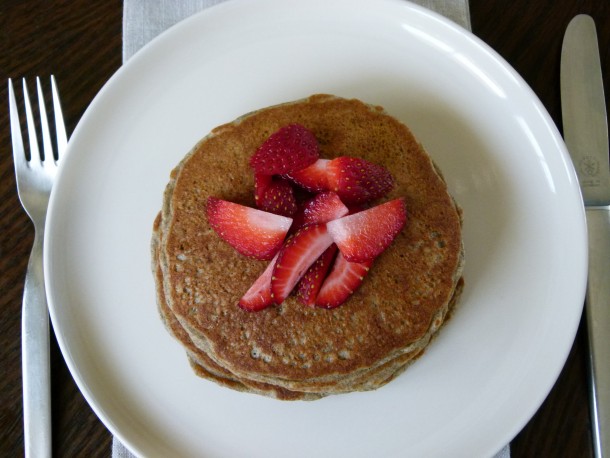
Oat flour is quite simple to make yourself if you don’t feel like buying it. Just process rolled oats in the food processor until powdery. That’s it! If you need or want the oat flour to be gluten-free, you must buy oats/oat flour that is labeled as such, because otherwise it can contain trace amounts of gluten. If you’re like my husband and are wondering how they take the gluten out of oats, they don’t really. Botanically oats should not contain gluten, but they do share crop space with gluten-containing grains and often they are processed in facilities which also process wheat and barley, for example. So the oats can pick up gluten that way. But if you prefer, feel free to use my standard whole wheat pastry flour for the oat and buckwheat flours. It just won’t be gluten-free and it will taste more like my traditional buttermilk pancakes, but with a little chew from the oats. I tend to adorn these pancakes with the same yummies that I would add to a bowl of oatmeal — diced bananas, chopped walnuts, and the like. But strawberries are incredible and plentiful right now, so we all included them yesterday and my husband tossed in his standard handful of blueberries. Mr. Picky eats these pancakes just fine, but did declare my “normal” pancakes are his first choice.
Extra pancake batter? We won’t waste it!! It will stay good in the refrigerator for a few days and can be used to make fresh pancakes later in the week. If you use buckwheat flour, don’t be put off by the gumminess of the batter. It’s very normal and still turns out perfect pancakes. You can also make all the pancakes at once and freeze them for another day. I like to put a piece of parchment paper in between each piece so they don’t stick together. Another idea is to use the pancakes instead of bread for a sandwich or a roll-up. Any other creative ideas for using up oatmeal or pancakes??
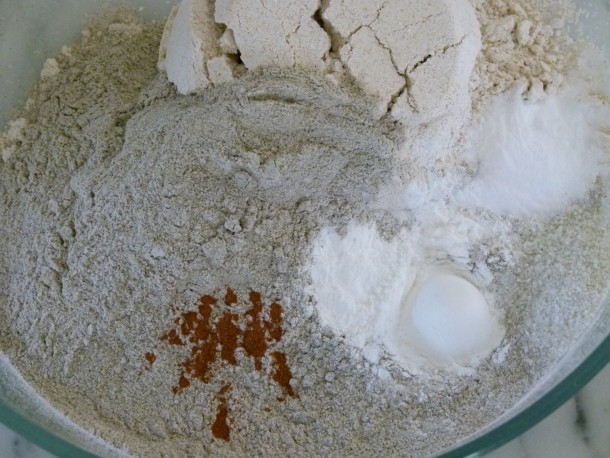
1 cup buckwheat flour (or substitute whole wheat pastry flour for all or part of the oat and buckwheat flours)
1 teaspoon fine sea salt
2 teaspoons aluminum-free baking powder
1 teaspoon aluminum-free baking soda
pinch ground cinnamon (optional)
2 cups buttermilk*
2 large eggs
1 teaspoon pure vanilla extract
1 Tablespoon 100% pure maple syrup
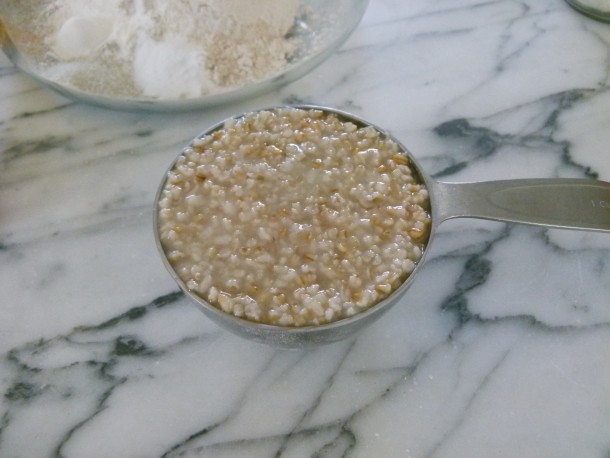
1 cup COOKED oatmeal (preferably steel-cut)
4 Tablespoons unsalted butter, melted
Melted, unrefined coconut oil for brushing the griddle
Instructions
Preheat a griddle to 400 degrees or medium heat. (Not all built-in griddles are the same. 350 degrees may be fine for you.)
Combine the flour, salt, baking powder, baking soda and cinnamon in a large mixing bowl.
In a medium bowl or 4-6 cup measuring cup, whisk together the buttermilk, eggs, vanilla, maple syrup, melted butter and oatmeal until well blended. (Or combine all wet ingredients in a blender and add to dry mix with oatmeal.)
Pour the wet mixture into the dry ingredients and stir until just combined.
Brush the griddle with coconut oil and spoon about ¼ cup of batter onto the griddle. Add blueberries, chocolate chips or diced banana to the surface, if desired. When bubbles start to form on the surface of the pancake and the edges become slightly dry, flip it over and cook until done. Maintain the heat on medium-low or 400 degrees.
Notes
*No buttermilk? Sub half unsweetened yogurt and half whole milk. Or use 2 cups milk, omit the baking soda and use 1 Tablespoon baking powder instead.