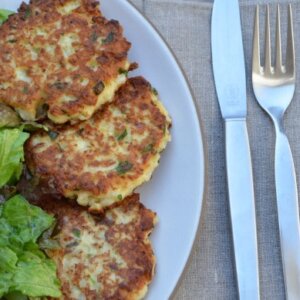
Grain-Free Cauliflower Tabbouleh Recipe

We have had some interesting discussions in my classes lately about the latest findings concerning the presence of arsenic in rice.  Arsenic is a chemical element which occurs naturally in water, air, food, and soil.  This natural form is referred to as organic arsenic.  Arsenic is also the product of contamination from manmade fetilizers and pesticides, as well as burning coal and oil.  This inorganic arsenic is what is linked to certain cancers and has many people concerned.  Inorganic arsenic has found its way into may different foods through soil, as well as into our drinking water, but for some reason rice absorbs it much more than other foods.

Although I don’t take such reports lightly, the jury is still out on just how much arsenic is actually in rice since it varies from region to region (California-grown rice seems to contain less than rice grown in Arkansas, for example) and how much we should limit or not limit our rice consumption.  I’m generally not an alarmist in these situations, so I will be mindful of this information and continue to eat rice in moderation.  But it’s a good reminder of why it’s important to eat a well-balanced diet of a wide variety of whole foods (90% of the time, of course!).  I’m sure one can do research and find whatever it is we want to hear.  I like Dr. David Katz’s interesting point that cancer rates are generally low where rice consumption is highest.

But if you are concerned about your rice intake or you’re just looking to expand your horizons a little, have I got the recipe for you!  Cauliflower Tabbouleh uses barely steamed and grated cauliflower in place of the typical bulgur wheat, making this a grain-free,  gluten-free salad.  When the cauliflower is grated, it completely resembles rice in appearance and even texture a little.  It’s fun serving this tabbouleh to guests who usually have no idea what they’re eating and naturally assume it’s rice.  Cauliflower has a fairly subtle flavor, so you really pick up everything else that’s going on here with fresh herbs, juicy pomegranates and a sweet-earthy dressing.

Tabbouleh is traditionally a parsley salad with bits of bulgur wheat, onion, tomato and cucumber.  It’s such an awesome, healthful, fresh salad which I really enjoy when the weather is warm.  I make a really yummy version with quinoa that is one of my summer staples.  But this recipe with cauliflower is like an autumnal tabbouleh with some pomegranates for a sweet and juicy crunch.  Many “cauliflower rice” recipes call for the cauliflower to be raw, which I don’t enjoy as much as giving it a quick steam or blanche.  Raw cruciferous vegetables are also a tad harder to digest than lightly cooked.  Cauliflower is is very rich in fiber, phosphorus and potassium, and a very good source of Vitamin C, Vitamin K, Folate, and Manganese.  Plus the entire cruciferous family contains powerful anti-cancer compounds.

I just made this for Rosh Hashana lunch last week and served it with roast chicken and a few other salads.  The girls got it in their lunchboxes the next day mixed with a few spoonfuls of quinoa and one of them had some feta mixed in as well.  By the way, I am posting photos of the kids’ school lunches once a week on Facebook and Twitter in case you’re in a lunchbox rut.  I also love this cauliflower with Spice-Rubbed Salmon, grilled chicken kabobs, and even turkey burgers. More importantly, there are so many ways to have fun with this preparation of cauliflower.  I’m thinking about using it in place of rice for a vegetable fried rice, just for fun of course.    No one here is giving up rice that fast!

Grain-Free Cauliflower Tabbouleh
Author: 
Serves: 6-8
 
Ingredients
  • 1 head cauliflower, cut into florets
  • Kosher salt for cooking cauliflower
  • 2 cups diced celery, about 5 stalks
  • Seeds from 1 large pomegranate, about 1⅓ cups
  • ½ cup finely diced red onion or shallot (you can soak in ice water for 15 minutes to take the raw edge off)
  • ¼ cup chopped parsley leaves
  • 2 Tablespoons chopped fresh mint leaves
  • ¼ cup fresh lemon juice
  • ½ cup unrefined, cold-pressed, extra-virgin olive oil
  • ¾ teaspoon cinnamon
  • ¾ teaspoon cumin
  • ¾ teaspoon sea salt
  • ½ teaspoon of freshly ground black pepper or to taste
Instructions
  1. Prepare a large bowl with ice water. Place cauliflower in a large pot with an inch of water and a teaspoon of kosher salt. Bring to a boil and steam cauliflower for 3-4 minutes until crisp tender. Drain in a colander and immediately plunge cauliflower in ice water.
  2. Drain cauliflower and transfer to a clean kitchen towel to dry off a little.
  3. Fit the grater attachment in a food processor and gently grate/shred the cauliflower. It will look like barley or rice. Transfer to a serving bowl.
  4. Stir in remaining ingredients and toss to combine. Taste for seasonings, especially if you allow this to sit. You may need an extra pinch of salt.

How to Seed a Pomegranate

Eating seasonally means that when Mother Nature closes one door, she opens another.  I came home from the farmers’ market the other day with good news and bad news for the kids.  This would be the last of the peaches and nectarines.  “What????  OMG!  That’s so sad.”  But guess what I found?  Pomegranates!  “They’re back?  OMG!  Can we have some right now?  Did you buy a lot?”  What peaches?

During the fall, my family goes through about 7 pomegranates a week and sometimes more if the kids’ friends come over.  There’s something so addictive about these juicy and crunchy little seeds.  I very often find empty pomegranate bowls on the girls’ desks in the morning because they snack on the seeds while doing their homework.  I know, pinch me.  They aren’t the only ones who love pomegranates.  Mr. Picky eats them while he watches football and baseball games on tv.  I toss them into my morning yogurt, muesli or for a fun crunch in salads.  So good!

I will gladly support any addiction to something so super healthful.  Perhaps I’m preaching to the choir here, but let me remind you how rich in antioxidants pomegranates are.  The juice in the seeds contain ellagic acid and punic alagin which scavenge free radicals in the body and help preserve the collagen in your skin (pssst, that means they help you stay looking young!)   Pomegranate seeds also contain vitamin C, magnesium, calcium, and plenty of fiber.  All good news!  The only bummer about pomegranates is that you have to take the time to seed them, which is a little more effort than washing a piece of fruit and taking a bite, but it’s worth it!  Sure, you can buy containers of the seeds from the supermarket, but I find them to be a tad soggy.  Just do what I do and teach your kids how to seed them!

There are several strategies for releasing pomegranate seeds from the shell.  For example, I’ve seen recommendations to cut a pomegranate in half and whack it over a bowl to release the seeds.  Don’t do that.  Pomegranates stain like heck and you’ll inevitably spray red juice on your favorite shirt as well as the kitchen walls.  Here’s what I consider to be the best way to seed a pomegranate for maximum ease and minimum seed burstage (is that a word?):

  1. Put on a dark colored apron.  (Read above.)
  2. Fill a large bowl with cool or room temperature water and set aside.
  3. Place the pomegranate on a cutting board and carefully make a slice from the top to the bottom.  Separate the pomegranate into two halves.
  4. Submerge one half in reserved bowl of water and gently push the seeds off the membrane.  Break apart the pomegranate further to access more seeds, but do it under water.  Repeat with other half.
  5. The seeds will sink to the bottom of the bowl and pieces of the white membrane will float to the top.  Just skim those off and discard.  Drain the seeds and pat dry a little before storing in a container in the refrigerator.

Even though it’s the beginning of the season, I have gotten some beautiful pomegranates thus far.  In selecting a good one, in my experience, the heavier the fruit, the juicier it is.  Also, the ones that seem to be cracked (see above) tend to have the reddest and most flavorful seeds.  Check out some delicious salads which use these ruby jewels — Fennel and Green Apple Salad and Butternut Squash Salad with Pomegranates and Pecans.  Please share how you like to eat pomegranates!

Vanilla and chocolate chia seed pudding recipes

Have you ever bought something that you heard people talking about, that you thought you should start eating and would figure out how to get it into your diet soon but never did, only to have that something sit in your pantry forever?  That would be a scenario with me and chia seeds a few years ago.   I kept reading about these little nutritional powerhouses and I was easily convinced about all their benefits and that I should be incorporating them into my diet, but I hadn’t the slightest idea how to actually eat them.  Chia seeds are super high in Omega-3 fats (which many of us don’t consume enough of) and antioxidants.  They have almost double the fiber of flaxseeds, as well as lots of protein, calcium, iron and magnesium.  What is unique about chia seeds is their gel-like consistency when they are soaked in liquid.  They become thick like tapioca and that gel actually helps to keep everything moving very smoothly throughout our bodies.

Most suggestions that I originally encountered for consuming chia seeds were to “sprinkle” them on food, such as oatmeal or yogurt.  That was fine for me, but the kiddos and Mr. Picky Sr. weren’t going for it.  My next idea was to add chia seeds to cookie dough, which did make for a delicious almond butter and chia seed cookie.  But a cookie isn’t going to give you a heck of a lot of chia seeds/nutrition.  Finally I heard about chia pudding – an instant, raw, thick and silky pudding of chia seeds soaked in a barely sweetened liquid.  Sold!  Not only is chia pudding even easier to make than tofu chocolate pudding, but I think it’s even more delicious!

I have two versions to share with you because even though I love the plain Jane vanilla version, Mr. Picky thought it looked like tiny eyeballs and wouldn’t try it.  So I added a little cocoa powder to make it chocolate-y and less like, well, eyeballs.  Both versions are great.  I eat vanilla chia seed pudding for breakfast with berries or diced banana on top and it fills me up for a good long while.  Mr. Picky and his buddies love the chocolate pudding after school with lots of different toppings like coconut, raspberries or sliced almonds.  Check out the video I did below for The Chalkboard on how to make this delicious concoction.  Naturally I used date-sweetened Pressed Juicery almond milk to make it, but you can follow the recipe below.

Now that we’re hooked, I’d love to hear your favorite way to eat chia seeds!


Vanilla and Chocolate Chia Seed Pudding
Author: 
Serves: 2
 
Ingredients
  • 1 ¼ cups almond milk
  • 3 pitted dates or sweetener of choice, to taste
  • ½ teaspoon pure vanilla extract
  • 2-2 ½ Tablespoons raw cacao or unsweetened cocoa powder (if making chocolate pudding), depending on how chocolaty you like it
  • ¼ cup chia seeds
Instructions
  1. Place almond milk, dates, vanilla and cacao in blender and process until dates are pulverized. A Vitamix does a great job with this. If your blender leaves the dates too chunky, you can strain the mixture before adding it to the chia seeds.
  2. Pour chia seeds into a medium container and add almond milk mixture. Stir immediately to combine otherwise you may end up with blobs of chia seeds. Allow to sit on countertop and stir every 5 minutes. After 15 minutes, it should have thickened.
  3. Cover and refrigerate for at least an hour. I usually do this the night before. Stays in the fridge for as long as your almond milk would. Fun to add toppings like fresh fruit, coconut or chopped nuts.

Roasted vegetable lasagne recipe

I feel like my universe is in a state of transition right now.  Although I’m sensing this shift in energy in lots of people, not just me.  We’ve transitioned from vacation to school, about to move from summer to fall, and we’re starting to change what we wear.  It’s natural for us to adapt from warmer to cooler weather by adding an extra layer or wearing warmer clothes.  We can think of food in the same way.  It has the ability to warm us up or cool us down.  Even the way you cook or don’t cook your food can change how “warming” or “cooling” it is.  The most cooling form of a vegetable is its raw state, which is why I favor lots of salads and raw soups like gazpacho in the summer.  But today we had the first break in our heat wave and as I scoured the farmers market feeling a little chilly in my short sleeves, I had a hankering for roasted vegetable lasagne.

But before you think of the lasagne you eat in the dead of winter — the heavy, cheesy, carb-y, stick-to-your-ribs-and-thighs kind — think again.  Let’s call this one “Transition Lasagne.”  It’s warm, flavorful and satisfying, but it’s mostly vegetables with a mere couple of ounces of pasta in the entire pan, so it’s super light too.  I also use mozzarella only on the top layer and no one seems to have noticed the difference.  If you’ve made lasagne before, you follow the same basic steps of layering except here we use thick slices of roasted vegetables in place of sheets of pasta.  There’s still one layer of pasta, though.  I tried this with all veggies and it was a little too watery.  The top layer of blanched collard greens is really pretty too.  I got the idea from NY Times columnist, Martha Rose Shulman, who published a beautiful “Lasgana with Collard Greens” a few months ago.  Just like Ms. Shulman’s, not only is this lasagne lighter and fresher than the traditional, but no doubt more healthful too.

This is exactly what I wanted on a day like today and my family was pretty psyched when they came to the table, too.  Mr. Picky psyched about vegetable lasagne?  Ok, no, he wasn’t.  He picked it apart, scraping the cheese off both the pasta and the zucchini so that it was more palatable to him and the eggplant came over to my plate.  This is actually progress.  Last year he wouldn’t have eaten any of it!  Does this make me crazy?  Not really.  Because I know that transitioning to being a good eater doesn’t just happen with a change in the weather.

5.0 from 1 reviews
Roasted Vegetable Lasagna
Author: 
Serves: 6-8
 
Ingredients
  • 1 medium eggplant, about 1 ¼ pounds
  • 1 ½ pounds of zucchini, about 3 medium, trimmed and cut lengthwise into ½-inch slices
  • Olive oil for brushing on vegetables
  • Sea salt and freshly ground black pepper
  • 3 large collard green leaves
  • 3- 3 ½ cups of marinara sauce (depending on how saucy you like it)
  • 15 ounce container whole milk ricotta
  • 1 large egg (helps to bind the ricotta)
  • ½ cup grated Parmesan or Pecorino cheese, divided
  • 4 sheets no-boil lasagna noodles or your favorite gluten-free pasta, cooked and drained
  • 4 ounces grated mozzarella cheese, about 1 cup
Instructions
  1. Preheat oven to 375 degrees. Line 2 baking sheets with unbleached parchment paper.
  2. Slice the stem off the eggplant and with a vegetable peeler, peel a few strips off the eggplant so that you don’t get 2 end pieces that are all peel. It will be hard to cut through the lasagne otherwise. Slice the eggplant lengthwise into ½-inch slices. Arrange the eggplant in one layer on one baking sheet and the zucchini in one layer on the other. Brush both sides of the vegetables with oil. Sprinkle with sea salt and pepper. Roast until tender, about 30 minutes. Then lower the temperature to 350 degrees.
  3. Bring a large pot of water to a boil. Add a tablespoon of kosher salt and the collard leaves. Pull them out after 2 minutes.
  4. In a medium bowl, combine the ricotta, egg and 6 Tablespoons of Parmesan cheese.
  5. Spread ½ cup of marinara sauce on the bottom of a 13 x 9 baking dish. Arrange the roasted eggplant slices on top of the sauce in one layer, squishing them together a bit so there aren’t too many open spots. Take ⅓ of the ricotta mixture (about ⅔ cup), and with a spoon gently spread it over the eggplant slices. Spread ⅔ - ¾ cup of marinara sauce over the cheese mixture.
  6. Next, spread half the remaining ricotta mixture over the pasta sheets (I usually hold the pasta in my hands to do this.) Arrange the pasta in one layer over the eggplant/cheese/sauce and top with another ¾ cup of sauce.
  7. Repeat with the zucchini slices, remaining ricotta mixture and ⅔ - ¾ cup of sauce.
  8. Finally, place the collard greens in one layer on top. Spread ⅔ - ¾ cup of sauce on top of the greens, then sprinkle the mozzarella cheese and Parmesan over the sauce. Cover the dish tightly with foil and bake for 30 minutes. Remove from the oven, uncover and bake another 15-20 minutes until cheese is bubbly and golden. You can broil the top if it doesn’t brown enough. Lasagne is easier to cut (use a serrated knife) if you allow it to sit for a few minutes.
Notes
You can replace one of the layers of vegetables with a layer of pasta, if you prefer. You can also make this “cheesier” by adding a sprinkle of mozzarella in between each layer.

Vegetables can be cooked the morning of or the day before to save yourself some time.

Kale, mushroom and brown rice bake recipe

Kale, Mushroom and Brown Rice Bake | Pamela Salzman
Photography by Reagan Brooks

Daughter #1 is my 15-year-old who used to turn her nose at her plate if food groups were touching.  So you can imagine how very satisfying it was for me when she sighed, “I could eat Kale, Mushroom and Brown Rice Bake every day.”   Sigh.  Actually, both my daughters are crazy about this rice and veggie quasi-frittata and I am thrilled to cook them something so healthful and substantial for breakfast, lunch or dinner.  At the moment, the girls are on a brown rice bake kick and I’ve had to make it three times in the last two weeks!

Kale, Mushroom and Brown Rice Bake | Pamela Salzman

With teenage daughters usually comes a little drama, even first thing in the morning.  It usually involves someone borrowing someone else’s clothes without asking or someone posting a picture on Instagram of the other one sleeping with her mouth open.  But who knew that even breakfast food could fuel more than just hungry bodies?  Yesterday morning there was only 1 piece of brown rice bake leftover from the day before and Daughter #2 was the first one in the kitchen.    You know what they say about the early bird….  Daughter #1 was not the early bird yesterday, nor is she any day for that matter, but apparently she dreamt all night of brown rice bake instead of the boys from One Direction.  Do you know where this is going?  I watched it unfold in slow motion as #1 opened the refrigerator looking for the breakfast of her dreams while #2 savored another forkful of the last of the rice bake.  I knew what was next.  “Where’s the rice bake?”  No response was really necessary as my glance shot over to her sister who looked hesitant and terrified as she finished the last bite.  Hell hath no fury like a hungry teenage girl robbed of her rice bake.  No further details necessary.

Kale, Mushroom and Brown Rice Bake | Pamela Salzman                    Kale, Mushroom and Brown Rice Bake | Pamela Salzman

What’s the point of airing my family’s dirty laundry?  Oh merely just to share how much we love Brown Rice Bake and to encourage you to make it!  Although most of us (except for Mr. Picky) love frittatas, this is less eggy and more rice and vegetables bound with just enough egg to hold it all together.  The rice and (optional) sliced almonds give every bite great texture.  It’s super satisfying for any meal and a great way to use up leftover cooked brown rice and whatever vegetables you have lying around.  Think of this recipe as merely a roadmap to deliciousness – there is more than one way to get there.  Spinach, broccoli, leeks, asparagus, zucchini – all perfect here.

Kale, Mushroom and Brown Rice Bake | Pamela Salzman

I felt bad that Daughter #1 was disappointed yesterday so last night I sautéed all my vegetables and pre-measured the rice, cheese, salt and almonds, so all I had to do this morning was crack some eggs and measure a bit of milk.   I was so excited to surprise my lovely daughter with a new brown rice bake when she woke up this morning.  It’s noon and I’m still waiting for her to wake up.  Just praying there’s some rice bake left when she does…..

Kale, Mushroom and Brown Rice Bake | Pamela Salzman


5.0 from 1 reviews
Kale, Mushroom and Brown Rice Bake
Author: 
Serves: 4-6 or makes 12 individual "muffins"
 
Ingredients
  • 2 Tablespoons unrefined extra-virgin olive oil or ghee
  • 4 ounces mushrooms (such as shiitake*), chopped
  • 1 onion, finely chopped
  • 3 large kale leaves, stemmed and chopped (or more if you like)
  • Sea salt
  • 1 garlic clove, minced
  • 2 cups cooked brown rice (or barley, farro or spelt)
  • 5 Tablespoons sliced almonds, divided
  • ½ cup grated Parmesan or Pecorino cheese, divided
  • 4 large eggs
  • ¼ teaspoon pepper
  • ¼ cup whole milk or unsweetened hemp milk
Instructions
  1. Preheat oven to 375 degrees and grease an 8x8 or 9-inch round baking dish. You can also use a 12-cup muffin tin, greased or lined with silicone liners.
  2. In a large skillet heat the oil/ghee over medium heat. Sauté the mushrooms, onions, kale and a pinch of salt for about 3-5 minutes or until just beginning to soften.
  3. Add in the garlic. Continue cooking until everything is softened and the mushrooms are golden, about another 3 minutes.
  4. Place the rice in a large bowl. Stir in the mushroom mixture, ¼ cup almonds, and half the Parmesan cheese.
  5. In a medium bowl, whisk the eggs, milk, ½ teaspoon salt and pepper. Fold the eggs into the rice mixture, then pour into your prepared baking dish. Sprinkle with the reserved half of cheese and 1 Tablespoon of sliced almonds.
  6. Bake for about 30 minutes or until set.
Notes
*To clean mushrooms, wipe with a damp paper towel. For shiitakes, slice off stems and discard.


Farro with roasted vegetables and roasted tomato dressing recipe

We had such a nice Labor Day weekend.  I hope you did, too.  We were able to squeeze in some beach time, family time, yoga (for me) and our annual block party, which was great fun.  The combination of the balmy weather and refrain from “labor” made me wish that summer would last just a little longer.  Although, as I mentioned in my gazpacho post, I am riding the summer tomato train for as long as possible.  Since this may very well be my last recipe of the year with tomatoes, I am sharing a goodie.

The inspiration for this recipe came from Deb at Smitten Kitchen who adapted it from Gourmet magazine.  The original recipe called for Israeli couscous, which I couldn’t help but substitute out for a more whole (and tastier) grain like farro.  But what makes this dish special is the incredible dressing which uses slow-roasted tomatoes as it’s base.  What could be better, tomatoes and grains with a tomato dressing?  It’s the perfect recipe for a tomato-fanatic like me!

Ok, I can read your mind.  It’s not the fastest recipe on the planet.  The cherry tomatoes have to be washed, dried, halved, arranged on a baking sheet and roasted for an hour.  Although you don’t have to arrange the tomato halves like soldiers in the photo here.  I thought it would look nice that way, but now I realize it just makes me look obsessive compulsive.  Anyway, I was making this on Friday afternoon to bring to the beach for a potluck, and I tried timing the tomato prework. Excluding the roasting bit, I think it only took me about 15 minutes which I did while watching an episode of “Barefoot Contessa.”  Can I just say I wish Ina Garten would invite me over to cook, play bridge and drink cocktails with her and her friends, especially TR.  Sigh.  Speaking of Ina, do you remember her Orzo with Roasted Vegetables from 2001?  Gasp, was that really 11 years ago?  You know, the one that we all made a gajillion times for every backyard barbeque and potluck for years.  Loved it, but OD’ed on it for sure.  Ina’s salad was easy, but definitely involved some labor, and yet we all thought it was worth it.

Ok, this recipe is like that for me!  A little extra work, but worth it, worth it, worth it!  I taught this last September and again to a group this past July, all the while thinking how divine it is and how much I love it.  And then, while watching Ina on Friday afternoon, that orzo salad popped into my head and I changed this recipe on the spot by cutting the amount of farro in half and adding a bunch of roasted vegetables in its place.  The good news — it was A-MAZING, so much better than the original!  The bad news – it was A-MAZING, so much better than … the way I had taught it to A LOT of students.  Guilty face.  Well, I guess that’s what blogs are for!


View this post on Instagram


A post shared by Pamela Salzman (@pamelasalzman)


Farro with Roasted Vegetables and Roasted Tomato Dressing
Author: 
Serves: 6-8
 
Ingredients
  • 2 pints cherry tomatoes, about 1 ½ pounds
  • 6 small-medium garlic cloves, UNpeeled
  • ¼ cup unrefined cold-pressed extra-virgin olive oil + additional for vegetables
  • ¼ cup warm water
  • 1 teaspoon fresh lemon juice
  • 1 teaspoon sea salt + additional for vegetables
  • ¼ teaspoon freshly ground black pepper + additional for vegetables
  • 1 bunch asparagus, trimmed
  • 5-6 medium zucchini
  • 1 cup farro
  • Kosher salt
  • ½ cup Kalamata olives, pitted and chopped
  • ⅓ cup chopped fresh flat-leaf parsley
  • ¼ cup chopped fresh basil
  • 1 teaspoon chopped fresh thyme (only if you’ve got it)
Instructions
  1. Preheat oven to 250 degrees. Halve tomatoes through stem end and arrange cut-side up in one layer on a large baking sheet. Add garlic to pan and roast about 1 hour, or until tomatoes are slightly shriveled around the edges. Cool in the pan for 30 minutes.
  2. Peel the garlic and put in a blender with oil, water, lemon juice, salt, pepper and ½ cup roasted tomatoes. Blend until very smooth.
  3. Turn the oven to 400 degrees. Arrange the asparagus on a large baking sheet and drizzle with oil plus a sprinkle of salt and pepper to taste. Chop the zucchini into 1-inch cubes. Toss with olive oil and arrange in one layer on a baking sheet. Sprinkle with salt and pepper to taste. Roast asparagus for 12 minutes or until tender. Roast zucchini 35 minutes or until caramelized. Chop asparagus into 1-inch pieces.
  4. Bring a large pot of water to a boil. Add a few substantial pinches of kosher salt and the farro. Cook until farro is tender, but still al dente, about 20-25 minutes. Drain very well and transfer to a serving bowl.
  5. Add olives, remaining tomatoes, asparagus, zucchini, herbs and dressing to farro. Toss to combine and taste for seasoning. Serve warm or at room temperature.


Zucchini bread pancakes recipe

A few years ago, someone suggested I teach a class with a breakfast menu.  At first I didn’t think it was such a good idea because breakfast seems kind of easy, at least too easy to be taught in a cooking class.  In our house the rotations is oatmeal or muesli, scrambled eggs, smoothies, yogurt and granola, pancakes and leftovers from last night’s dinner.  But the more I thought about it, I realized there was a nice variety of fun, delicious and healthful recipes I could share.  Because I do believe breakfast is nutritionally the most important meal of the day, especially for children, I knew these recipes needed to provide sustenance, long-lasting energy and stable blood sugar.  My first breakfast class was a great success and I have continued the tradition every June (arbitrary selection of month) since then.

I tend to follow a similar formula each June based on what my family and I love to eat for breakfast, both on the weekdays and weekend.  I always teach a smoothie, muffin, egg-based dish and a pancake recipe.  When I was growing up, pancakes were for Saturday mornings when Mom had time and no one was rushing off to work or school.  I too love lingering over a plate of pancakes on the weekends, but by making the batter the night before and teaching my older girls how to cook their own, we enjoy them on a school mornings, as well.  If you’re thinking it’s a little boring to eat plain old pancakes twice a week, I would agree with you!  We add lots of different things to our pancakes while they’re cooking and the kids each seem to have their own favorite combo, such as fresh raspberries and mini-chocolate chips or diced banana and pecans.

But for my breakfast classes, I needed to debut more than just buttermilk pancakes with a different fruit each time.  I’ve posted most of my favorites by now, including oatmeal pancakes and pumpkin pancakes.  Both are really delicious!  After seeing a recipe by fellow Foodily tastemakerJoy the Baker, for carrot cake pancakes, I had an idea to make pancakes with the same flavors in zucchini bread.  To me, zucchini bread really isn’t about the zucchini, which I think is a little tasteless but does add nice moisture to muffins and quick breads.  I’m mostly in it for the sweet spiciness of cinnamon and nutmeg, perhaps combined with a few nuggets of walnuts.  What’s not to love?  And zucchini bread pancakes could be made with almost no added sweetener — so great!

These pancakes made it on the menu this past June and I think they were a big hit.  I made them successfully with several different flours, including whole wheat pastry, whole spelt, and sprouted whole wheat.  The latter two flours tend to create a thicker batter, so I used a bit less of those, but they made for a nice hearty pancake.  Whole wheat pastry flour is very light, almost mimicking white flour, but still has all the fiber and bran of whole wheat, which it is.  We also played around with adding pecans, blueberries or the oft-requested chocolate chips, but personally I love them completely plain with either a thin drizzle of maple syrup or a dollop of whole yogurt.  Such a delicious breakfast for the long weekend as well as for a first day of school.  I hope you all enjoy a fantastic Labor Day!

Zucchini Bread Pancakes
Author: 
Serves: makes about 12 4-inch pancakes
 
Ingredients
  • 1 ¾ cups sprouted wheat flour or 2 cups whole wheat pastry, white whole wheat or whole spelt flour (or a combo)*
  • 1 teaspoon aluminum-free baking powder
  • 1 teaspoon aluminum-free baking soda
  • 1 teaspoon fine sea salt
  • 1 Tablespoon ground cinnamon
  • scant ¼ teaspoon ground nutmeg
  • 2 cups buttermilk**
  • 2 large eggs
  • 1 teaspoon pure vanilla extract
  • 1 Tablespoon 100% pure maple syrup
  • 3 Tablespoons unsalted butter, melted
  • 2 cups shredded zucchini
  • Melted, unrefined coconut oil or unsalted butter for brushing the griddle
Instructions
  1. Preheat a griddle to 400 degrees or medium heat.
  2. Combine the flour, baking powder, baking soda, salt and spices in a large mixing bowl.
  3. In a medium bowl or 4-6 cup measuring cup, whisk together the buttermilk, eggs, vanilla, maple syrup and melted butter until well blended. (A blender can do this easily, too.) Fold in shredded zucchini.
  4. Pour the wet mixture into the dry ingredients and stir until just combined.
  5. Brush the griddle with coconut oil and spoon about ¼ cup of batter onto the griddle. Add blueberries, chocolate chips, diced banana or chopped walnuts to the surface, if desired. When bubbles start to form on the surface of the pancake and the edges become slightly dry, flip it over and cook until done. Maintain the heat on medium-low or 400 degrees.
Notes
*Gluten-free: substitute 1 cup buckwheat flour and 1 cup brown rice flour for the wheat flour. Or you can use GF oat flour, too, such as ¾ cup oat flour, ¾ cup buckwheat flour and ½ cup brown rice flour.

**No buttermilk? Sub half unsweetened yogurt and half whole milk. Or use 2 cups milk, omit the baking soda and use 2 teaspoons baking powder instead.

Gazpacho with avocado recipe

The kids are going back to school tomorrow, which means that my favorite season is UNofficially over.  No more lazy days and waking up late or reading for pleasure instead of for a test.  Back to making lunches at 6:30 am and soccer carpools.  Not so fast!  The good news is that summer isn’t officially over until September 22nd and there are tomatoes to prove it.

If you’re new here, I am mildly obsessed with summer tomatoes, i.e. tomatoes grown in soil and hot July and August sun until they’re sweet and juicy and drippy with intense tomato flavor.  My garden doesn’t produce that many so I supplement with tomatoes from my local farmers markets or GROW, my favorite local market which always seems to find great produce from local farms.  I’m a lucky girl for sure!  I try to take advantage of the fleeting tomato season, so I buy a ton and seem to use tomatoes almost every day in some way, even for breakfast or in between meals.  Just now I took a handful of yellow grape tomatoes and ate them as a little snack like candy, which is what they tasted like.  Yum!

best to chop each ingredient separately; pureed  fresh tomatoes stand in the place of canned tomato juice

It’s always my preference to keep things simple when the ingredients are perfect, like sliced tomatoes and avocado on grilled bread with sea salt, but gazpacho is a recipe that is worth the extra 5 minutes to make.  We’ve been enjoying some hot weather here in Southern California so it’s the perfect time to enjoy this cooling, no-cook soup.  My version of gazpacho is not exactly traditional, but just as delicious and possibly a tad more healthful.  In Spain, it is very typical to add day-old bread, which I omit.  I don’t notice the lack of bread one bit, and I think if you’re going to indulge in bread, you might as well actually know you’re eating it.  I also don’t use canned tomato juice, which normally contains BPA or aluminum or both.  Yikes!  Not only that, I think you can get a cleaner, more tomato-y flavor from using awesome fresh tomatoes, not to mention more vitamins, minerals and antioxidants like lycopene.

My kids like gazpacho because they think it tastes like a blended salad and they can add an assortment of toppings.  As I’ve mentioned, I’m big into topping bars, especially for soups and salads, because I think it gives the kids more control over what they’re eating and I notice they tend to eat more of a food when they can make it their own, so to speak.  Our favorite topping with gazpacho is creamy cubes of avocado with give the perfect balance to the acidity of the tomatoes and vinegar.  But don’t let me stop you there.  Croutons, grilled corn kernels, chopped shrimp or crab are all fantastic additions to the top of this bowl of summery goodness.  I’ll come clean and confess I’ve even put out popcorn for Mr. Picky to add.  Whatever works, people.  I love pairing cool gazpacho with chicken kebabs and chimichurri sauce or a summer frittata for a light dinner.  But one of my favorite ways to serve it is in little shot glasses as an hors d’oeuvre.  With Labor Day weekend around the corner, here’s one way you can keep that summer feeling going strong.

5.0 from 1 reviews
Gazpacho with Avocado
Author: 
Serves: 6
 
Ingredients
  • 2 cups large chopped unpeeled Persian cucumbers, about 3-4
  • ½ small red onion, cut into chunks*
  • 4 large (about 2 ½ - 2 ¾ pounds) ripe tomatoes, cored and cut in half crosswise to remove the seeds, cut into chunks
  • 3 medium garlic cloves, peeled
  • 2 teaspoons sea salt
  • freshly ground black pepper to taste
  • 2 Tablespoons Sherry vinegar
  • ¼ cup unrefined, cold pressed extra-virgin olive oil
  • 1 avocado, cubed
Instructions
  1. Place the cucumber in a food processor fitted with the metal blade and pulse until coarsely chopped. Transfer the cucumber to a large bowl. Repeat the process with the red onion and transfer to the bowl with the cucumber.
  2. Take half of the tomato and pulse in the food processor until chunky and add to the bowl.
  3. Smash the garlic cloves and place in the food processor with the remaining tomato pieces, salt and pepper, vinegar and oil. Process until smooth.
  4. Transfer mixture to the bowl with the cucumber and onion and stir to combine. Cover and refrigerate until cold.
  5. Before serving, garnish with avocado. Can be made several days ahead.
Notes
You can add finely diced radish for pepperiness; hot sauce or jalapeño for heat, croutons for crunch, or a dollop of sour cream. You can also use yellow heirloom tomatoes for a yellow gazpacho.

*Onion can be soaked in ice water for 15 minutes to take the edge off the raw flavor.