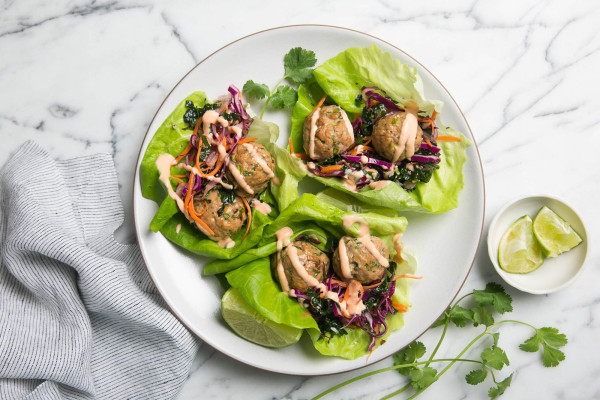
Why is it that I don’t like meat, but I can handle meatballs? Maybe because it doesn’t resemble actual meat? Most people, both kids and adults, like meatballs. I have made many meatball-related recipes in my classes, and they are always quick favorites. I grew up thinking a meatball was only something simmered in a marinara (tomato) sauce and served with pasta. And it usually is, but there are Mexican-flavored meatballs in albondigas soup, sweet and sour meatballs, Swedish meatballs and Greek meatballs, so why can’t there be Asian-flavored meatballs? Indeed there can be.
When I came up with this recipe, they didn’t go into a soup or in a rice and veggie bowl, although those would be great ways to enjoy the meatballs. I served them taco-style, in a big lettuce leaf with crunchy cabbage and a spicy sauce. My family went nuts and the mamas in my classes all ran home to make these for their kiddos. I received lots of great feedback, so I am confident you will receive rave reviews.
Maybe you’re in the whirlwind of Thanksgiving preparation madness and can’t focus on the day after quite yet. But just thinking about this soup relaxes me. You know how I am rather structured and favoring traditions on Thanksgiving? I am just as much that way the day after Thanksgiving. I stay in my pajamas until noon, forgoing the turkey burn spin class that everyone else is at, in favor of a very leisurely breakfast with my family and holiday shopping on my laptop. But the first thing I do on Friday morning is to start my turkey stock on the stove with last night’s carcasses and fresh aromatic vegetables. Now when I smell turkey stock, it feels like a day off. And then I always make some version of a simple turkey soup for dinner. What’s nice about using the remnants of a roasted bird versus a raw one, is that you don’t have the accumulation of fat to contend with. So the resulting stock can be used that same day (as opposed to waiting until the next day to remove the fat that has solidified from the top.)
In general, you can take any soup which calls for chicken and chicken stock and replace it with turkey. Turkey just has a stronger, more distinctive flavor which tastes like….turkey! But you can take my Chicken and Lime Soup with Avocado and use turkey there, or Italian Wedding Soup with shredded turkey instead of turkey meatballs, and so forth. Or just make a batch of stock and freeze it for a rainy day. This soup though, is the perfect antidote to all the richness from Thanksgiving dinner. It’s a nice, light broth soup with a little tang from fresh lemon juice. I love that it doesn’t taste like yesterday’s meal. I personally like eating my leftovers in a transformed way, as opposed to just heating them up and having the same exact meal the next day. Not that there’s anything wrong with that, of course.
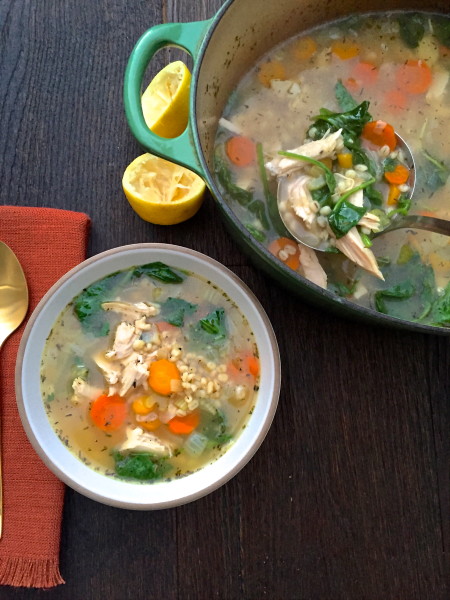
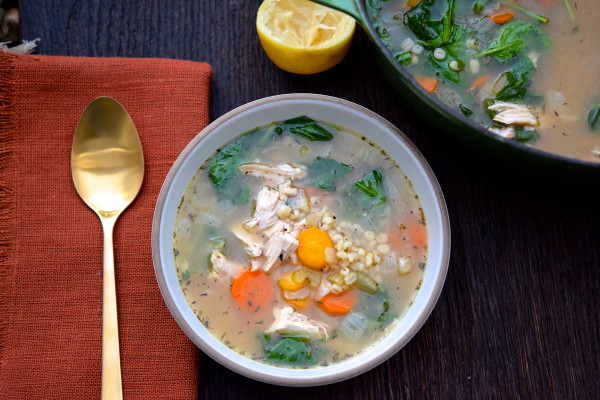
I had some turkey leftovers from a recent class, so I made this Lemon Turkey and Barley Soup for my family and they all, even Mr. Picky, loved it! What’s lovely about barley is that it thickens up the longer it sits so I enjoy this soup even more the next day, and so did my kids when I put it in their thermoses for school lunch. If you are gluten-free, I think any kind of rice would be nice instead of barley. Be mindful of the cooking times, though. Brown rice takes 50 minutes and white takes 18. I asked the kids what they thought of the lemon juice in the soup and they all thought it was the perfect amount — definitely lemony, but not too much. I personally would have liked a little more lemon, but that’s something that can be added to each individual’s bowl, as well. It’s a nice, fresh twist on a barley soup. For a more traditional barley soup, check out this link here and sub turkey stock if you like.
Ironically, this year my day after Thanksgiving will be different. I’ll be waking up before the sun comes up and heading over to KTLA Channel 5 (not in my pajamas) armed with my Thanksgiving leftovers to make some delicious recipes with the anchors that morning. If you are in LA and are interested in tuning in, my segment is scheduled for 9:45 am!
Until then, I hope you have a wonderful holiday. I always remind myself in the midst of the planning and prep and cooking that this day is about being mindful of all we have to be thankful for — and there’s always, always something. I am so grateful for all of you and my students, from whom I learn so much and who inspire me every day!
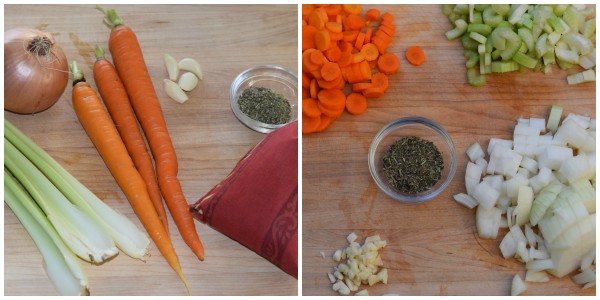
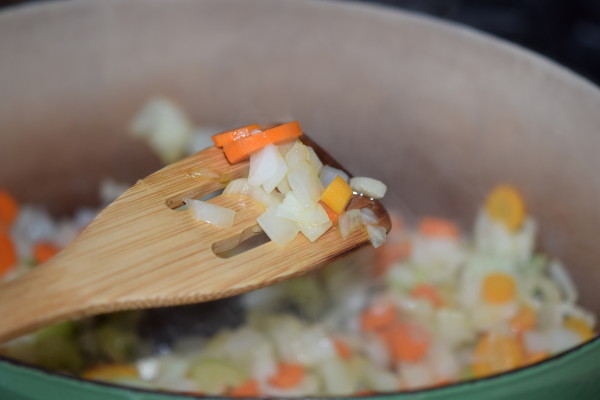
Warm the olive oil in a large pot over medium heat. Add the onion, carrots, celery and garlic and sauté until the onions are translucent, about 8 minutes.
Add the herbs de provence and stir.
Add the stock, barley, salt and pepper and bring to a boil. Lower to a simmer and cook partially covered until the barley is tender, at least 30 minutes.
Stir in the cooked turkey and simmer until turkey is heated through. If you want the barley to become larger and thicken the soup a little, just simmer another 10-20 minutes.
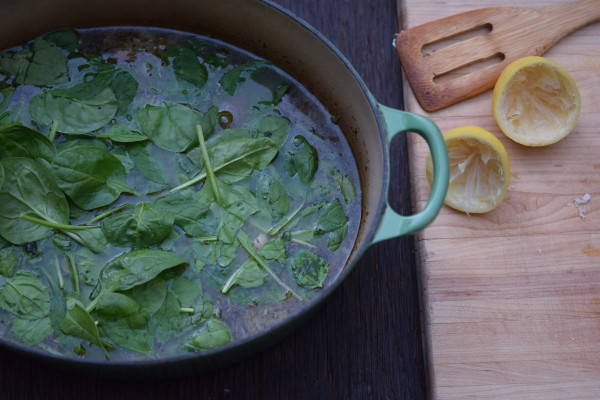
Stir in the lemon juice and spinach and cook until spinach is just wilted. Taste for seasoning and add additional salt, pepper or lemon juice, if needed. Serve with grated Pecorino or Parmesan cheese, if desired.
Notes
* Herbs de provence is a blend of dried herbs which often include thyme, oregano, savory, marjoram, rosemary, and other herbs. If you don’t have herbs de provence, feel free to make your own blend of these herbs to use instead. ** You can also substitute 1-2 cups cooked grains and decrease the stock to 6-7 cups. You will just need to warm the grains through and not cook them for the full amount of time.
I know you are all in major Thanksgiving prep mode. But I wanted to post this recipe for the day after if you are planning that far ahead. And if that is the case, you and I are probably good friends, or should be. One of the reasons I absolutely love the day after Thanksgiving is because I sit in my pajamas until noon like a lady of leisure and make everyone bring me things like tea and slippers, and fetch me the remote control because I slaved over that meal for days and days and I deserve to sit on that couch for as long as I feel like it. Ha! Once a year, it’s nice to be queen for the day.
I also love the day after Thanksgiving for the leftovers. Leftovers mean I don’t really have to cook, but I do need to figure out how to repurpose turkey and potatoes and such in a tasty way. I used to just literally reheat everything and we would have another Thanksgiving dinner the next night with some fresh turkey vegetable soup from simmering the turkey bones all day. But personally, I have tired of that sameness two days in a row and have begun to look for ways to redo leftovers that don’t seem like leftovers. I have made turkey shepherd’s pie and turkey pot pie (use turkey instead of chicken in this recipe), as well as Southwestern turkey and black bean chili and turkey, butternut squash and wild rice soup and so on.
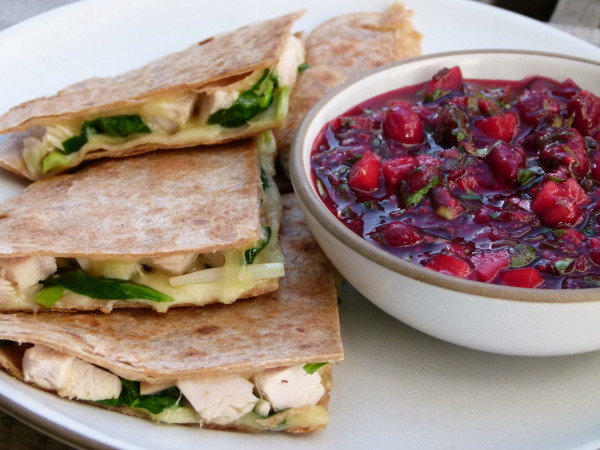
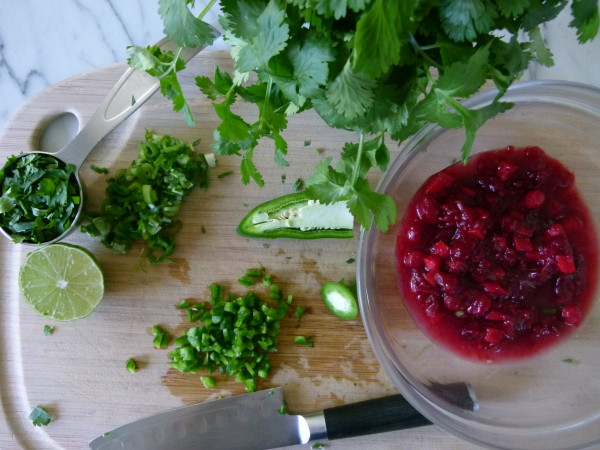
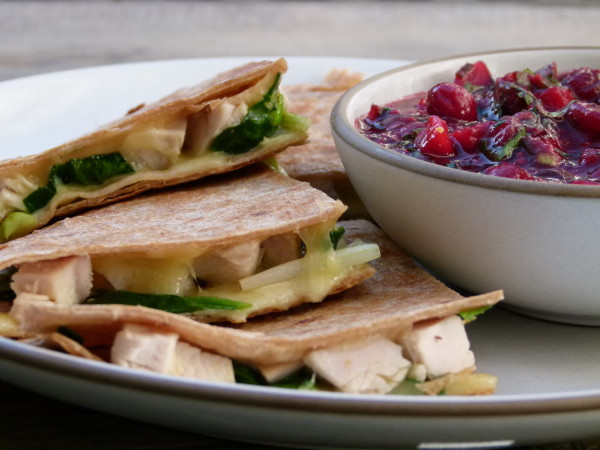
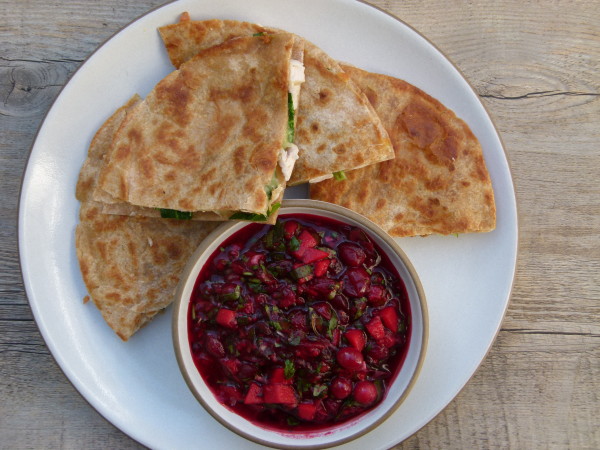
But this year, I am really going off in a different direction with these Turkey and Spinach Quesadillas with Cranberry Salsa. Has this New Yorker been in Los Angeles too long? By the sound of today’s post, you might think so. Or maybe it’s because as I write this, it’s 75 degrees and my mind isn’t going toward something heavy like turkey stew. I like this recipe for a variety of reasons, the first of which is that it’s tasty. Another reason is that it’s so easy and I don’t need multiple pots and pans and cutting boards. I am kind of not into cooking this Friday. Lastly, I like the twist of a different, fresh flavor.
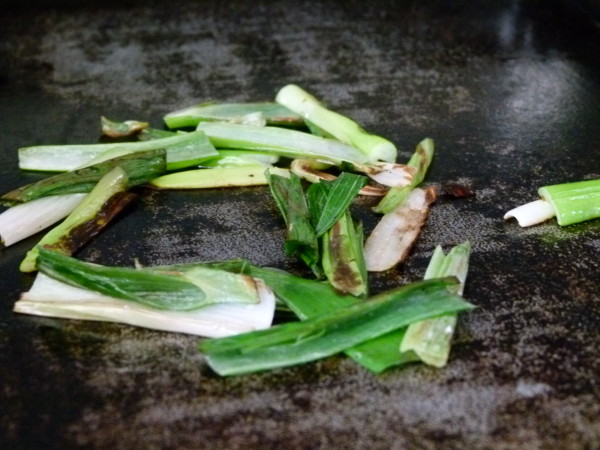
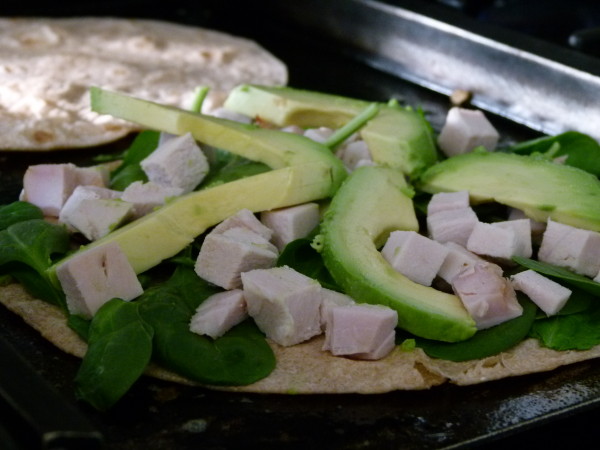
My family all had different opinions about this recipe which is why my life stays interesting. Mr. Picky still will not eat cheese because he thinks it’s the devil and I won’t eat it often because it’s not great for me, so the two of us tried the turkey quesadilla without cheese and with avocado instead. Delicious! The creamy from the avocado was a perfect replacement for the melted cheese, in our opinion. As for the salsa, my husband likes cilantro 50% of the time and in the cranberry sauce was not one of those times. One of my daughters put plain cranberry sauce on her quesadilla and liked that just fine and thought that would be a better way to present this recipe since there was no extra work involved there. True.I also loved the cooked green onions, but there’s a good chance you might not have those lying around, so if you could easily sub cooked regular onions if you’re motivated. No judgment from me if you’re not, though.
Hope you have an amazing holiday! We all have so much for which to be grateful!
8 (8-inch) whole grain tortillas (I like Rudi’s whole spelt and Food For Life sprouted grain)
1 cup (4 ounces) shredded Monterey Jack cheese
2 cups chopped cooked turkey
4 handfuls baby spinach leaves
Instructions
Prepare the salsa: combine all ingredients in a bowl. Cover and refrigerate.
Prepare quesadillas: heat a large skillet or griddle over medium-high heat. Warm olive oil and sauté the green onions for a couple of minutes until tender. Remove the onions and lower the heat to medium.
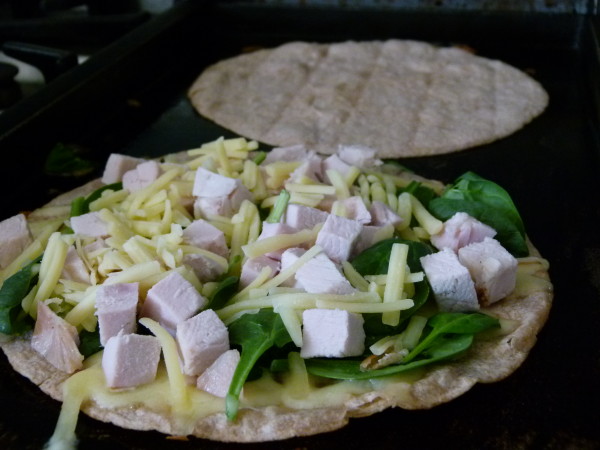
Add a little butter or oil to the pan, place a tortilla on the pan and sprinkle cheese over the tortilla, Top the cheese with ¼ of the onions, ½ cup turkey and a handful of spinach leaves. Cover with a tortilla. Cook until the underside is lightly golden and flip over. Cook until cheese is melted.
Make remaining three quesadillas in the same way, adding a little extra butter to the pan if necessary to prevent sticking.
Cut each quesadilla into 4 wedges and serve with prepared cranberry salsa or plain cranberry salsa.
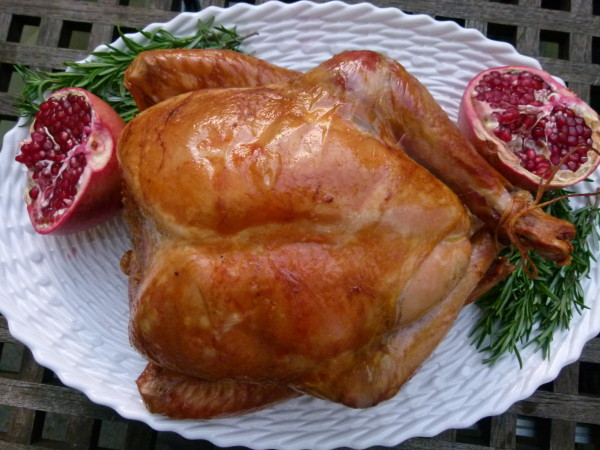
This is it, my last Thanksgiving recipe for you. And it’s my favorite way to make turkey as of late. I taught this method in all my November classes last year and a few this year and I was consistently thrilled with the results. I don’t even like turkey, but this was juicy and so flavorful. Even if you have solidified your Thanksgiving menu, I’m not too late with this one since you are probably making turkey of some sort. Let’s get down to the nitty gritty of making a good turkey:
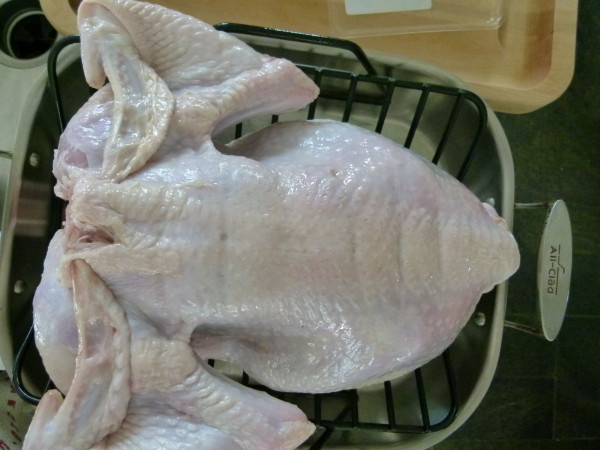
Buy a fresh, organic turkey (they taste better than frozen and/or Butterball chemically-injected ones). If you bought a frozen turkey, plan for a few days to defrost in the fridge. Do not thaw in brine!
Don’t forget to remove the neck and giblet bag from the cavities (including the neck.)
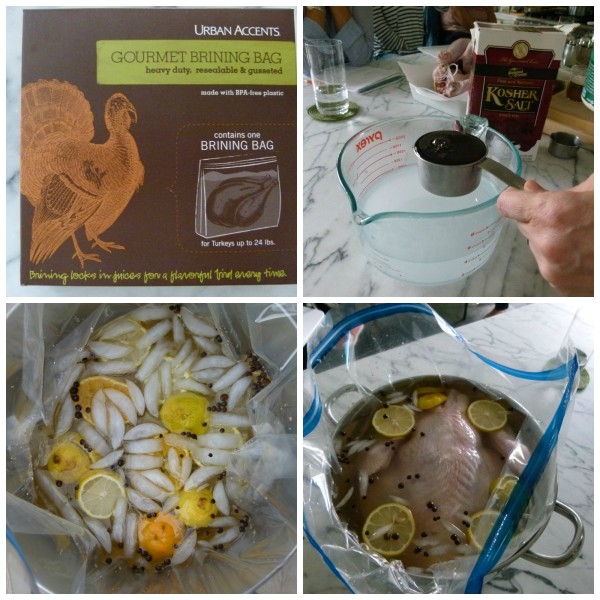
Brine it. You can dry brine (which means you’re rubbing the turkey inside and outside with kosher salt 2-3 days before) or wet brine 24 hours in advance. A wet brine is a salt-water solution, usually with brown sugar and some other flavors. Brining gets the salt deep into the meat to season it well and keeps the turkey juicy. Both brines do this. The advantage of a dry brine is that it’s easier, especially if you’re cooking a super large turkey. All you have to do is rub it with salt. ANd it takes up less space in the fridge. The advantage of a wet brine is that it’s faster and you can add different flavors to the solution. The only time you don’t want to brine a turkey is if it is a KOSHER bird. Those have already been brined. If you can find a good quality organic, kosher turkey, go for it. You don’t have to prep it in advance = easier. I have tried NOT brining a turkey, and instead seasoning it just before cooking. Not the same. DO the brine. If you don’t have room in your fridge, place the turkey in the brine in a pot in a cooler with ice and it will be just fine.
Allow the turkey to come to room temperature before cooking. Promise me you’ll take the turkey out of the refrigerator at least one hour before cooking it, otherwise the interior will be underdone and the exterior will be overcooked and dry. That does not have to happen. For the largest birds (over 20 pounds), leave out of the fridge and out of the wet brine (if you’re using it) for 2 hours before roasting. 12-18 pounds leave out for 90 minutes before roasting. Less than 12 pounds leave out for at least an hour before roasting.
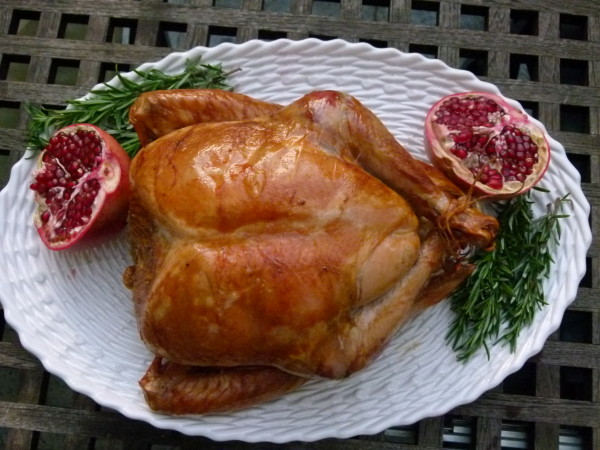
Use a meat thermometer to determine whether or not your turkey is ready. You cannot go by the chart on the turkey wrapping or by a recipe. I have made over 150 turkeys in my life in lots of different ovens and trust me, you need a meat thermometer to say the thickest part of the breast, which is on the side closer to the neck, registers between 160-165 degrees. The thigh should register around 175 degrees. Check this post here to see if your thermometer is accurate!
Allow the turkey to rest for at least 20 minutes before carving. The juice will redistribute and the turkey will be juicer. If you take the turkey out and cut it too soon the juices with pour onto your cutting board. That would be sad. Feel free to allow the turkey to rest a little longer, up to 40 minutes is fine. But keep it covered with a piece of foil so it stays warm while you make gravy and bake your stuffing. Click on this post for carving help.
You don’t have to follow this recipe for a great turkey, but you should employ the above strategy. Here are my other turkey recipes on my site:
You will have a delicious turkey, I am sure. But, if something goes wrong, here are some tips:
If you have dry turkey meat: carve the turkey and pour hot chicken or turkey stock over it. No one will know!
If your turkey is undercooked and you’ve already cut into it, remove the thigh and drumstick and take the breasts off the carcass. Put all the pieces into the roasting pan and put back in the oven until they reached the desired temp.
Good luck!! Leave a comment on any recipe if you have questions!
12-14 pound fresh turkey, giblet bag and neck removed, rinsed
For the brine:
1⅓ cup kosher salt (such as Diamond Crystal)
½ cup maple syrup or brown sugar
1 quart hot water
1 orange, cut into crosswise slices
1 lemon, cut into crosswise slices
1 Tablespoon black peppercorns
2 teaspoons allspice berries
1 gallon ice cold water
1 onion, quartered
3 or 4 parsley sprigs, thyme sprigs and or sage leaves
3 sprigs of fresh rosemary
1 apple, quartered or cores from 2 apples
6 Tablespoons unsalted butter, melted or olive oil
1-2 cups stock or water
Gravy
¼ cup dry white wine
5 Tablespoons all-purpose flour
3 -3 ½ cups chicken or turkey stock, preferably homemade
sea salt and freshly ground black pepper to taste
Instructions
I like to brine the turkey for about 14-18 hours. You can brine it, remove it from the brine and then store it in the refrigerator for a day until you are ready to cook it. To make the brine: Dissolve the salt and maple syrup in the hot water. Take the orange slices and carefully squeeze them into the mixture. Add the lemon, peppercorns and allspice berries.
Place the brining bag in a large stockpot. Add the cold water to the bringing bag and then the warm mixture. Place the turkey in the brine breastside down and make sure the whole bird is covered with liquid. Seal the bag securely and place pot in the refrigerator for 12-18 hours.
Remove the bird from the brine and rinse with cold water. Pat dry. Refrigerate until ready to cook or proceed with recipe.
The day of roasting, take turkey out of refrigerator and wipe dry with paper towels. Bring to room temperature, about 60-90 minutes.
Preheat oven to 425 degrees. Position a rack in the lowest rung of the oven. Oil a V-shaped rack in a roasting pan.
Sprinkle a little freshly ground black pepper in the cavity and then add in the onion, herbs, and apple. Truss the turkey by tying the legs together. Brush the skin all over with some of the butter or oil.
Place the turkey on the rack in the pan, breast-side down and pull the wings behind the back. Roast for 40 minutes, basting with butter or oil after 20 minutes. Reduce the heat to 325 degrees, turn breast side up (I usually wear clean rubber gloves to do this) and add 1 cup stock or water to the roasting pan. Continue to roast, basting with the remaining butter or oil until used up and then with the pan juices every 20 minutes. Add additional stock to the roasting pan if you notice there are no pan juices with which to baste the turkey.
Roast until golden and cooked through. After about 2 hours, start testing for doneness by inserting an instant-read thermometer in the thickest part of the breast away from the bone; it should register 165-170 degrees. You may also test the thigh – it should read 180 degrees. The turkey should roast a total of about 2 ¾ hours, but it can range from about 2 ½ - 3 hours or 12-14 minutes/pound.
Transfer to a cutting board or warmed platter and cover loosely with aluminum foil until ready to carve, at least 20 minutes (I prefer longer.) Use the pan juices to make gravy.
Prepare the gravy:
Pour all the pan juices, including the fat into a fat separator. Allow the fat to separate from the juices.
Heat the roasting pan over medium heat on the stove and add the pan juices, leaving the fat in the fat separator. Add the wine to the roasting pan. Bring to a boil and lower heat to a simmer for 2-3 minutes, stirring with a wooden spoon to dislodge any brown bits that stick to the bottom of the pan. Strain into a bowl or you can use the gravy separator again or wait until Step 4 and strain into the gravy saucepan.
In a saucepan over medium heat, warm the reserved fat from the gravy separator until it is bubbly. You should have at least 3-4 Tablespoons. If you don’t, add some olive oil. Add the flour and whisk rapidly to cook the flour, about 2-3 minutes.
Whisk in the strained pan juices and 3 cups of stock to the saucepan until smooth. Bring to simmer and cook until thickened, about 5 minutes. Season to taste with salt and pepper. Keep warm on lowest heat. Add additional stock as needed to achieve desired consistency.
I’m a happy mama since I picked up Mr. Picky from sleepaway camp on Saturday. 13 days is just too long for me to be apart from that guy. I have been enjoying all the stories, hanging on every word as if he traveled around the world. Bless his heart, Mr. Picky “snuck” some food from camp to bring to my husband and me. Thankfully, it was from breakfast the morning he left and not from last week. From his backpack he pulled out a paper cup with a few pieces of melon for me and a cup with mini cinnamon buns mixed with tater tots for my husband. What does that tell you?
While Mr. Picky can’t stop talking about his counselors, his bunk mates and all the competitions in which he participated, I had to find out about the food. What was your favorite dinner? Did you eat any vegetables? What did you drink? Blah, blah, blah. I’m so predictable, but I have no self control. I have to give the camp props that soda is not served. I don’t know if I could handle that.
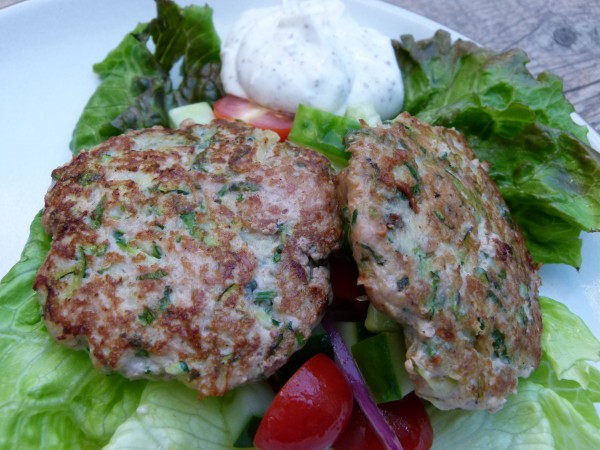
So what I have gathered is that Mr. Picky didn’t eat any protein at breakfast ever since, go figure, the camp doesn’t serve Organic Pastures Raw Organic Milk, and Mr. Picky still doesn’t eat eggs or cheese. And it also sounds like the only vegetable he ate was cucumber. So we have some catching up to do! One thing that my son loves is any type of burger, even veggie burgers. I made these turkey burgers the week before he left and he loved them so they’re going on the dinner menu again this week. It’s another winner recipe from Yotam Ottolenghi’s “Jerusalem” cookbook.
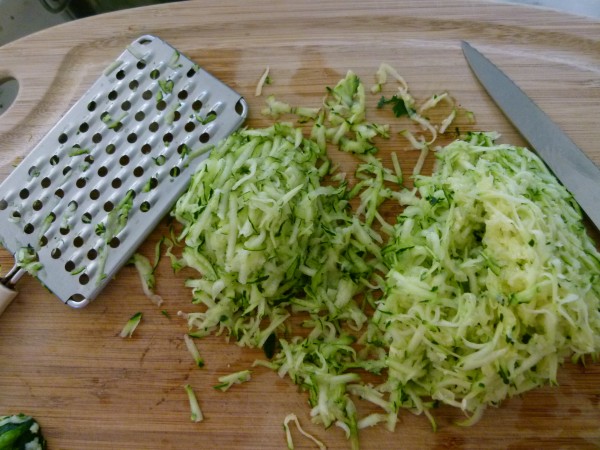
If you’re bored with plain burgers, these are so different and delicious. And a great way to make a (small) dent in your zucchini crop. They are moist, herby and they’ve got a great kick to them. If spicy isn’t your thing, you may want to cut back to a pinch of cayenne. Although if you make the sumac sauce, which is delicious, it really cuts the heat from the burgers. But I’m not really doing dairy these days and Mr. Picky didn’t want any sauce, so I only made half the recipe for the sauce and I thought it was the perfect amount. I also didn’t use traditional buns when I made these. Bread will just detract from the tastiness of these burgers! Instead we ate them on lettuce leaves with some chopped cucumbers and tomatoes, right up my alley. Of course if you want a more traditional burger, you can probably get 6 “standard” size patties and pile them onto buns with all your favorite fixings. Delish!
Author: Pamela, adapted from "Jerusalem" by Yotam Ottolenghi and Sami Tammy
Serves: 4-6 (Makes about 18 1½ ounce burgers or 12 2½ ounce burgers)
Ingredients
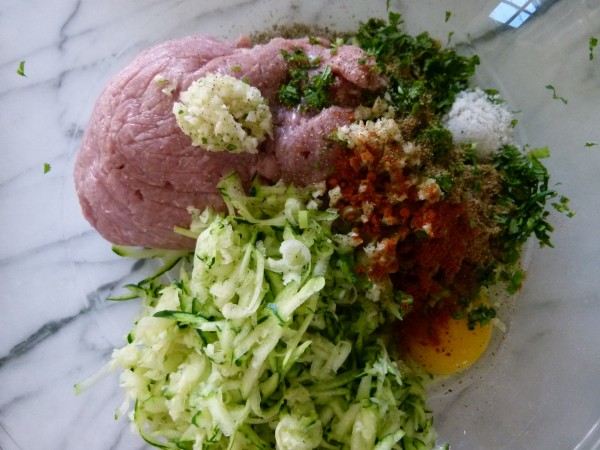
1 pound ground turkey (I like dark meat)
1 large zucchini, coarsely grated (scant 2 cups)
3 scallions, white and green parts, thinly sliced
1 large egg
2 Tablespoons chopped mint
2 Tablespoons chopped cilantro
2 cloves garlic, grated or minced
1 teaspoon ground cumin
1 teaspoon sea salt
½ teaspoon freshly ground black pepper
¼ teaspoon cayenne pepper (perfect for us, but the original recipe called for ½ teaspoon; you can use even less if you don’t want them spicy)
unrefined olive oil, coconut oil or ghee for searing
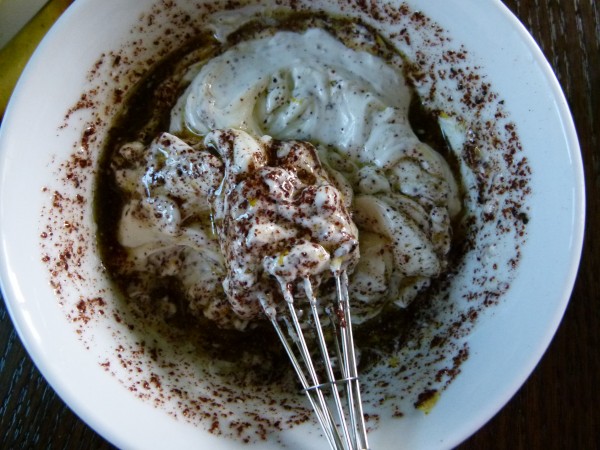
For the Sour Cream & Sumac Sauce:
Scant ⅓ cup full-fat Greek yogurt
Scant ¼ cup sour cream (or use all Greek yogurt)
½ teaspoon grated lemon zest
½ Tablespoon freshly squeezed lemon juice
½ small clove garlic, grated or minced
2 ¼ teaspoons unrefined, cold pressed, extra virgin olive oil
1 ½ teaspoons sumac
¼ teaspoon sea salt
a few grinds of freshly ground black pepper
Instructions
Make the sour cream and sumac sauce by placing all the ingredients in a small bowl. Stir well and set aside or chill until needed.
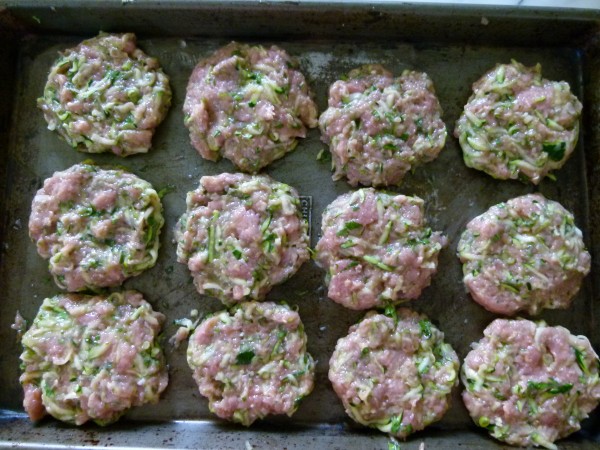
In a large bowl, combine all the ingredients for the patties except the olive oil. Mix gently with your hands and then shape into about 18 burgers, each weighing about 1 ½ ounces or 12 burgers, each weighing about 2 ½ ounces.
Pour enough oil into a large frying pan to form a layer about 1/16 inch thick on the pan bottom. Heat over medium heat until hot, then sear the patties in batches on both sides. Cook each batch for about 5-7 minutes on each side, adding oil as needed, until golden brown and cooked through.
Serve warm or at room temperature, with the sauce spooned over or on the side.
I love new beginnings and thankfully we have so many opportunities to start fresh. For me, the first day of school, beginning of summer, first day of spring and of course, January 1st are all times of the year when I take a minute to regroup, reflect and think about what I’d like to do better or differently. I even think of Sundays in the same way, a time to prepare for the week ahead. I am an obsessive list-maker so I start with my menu for the week, as well as errands that need to get done, calls to be made, projects that need to be completed, etc. But January 1st is a day when I think about bigger goals whether it’s being more physically active, learning how to meditate, eating dinner as a family 5 nights a week, or stepping away from the computer by 8:00 pm each night (sounds like a dream, yes?).
Most people I know make resolutions about food and their health or just take this time after holiday indulging to cleanse or go on a diet. I’ve never been able to restrict my daily fuel consumption to juices for a few days without becoming a complete raging you-know-what, so instead I try to return our diet to lighter, but always nourishing foods. It is still the middle of winter after all, and too many cold and raw foods may leave you feeling imbalanced and out of harmony with nature.
I recently spent the week with my family in NY and had a great time cooking with my mom and sisters. I think we made a soup or stew every single day for either lunch or dinner. Kids usually like soups, especially if you let them add fun foods on top like tortilla chips, popcorn or shredded cheese. Soups are also a great opportunity to get in some homemade stock which is such a great immune booster at the time of the year when we need it most. I’d like to share with you one of my kids’ favorites, Italian Wedding Soup. Honestly, I didn’t do my homework here and I can’t tell you the origins of the name, but you can call it whatever you like, including “chicken soup with baby meatballs” which is what Mr. Picky calls it. He ate three bowls of this the other day which makes me happier than getting into my skinny jeans. If you have a picky eater, you know what I’m talking about.
My grandma used to make a version of this with small pasta and escarole, but I think white beans are much more nutritious than pasta. The way I prepare this here is rather brothy, but I don’t see why you couldn’t add more vegetables or beans and make it heartier. Either way, whenever I eat this, it always feels like a big loving hug and I can’t think of a better way to start a new year.
¼ cup dry whole grain bread crumbs (purchased or just toast fresh breadcrumbs)
½ cup fresh bread crumbs (1 slice of bread, hard crusts removed, processed in food processor)
⅓ cup Pecorino or Parmigiano cheese
1 pound ground turkey, preferably dark meat
1 Tablespoon finely chopped parsley
1 clove garlic, finely chopped
¾ teaspoon sea salt
freshly ground black pepper to taste
FOR THE SOUP:
2 Tablespoons unrefined extra-virgin olive oil
1 medium yellow onion, diced
2 large carrots, diced
2 stalks celery, diced
10 cups chicken or turkey stock, preferably homemade
1 ½ cups cooked cannellini beans or 1 15-ounce can, drained and rinsed**
sea salt and freshly ground pepper to taste
10 ounces baby spinach, stems trimmed or 1 head escarole, chopped
2 Tablespoons freshly grated Pecorino or Parmigiano, plus extra for garnish
Instructions
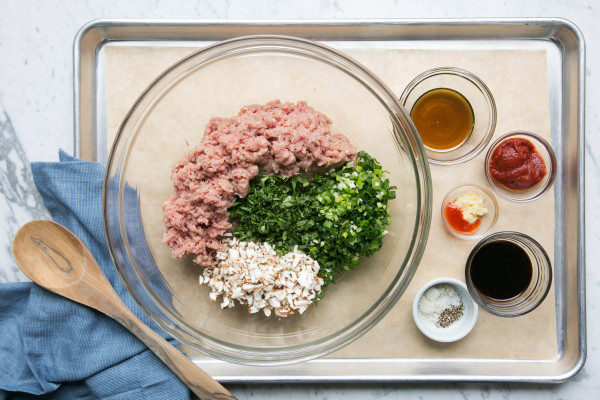
To make the meatballs, stir the first five ingredients in a bowl to blend. Add the remaining meatball ingredients and combine well with your hands. Using a half tablespoon or a mini-ice cream scooper, scoop the meat mixture into your hands and from them into 1-inch diameter meatballs. Set aside on a plate or baking sheet.
To make the soup, warm the olive oil in a large pot over medium heat. Add the onions, carrots and celery and sauté until the onions are translucent.
Add the broth, beans and 2 teaspoons salt. Bring to a boil and carefully add the meatballs (if using escarole, add this now too.) Lower to a simmer and cook until the meatballs are cooked through, about 8-10 minutes.
Stir in the spinach and grated cheese and cook until spinach is just wilted.
Taste for seasoning. Serve with additional grated cheese, if desired.
Notes
*To make this vegetarian, use your favorite vegetarian meatballs and vegetable broth.
**Traditionally served with ditalini or pastina. If you prefer to use pasta, add already cooked pasta to the soup and the end with the spinach. Another option is to add cooked Arborio rice or green peas.
Are we having fun yet?! Good, good. I have been running around the house yesterday and today like a busy bee, very excited that the big day is almost here. I’m taking a quick breather from the Thanksgiving marathon just to touch base and check-in with you all. Hope everything is going according to plan and that you’re enjoying the process. What I am not doing today, however, is sharing a Thanksgiving recipe on the day before Thanksgiving because I know you are all planners and that ship has sailed!
Instead, I thought I would give all you super organized and efficient people a great way to use up any leftover turkey you might have on Friday. I always make turkey stock and a simple turkey vegetable soup the day after. I have also given in to chicken pot pie or shepherd’s pie with turkey. But I also think it’s nice to make something on Friday that tastes NOTHING like the dinner you just spent a month thinking about! It’s actually one of my strategies for getting everyone excited to eat leftovers even the day after Thanksgiving.
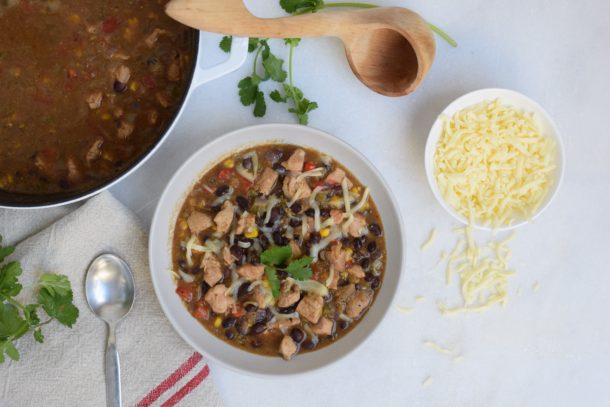
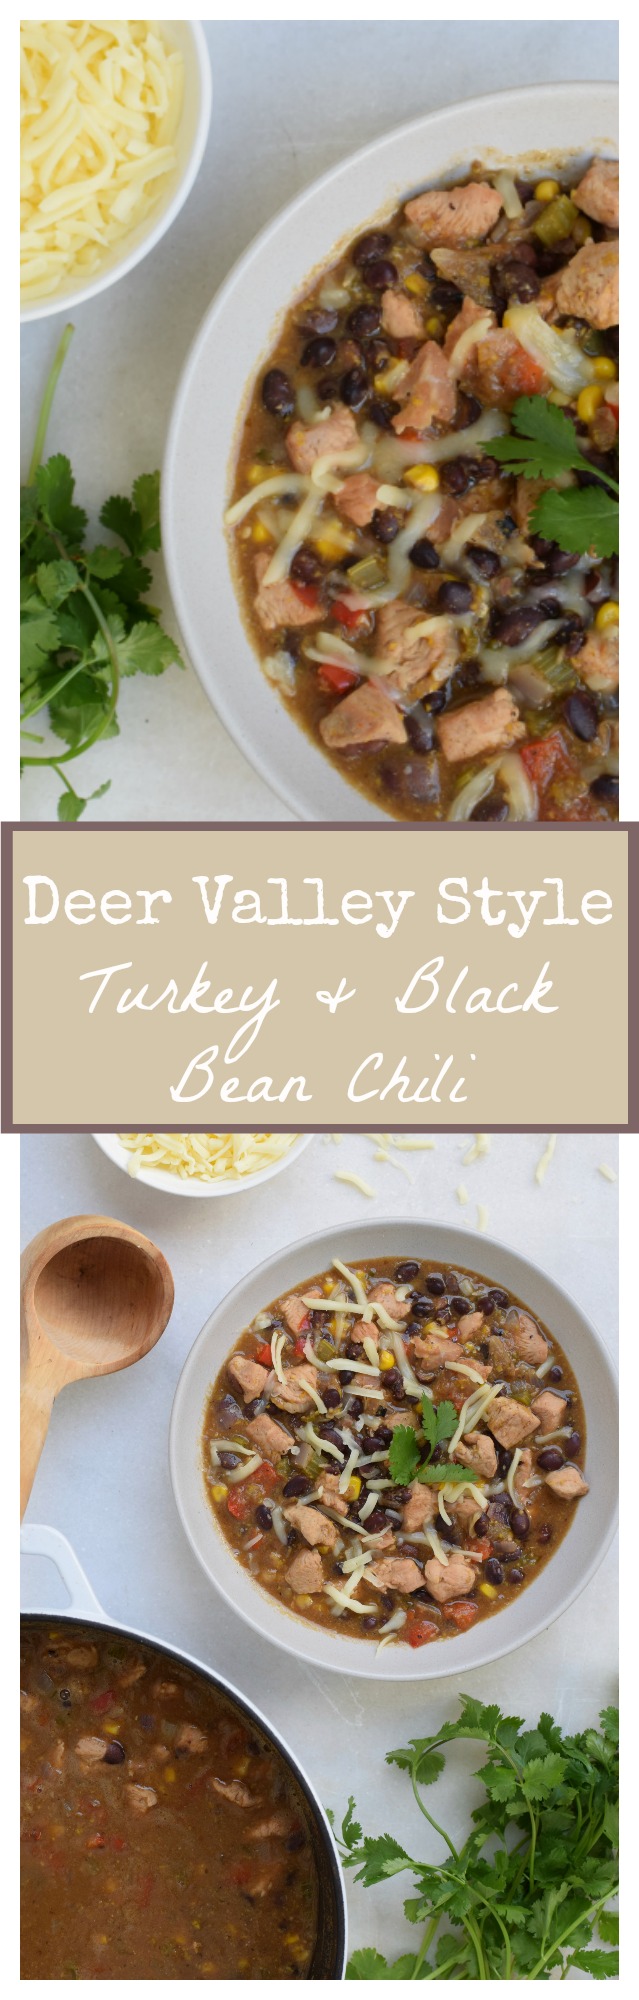
This recipe is inspired by the fabulous chili at the Deer Valley ski resort in Utah. I first skied Deer Valley in 1994 when my husband and I were engaged. He and his family have been going to the resort since it first opened over 30 years ago. It is a really special place and we are fortunate to be able to go there a couple times each year with the kids. Although I enjoy skiing and Deer Valley is absolutely stunning, I’m not super gung-ho about getting out there early and making the most of my day on the slopes. I’m really in it for the food. My favorite part about skiing is building up a good appetite and rewarding myself with a nice hearty lunch. I actually start thinking about this turkey chili when I sit down on the chair lift for the first run of the day!
Turkey chili is one of the few items that the resort serves every single day. I happen to notice the the lunchrooms also serve a roast turkey plate every single day. Hmmm, could it be the kitchen needed to find a way to use up yesterday’s roast turkey? Hmmm…. Anyway, we all love this chili because it’s lighter than a beef chili and a totally different take on the typical red, tomato-based ones that are so common. This one is lighter and tastes fresher, perhaps because of all the delicious vegetables. Regardless, all the signature shops on the mountain and many of the local grocery stores sell the special seasoning packet and the dried black beans in addition to the recipe so you can make it at home. For $7 or $8 plus the cost of the turkey, vegetables and stock, you can make this pot of deliciousness at home. Hmmm….$8 for 1/2 pound of dried beans and a few dried spices. It wasn’t long before I decided I need to figure out what the heck was in that seasoning packet!
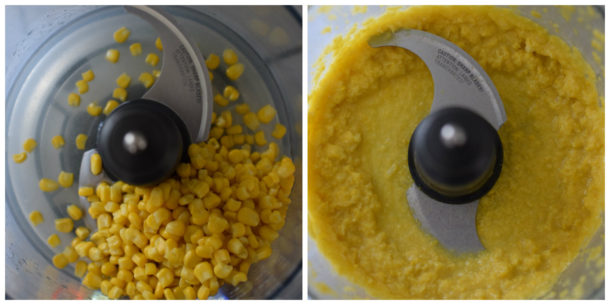
I can’t say this turkey chili is exactly like Deer Valley’s, but it’s close enough and I’m not sure my kids have noticed. For sure I use half the amount of butter than the recipe calls for and I omitted the leeks, which I think don’t make or break this chili. I also don’t use canned creamed corn, because ugh — canned and creamed and sugar don’t go with corn — so instead I just make a little corn puree. The only ingredient you may not have lying around is masa, which is ground dried corn that’s been treated with lime. It’s what corn tortillas and tamales are made from. I have to say, it does thicken up the chili and give it a fabulous Southwestern corn flavor. It’s also not an expensive ingredient, so I say definitely go for it.
Alrighty, dear readers, that’s all the time I have today. I am elbow-deep in sweet potatoes and butternut squash and my kids are starting to bicker about who gets to pick the music we listen to while we work. Ahhh, sounds like Thanksgiving! Hoping you all have a lovely holiday. xoxo
4 Tablespoons unsalted butter (you can use oil, but it won’t be as good) -- vegans can use organic Earth Balance
2 pounds boneless, skinless turkey breast, cut into 1-inch cubes or cooked turkey, cubed -- vegetarians and vegans can add 5 cups of additional vegetables and beans
1 red onion, chopped
1 cup chopped celery, about 3 stalks
1 sweet red bell pepper, chopped
1 jalapeno, seeded (or leave seeds for extra heat) and finely diced (optional)
2 cloves garlic, finely diced
¼ cup masa harina (more if you like a thick chili)
2 ½ Tablespoons ground cumin
2 Tablespoons ground coriander
2 teaspoons dried oregano
1 teaspoon cayenne (cut back if you don't like spicy)
2 Tablespoons maple sugar or natural cane sugar
2 teaspoons sea salt (double if you’re using unsalted stock)
freshly ground black pepper to taste
4 ½ cups of chicken or turkey stock, divided* -- vegans can use vegetable stock
5 cups or 3 15-ounce ounce cans cooked black beans (drained and rinsed)
Instructions
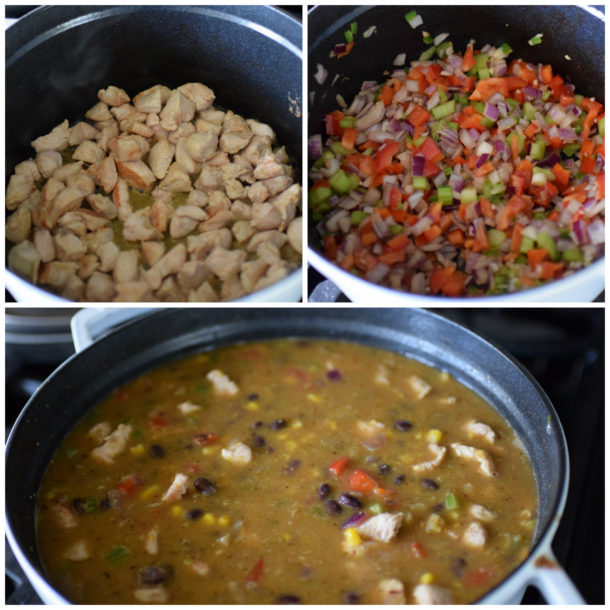
Melt butter in a large pot. If using raw turkey, add half the turkey and sauté until lightly browned. Remove with a slotted spoon to a bowl. Repeat with the remaining turkey. If using cooked turkey, do not saute in butter, but add in step 3.
Add the onion, pepper, celery, jalapeno, and garlic to the pot and sauté until tender, about 10 minutes.
Add the masa harina, spices, sugar, salt and pepper to the pot and cook, stirring frequently for 5 minutes. Return turkey and any accumulated juices back to the pot.
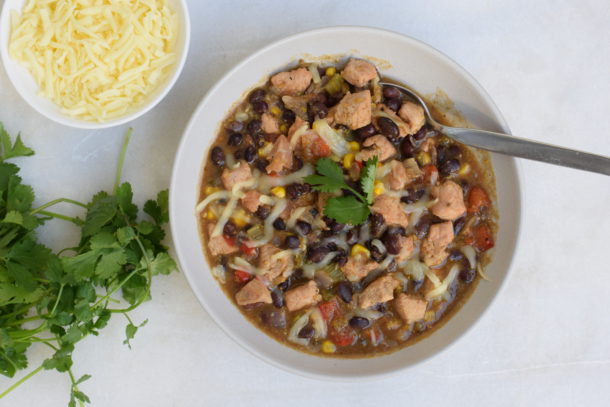
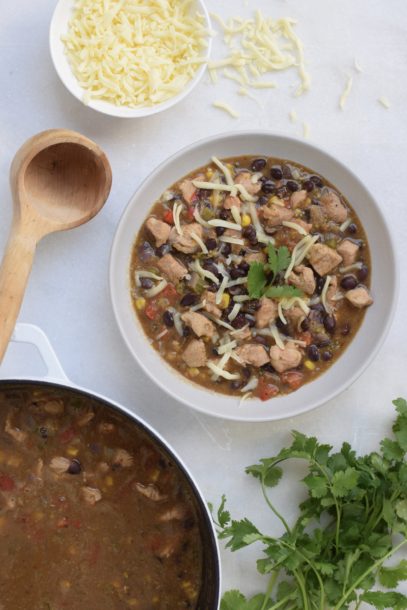
Add 4 cups stock, 1 cup corn and the beans to the pot. Take the remaining 1 ¼ cup of corn and puree with the remaining ½ cup stock in a food processor (a mini processor works too.) Add the pureed corn to the pot. Mix well and bring to boil over medium-high heat. Lower the heat to a simmer and cook, partially covered for 25 minutes. Serve with desired condiments (sour cream, cheese, minced onion, cilantro) or serve on top of a baked potato.
Notes
*If you only have stock in 32 oz. containers, no need to open a new one just for a ½ cup of stock. Puree corn in ½ cup water.
This is it, friends! We’re in the home stretch and I’ve got one last recipe to share before the big day. By now you know I get most excited about the side dishes, but in my classes I spend more time answering questions about turkey. What size should I order? What kind of turkey should I buy? Why does my turkey always turn out dry? How do I know when it’s done? What do you think about deep frying a turkey? (I don’t.) And so on. Even though I’ve been around this block quite a few times, and I’ll admit that I can get a little unnerved when it’s time to make the turkey. With so many factors at play here, e.g. size, temperature of the bird, variance in oven temperatures, and so many methods, e.g. dry brine, wet brine, kosher, breast side down, basting every 20 minutes, etc., it can be a little tricky knowing how to achieve the best result. I think most of my turkeys have turned out great. But I’ve had my mishaps and I have learned there’s always a solution, even when I forgot to close the door to my garage refrigerator and my turkeys were about 80 degrees the next morning. Total rookie move, and that was three years ago. (I didn’t cook them, by the way. I went to Whole Foods at 7:00 am and bought 2 brined turkeys. Problem solved!)
I’ve really only cooked two different versions of turkey, a whole roasted bird and a whole roasted breast. Like I said, I get more excited and have more fun with the side dishes! But traditionally since the turkey is the star of the show, I like to put my best foot forward and prepare a delicious bird. Normally I roast two whole turkeys on Thanksgiving, but a whole roasted breast can come in handy for a smaller crowd or to supplement a whole turkey if most of your guests prefer white meat. I’ve tested many methods for cooking a breast and this is hands-down my favorite. It is also a little different from how I cook a whole turkey. Whereas I prefer dry brining a whole turkey, I’ll go for the wet brine with a turkey breast which is much more easy to maneuver in a ziptop bag full of brining liquid. (Unlike the time in 2001 when my bag o’brine surrounding my 20-pound turkey exploded all over my kitchen floor. Cleaning that mess was definitely NOT on the schedule.) Either way, it is key to get that meat pre-seasoned with salt so it’s tasty and stays moist. It makes a huge difference!
I’ve made a dozen of these whole breasts over the last couple weeks and each one has turned out moist and flavorful. The best part is that with this straightforward method, there’s no constant basting and no worrying about wether or not the thigh meat will cook at the same rate as the breast. Funny, the question I received the most after classes this month was “why do we only make turkey on Thanksgiving?”
1 , 6-7 pound whole bone-in, skin-on turkey breast
2 Tablespoons fresh thyme leaves, chopped
2 teaspoons freshly ground black pepper
6 Tablespoons softened unsalted butter or unrefined, cold pressed, extra virgin olive oil
1 cup chicken or turkey stock or water (stock will allow you to make gravy)
Gravy
¼ cup white wine
5 Tablespoons all-purpose flour (or a gluten-free flour blend, such as King Arthur's Multi-purpose)
3- 3 ½ cups chicken or turkey stock, preferably homemade
Sea salt and freshly ground black pepper to taste
Instructions
Make the brine: In a medium saucepan over high heat, combine the salt, brown sugar, peppercorns and 1 quart water. Bring to a boil and continue boiling, stirring until the salt and sugar are dissolved, about 3 minutes. Remove from the heat and transfer to a large bowl. Stir the ice water into the brine and make sure this mixture is cool before proceeding, otherwise add more ice.
Place the brining bag in a large bowl or pot and transfer the turkey to the bag. Pour in the brine into the bag with additional ice, if needed. Seal the bag securely! Refrigerate the turkey for 12 to 18 hours.
About an hour before cooking, remove the turkey from the brine, rinse thoroughly with cold water and pat dry with paper towels.
Preheat the oven to 425 degrees. Combine the thyme, black pepper and butter in a small bowl. Loosen the skin from the breast and open it to make a pocket. Spread the butter mixture directly on the meat. Rub a little all over the skin. Place the turkey breast-side down in a v-shaped rack in a roasting pan. Add the stock. Roast the turkey for 30 minutes.
Reduce oven temperature to 325 degrees. Turn turkey breast-side up (I wear rubber gloves to flip) and tent with foil. Continue to roast until an instant read thermometer registers 160-165 degrees when inserted into the thickest part of the breast, about an additional 1 ½ to 2 hours, depending on the size of the turkey. The temperature of the meat is more important than how long the turkey is in the oven!
Remove from oven and keep covered with foil and allow to rest at room temperature at least 30 minutes. Carve and serve with pan juices or prepare gravy. Don't forget to save the carcass for making stock!
To make gravy: remove the turkey from the roasting pan, pour the pan drippings into a fat separator.
Pour the wine and the pan juices (that have been separated from the fat) back into the roasting pan, and place over medium heat. Bring to a boil and boil for 2-3 minutes, scraping the bottom of the pan with a wooden spoon to dislodge any brown bits. Strain into a bowl and set aside.
In a saucepan over medium heat, warm the reserved fat until it is bubbly. If you don't get 3-4 Tablespoons of fat from the drippings, add some olive oil. Add the flour and whisk rapidly to cook the flour.
Strain the mixture from the roasting pan into the saucepan and 2 cups of stock. Cook, while rapidly stirring, until smooth and thickened, 1-2 minutes. Add the remaining stock as needed to achieve desired consistency. Season to taste with salt and pepper.
Notes
Check out my video on how to make gravy and carve the breast at the bottom of this post!