Provençal Goat Cheese Gratin Recipe

If you don’t follow me on Facebook or Twitter, you might have been wondering this week if I fell off the face of the internet. Believe it or not, I went back to Europe! Except this time, I traveled solo and it was all work. Last Friday I left the land of sandy beaches for the gorgeous countryside of Southwest France where I met eight fabulous ladies, several of whom are my cooking class students, for a one-week culinary retreat.


I was invited to Saint Antonin Noble Val by a lovely American couple who visited the region several years ago and decided to stay for good. During the summer, Alisa and Bruce run Raison d’Art, an art camp for teenagers. But in the off-season, they host specialty retreats for adults at a restored 200 year-old farmhouse. When they asked me last winter if I would consider leading a culinary week in their area, it didn’t take long for me to say “OUI!”


I did miss you all very much and had every intention of blogging, but my students were keeping me very busy this week and away from the computer. We started out our days with invigorating hikes in the countryside followed by breakfast at the house. But we weren’t here to relax. Several mornings involved scouring the local open markets for ingredients to be used in our evening classes. Alisa and Bruce also took us around to visit many neighboring villages and local artisans, including a family-run vineyard and a goat farm, where we bought the most insanely delicious goat cheese. And everyday we adopted the French way by lingering for several hours over lunch, not that we had much of a choice – lunch is a serious time of day where ALL the shops and businesses except restaurants close from 12-2 (or longer) and no one is in a rush.


When we returned to the house at the end of each day, we all came together in the kitchen for our hands-on cooking classes. Normally my classes back home are demonstration, but this was such fun for me to cook side by side with all the students. I even tried a few things for the first time, such as potimaron, a delicious winter squash that I have yet to see in the states, as well as a few goat and sheep cheeses that that were so crazy good. A lot of love went into our cooking and we enjoyed eating a delicious dinner together every night. All the teaching wasn’t done by me, however. After dinner, the ladies taught me how to play Canasta, an addictive card game I have yet to win. Next time!

I wish I had been able to take more pictures while we were cooking and share some recipes along the way, but I was caught up in the energy of the kitchen and the lighting in 200 hundred year-old farmhouses isn’t all that fantastic either. One recipe that I was able to photograph a bit of was this Provencal Goat Cheese Gratin that we ate with herbed flatbreads which we made ourselves. Goat cheese is something I expected to see in France, but I had no idea how incredible it would be. Nor did I expect that I’d choose to eat it twice day!

The goat cheese we bought was so fresh and made from raw goat’s milk, which is closer in composition to human milk than cow’s milk. Raw dairy from goat, sheep or cow is also much easier for us to digest. Several of the students commented that they can’t eat cheese in the U.S., but the goat cheese in France was no problem. We enjoyed local goat cheese so many different ways – from super young and fresh to slightly aged. We had it rolled in herbs or shallots, baked warm in a salad or broiled on a tartine. By the end of the week, Bruce was making us goat cheese sampler plates to nosh on with fresh bread and local wine while we cooked. Verrrry nice!


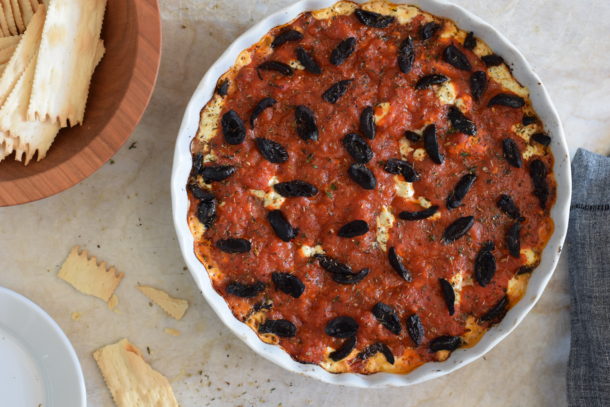
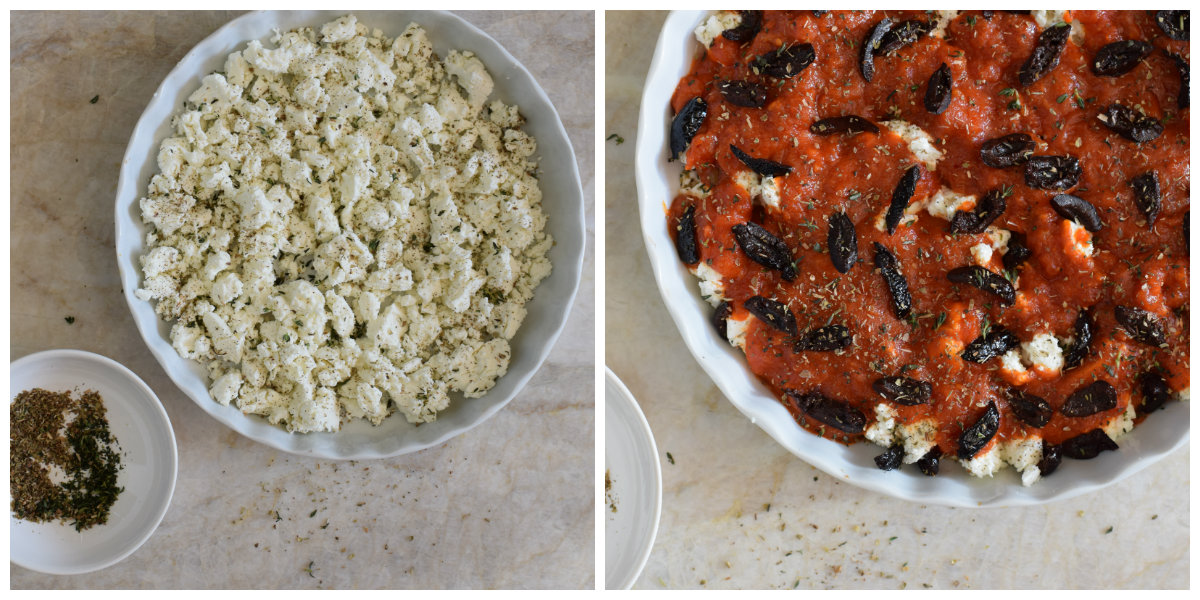
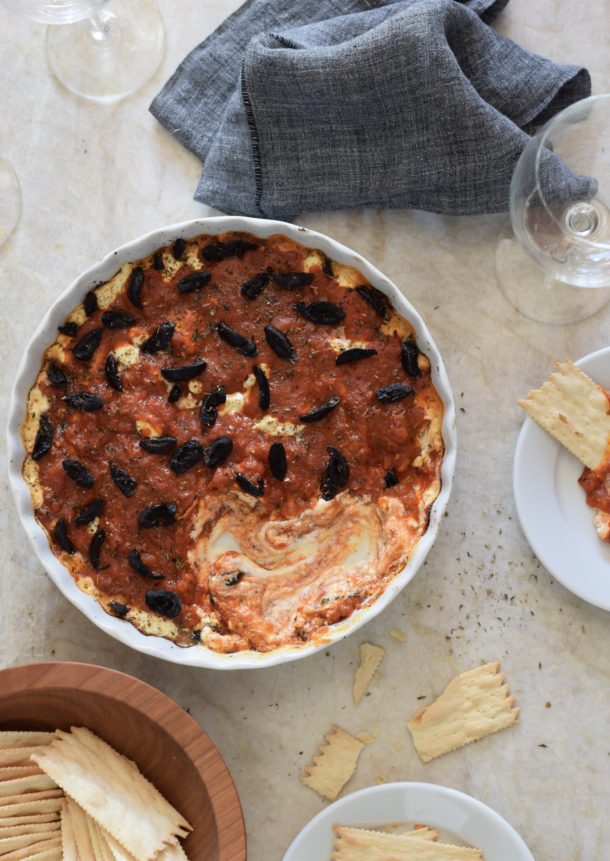
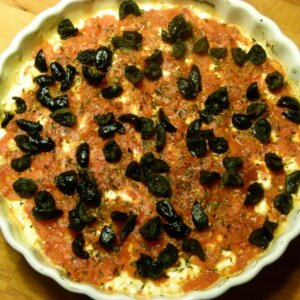
This baked gratin was a hit and it was super easy, too. We simply made a bed of crumbled fresh goat cheese on the bottom of a fluted baking dish and topped it with a quick homemade fresh tomato sauce, fresh thyme, oregano and sliced oil-cured olives. The gratin was broiled just until the goat cheese was warm. It’s the perfect thing to make as an hors d’oeuvre since it’s easy, delicious and can be assembled ahead and broiled just when your guests arrive. Although we baked our own flatbreads for scooping up the dip, I’ve also eaten this smeared on toast or fresh bread. I imagine it would also be amazing with eggs. Perhaps my next post will be titled, “How to Eat Your Way Through France Without Gaining Weight!”


Provençal Goat Cheese Gratin
Ingredients
- Sauce:*
- 6 medium tomatoes
- 2 Tablespoons olive oil
- 2 large cloves garlic minced
- sea salt and freshly ground black pepper
- Gratin:
- 10 ounces soft goat cheese rindless
- 2 teaspoons fresh thyme leaves minced
- 2 teaspoons fresh oregano leaves minced or a pinch of dried
- 20 black olives such as French Nyons, pitted and quartered
Instructions
- Bring a medium pot of water to a boil and turn off the heat. Score the bottom of the tomatoes and place in the water for 30 seconds. Remove the tomatoes with a slotted spoon. Peel the tomatoes, cut in half around the “equator,” remove the seeds and finely chop.
- Warm the oil in a large skillet over medium heat. Add the garlic and sauté for one minute. Add tomatoes, salt and pepper to taste and cook until slightly thickened, about 3-5 minutes.
- Preheat the broiler.
- Crumble the cheese on the bottom of a 10-inch round baking dish. Sprinkle with half of the herbs. Spoon just enough tomato sauce to evenly coat the cheese. Sprinkle with the olives and the remaining herbs.
- Place the baking dish under the broiler about 3 inches from the heat. Broil until the cheese is melted and fragrant, and the tomato sauce is sizzling, 2-3 minutes.
- Serve with crackers, toast, flatbread or fresh bread.