-
 1 × $27.00
Subtotal $27.00

Since my husband and I both have our own businesses, a big family vacation hasn’t been in the picture for many years. We never felt that we could take the time off from work or spend the money during uncertain economic times. But with Daughter #1 off to college (we hope) in two years, we decided it was now or never. So here we are in Amsterdam with two teenage girls and a picky 8-year-old on the first day of a 3 1/2 week European adventure. So far so good!

We are hoping to create some amazing memories, expose the kids to beautiful and interesting places and cultures, and enjoy some quality family bonding time. I purposely didn’t purchase any international phone plans for the girls so that they would focus on our experiences, but somehow they have already figured out how to call and text their friends for free. Oy. Regardless, I decided to let a lot go before we embarked on this trip, especially with regard to food. Sometimes you have to go with the flow and not create any unnecessary stress at a time when you are supposed to be relaxing. So I ate a cheese and tomato pancake in Amsterdam today and didn’t think about the white flour, non-organic butter and cheese I had inhaled. Until now. Just kidding! Totally ok with it.

What I did think about before I left was you dear people and how I still wanted to continue to inspire you with some healthful recipes to cook. I hope you know that I really do walk the talk and prepare dinner for my family at least five nights a week, sometimes six or seven. I especially like to make sure I cook the night before I leave for a trip so that we have a proper meal and a good night’s sleep. So I thought I would share with you what I made for our last dinner at home.

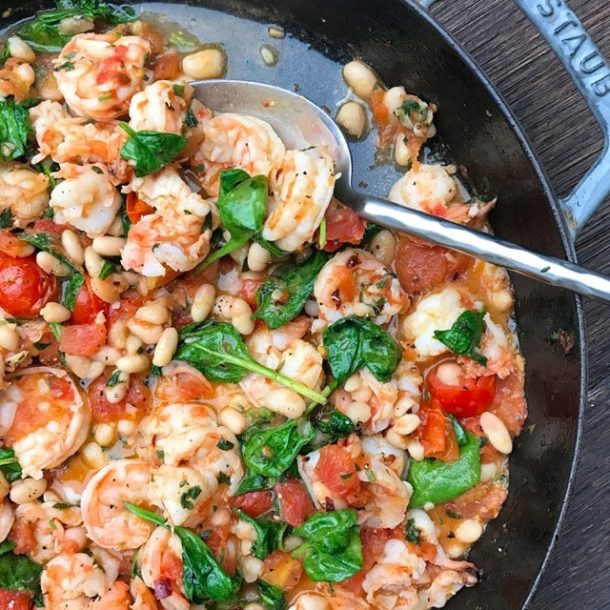
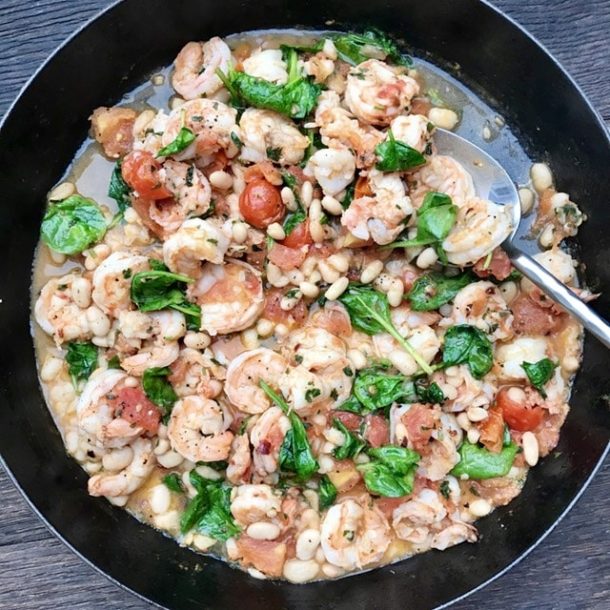
Granted, the night before we left for 3 1/2 weeks was a busy one and Pamela had veeeeery limited time. Shrimp with tomatoes, white beans and spinach was one of the only things I knew how to whip up in about 15 minutes and feel good about. Yes, you see white rice on the plate because my choice was either brown rice and not going out to buy Mr. Picky a rain jacket or white rice and keeping him dry on our trip but losing a little fiber. Mr. Picky always wins and I’m glad since we had a little sprinkle tonight as we walked back to our hotel after dinner.

With some grilled zucchini, this was otherwise the perfect meal. You know by now I could eat tomato-garlic-olive oil on anything and I love seafood. But I will admit right now that Daughter #2 is still boycotting anything that swims and I my husband doesn’t eat shellfish. The beauty of this dish is that you can easily adapt it for vegetarians or non-seafood eaters by eliminating the shrimp since the white beans add lots of good protein. So the two of them just picked out the shellfish. More for me! If you can find good quality wild shrimp, it’s actually a really good source of Vitamin D and iodine, and very low in fat.
I used Eden Organic canned white beans for this recipe and fresh tomatoes. The beans make the sauce nice and creamy so include something in the meal to soak up the juices. Besides rice, I think polenta or millet would be good choices too. You could also sub arugula for the spinach, but Mr. Picky just started eating spinach so I didn’t want to push my luck. Speaking of pushing it, it is now morning and everyone is waiting for me to head over to the Van Gogh Museum. Check out my daily posts on Twitter and Facebook for more European updates!


I had my first s’more on a girl scout camping trip when I was 12 and I thought it was genius. I loved that crispy graham cracker paired with a smooshy, slightly burnt marshmallow and the way the chocolate just started to melt a little. Do-it-yourself desserts are just so fun to put together too, especially when you’re with friends. I remember sitting around the campfire with the other girls trying to get the perfect golden toastiness on our marshmallows without actually setting them on fire and then giggling as we snuck an extra square of chocolate, because why the heck wouldn’t we?

I think s’mores have a way of bringing out the kid in all of us, so they are always a welcome dessert in the summer when we have other families over for dinner. Set your s’mores bar with homemade graham crackers and your family and friends will be like, “no you didn’t!” I certainly don’t have to tell you how to put together a s’more, but I thought I would share a fun twist on a classic.

Since I think marshmallows border on toxicity (I can be fun, really!), that was my target in creating a more healthful s’more. Basically, I grill firm, but ripe and speckled bananas and use those in place of the marshmallows. You still get something sweet, something soft and something that tastes amazing with chocolate and graham crackers. The point of grilling them is just to get them warm enough so they melt the chocolate a little bit, so watch out for chocolate dripping down your chin. With all the fun, new chocolates out there, I think it would be amazing to put out some interesting ones for people to use. Picture a grilled banana s’more paired with caramel and sea salt chocolate or one laced with hot pepper or bits of lavender. Did I have you at “grilled?”


There are some things that I just don’t think are worth making from scratch (like puff pastry) and then there are some things I can’t believe can be made from scratch and taste good, like graham crackers. Wait, not just “good,” but amazing! Who doesn’t remember eating graham crackers as a child? But you always got them out of a box, right? Not anymore. Be prepared to have your life changed!


Even though my mom didn’t allow many over-the-top sweets in the house, graham crackers sometimes made the cut. Whereas Ho-Ho’s and Twinkies were definitely taboo, graham crackers seemed relatively benign and not overly sugary. My mom bought Honeymaid, which we used to smear with peanut butter or cream cheese or just dunk in milk. My kids would like to do the same, but I rarely buy packaged cookies. First of all, I think that homemade always beats store-bought. And it’s hard to find treats made with unrefined ingredients and without lots of scary chemicals.


Last June and July my summer intern Hannah and I went graham cracker crazy, making a new batch or two every week. I finally settled on this recipe here which my friend Cheryl helped me with. These graham crackers have just the right amount of sweetness, which makes them a perfect snack for your little guys and for s’mores. I like using a combination of whole spelt or wheat flour and brown rice flour. Rice flour is very light and has a grittiness that I think is ideal for graham crackers. If you don’t have it, just use all spelt or wheat flour and they will still be delicious. But I think the key with graham crackers is to ask yourself how perfect you want them to look. I so admire people who have the patience for making things look like they popped out of Martha Stewart Living because I don’t. I will admit, I did my best with the batch I photographed for this post, but normally I leave my ruler in the drawer. If you are giving these as a gift, using them for s’mores, or offering them to a large group of children, you may want the crackers to be as uniformly sized as possible so it might be worth the effort to measure out the dough and where you cut your lines.


This recipe is otherwise crazy simple, but makes a great impression. Last summer my go-to dessert for entertaining was a s’mores bar with these homemade graham crackers which Mr. Picky helped me bake on more than one occasion. To me, having my kids helping me in the kitchen is the best part of making your favorite treats from scratch. I also love that you can put into them what you want. All organic ingredients? No problem! Half the sugar of their traditional counterparts? Go for it! Lots and lots of love? Always!


I love to bake healthful treats for my family and typically my go-to flour is derived from wheat. Because they are unrefined and have a nice, earthy flavor, I rely a lot on whole wheat pastry flour as well as white whole wheat and traditional whole wheat in my recipes. Wheat flours have a considerable amount of gluten, a protein which helps provide your baked good with structure and elasticity. But there is a whole world of other whole grain flours which can be very satisfying to work with.
Spelt flour, in particular, is one I am using more and more. Spelt berries, which are milled into spelt flour, are a very ancient grain related to wheat berries. In fact, spelt is older than many wheat hybrids. According to “The World’s Healthiest Foods,” spelt offers a broader spectrum of nutrients compared to many of its more inbred cousins in the Triticum (wheat) family. It is an excellent source of manganese, and a good source of protein, copper, and zinc. Another significant benefit is that some people who are sensitive to wheat can tolerate spelt. Spelt is not gluten-free, however, so if you are gluten-intolerant or if you have Celiac disease, spelt is not for you.
Spelt has a much lower gluten content than wheat, but it has enough to keep your baked goods from falling apart. Less gluten can be beneficial for a number of reasons. Spelt ends up being much easier to digest than wheat and produces a more tender crumb (gluten can make things tough.) Tenderness is something I want in muffins, quick breads, pancakes and pie crusts, so spelt flour is great to use in these recipes. Spelt flour is also really easy to work with, most of the time I just substitute it one-for-one with wheat flour. Technically spelt flour is more water soluble than wheat flour, which means you will need to use less liquid in a recipe. I’m really too lazy to calculate any conversions and I haven’t had any issues thus far.

Another reason I love spelt flour, especially whole spelt flour, is that it tastes nutty, but almost sweet. Because I don’t use a lot of sweeteners in my baking, this can be a welcome advantage. Sometimes whole wheat flours can have a slight bitter aftertaste, especially in recipes where there is no sugar to provide some balance. But the “sweetness” in spelt still works in savory recipes like tart crusts without competing with the other flavors.
Keep in mind that spelt flour is sold like wheat flour, refined, unrefined and/or sprouted. I tend to stick with whole (unrefined) spelt flour for almost all my baking, but I do prefer pastry crusts made with white (refined) spelt flour. I was able to find a sprouted spelt flour in NY and made the most delicious pancakes with it. You can also buy spelt berries which are cooked like other whole grains such as barley or rice. I tend to use spelt, farro and barley very interchangeably. Mr. Picky’s favorite bread for toast is Rudi’s spelt bread which contains no seeds of any kind, thank you. We also love their whole spelt tortillas. Very recently, I have been making spelt pasta more often than any other kind, and everyone loves it! I would love to hear from you if you have experimented with spelt or have any favorite spelt products. In the meantime, a good place to start is with my recipes for Whole Grain Buttermilk Pancakes (the ones pictured above were Mr. Picky’s with mini-chocolate chips), Carrot Cake, Zucchini-Blueberry Bread, and last summer’s Stone Fruit Crostata (pictured below). You should also check out two of my favorite cookbooks which contain some fabulous spelt recipes, “Good to the Grain,” by Kim Boyce and “Ancient Grains for Modern Meals,” by Maria Speck. Enjoy!


A close second to my obsession with summer tomatoes is my love for fresh locally-grown summer corn. I think I buy it twice a week from the end of June to October. I love corn’s juicy, grassy sweetness. I love how easy it is to make it taste good (if it’s fresh) and how it goes so beautifully with all the other summer produce. A major bonus is that everyone in my family loves corn. Actually, not true. My father grew up on a farm in Italy where they fed the pigs corn and he still associates it with animal feed. Pity.

Given all the above, I have prepared A LOT of corn for summer dinner guests and I have made an unscientific observation. Adults are not fond of eating corn-on-the-cob in front of people they are not related to. Guilty! I have served both boiled and grilled corn on the cob to guests, as well as sauteed corn kernels or corn off the cob in a salad, and corn cut off the cob is always more popular. I think that sometimes eating an ear of corn is awkward or messy. Perhaps it gets stuck in your teeth or stays on your check and no one tells you until dessert is served. So I have a policy of making corn on the cob for my kids and my husband and me, but always cut off the cob for guests.


One very popular way to eat corn in Southern California is Grilled Mexican Corn on the Cob. Typically the ear of corn is grilled in the husk and then the kernels (still on the cob) are slathered with mayonnaise, chili powder and/or cayenne pepper, a squeeze of fresh lime and sprinkled with salty, crumbly Cotija cheese. Utterly delicious, albeit messy and something I would never eat in front of you, especially if I hope to make a good impression and keep my shirt from the dry cleaners. But I figured the same flavors would translate to to cut corn kernels. It worked! The only thing I leave out is the mayonnaise which I think can take over and detract from the corn. But I’m sure many of you would challenge me on that one. I am crazy about grilling corn in the husks, though. Have you ever smelled burning corn husks? It’s fantastic. I really think it adds a delicious smokiness to the final dish.


Definitely try this recipe if you’re looking for something a little different or if you love the taste of grilled street corn, as some people call it, but you’d still like to look like a lady/gentleman while you eat. I served this the other night with grilled fish tacos and I ate it both as a side dish as well as a condiment on my taco. Delicious! If you can’t get enough of corn right now, try my recipe for my favorite salad, Chopped Grilled Vegetable Salad, as well as Southwestern Quinoa Salad, or Grilled Corn and Black Bean Salsa. Of course there are thousands of recipes you can search on Foodily, where I was just asked to be a Tastemaker. Fun! I get to highlight awesome recipes that I find all over the web. Check it out!


Is it sweltering where you are? I would trade places with you. As I write this it is raining and cold where I live in Southern California. At the beach. I want my money back. Daughter #1, however, is in Connecticut with no air conditioning, and soon to be in Washington, DC where the temperature is expected to hit 97 on Tuesday and Wednesday and so on. I’m jealous. I love hot weather. More than that, I love eating hot weather food in hot weather.

Did you know that all food has a thermal nature? It has the power to warm you up or cool you down. And that’s why nature gives us tomatoes and cucumbers in the summer and not the winter, because they are cooling and hydrating and the perfect antidote to beat the heat. You know how obsessed I am with summer tomatoes and since they arrived on the scene a few weeks ago, I haven’t let up. (I promise, however, that not every recipe this summer will involve a tomato.) Even though the temperature is a perfectly mellow 70 degrees where I am, it hasn’t stopped me from making salads like Fattoush, one of my favorites. I wish I could tell you with certainty if Fattoush is Lebanese or Syrian or Israeli, but I have no interest in starting a cold war on my blog so shall we just say it’s Middle Eastern? My only goal is to convince you to make this salad because it’s delicious, addictive and good for you right about now.

Fattoush reminds me of Panzanella, the Italian bread and tomato salad which I happen to be teaching this month in my classes, although for sure it has its differences. Basic Fattoush is diced up tomatoes, cucumbers, onions, parsley, and fried or toasted pita bread with a lemon juice-olive oil dressing. There is also a special ingredient which I fell in love with only a few years ago called sumac. Stay in your seats, it’s not the poison kind, but this sour, citrusy berry that is dried, ground up and adds a puckery, tartness to the salad as well as a vibrant dusting of red. (Are you thinking anthocyanins and antioxidants like I am? Yes!) It’s very easy to find online or in Middle Eastern markets, spices shops or at some local natural foods stores. You will want to get some! Now that’s just the basic. You can add romaine lettuce, radishes, purslane (a juicy green that is hard to come by), and/or mint. It’s hard to go wrong.

I have eaten this salad at Middle Eastern restaurants and been served a little scoop of it on the plate as if it’s an after thought. Hmph! Why is that? I could make a whole meal of Fattoush with a handful of chickpeas thrown in, especially if I don’t feel like turning on the oven or standing in front of a hot grill. I have an Israeli friend who consumes this for breakfast and why not? However you decide to eat this, you will surely be embracing summer and be in harmony with nature. Enjoy!


This post is part of a series I am doing for Positively Positive.
Since we are all such unique individuals, foods that are health-supportive for some may actually work against or be an allergen for others. In the field of nutrition, this apparent contradiction has sparked lively debate and controversy, most recently when the FDA declared salt our enemy.
The government’s solution to reclaim our health is to wage war against salt.
Really? Sure, there is a small percentage of the population that is sensitive to salt, but that’s not the case for everyone. Furthermore, the evidence to support the notion that “high” levels of salt intake can lead to hypertension and premature death is decidedly weak. In fact, there are scientific studies proving that too much salt restriction can actually be harmful to our health.
We should understand what the real problem is and also what need not cause us concern.
Click here to read the rest of the post on Positively Positive’s website.


Ok, my kitchen is more or less back together except for a few cabinets, and I couldn’t be happier. Never mind that every other room in the house has its contents spilled out into random hallways or in the living room which we never use. It doesn’t even bother me that we are all still sharing one bathroom … I can cook again! Takeout everyday was putting me in a cranky mood — and when Mama Bear ain’t happy, no one’s happy! I think the novelty of eating out even wore off with Mr. Picky, although my husband keeps trying to remind me that I was “only” inconvenienced for five days. Talk to the hand, dude. Listen, I had to make a fruit crisp on the front porch Wednesday.

I did a great big shop at the grocery store and the farmer’s market on Tuesday and I was giddy with all the possibilities. I think one of the reasons I get so excited when summer produce hits the stands is that I wait for it all year long. Local peaches, corn and tomatoes are special! I especially have a thing for summer tomatoes, and I’m hoping you do too, since there are lots of tomato recipes in the pipeline. You know that once you’ve had a truly vine-ripened, sun-kissed tomato, you can never go back to those hard, tasteless orbs from the supermarket that have nothing to do with a real summer tomato. I remember as child going into my father’s garden in the summer with a salt shaker to eat tomatoes with salt right off the vine. Heaven.

Tomatoes make this girl’s heart grow fonder when they are paired with basil. This classic combination is a favorite of mine and one I use in so many different dishes. Just this past week, I posted recipes for pasta with cherry tomato sauce, as well as a frittata with garden vegetables, including tomato and basil. In last summer’s classes, I taught pasta alla checca, which is a raw tomato and basil sauce. Of course, the traditional salad on every Italian menu is a Caprese, which is nothing more than alternating slices of good quality tomato and mozzarella cheese with basil, olive oil and salt. Several years ago I was in Italy with my family visiting a friend of my father’s on the Amalfi Coast. We had all eaten a large lunch that day and weren’t really hungry for a full dinner, so our hosts pulled tomatoes and basil from the garden, freshly made local mozzarella from the fridge, local olive oil and olives, and some bread from a bakery down the road. I know it may not sound like much, but every ingredient was the best I had ever had, and to this day I consider that meal one of my favorites ever.


One of my go-to side dishes in the summer is simply grilled or roasted eggplant slices. Occasionally I’ll add some mint and feta, but a few years ago I taught this recipe, which is essentially eggplant-meets-Caprese. Eggplant is such a sponge and loves all that juicy-tomato-and-olive-oil-goodness. I don’t eat very much dairy, so instead of big slices of cheese, I have added a few cubes mixed in with the tomato and basil mixture. In this photograph I used fresh buffalo mozzarella, which is a little milkier and lighter tasting, but you can use whatever cheese you’ve got, including burrata, feta or goat cheese — or none at all! I usually try to teach my girls to eat like civilized ladies, but I have found myself many a time eating this with my hands as an eggplant taco. Like the other night when we couldn’t find the flatware. It’s probably still in the living room…
