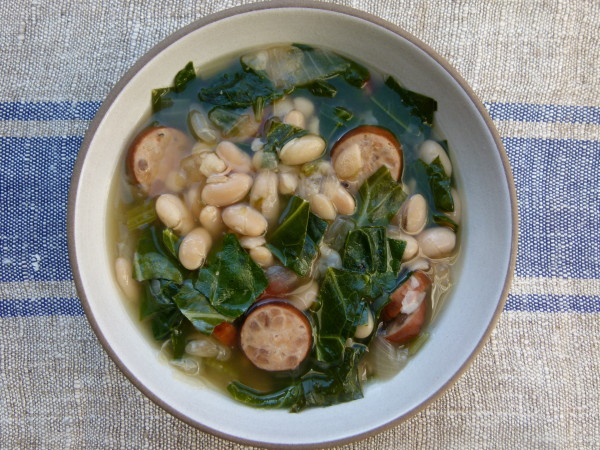
I know so many of you are fighting cold weather and stuffy noses, so I thought I would share with you a new favorite soup in our house. My friend and student Lynette gave me the recipe because it has been popular with her family. Nothing beats a warm and hearty bowl of soup when you’re not feeling 100% and this one is particularly fantastic since you place everything into a slow cooker in the morning and it’s ready by dinnertime (also great when you’re not feeling 100%.)
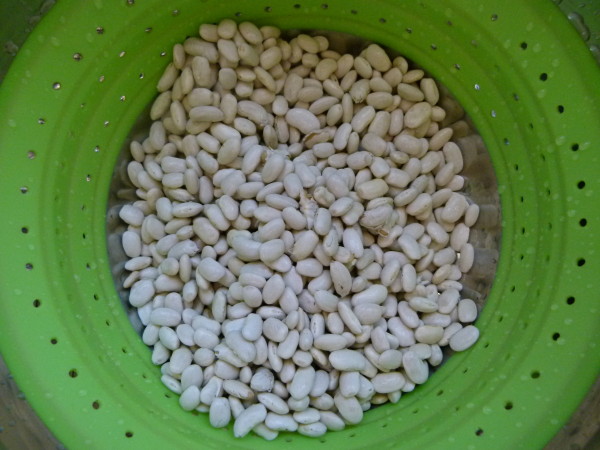
People in my classes have been begging me for more slow cooker recipes, especially the dump-and-start kind. If you don’t have a slow cooker, do not fear. I will give you directions for a stovetop version. Whereas I normally prefer to saute aromatic vegetables before using them in a soup or stew since it adds more flavor, in this recipe the extra step doesn’t make much difference. Lucky us! Although the original recipe doesn’t call for it, I prefer to soak my beans to neutralize the phytic acid, a hard-to-digest anti-nutritient. Soaking is optional though, as the slow cooker will easily cook the beans to a creamy softness without soaking.
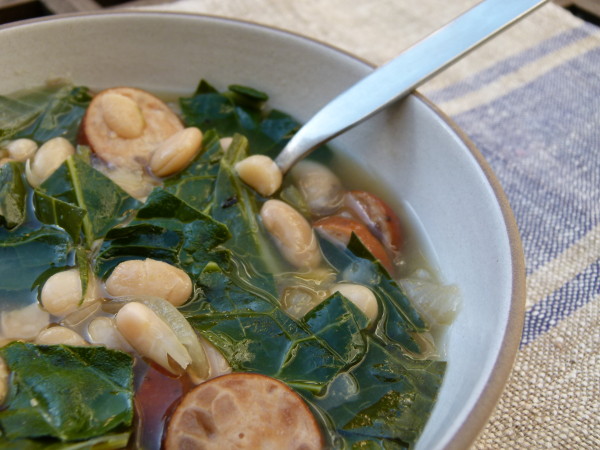
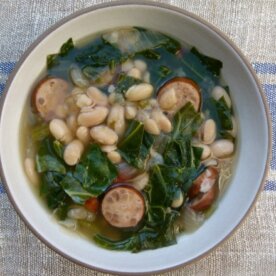
This was a perfect entree soup for dinner paired with corn muffins and a green salad. More importantly, all my kids, including the picky one, just loved it. I know some people can’t get into the idea of “just” soup for dinner. But I promise this is a hearty one. Beans are loaded with protein and fiber which both help keep you full for longer. There is also a small amount of sausage in the soup (I used chicken sausage) which you can omit if you’re vegetarian or vegan or use your favorite vegan sausage to add a little smokiness to the soup. For a more affordable dish, you can use a small ham hock for flavor instead of the sausage.
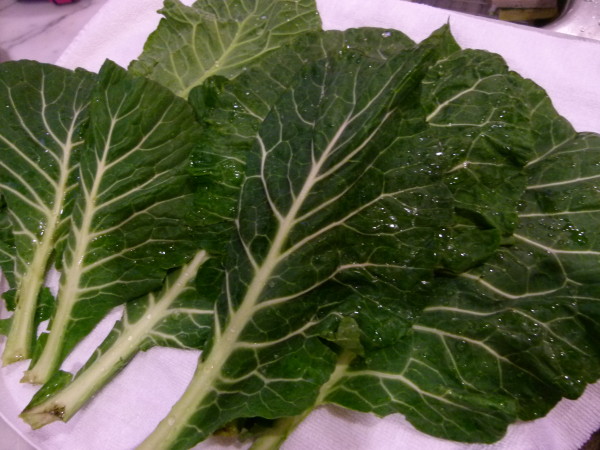
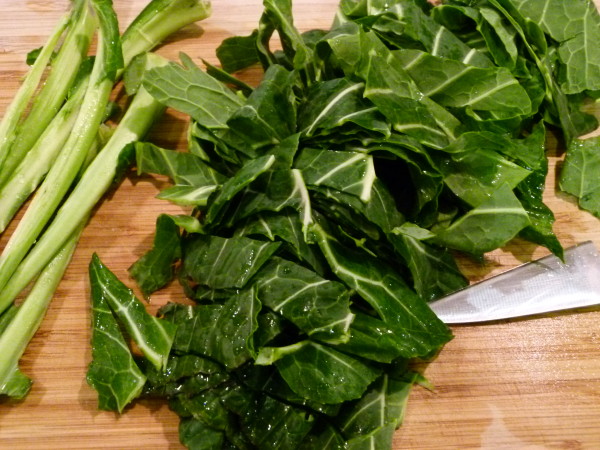
In my opinion everything is better, more alkalizing and more nutritious with dark leafy greens. I hope you are finding new and delicious ways to incorporate this food group into your diet. Kale seems to be the “it” leafy green of the moment, that it’s nice to see another leafy green in a recipe. Collard greens are used in this soup, but I’m sure cabbage or kale would be equally delicious here. This recipe is a keeper no matter how you make it!
Slow Cooker White Bean Soup with Sausage and Collard Greens
adapted from my friend Lynette who adapted it from Real Simple Magazine
1Tablespoonapple cider vinegar or red wine vinegar
sea salt and black pepper to tastesalt will vary based on what stock or sausage you use
unrefined olive oil for drizzlingoptional
Instructions
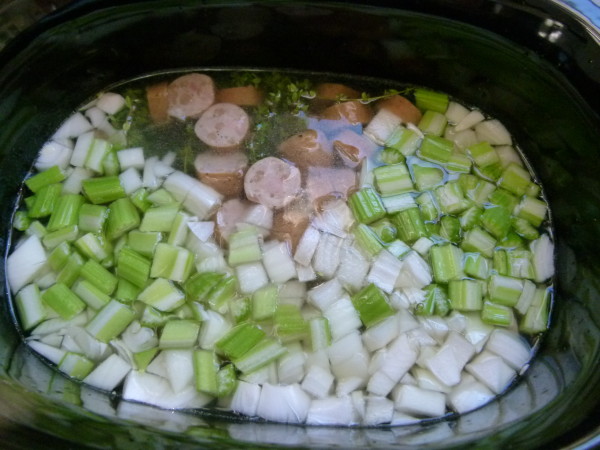
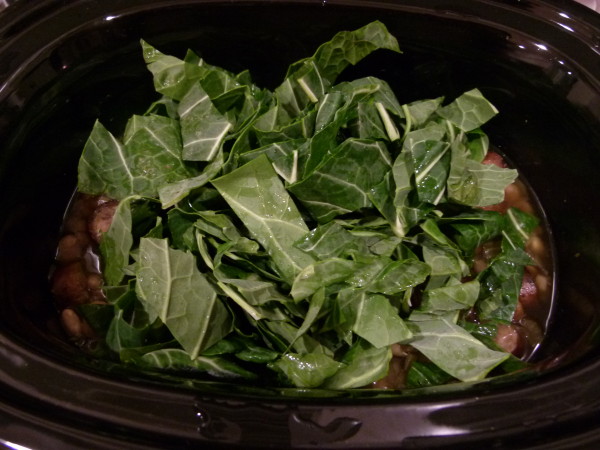
In a 4-6 quart slow cooker (mine is a 6.5 quart and it turned out great), combine the beans, sausage, onion, celery, and thyme. Add the broth and stir to combine.
Cover and cook until the beans are tender, on LOW for 7 to 8 hours or HIGH for 4-5 hours.
minutes before serving, remove and discard the thyme sprigs and add the collard greens. Cover and cook until the greens are tender, about 15 to 20 minutes. Stir in the vinegar and salt and pepper to taste.
Drizzle with olive oil, if desired.
Notes
*You don’t have to soak the beans if you don’t have time, but it makes them more digestible. You do need to soak them for the stovetop version.For a stovetop version, sauté onions and celery in 2 Tablespoons olive oil. Add soaked, dried beans, sausage, thyme and stock. Bring to a boil, lower to a simmer and cook covered until beans are tender, bout 60-90 minutes. Add greens and cook until tender, about 10-15 minutes. Stir in vinegar and season with salt and pepper to taste. Drizzle with olive oil if desired.
I love new beginnings and thankfully we have so many opportunities to start fresh. For me, the first day of school, beginning of summer, first day of spring and of course, January 1st are all times of the year when I take a minute to regroup, reflect and think about what I’d like to do better or differently. I even think of Sundays in the same way, a time to prepare for the week ahead. I am an obsessive list-maker so I start with my menu for the week, as well as errands that need to get done, calls to be made, projects that need to be completed, etc. But January 1st is a day when I think about bigger goals whether it’s being more physically active, learning how to meditate, eating dinner as a family 5 nights a week, or stepping away from the computer by 8:00 pm each night (sounds like a dream, yes?).
Most people I know make resolutions about food and their health or just take this time after holiday indulging to cleanse or go on a diet. I’ve never been able to restrict my daily fuel consumption to juices for a few days without becoming a complete raging you-know-what, so instead I try to return our diet to lighter, but always nourishing foods. It is still the middle of winter after all, and too many cold and raw foods may leave you feeling imbalanced and out of harmony with nature.
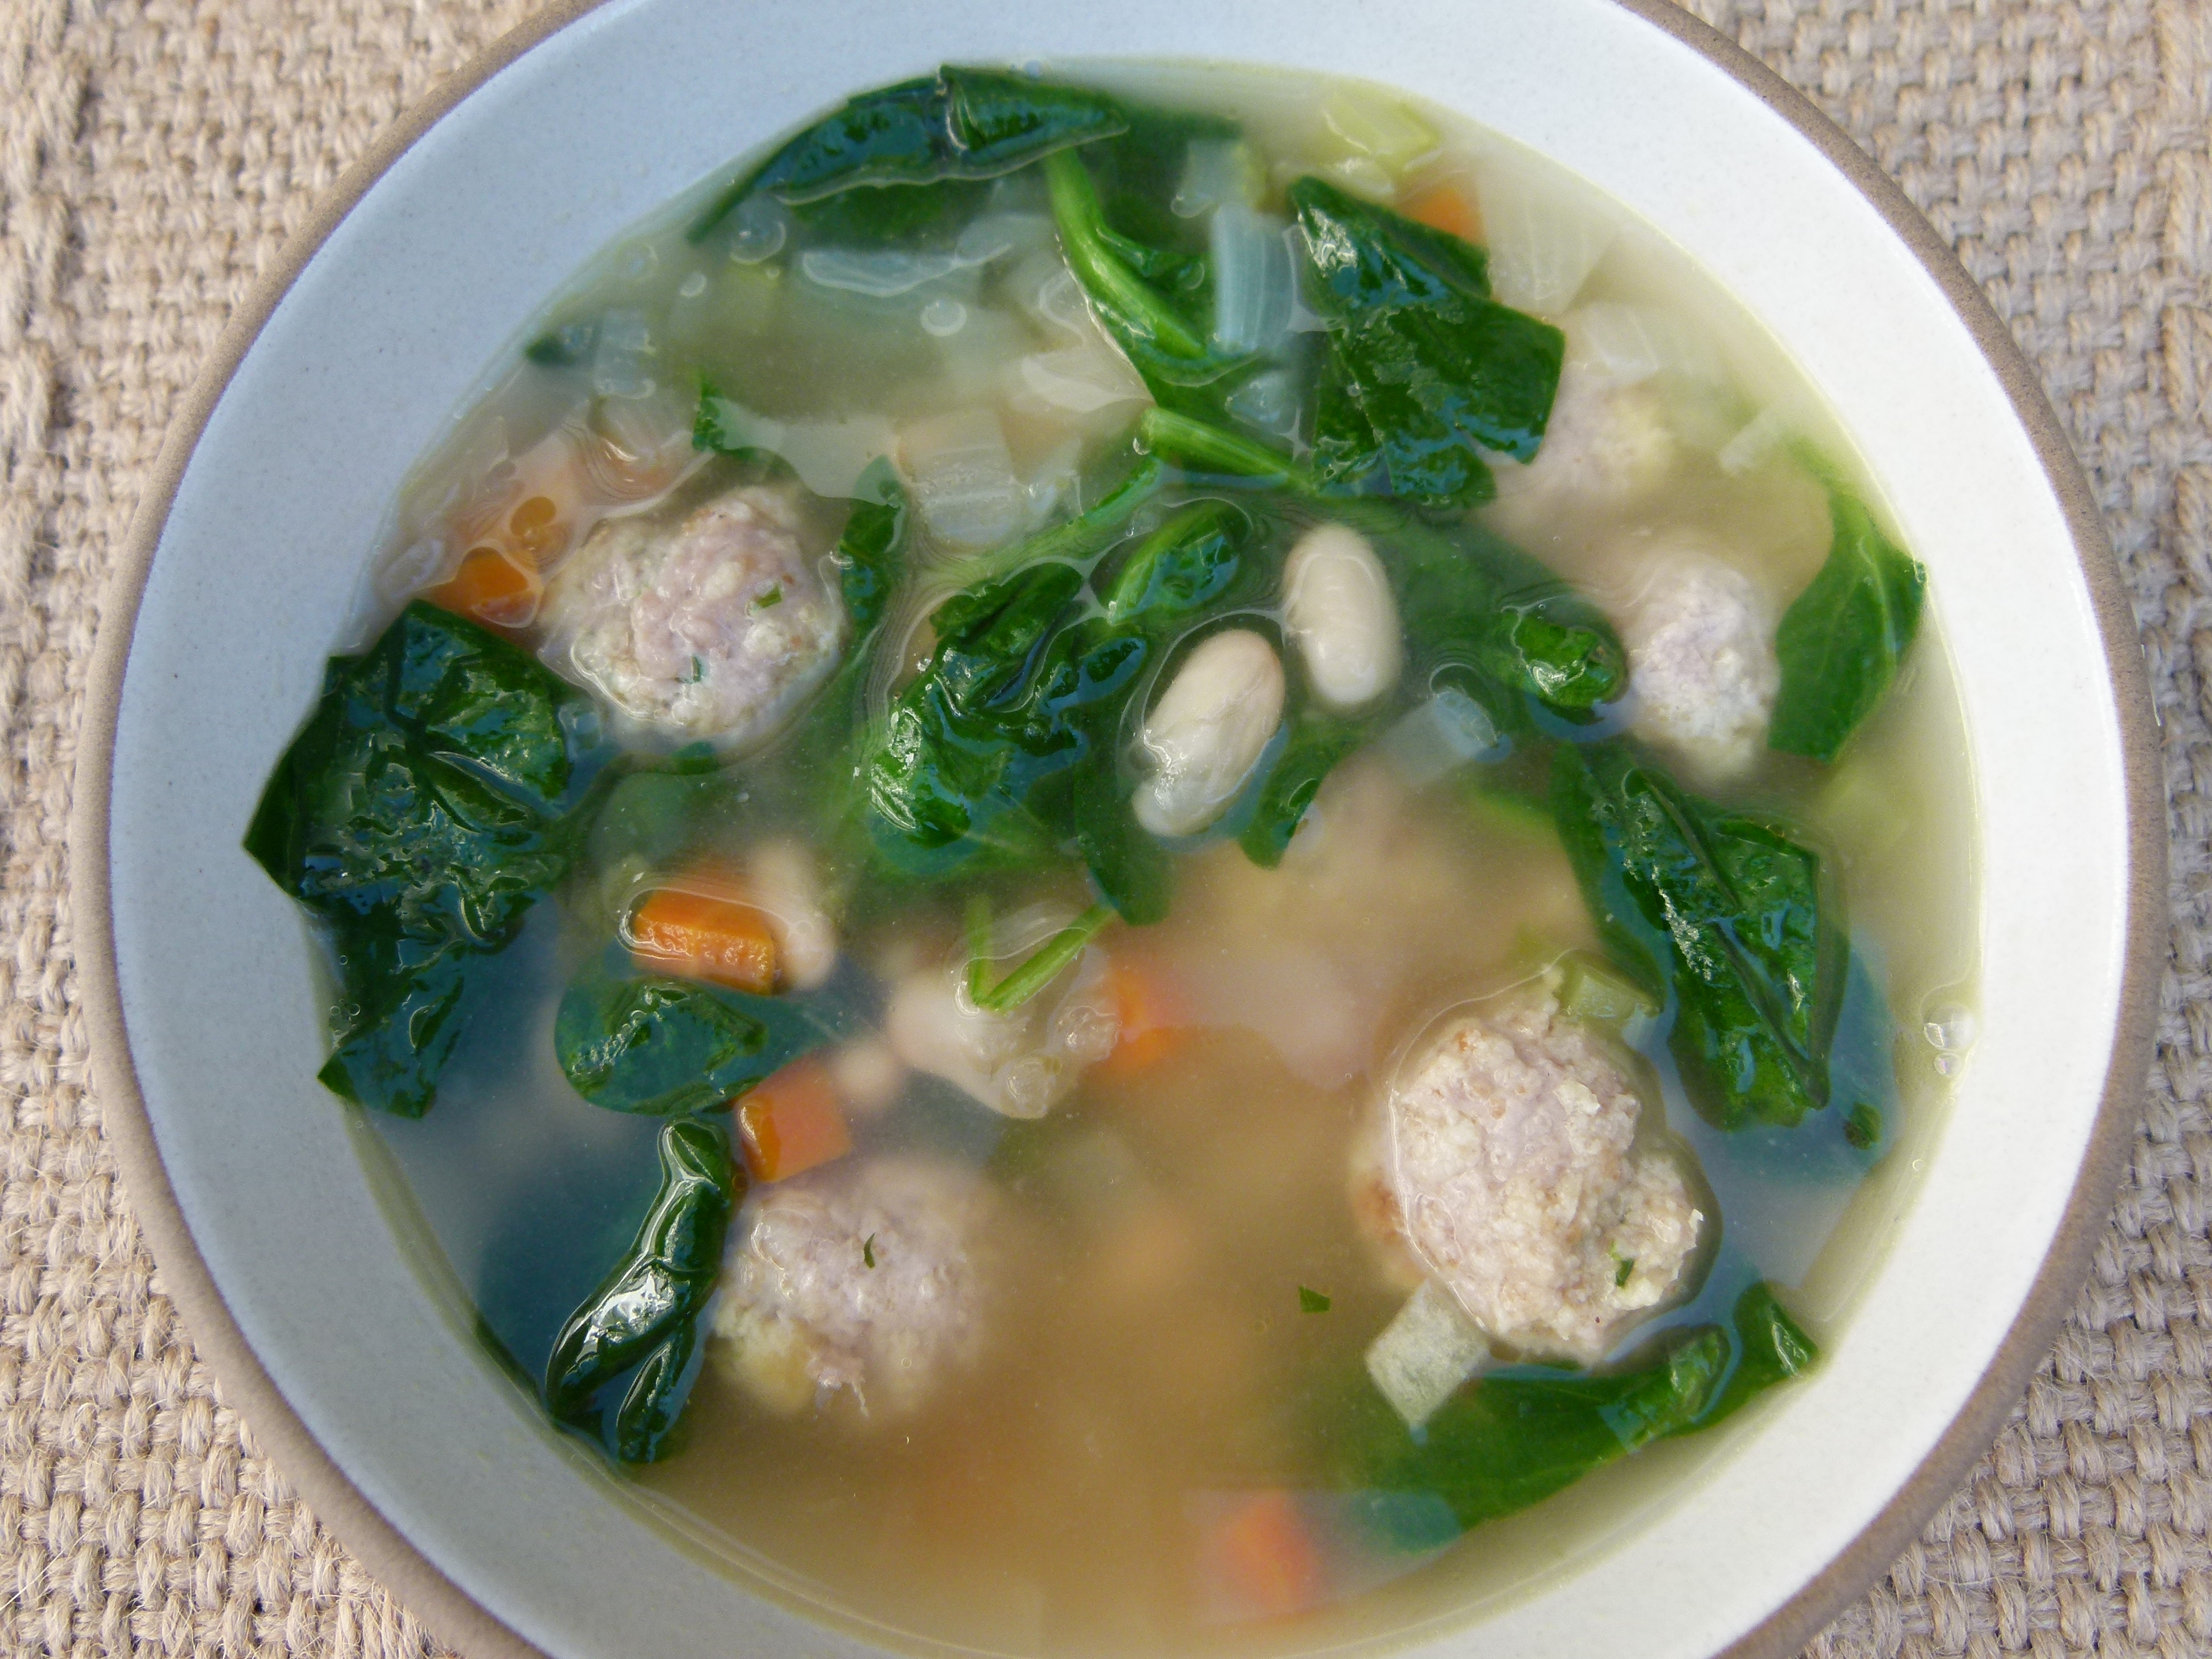
I recently spent the week with my family in NY and had a great time cooking with my mom and sisters. I think we made a soup or stew every single day for either lunch or dinner. Kids usually like soups, especially if you let them add fun foods on top like tortilla chips, popcorn or shredded cheese. Soups are also a great opportunity to get in some homemade stock which is such a great immune booster at the time of the year when we need it most. I’d like to share with you one of my kids’ favorites, Italian Wedding Soup. Honestly, I didn’t do my homework here and I can’t tell you the origins of the name, but you can call it whatever you like, including “chicken soup with baby meatballs” which is what Mr. Picky calls it. He ate three bowls of this the other day which makes me happier than getting into my skinny jeans. If you have a picky eater, you know what I’m talking about.
My grandma used to make a version of this with small pasta and escarole, but I think white beans are much more nutritious than pasta. The way I prepare this here is rather brothy, but I don’t see why you couldn’t add more vegetables or beans and make it heartier. Either way, whenever I eat this, it always feels like a big loving hug and I can’t think of a better way to start a new year.
¼cupdry whole grain bread crumbspurchased or just toast fresh breadcrumbs
½cupfresh bread crumbs1 slice of bread, hard crusts removed, processed in food processor
1/3cupPecorino or Parmigiano cheese
1poundground turkeypreferably dark meat
1Tablespoonfinely chopped parsley
1clovegarlicfinely chopped
¾teaspoonsea salt
freshly ground black pepper to taste
FOR THE SOUP:
2Tablespoonsunrefined extra-virgin olive oil
1medium yellow oniondiced
2large carrotsdiced
2stalks celerydiced
10cupschicken or turkey stockpreferably homemade
1 ½cupscooked cannellini beans or 1 15-ounce candrained and rinsed**
sea salt and freshly ground pepper to taste
10ouncesbaby spinachstems trimmed or 1 head escarole, chopped
2Tablespoonsfreshly grated Pecorino or Parmigianoplus extra for garnish
Instructions
To make the meatballs, stir the first five ingredients in a bowl to blend. Add the remaining meatball ingredients and combine well with your hands. Using a half tablespoon or a mini-ice cream scooper, scoop the meat mixture into your hands and from them into 1-inch diameter meatballs. Set aside on a plate or baking sheet.
To make the soup, warm the olive oil in a large pot over medium heat. Add the onions, carrots and celery and sauté until the onions are translucent.
Add the broth, beans and 2 teaspoons salt. Bring to a boil and carefully add the meatballs (if using escarole, add this now too.) Lower to a simmer and cook until the meatballs are cooked through, about 8-10 minutes.
Stir in the spinach and grated cheese and cook until spinach is just wilted.
Taste for seasoning. Serve with additional grated cheese, if desired.
Notes
*To make this vegetarian, use your favorite vegetarian meatballs and vegetable broth.**Traditionally served with ditalini or pastina. If you prefer to use pasta, add already cooked pasta to the soup and the end with the spinach. Another option is to add cooked Arborio rice or green peas.
Are we having fun yet?! Good, good. I have been running around the house yesterday and today like a busy bee, very excited that the big day is almost here. I’m taking a quick breather from the Thanksgiving marathon just to touch base and check-in with you all. Hope everything is going according to plan and that you’re enjoying the process. What I am not doing today, however, is sharing a Thanksgiving recipe on the day before Thanksgiving because I know you are all planners and that ship has sailed!
Instead, I thought I would give all you super organized and efficient people a great way to use up any leftover turkey you might have on Friday. I always make turkey stock and a simple turkey vegetable soup the day after. I have also given in to chicken pot pie or shepherd’s pie with turkey. But I also think it’s nice to make something on Friday that tastes NOTHING like the dinner you just spent a month thinking about! It’s actually one of my strategies for getting everyone excited to eat leftovers even the day after Thanksgiving.
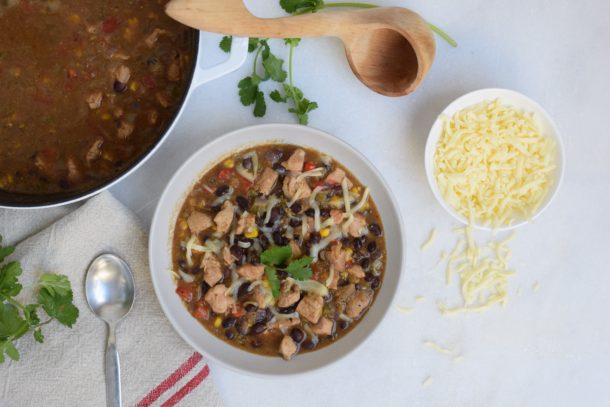
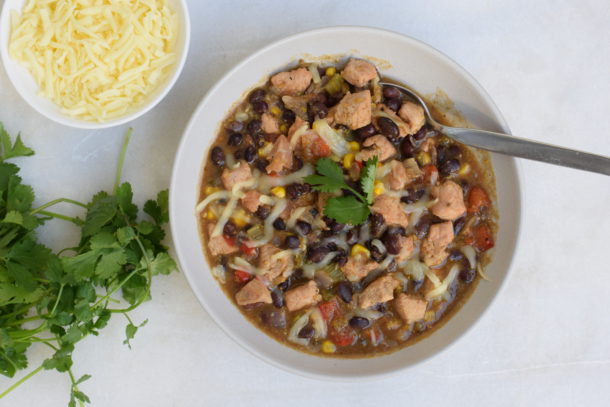
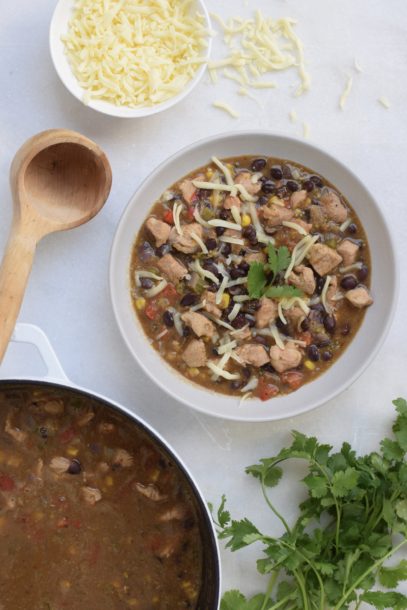
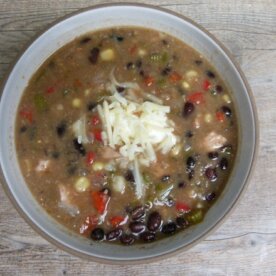
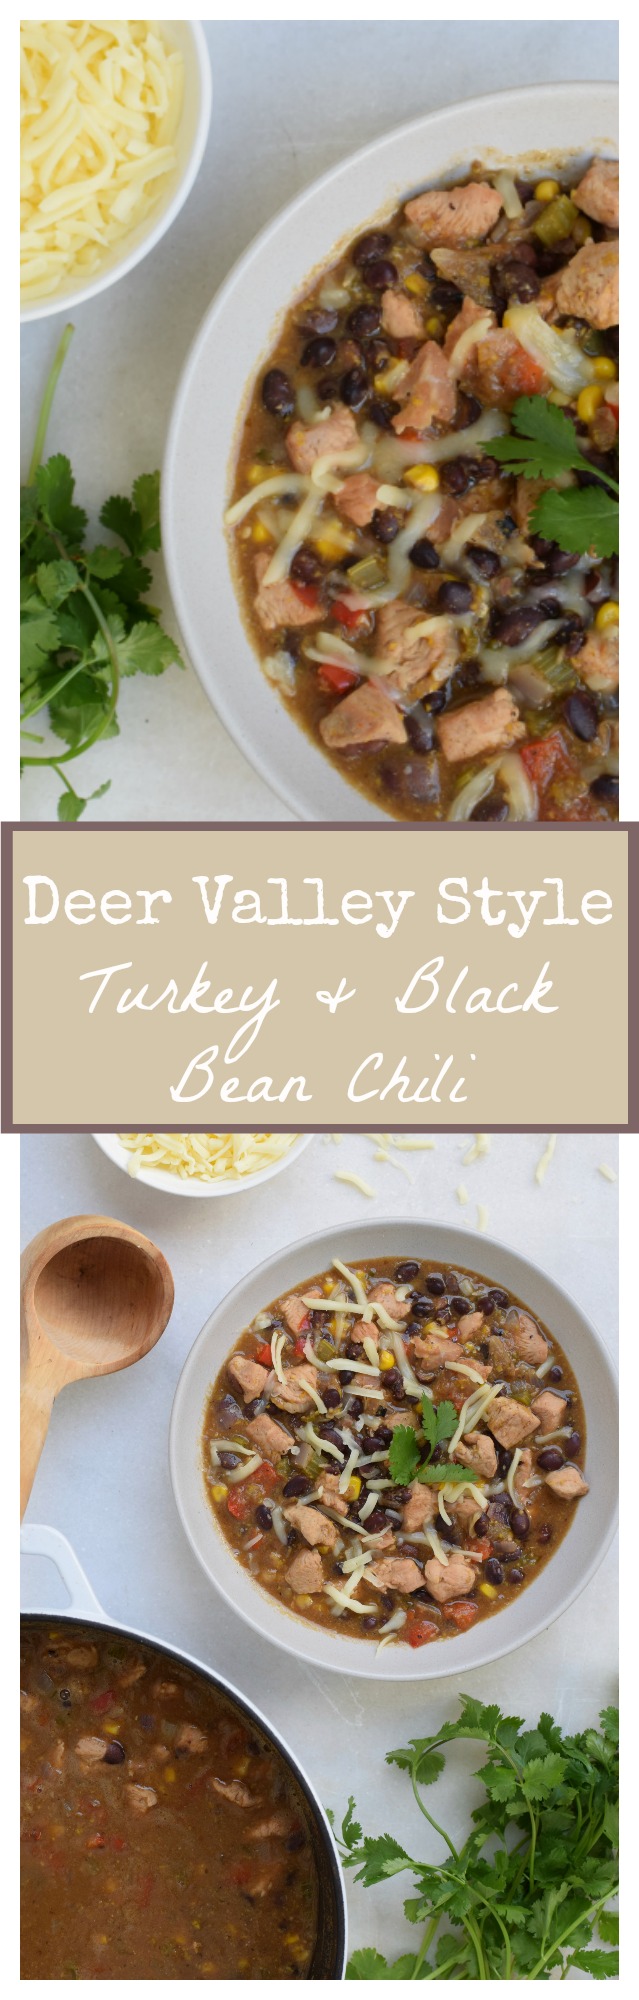
This recipe is inspired by the fabulous chili at the Deer Valley ski resort in Utah. I first skied Deer Valley in 1994 when my husband and I were engaged. He and his family have been going to the resort since it first opened over 30 years ago. It is a really special place and we are fortunate to be able to go there a couple times each year with the kids. Although I enjoy skiing and Deer Valley is absolutely stunning, I’m not super gung-ho about getting out there early and making the most of my day on the slopes. I’m really in it for the food. My favorite part about skiing is building up a good appetite and rewarding myself with a nice hearty lunch. I actually start thinking about this turkey chili when I sit down on the chair lift for the first run of the day!
Turkey chili is one of the few items that the resort serves every single day. I happen to notice the the lunchrooms also serve a roast turkey plate every single day. Hmmm, could it be the kitchen needed to find a way to use up yesterday’s roast turkey? Hmmm…. Anyway, we all love this chili because it’s lighter than a beef chili and a totally different take on the typical red, tomato-based ones that are so common. This one is lighter and tastes fresher, perhaps because of all the delicious vegetables. Regardless, all the signature shops on the mountain and many of the local grocery stores sell the special seasoning packet and the dried black beans in addition to the recipe so you can make it at home. For $7 or $8 plus the cost of the turkey, vegetables and stock, you can make this pot of deliciousness at home. Hmmm….$8 for 1/2 pound of dried beans and a few dried spices. It wasn’t long before I decided I need to figure out what the heck was in that seasoning packet!
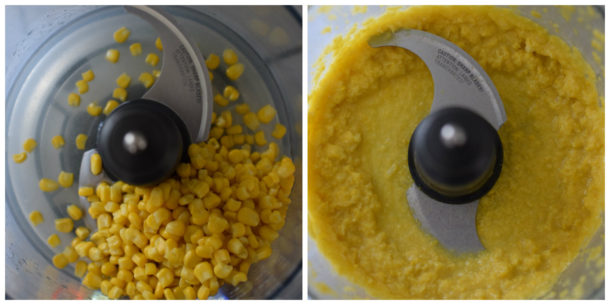
I can’t say this turkey chili is exactly like Deer Valley’s, but it’s close enough and I’m not sure my kids have noticed. For sure I use half the amount of butter than the recipe calls for and I omitted the leeks, which I think don’t make or break this chili. I also don’t use canned creamed corn, because ugh — canned and creamed and sugar don’t go with corn — so instead I just make a little corn puree. The only ingredient you may not have lying around is masa, which is ground dried corn that’s been treated with lime. It’s what corn tortillas and tamales are made from. I have to say, it does thicken up the chili and give it a fabulous Southwestern corn flavor. It’s also not an expensive ingredient, so I say definitely go for it.
Alrighty, dear readers, that’s all the time I have today. I am elbow-deep in sweet potatoes and butternut squash and my kids are starting to bicker about who gets to pick the music we listen to while we work. Ahhh, sounds like Thanksgiving! Hoping you all have a lovely holiday. xoxo
4Tablespoonsunsalted butteryou can use oil, but it won’t be as good -- vegans can use organic Earth Balance
2poundsbonelessskinless turkey breast, cut into 1-inch cubes or cooked turkey, cubed -- vegetarians and vegans can add 5 cups of additional vegetables and beans
1red onionchopped
1cupchopped celeryabout 3 stalks
1sweet red bell pepperchopped
1jalapenoseeded (or leave seeds for extra heat) and finely diced (optional)
2clovesgarlicfinely diced
¼cupmasa harinamore if you like a thick chili
2 ½Tablespoonsground cumin
2Tablespoonsground coriander
2teaspoonsdried oregano
1teaspooncayennecut back if you don't like spicy
2Tablespoonsmaple sugar or natural cane sugar
2teaspoonssea saltdouble if you’re using unsalted stock
freshly ground black pepper to taste
4 ½cupsof chicken or turkey stockdivided* -- vegans can use vegetable stock
2 ¼cupsfrozen sweet cornthawed (about 12 ounces)
5cupsor 3 15-ounce ounce cans cooked black beansdrained and rinsed
Instructions
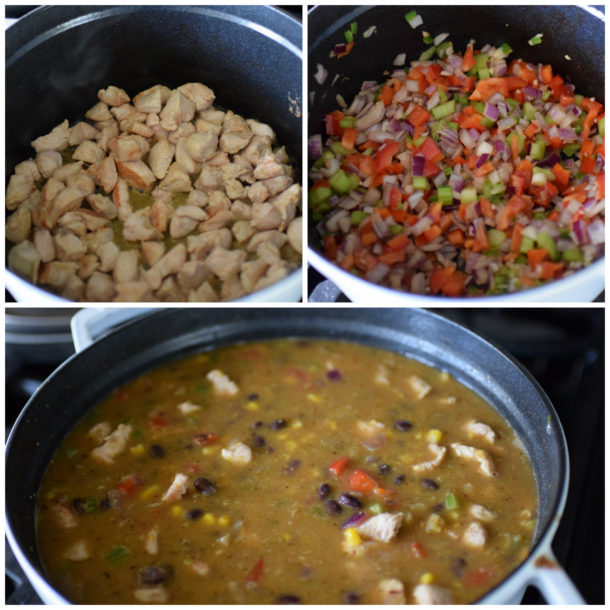
Melt butter in a large pot. If using raw turkey, add half the turkey and sauté until lightly browned. Remove with a slotted spoon to a bowl. Repeat with the remaining turkey. If using cooked turkey, do not saute in butter, but add in step 3.
Add the onion, pepper, celery, jalapeno, and garlic to the pot and sauté until tender, about 10 minutes.
Add the masa harina, spices, sugar, salt and pepper to the pot and cook, stirring frequently for 5 minutes. Return turkey and any accumulated juices back to the pot.
Add 4 cups stock, 1 cup corn and the beans to the pot. Take the remaining 1 ¼ cup of corn and puree with the remaining ½ cup stock in a food processor (a mini processor works too.) Add the pureed corn to the pot. Mix well and bring to boil over medium-high heat. Lower the heat to a simmer and cook, partially covered for 25 minutes. Serve with desired condiments (sour cream, cheese, minced onion, cilantro) or serve on top of a baked potato.
Notes
*If you only have stock in 32 oz. containers, no need to open a new one just for a 1/2 cup of stock. Puree corn in 1/2 cup water.
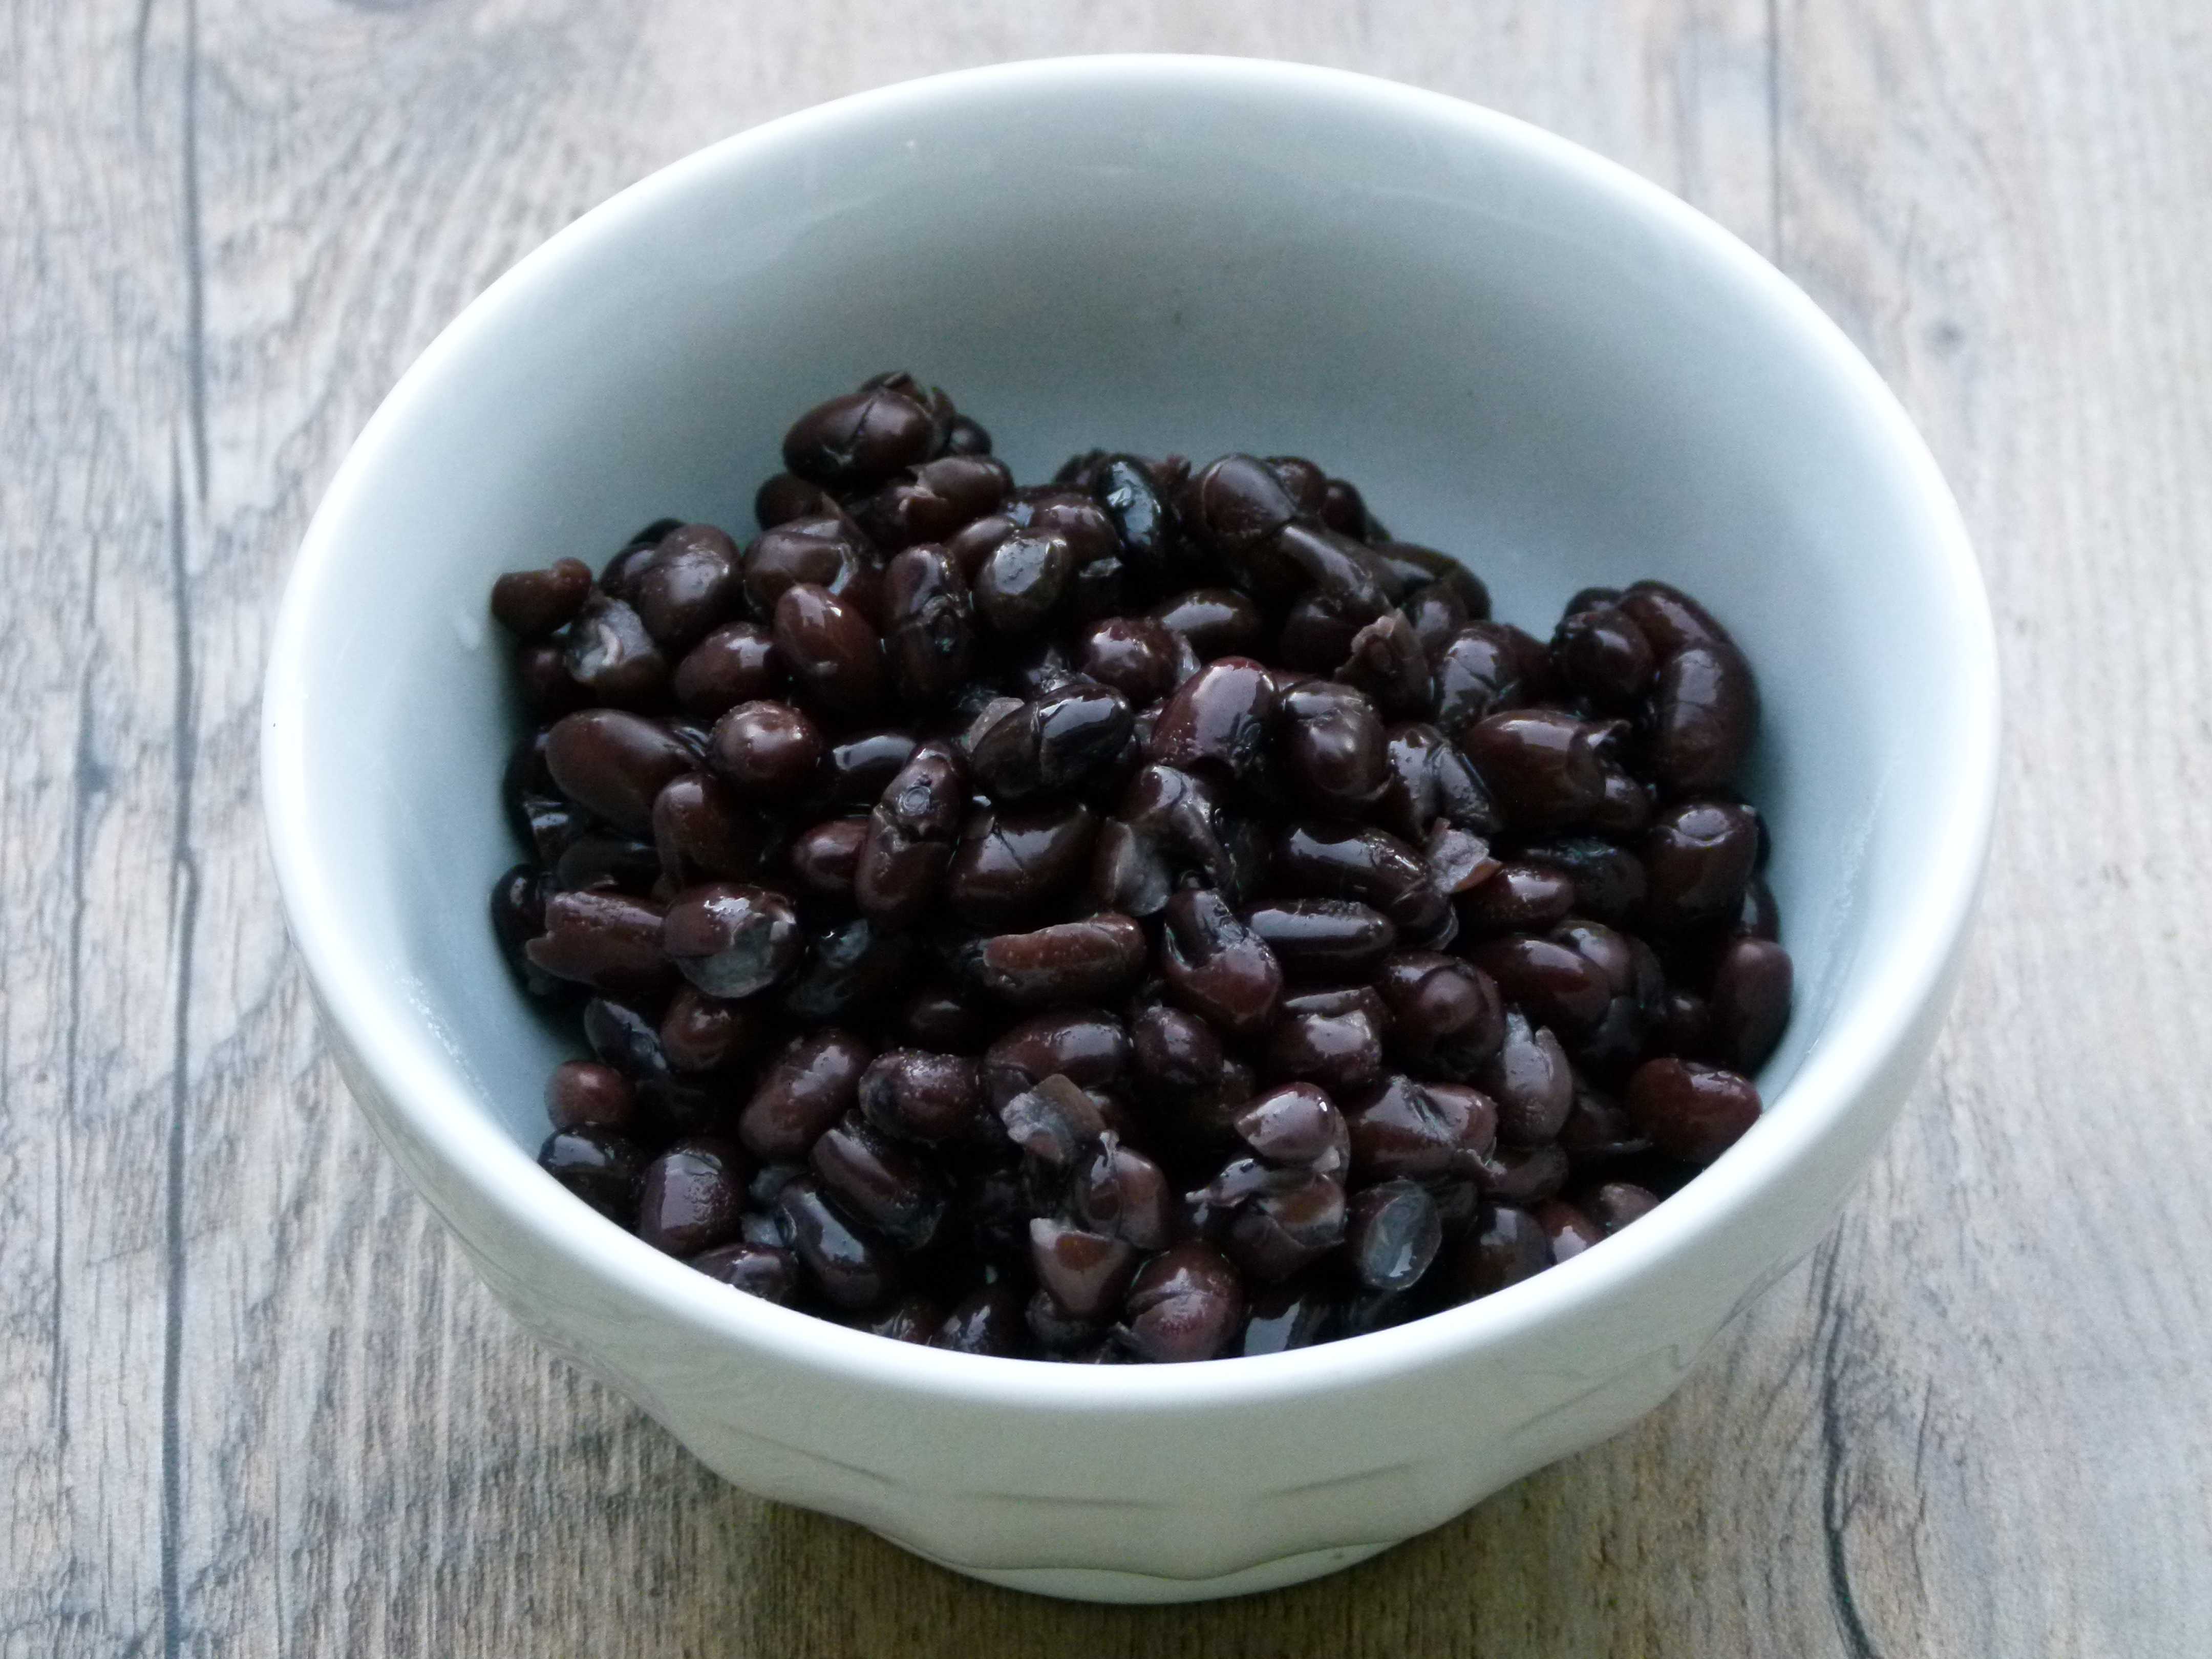
This is the time of year when I start to make more bean-based soups and chilis. And as soon as it stops being 80 degrees around here, I’ll get right on that. Actually, regardless of the season, we are a bunch of bean eaters in this house. Besides chili, I use beans in Mexican dishes, salads, pastas, veggie burgers, with braised greens or in dips. There are many varieties of beans that we eat — from garbanzos to black to pinto to Cannellini and more.
Beans are incredibly versatile and they happen to be a great low-fat source of fiber and protein. Beans are one of those low-glycemic foods that gives you long-lasting energy without spiking your blood sugar. Hooray! No insulin surge! And what’s more is that several types of beans including kidney, pinto and black are off the charts in antioxidants, as in a whole heck of a lot.
Beans are quite affordable, especially if you make them from scratch. A pound of dried beans can cost anywhere from $1 to $1.50 and that will yield the equivalent of 3-4 15-ounces cans. If you buy high-quality organic beans from a company like Eden Organic, which doesn’t line their cans with BPA, one can costs approximately $2.30. You can do the math here and realize that you would save a lot of money buy cooking your beans from scratch. Not only that, most cans are lined with BPA, which is a carcinogen that is not easily detoxified. And wouldn’t you feel better about not throwing all those cans into a landfill? Yes indeed.
I am teaching a black bean and pumpkin soup recipe this month in my classes and I have noticed my students furiously scribbling my instructions for how to cook dried beans. I realized this would be a good thing to post, so here are a few of my tips for preparing beans from scratch.
Buy beans from a store with a high turnover to ensure you don’t get very old beans which take longer to cook.
Plan ahead since you need to soak beans for at least 6 hours and then cook them for an hour or more.
Pick through the beans before soaking and look for any small stones or debris.
Place beans in a large bowl or pot and cover with a generous (4-6 inches) of cold water. If you have a piece of kombu (kelp), add that to the beans for additional digestibility and alkalinity. Leave the bowl on the countertop or in the refrigerator for at least 6 hours or overnight. Check to make sure all the beans stay below sea level! I usually start soaking in the morning when I’m making breakfast.
Drain the beans in a colander and transfer (with kombu, if using) to a large pot. Sometimes I add some onion and celery if I know I’m going to use the beans for a salad, but I usually don’t add vegetables. Fill with fresh cold water to cover by at least 4 inches and bring to a boil over high heat.
Lower heat to a simmer and skim off any foam from the top. Maintain a gentle, active simmer. Boiling the beans rapidly can make them lose their shape.
Start to test the beans for tenderness after 50 minutes. Continue to taste them until desired tenderness is achieved. This can take an hour or more depending on the age of the beans.
Turn the heat off and if you have time, add some kosher salt to the beans and allow the beans to cool in their cooking liquid.
Drain and now they’re ready to eat! Or store them in the refrigerator for up to 3 days or in the freezer for up to 3 months.
Update 4.30.13: I have had great success cooking dried beans in a slow cooker. Whereas the beans are more digestible if you presoak them, they will still cook to perfect tenderness without soaking. I put 2 pounds of dried beans in my slow cooker and filled it up with water (an inch or so under the lid.) Set it on LOW for 7 hours and they will be perfect. So exciting!
I think Indian food is very misunderstood in this country. Many people have the impression it’s overly spicy, heavy and greasy. Perhaps it’s because there aren’t a plethora of great Indian restaurants here and very often the not-so-great ones do serve oily, creamy dishes. Who knows, but that’s not what Indian food is all about. I started experimenting with Indian-inspired recipes about a year ago and fell in love.
I am especially crazy about the many versions of Dal, which simply means “lentils.” (By now you’ve figured out the name of this recipe is somewhat redundant, “Red Lentil Lentil.”) The lentils used in Dal are not the brown or French lentils commonly eaten here, but a split lentil which almost looks like a lentil flake. What is so fantastic about these lentils is that they cook up quickety-quick so they are perfect for a last minute meal.
What’s lucky for me is that Mr. Picky loves lentils. Yeah, yeah, how can I call him picky if he eats lentils? Because he won’t eat a hundred other things that most kids do eat! Regardless, his palate has been developing slowly and I was thrilled when he tried brown lentils for the first time. From that moment on, all lentils were fair game. Sure enough, after I told him this dal was “lentils,” he shrugged his shoulders and said “OK, I’ll have some.” Happy dance!
Dal is very nutritious (loaded with fiber, protein and iron) and easy to digest. Since the lentils are split, they don’t hold their shape the way common lentils do. In fact, they become kind of mushy which I find to be so comforting. Mmmmmmm! But like I mentioned, split lentils can be made so many different ways — from thin and watery to stick-a-fork-in-it-thick. The lentils themselves have a very subtle flavor and benefit from some flavorful (and very anti-inflammatory) spices. That doesn’t mean dal has to be hot spicy. This version here is soupy, but not brothy, flavorful, but not overpowering — for me, it’s just right. But the beauty of dal is that you can make this to suit your taste. Since the kids started school, I have been working quite a bit more and lately I have been feeling a little out of balance. You know when you just need a comfy blanket and a little R&R? Dal to the rescue!
Add the mustard seeds and cook until they start to pop, about 1 minute.
Add the garlic, ginger and remaining spices. Sauté for 1 minute, or until fragrant.
Stir in the onion, carrot and tomato. Sprinkle with salt and cook until just tender.
Add lentils and stir to coat with the vegetables and spices. Pour in the water or stock and bring to a boil. Lower heat to a simmer and cook until lentils are broken up, about 20 minutes. Taste for seasonings. Serve on its own or with a dollop of yogurt or raita.
If I had to pick one cuisine to stick with for the rest of my life, it would be a tough a call. But I could easily live off of Mediterranean food every day. I love the emphasis on fresh vegetables, olive oil, legumes and whole grains, cheeses and fish. Whether it’s Italian, Greek, or Israeli, this way of eating is definitely my comfort zone. And living in Southern California makes cooking Mediterranean-style quite easy with an availability of similar varieties of fresh produce, nuts, dates and olives.
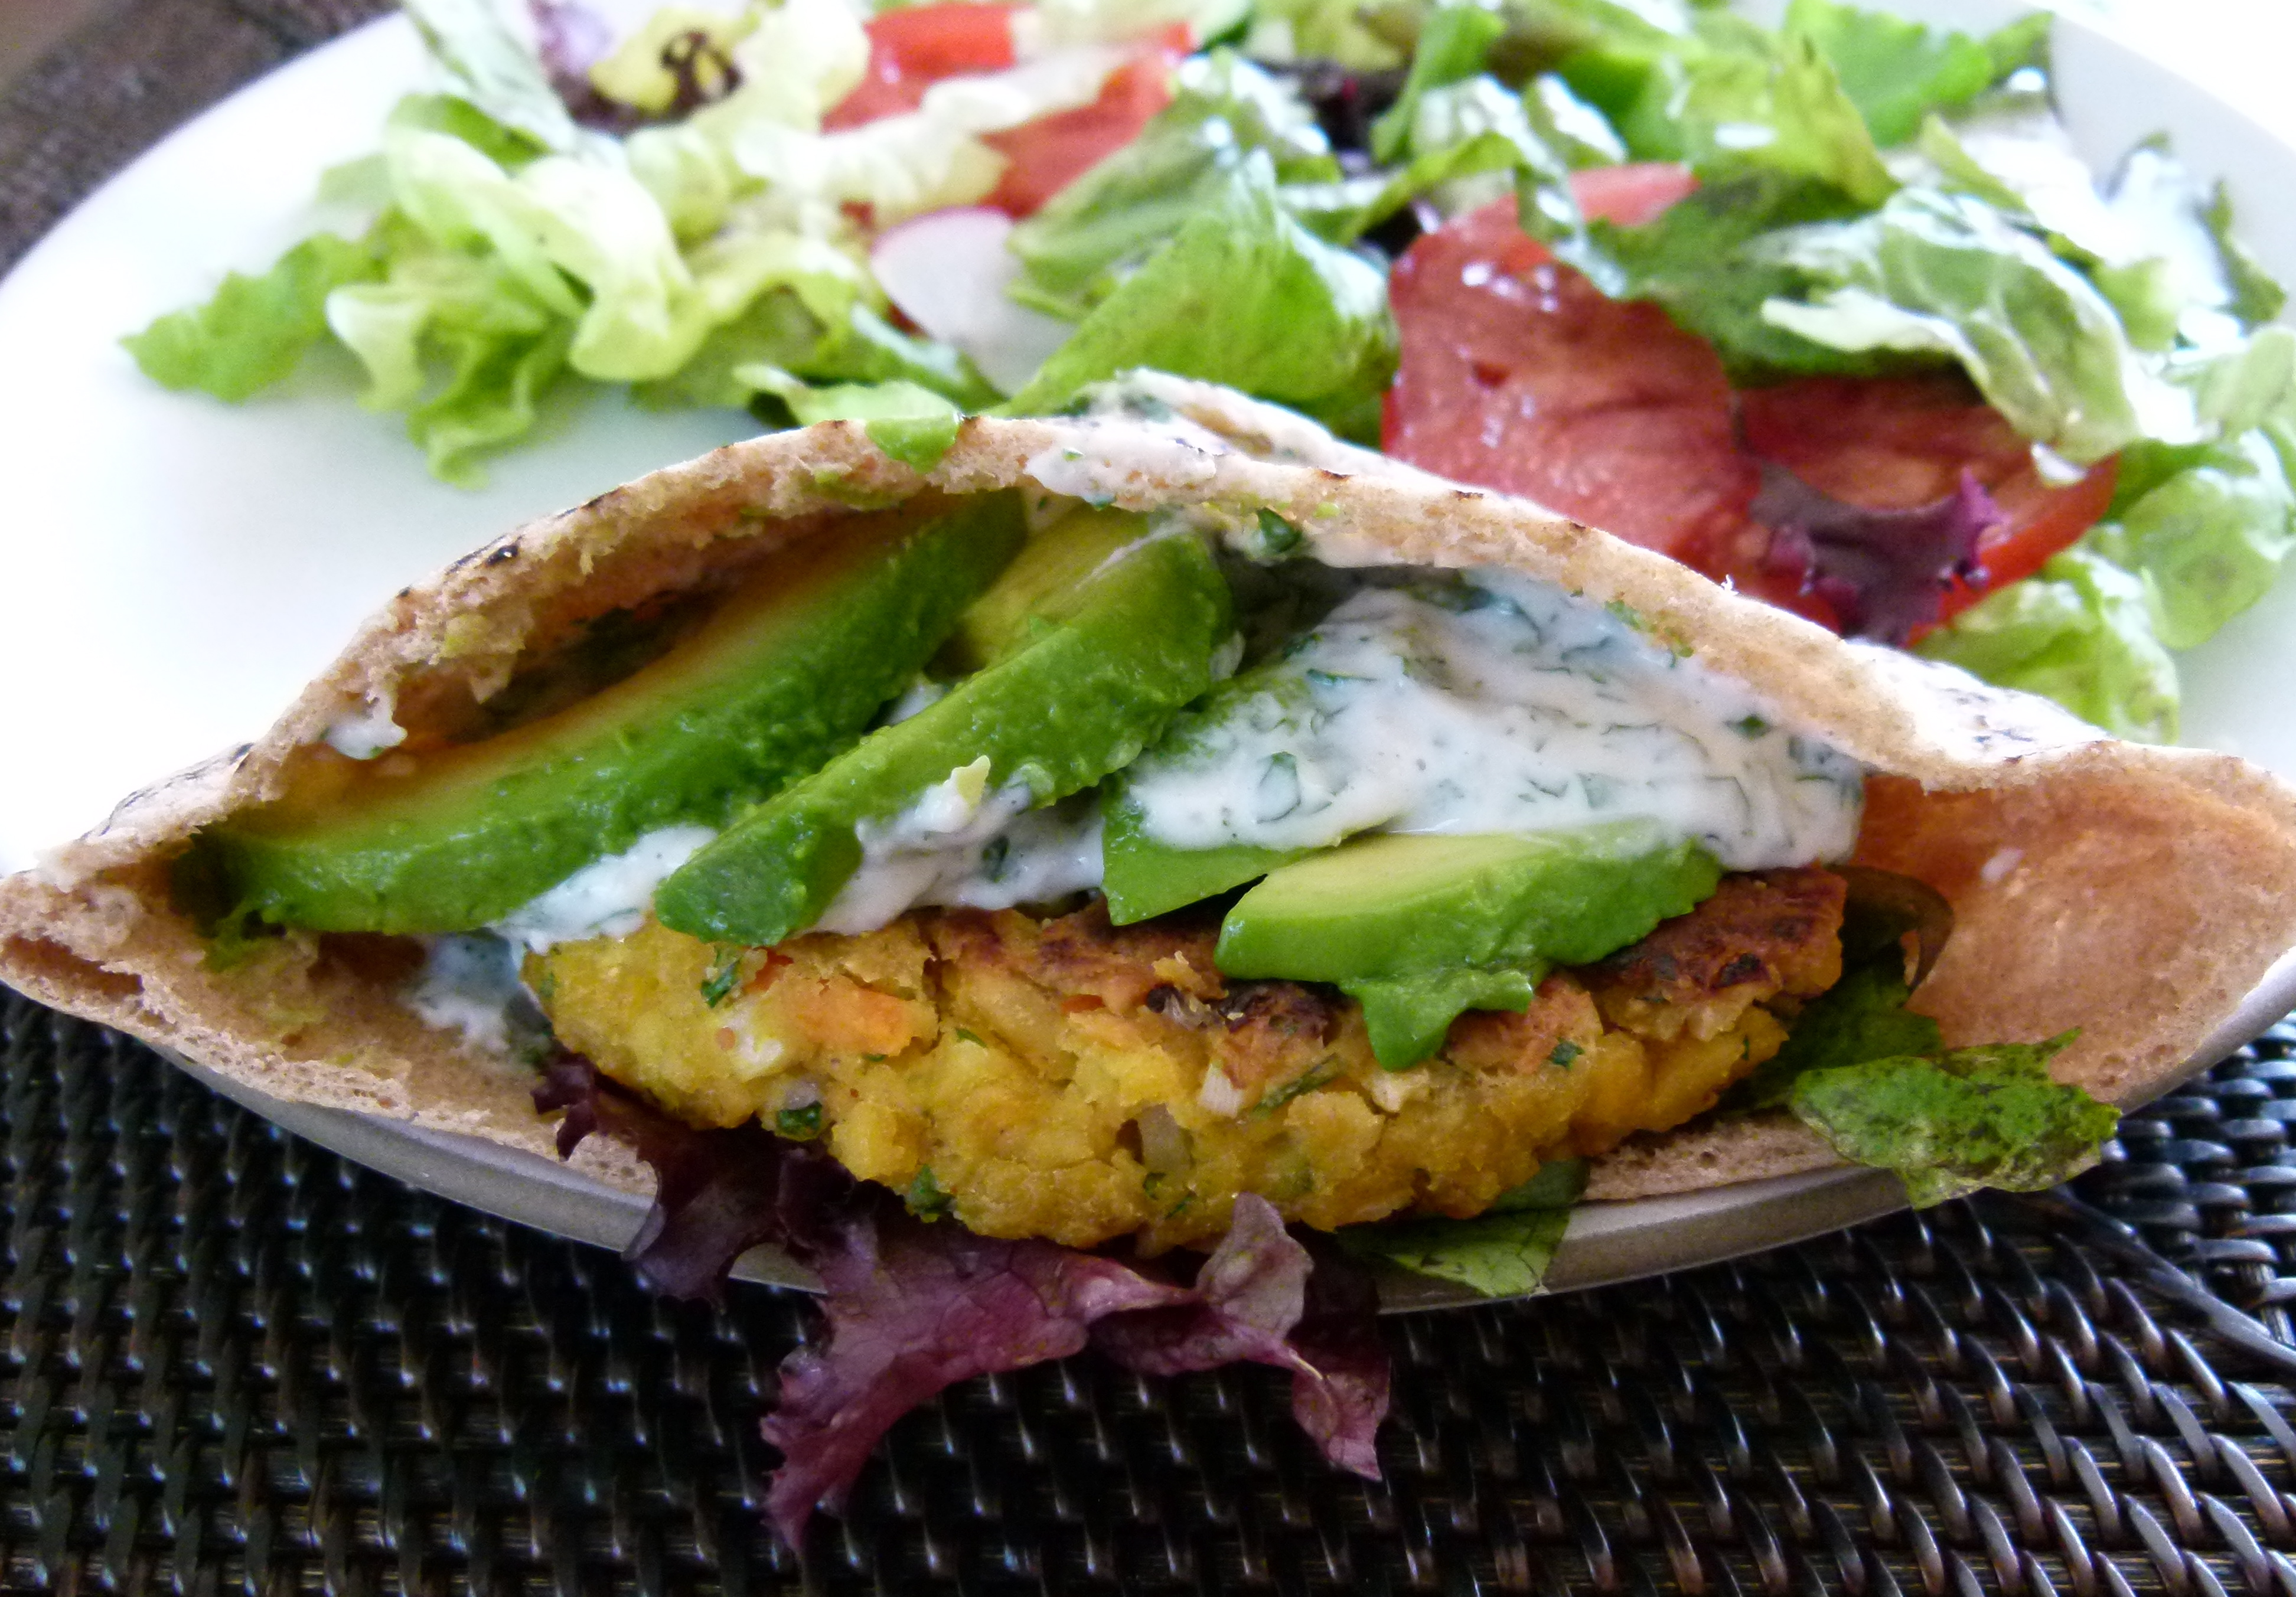
As I’ve mentioned before, one of my favorite things to do is to take a not-so-healthful food that I love and turn it into something I can enjoy regularly. Many years ago I decided to try making falafel (the deep-fried Middle Eastern chickpea nuggets) a little less “deep-fried.” (Ok, not everything Mediterranean is healthful.) Many iterations later I found myself with a delightful, substantial chickpea burger which in turn began my obsession with veggie burgers. I don’t love meat and poultry so much, although I think they are excellent sources of protein if you can find organic, pastured varieties. But I do love hearty, flavorful vegetarian food that makes me feel satisfied, especially anything bean-based which is loaded with low-fat protein and tons of insoluble fiber. I also like having recipes like this for entertaining when I always like to offer a vegetarian option (you’d be surprised how many people choose not to eat meat these days.)
These chickpea burgers are a favorite of mine and my whole family, even Mr. Picky who I am pleased to announce tried one for the first time last week with ketchup. Do what you’ve gotta do, friends. They are definitely a far cry from falafel, though. In fact, the only ingredients that falafel and these chickpea burgers have in common are chickpeas and cumin. But if I do it right, they’re crispy on the outside, moist on the inside and with flavors that remind of falafel. I usually eat veggie burgers sans bun since I find that they are plenty starchy without adding bread. But when serving them to family and friends, I offer warmed, whole wheat pita halves and an array of yummy toppings including sprouts, avocado, tomato slices, lettuce, cooked onion and most importantly, a creamy and refreshing sauce. In my opinion, it’s all about the condiments!
Chickpea burgers (and veggie burgers, in general) are fabulous for entertaining and for busy weeknights since they are best formed in advance and refrigerated so they firm up a bit. Out of the fridge, they cook up in minutes on a hot griddle or skillet. Once you realize how tasty these are, you’ll make a double batch and freeze half. If you freeze them, just don’t forget to place a piece of wax or parchment in between each patty so that they don’t stick together (ask me how I know this.) These burgers may not take you back to your last visit to the Mediterranean, but I hope they’ll keep you from visiting the freezer section of your supermarket! Enjoy~
Place the chickpeas, egg, garlic, salt, cumin, cayenne, lemon zest, flour and parsley in food processor. Pulse until a coarse mixture forms that holds together. It should be moist and sticky.
Place chickpea mixture in a bowl and mix in grated carrot and red onion. Take a ½ cup of the mixture and firmly press it into a patty about 3 ½ inches in diameter and ¼ inch thick. You can also form these into mini-patties for appetizers. Place on a plate or a baking sheet and refrigerate for at least 30 minutes and up to overnight. Cover if refrigerating for more than a few hours.
Heat a couple tablespoons of oil or ghee in a large skillet over medium heat until hot, but not smoking. Add patties to the skillet (do this in batches, if necessary) and cook until crisp and golden brown on the underside, about 6 minutes. Carefully turn over and cook until golden brown on the other side, about 3-5 minutes more.
Serve with or without a warmed pita half or a hamburger bun and suggested toppings.
I had the best day on Saturday. Where did I go? Nowhere! What did I do? Nothing! When was the last time you said you had the best time doing nothing? I know! Sometimes I feel like my life is like a runaway train. And although I enjoy its active pace, I wish I took more time to sloooooow down. This past Saturday was going to be more of the same — squeezing in a workout, a big farmer’s market shop for my classes, watching Mr. Picky’s soccer and baseball games, and chauffeurring the girls here and there. But the universe gave me a big gift in the form of a torrential rain storm and everything was canceled. Thank you, thank you!
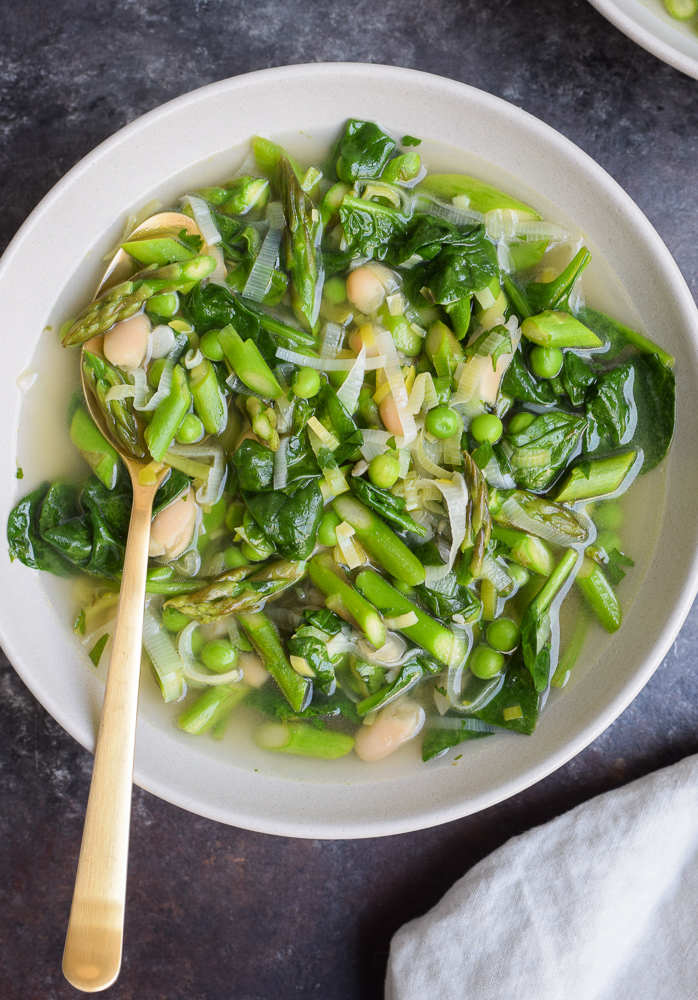
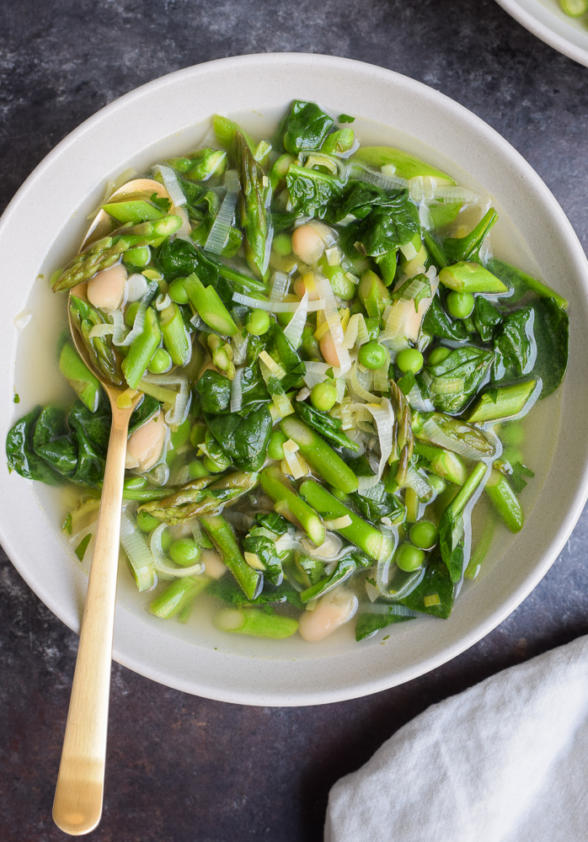
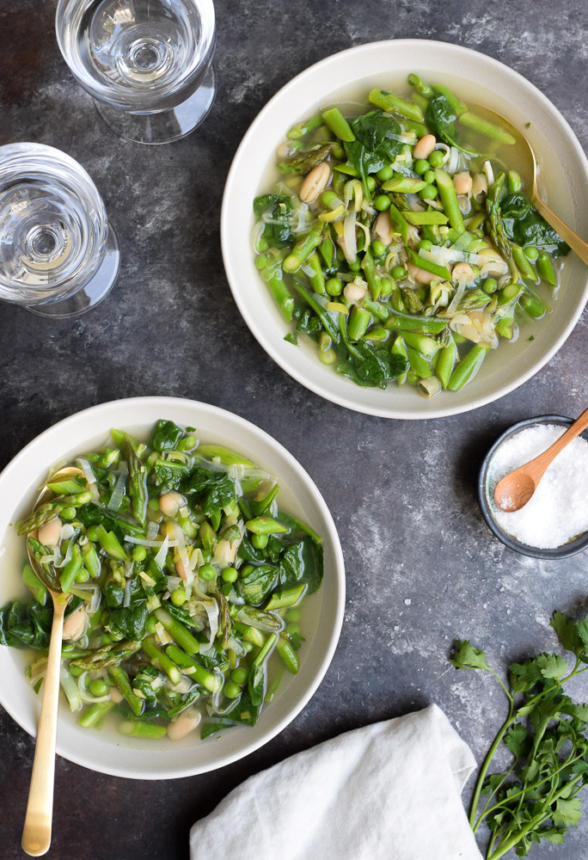
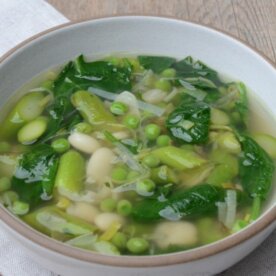
Mr. Picky stayed in his pajamas until 1:00 in the afternoon. I read more of the newspaper than just the front page. Daughter #1 and her adorable friend who spent the night would have normally met friends in town for breakfast, but hung around with us instead. They played as much One Direction music as we could take, baked a cake, and photographed every move for their 2,000 Facebook “friends” to enjoy. One thing for sure, I knew I would be making soup. I had an extra bunch of asparagus from Friday’s class, white beans and peas in the freezer, and a small bag of spinach. I had the makings of one of my favorites, Spring Green Minestrone. This is the soup I make whenever Spring rolls around. As much as I love hearty, chunky soups and stews, I like to leave those to the winter. Lighter, fresher soups appeal to me now, but ones which still have the ability to warm me up. And the combination of white beans and peas amounts to a complete protein, so I feel satisfied enough to eat this as a meal. But it’s all that GREEN that really makes me feel nourished.
The ingredients in this soup look like they couldn’t amount to anything special — there’s no secret ingredient, no flavor boosters. I’m even surprised when it turns out delicious. And the recipe is so dead simple, you have no excuse NOT to make your vegetable stock from scratch. This soup was one of the first cooked vegetable dishes that Mr. Picky actually ate a normal portion of. Saturday was no different. He dropped a piece of sourdough toast in his soup and ate every last pea. My husband poured the usual Pecorino in his. As for me, I embraced my bowl of springtime au naturel — perfect in its simplicity and which I ate really slooowly. I needed to make this special day last. Because although I heard it would rain again on Sunday, I knew that the chances of that happening were about as good as my kids getting a Coke with their lunch. And sure enough, Sunday’s sunshine came with places to be and things to do, but I got back on the train rejuvenated and restored and ready for it all.
2Tablespoonsunrefinedcold pressed, extra virgin olive oil
2leekswashed well, white and light green parts sliced thinly
4clovesgarlicsliced thinly
1poundasparagustrimmed and sliced on the diagonal into 1-inch pieces
1 ½cupsfresh or frozen green peas
2Tablespoonschopped flat-leaf parsley
6cupsvegetable stock or light chicken stockpreferably homemade
1 ½cupscooked white beanssuch as Cannellini or Great Northern, or 1 15-ounce can, drained and rinsed
2teaspoonssea saltmore if your stock is unsalted
4ouncesbaby spinach leaves
Instructions
In a large pot, heat the olive oil over medium heat. Add the leeks and sauté until tender, about 5 minutes. Add the garlic and sauté another 2 minutes.
Add the asparagus, peas and parsley and toss to coat with the oil, leeks and garlic. Pour in the stock, white beans, and sea salt. Bring to a boil and lower the heat to a simmer. Cook uncovered until the asparagus is just tender, about 5 minutes.
Stir in the spinach leaves and taste for seasoning. Don't be disappointed, but that's all you have to do!
Notes
If you make your own stock, use the tops of your leeks and the woody ends from the asparagus that you might be inclined to compost or throw away.
A few weeks ago, six other families and mine planned to get together for a pot luck at my friend Lana’s house. One of the families keeps kosher, so we decided to go with a fish and dairy meal. I thought these vegetable enchiladas verdes would be a great vegetarian option. At least it seemed like a good idea at the time, but that’s because I wasn’t remembering Mr. Picky’s haircut after school that day and his basketball practice from 4-5. I think I was just craving enchiladas on the day I volunteered and not thinking it was a bonehead move to offer to make them for 35 people.
Homemade enchiladas are one of my absolute favorite things to eat. But I’m not talking about the overly cheesy and soggy kind. I love a good (GMO-free) corn tortilla wrapped around either some poached chicken or vegetables and beans and then smothered in fresh tomatillo sauce. You can even hold the cheese. We ski a few times each year in Deer Valley, Utah, which is known not only for its great ski runs, but for pretty good lunch on the mountain. Once in a blue moon they serve the most divine roasted vegetable enchiladas, which is how this recipe was inspired. I actually prefer vegetable enchiladas over ones with chicken and my husband says he doesn’t miss the meat at all.
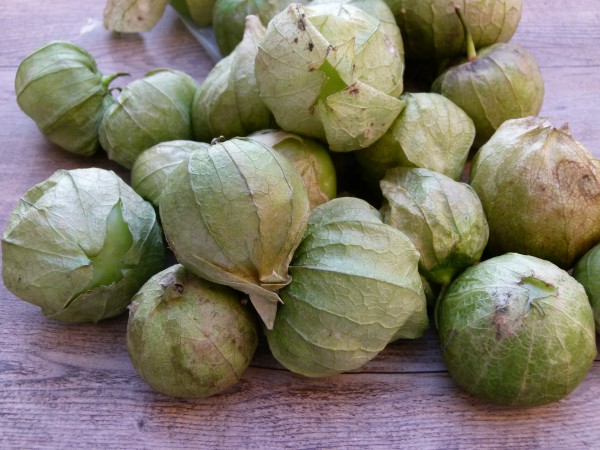
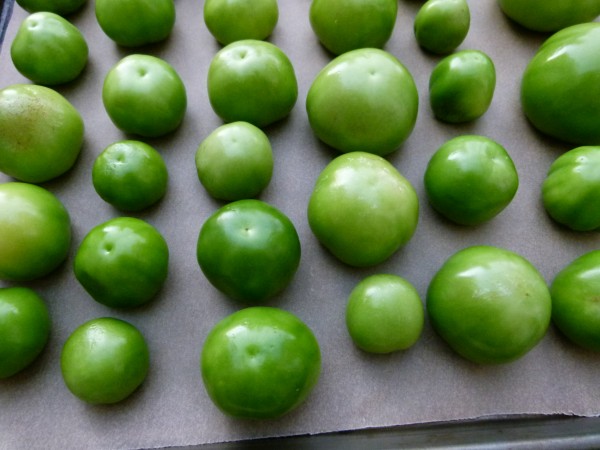
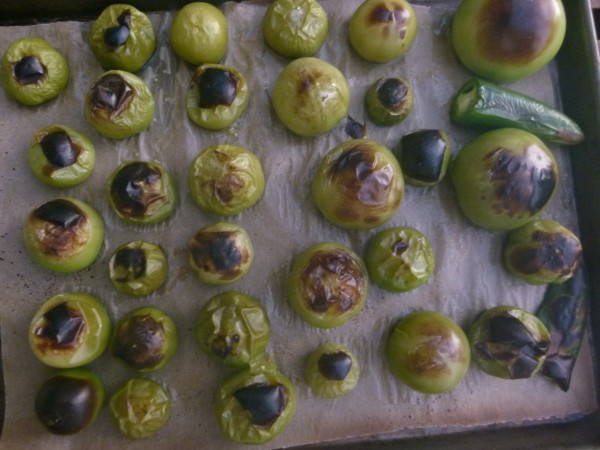
I also prefer the “green” version over the red and I love making tomatillo sauce from scratch. Have you ever seen one of these cuties? One of my students thought the supermarket prewraps each tomatillo in these paper husks, but in fact, they grow that way. Tomatillos are related to tomatoes, but they have a tangy, puckery, sourness that Mr. Picky doesn’t care for, so his enchiladas are made with no sauce for now. You know what I say? More for me! If you eat dairy, that tanginess does go particularly well with cheese or sour cream. Just saying. I tried several methods for making tomatillo sauce and broiling them on a sheet pan was not only easy, but that little bit of char on the tomatillos added tons of flavor to the sauce. You can also boil them, but boiling vegetables, especially ones high in Vitamin C, isn’t usually my first choice.
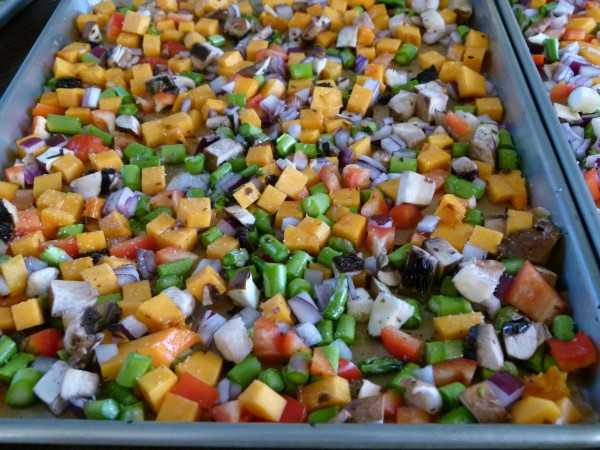
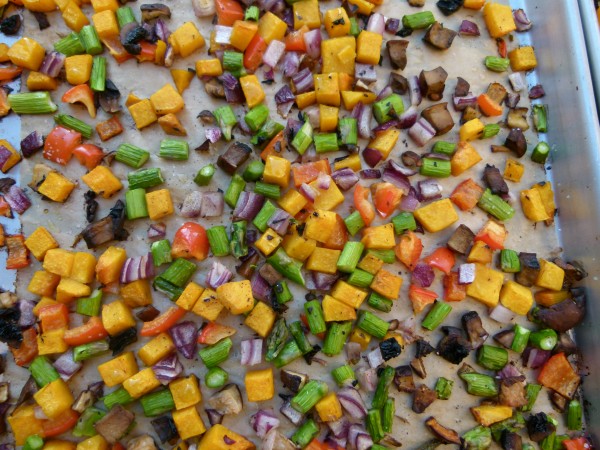
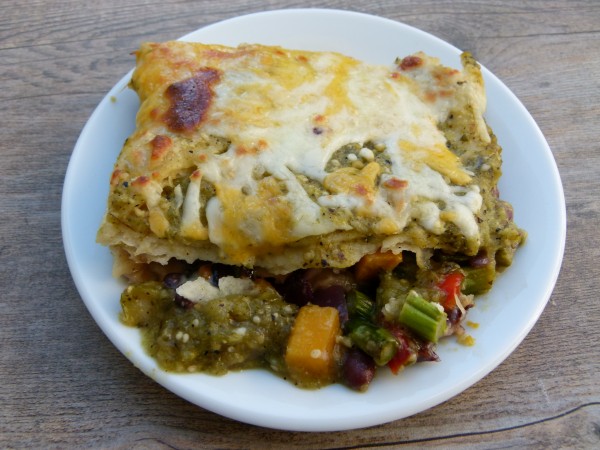
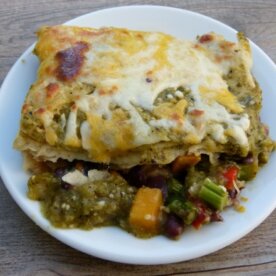
I’m sure you can see from my pictures that dicing up 3 sheet pans of vegetables was a bit of work. When I do this for my family, it’s no big deal. But besides the vegetable prep, there is also the task of rolling each tortilla around a small amount of filling and nestling them side by side in a baking dish. So the first pan started that way until I started cursing myself for not having volunteered a lasagne, the perfect potluck dish to feed a crowd. LIGHTBULB! Enchilada Lasagne! At the rate I was going, there was no way we would make it to dinner even fashionably late. So I took 6 corn tortillas and made one layer on the bottom of the baking dish, dumped half of the remaining filling on top plus a few sprinkles of cheese, put down another 6 tortillas in one layer and covered the whole thing with tomatillo sauce and a bit more cheese. 2 minutes. Done. Am I a genius or an idiot? Toss-up.
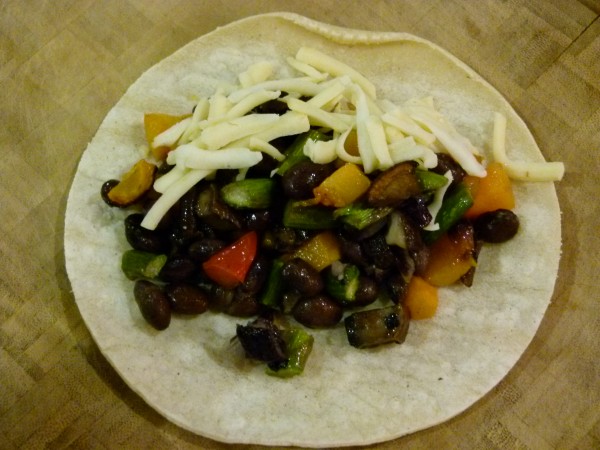
There are so many delicious vegetables you can use, or use up if you have a bunch of random odds and ends in the fridge. This time around I used butternut squash, sweet bell pepper, shiitake mushrooms, asparagus and red onions, but I have also added sweet potatoes, zucchini, and carrots. I’ve never used sauteed or blanched greens, such as spinach or Swiss chard, but I think I will the next time around. I was going to post this recipe next month, but it occurred to me that you all may be entertaining for the Super Bowl this weekend and my new discovery of the Enchilada Casserole would be the perfect thing to serve a crowd. Here are a few ways to make this even easier for you:
Use pre-made enchilada sauce — but only if you have access to a good one or if you can’t find fresh tomatillos.
Make your own sauce, but do it the day before.
Dice and roast your vegetables the day before or first thing in the morning. Keep them in a covered container in the fridge until you are ready to assemble your enchiladas.
Make the casserole version. It will take sooooo much less time, especially if you are making more than one pan of it.
Assemble it in the morning. That will give you time to clean up the family room and whip up some guacamole before your guests arrive.
Freeze it. Thaw it out and bake for a delicious dinner another busy night.
Are you planning on having people over for Super Bowl Sunday? Other great options can be Vegetable Chili served over brown rice, quinoa or millet; a Taco bar; a Fajita bar; a Baked Potato bar; and of course, Guacamole and Baked Tortilla Chips. As you can see, I am happy to cook before the opening kick-off, but then everybody needs to fend for themselves so I can concentrate on the game. Go Giants! By special request, my famous cornbread recipe coming up on Friday!
5-6cupsmixed vegetablessuch as butternut squash, zucchini, sweet bell pepper, red onion, mushrooms, apsaragus, cut into ½-inch cubes
Olive oil for drizzling
Sea salt and freshly ground black pepper
1 ½cupscooked black beans or 1 15-ounce candrained and rinsed
Sauce:
20medium tomatillosabout 2 ¼ pounds, husked and washed
1jalapenostem removed (will make the sauce a 5 on a heat scale of 1 to 10)
½small onionpeeled
3garlic cloves
10sprigs cilantro
1Tablespoonsea salt
3Tablespoonsolive oil
12corn tortillas
grated cheese(such as Monterey Jack) if desired or crumbled queso fresco
Instructions
To roast vegetables: Preheat the oven to 375 degrees. Place the vegetables on a parchment-lined baking sheet. Drizzle with oil and toss to coat evenly. Sprinkle with salt and pepper. Roast until tender, but not over-cooked, about 25 minutes. Add the black beans to the vegetables and mix together or put everything into a bowl to combine.
Place all the tomatillos and the jalapeno on a baking sheet. No need to line with parchment paper. Change the oven to broil. Place under the broiler for about 10 minutes, turning over after 5 minutes until tomatillos are lighter in color and contain a few brown spots. Change oven to 350 degrees if baking the enchiladas right away.
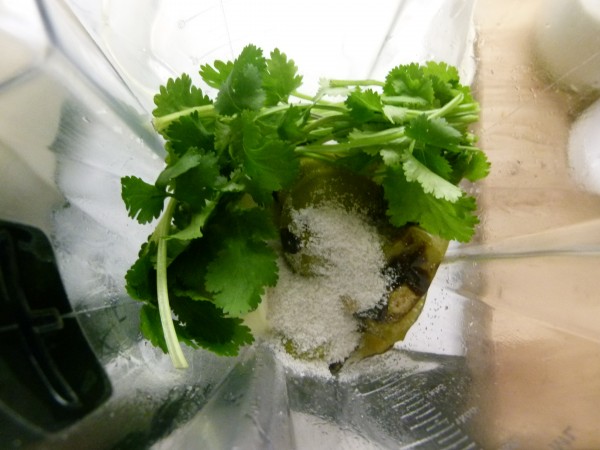
Transfer the tomatillos to a blender or a food processor with the jalapeno, 3 garlic cloves, ½ onion, cilantro and sea salt. Process until smooth. You should have 4 cups of sauce.
Heat a skillet over medium heat and warm the olive oil. Add the tomatillo sauce and simmer 5 minutes.
In the meantime, warm the tortillas on a griddle or skillet on both sides until softened.
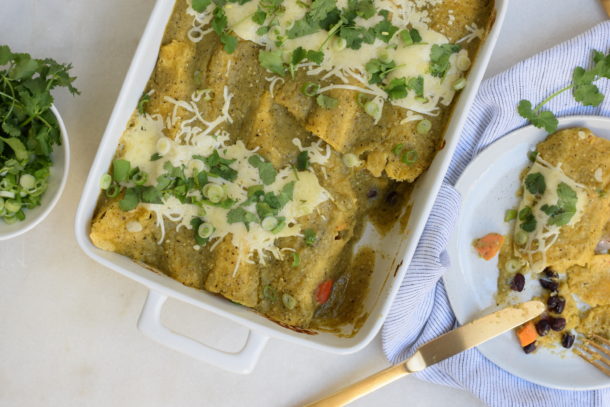
Pour 1 cup of sauce on the bottom of a 13x9-inch baking dish. Place about 1/3 cup of vegetables down the middle of a tortilla and roll tightly. Place seam-side down in the baking dish. Repeat with each tortilla. Cover all the rolled tortillas with remaining sauce. Sprinkle with grated cheese, if desired. Bake until heated through and cheese is melted, about 10-12 minutes. Serve immediately.
Casserole version: Pour 1 cup of sauce on the bottom of a 13 x 9-inch baking dish. Place 6 corn tortillas in one layer on top of the sauce. Spread all of the vegetables and beans on top of the tortillas. Sprinkle with cheese, if desired. Arrange another 6 corn tortillas over the vegetable mixture in one layer. Pour enough sauce to cover well and sprinkle with more cheese, if desired. Bake until heated through and cheese is melted.
Notes
Leftovers? Chop up the enchiladas and add to a pot of chicken broth. Heat and serve. Enchilada Soup!