Mushroom and leek stuffing recipe


When I married my husband over 17 years ago (gasp!), I was more than excited to start hosting some of the holidays at our new home. But I soon realized that my husband’s traditions were slightly different from the ones I grew up with, especially on Thanksgiving. What? No first course of pasta with marinara sauce? Strange, I thought, but I could adapt! My mother-in-law kindly shared with me the way things were done on the West Coast. She liked to serve everyone a salad to start and plate the main dinner for each person in the kitchen. Turkey and gravy, mashed potatoes and stuffing were all givens, and their stuffing of choice was Pepperidge Farm. No problem!

My husband and I have hosted every Thanksgiving since 1996 and enjoy the comfort that develops when you do something over and over again. I have since incorporated my own traditions like buffet – easier and much less waste – and soup to start. About 6 years ago I decided to examine the ingredients on the seemingly innocuous bag of Pepperidge Farm stuffing. Holy crap. I couldn’t believe the garbage that went into breadcrumbs! One thing I knew for certain was that Pepperidge Farm was uninvited to Thanksgiving…forever!

Actually, if it were up to me, I would drop stuffing from the menu altogether. I really don’t get it. With ALL the delicious food on the Thanksgiving table, many of the dishes starchy, we’re going to eat gussied up bread, a food we already overeat on every other day of the year?? I was trying to explain to my husband that mashed potatoes, sweet potatoes and butternut squash are all starches, as is the obligatory cornbread. We should balance out the meal with additional vegetables, like Brussels sprouts! “You’re taking this health food thing a little too far. The stuffing stays!”
Although I like to think of myself as the dictator of my kitchen empire, the director of Thanksgiving, I’m really a democratic leader. I figured my only option was to create a delicious, higher quality stuffing that looked like Pepperidge Farm and tasted enough like it, but even better. So here’s my take on a good classic stuffing that’s not too gourmet, in fact tastes very close to our old preservative-laden standby. I usually make two for our dinner, one with mushrooms to suit me and one without for my hubby.

I’ve tried this stuffing with whole grain breads like whole wheat or spelt, but truthfully it tastes a little “wheat-y.” There was a fantastic bread I used to buy from Whole Foods called Miche, which was a sourdough bread made of a blend of whole wheat and white flours. That was about as whole grain as my family could take on Thanksgiving. Truth be told, I prefer to go down in our family history as the benevolent one who said, “ let them eat stuffing!”

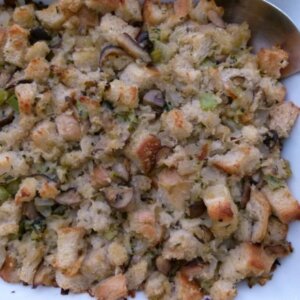
Mushroom and Leek Stuffing
Ingredients
- 1 ½ pounds rustic whole wheat or white bread hard crust removed
- 6 Tablespoons unrefined cold-pressed extra-virgin olive oil
- ½ pound shiitake mushrooms wiped clean, stems removed and discarded, caps sliced
- ½ pound cremini mushrooms wiped clean, quartered
- 2 stalks celery chopped
- 1 large onion chopped
- 2 leeks cleaned and sliced
- 3 garlic cloves minced
- 1 ½ teaspoons fresh thyme chopped
- 1 teaspoon dried sage or poultry seasoning or 2 teaspoons fresh sage chopped
- 2 Tablespoons flat-leaf parsley chopped
- 2 teaspoons sea salt or 3 teaspoons if using unsalted stock
- ½ teaspoon black pepper
- 3-4 cups chicken turkey or vegetable stock (depending on if you like it wet or dry)
- 2 Tablespoons unsalted butter cut into small dice (optional)
Instructions
- Preheat oven to 350 degrees.
- Place bread in a food processor and process into large crumbs or cut into ½-inch dice. (I like to do a combination.) You should have 10 cups. Spread bread over 2 large shallow baking pans and bake in upper and lower thirds of oven, stirring occasionally and switching position of pans halfway through baking, until completely dry, about 25 minutes. Transfer bread to a large bowl.
- Increase oven temperature to 450 degrees and grease a 13x9-inch baking dish.
- Heat olive oil in a large skillet over medium heat. Add mushrooms, celery, onion, leeks, and garlic, and sauté, stirring occasionally until softened, 10 minutes.
- Stir in thyme, sage, parsley, salt and pepper. Add vegetables to bread, tossing to combine.
- Pour chicken broth over the bread mixture, tossing to coat evenly.
- Spread stuffing in a baking dish, dot with butter and cover tightly with foil. Bake in upper third of oven until heated through, about 20 minutes. Remove foil and bake stuffing until top is browned, 10 – 15 minutes more. Stuffing can also be baked in a well-greased 12-cup muffin tin.
Notes
Bread crumbs can be prepared several days in advance.
Vegetables can be chopped the day before.
Entire casserole can be prepared up to the point of baking the day before and refrigerated or frozen and then thawed and baked according to the directions.
Vegetables can be chopped the day before.
Entire casserole can be prepared up to the point of baking the day before and refrigerated or frozen and then thawed and baked according to the directions.
Tried this recipe?Let us know how it was!
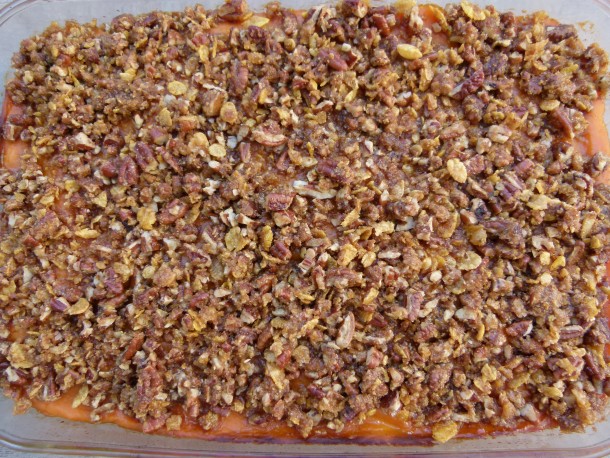
Sweet potato casserole recipe

There are a few recipes I make on Thanksgiving that I call “one-hit wonders.” That is to say I don’t make them on any of the other 364 days in the year. I’m no fan of stuffing, for example, so I keep the masses happy by making it on the holiday and then we forget about it until next year. My Maple-Glazed Sweet Potato Gratin was in the same category for no other reason than it just seemed a little decadent to serve on a day that isn’t considered the biggest meal of the year.

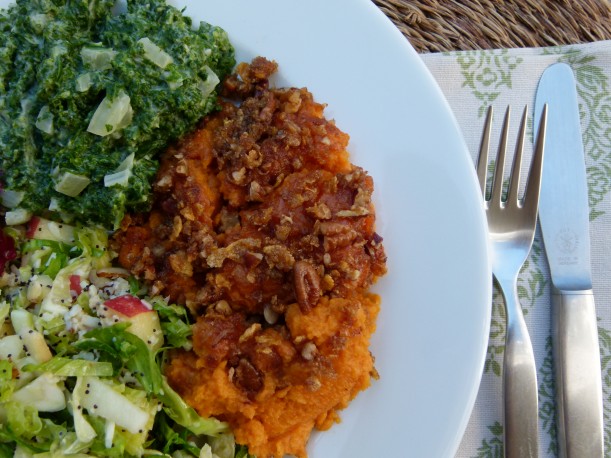
Just for fun, I recently tried a new sweet potato recipe which my kids absolutely flipped for. Not only has this Sweet Potato Casserole bumped the former gratin out of the coveted spot, but my kids have begged me to make it multiple times since then. My girls have even eaten it for breakfast and as an after-school snack. I am crazy for sweet potatoes any which way and I am perfectly content with a nice big juicy one plain and simple. So when recipes start adding cups of brown sugar with marshmallows or oatmeal cookie dough on top, I can’t take them seriously. We’re going to try and keep things classy over here, ok?
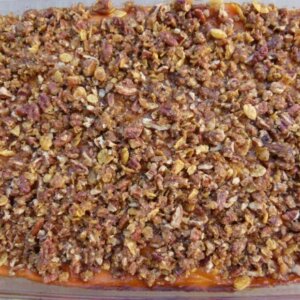
But there was something intriguing about this recipe from Food & Wine that I had to try. Despite the pureed sweet potato base mixed with eggs, milk, butter and an obscene amount of sugar, I saw potential. The topping is what really had me since I just love a contrast in textures. I could already taste the silky puree with the light and crispy cinnamon-nutmeg flakes and nuts. Even after I cleaned up this recipe by cutting the sugar by almost two-thirds, the casserole was still absolutely divine and a perfect complement to your Thanksgiving buffet. It’s also super easy to make if you have a food processor and can be done in advance (Thanksgiving magic words!) By the way, I have also made this recipe dairy-free with success by using coconut oil instead of butter and unsweetened hemp milk instead of regular. Since it’s already gluten-free, everyone’s happy!
What? Did you just call me “trashy” behind my back for using cereal in a Thanksgiving recipe? Guilty. Maybe I deserve it. You know what I say? Worth it!
Sweet Potato Casserole
Ingredients
- 5 ½ pounds sweet potatoes such as garnet or jewel, scrubbed (these are often labeled "yams" at the market)
- 1 ½ sticks unsalted butter or ¾ cup unrefined coconut oil melted, divided
- 1 ½ teaspoons sea salt + a pinch
- 1 ½ teaspoons ground nutmeg divided
- 1 Tablespoon pure maple syrup
- 1 cup whole milk or plain unsweetened hemp milk
- 3 large eggs beaten
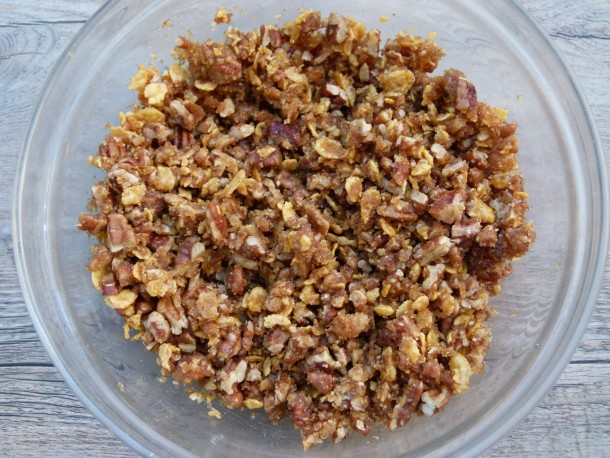
- 1 cup pecan halves or pieces about 4 ounces
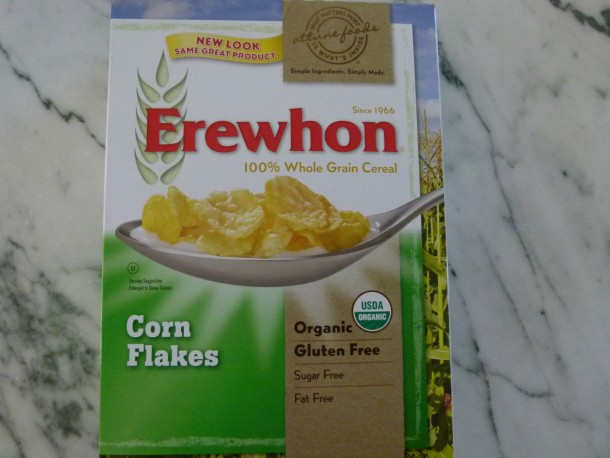
- 1 cup cornflakes crushed
- ½ teaspoon ground cinnamon
- ½ cup maple sugar or brown sugar
Instructions
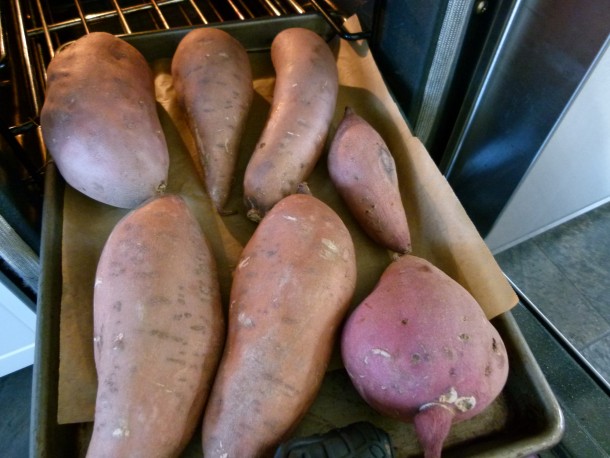
- Preheat oven to 400 degrees. Place the sweet potatoes on a parchment-lined baking sheet and bake in the oven until tender, about an hour, but could be more depending on size. Or you can also boil peeled, cubed sweet potatoes in water for 15 minutes or until tender and drain, but I think roasting the sweet potatoes makes then sweeter.
- Lower the oven temperature to 350 degrees. Butter a 13 x 9 inch baking dish.
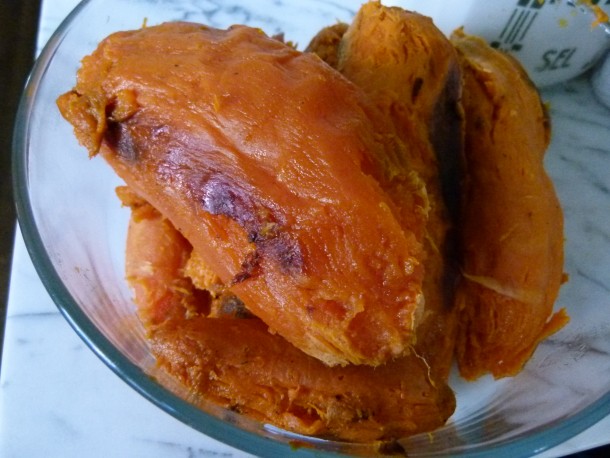
- When the sweet potatoes are cool enough to handle, peel and discard the skin and place potatoes in a food processor. Puree until smooth. Do this in batches if necessary.
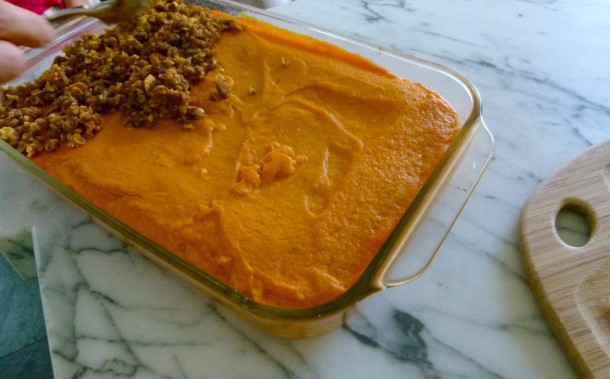
- Transfer the puree to a large bowl. Add half the butter (6 Tbs.), salt, 1 teaspoon nutmeg, maple syrup, and milk. Stir to combine and then stir in the eggs. Pour the mixture into the prepared baking dish and smooth the top with a spatula. Recipe can be made up to this point one day in advance and kept covered in the refrigerator. Cover with foil and bake 40 minutes.
- Spread the pecans on a baking sheet and bake for 5 minutes, until lightly toasted. Transfer the pecans to a cutting board and coarsely chop. In a bowl, toss the pecans with the cornflakes, cinnamon and remaining 6 tablespoons of melted butter, ½ teaspoon nutmeg, maple or brown sugar and a pinch of salt.
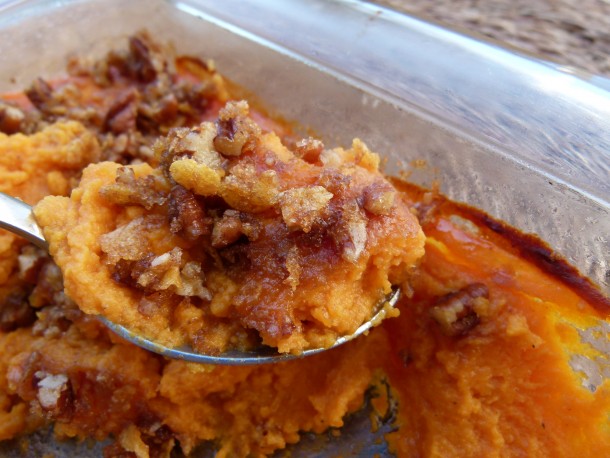
- Remove foil from casserole. Distribute small clumps of topping all over sweet potatoes. Bake, uncovered, for 40 minutes longer, until topping is golden and sizzling. Let casserole stand for 20 minutes before serving. ( I have also baked it covered for 30 minutes, uncovered for 30 and it still turned out great!)
Notes
You can bake this up to 4 hours in advance and serve it warm or at room temperature.
Tried this recipe?Let us know how it was!
Planning a Happy Thanksgiving — 2 Weeks and Counting


This post was originally published on November 10, 2011.
Thanksgiving is 2 weeks away! Is the exclamation point there to emphasize panic or joy? I’m excited! I’ve been teaching quite a few Thanksgiving-themed classes as of late and I’m feeling spirited. One of my students said to me today that my Thanksgiving planning blogs are stressing her out. Yikes! Of course that was not my intention. The whole point is to show you what you can do in advance, not what you must do in advance. All these tips and strategies are most relevant to the hosts and hostesses who are preparing most or all of the meal themselves and who have a busy schedule leading up to the holiday. If I didn’t get a lot of these tasks completed early, I don’t see how I could pull off this meal without tons of stress.
Here’s what you can get done this week:
- Get your knives sharpened Especially your carving knife. A razor-sharp knife is the most important tool in your kitchen. In my area, you can get your knives sharpened at Sur La Table, the farmer’s market and at the local cutlery store at the mall. I think Sur La Table charges $1/inch.
- Make your grocery lists I make three lists:
- Non-perishables (e.g., flour, spices, wine, nuts, dried fruit) I buy these now.
- Perishables to buy one-week ahead (e.g., winter squashes, butter, hard cheeses, potatoes)
- Perishables to buy two days before (e.g., turkey, dairy, bread for stuffing, all other fruits and vegetables)
- Buy to-go containers I always make too much food and I like sending care packages home with my guests to enjoy the day after, especially our single friends. This year I am definitely packing up all the extra desserts so that they aren’t tempting me the next afternoon when I’m shopping for holiday gifts online. I love the idea of having people bring their own reusable containers, but for me it’s easier to get these disposables from my local Smart & Final.

- Clean out the refrigerator I’ll get to this over the weekend. Now is a great time to get rid of food past its prime or to get creative with the last spoonful of nut butter or those four olives just to make more space in the fridge. I have a second, inexpensive refrigerator in the garage which really comes in handy for big dinners. If you don’t have the extra space, see if one of your neighbors is going away for the holiday and can store your chutney and jam collections for a few days.

- Check your instant read thermometer This tool the only way you’ll be able to tell if your turkey is cooked properly, so it’s important that it’s accurate. If you’re unsure, stick the tip of the thermometer into boiling water. If the temperature reads 212 degrees Farenheit, you’re good to go.
Perfect Apple Pie Recipe


I am teaching Apple Pie in my Thanksgiving classes this month and I thought I really should share the recipe with you too, my dear readers. Perfect for Thanksgiving or if you’re hunkered down watching Election Day coverage tonight. What is more American, classic and delicious in the fall than a homemade apple pie? It just oozes love and hugs, don’t you think? My boyfriend in college was so smitten when I made him an apple pie, I think it’s one of the reasons he asked me to marry him! Still works!


In addition to pumpkin pie, apple has been on my Thanksgiving table every year since I’ve been married. I make it the way I like it, not too sweet and not overly spiced, so you really taste the apples. At this time of year, there are so many varieties of apples with different flavors and textures, and everyone has his or her favorite. But I think the secret to the best apple pie is using a few different types of apples. When I make apple pie, I like to choose a sweet, a tart and a soft variety. The flavors are more complex and texture is fabulous.

Do plan ahead when making any pie, especially if you are making the crust from scratch, which I definitely think you should! Pies take a good hour to bake and I think they benefit from cooling a bit out of the oven. The juices settle and thicken up and I think apple pie tastes better warm, rather than piping hot, but I know some of you will disagree.

If you are looking to do some of the work in advance, you can make your crust a few days ahead and refrigerate it or a few months ahead and freeze it. You can also combine your dry ingredients for the pie filling ahead and keep the mixture in a covered container in the pantry. Unfortunately, you will need to peel and slice your apples just before filling your pie, but it’s a fun activity to do at the kitchen table with your child or friends. I bake two apple pies on Thanksgiving morning, but I make sure they are out of the oven before the turkey needs to go in. When the girls were younger, they would always help peel and slice the apples while we watched the Macy’s parade on television. It’s a lovely memory of time together in the kitchen, but it’s just a memory since the girls haven’t woken up before 11:00 am on Thanksgiving in a few years. Although I’ll admit, the smiles on their sleepy faces as I pull those pies out of the oven is still just as precious.


PERFECT APPLE PIE
MAKES 1 9-INCH DOUBLE-CRUST PIE
3 Tablespoons all-purpose flour (this gets used in the filling) + more for dusting countertop
1 large egg yolk
1 Tablespoon heavy cream, half-and-half, or whole milk
1 pound tart apples, such as Granny Smith
1 pound sweet apples, such as Fuji
1 pound soft apples, such as Golden Delicious
2 Tablespoons fresh lemon juice
¼ cup organic cane sugar + extra for optional sprinkling on crust
1 teaspoon ground cinnamon
pinch ground nutmeg
¼ teaspoon sea salt
1 Tablespoon unsalted butter, cut into small pieces
- Roll one disk of pie dough on a lightly floured countertop, regularly checking to make sure disk is not sticking to counter. Roll into a 12-inch round. Fit pastry into a 9-inch pie plate. Roll second disk in the same manner. Transfer to a baking sheet and refrigerate pie shell and 12-inch round until ready to fill pie.
- Preheat oven to 400 degrees. In a small bowl, whisk together egg yolk and cream.
- Peel, core and slice apples crosswise into ¼-inch slices. Transfer to a large bowl and mix in lemon juice, sugar, flour, cinnamon, nutmeg and salt. Combine well. Arrange apple mixture in pie shell and dot with butter.
- Place the rolled out disk on top of the apples and press down gently. Press together the dough at the rim of the pie plate to seal. Tuck top dough under bottom dough and crimp around the edge as you like. Brush the top of the pie with the egg wash and sprinkle with sugar, if desired. Cut three slits into the top center of the pie crust to allow steam to escape. If pie dough is feeling very soft, place pie in the freezer until firm.
- Place pie on a baking sheet. Bake 20 minutes. Reduce oven temperature to 350 degrees. Continue baking until the crust is golden and the juices are bubbling and have thickened, about 40-50 minutes more. Transfer to a cooling rack to cool. Pie can be kept at room temperature for up to 2 days.
How To Make Pie Crust


I am a total sucker for seasonal fruit desserts, and pies are no exception, especially in the summer and fall. But we know each other well enough by now to know that I’m not a big dessert pusher. I think overdoing sugar and refined foods like white flour can really compromise your health. But, during the holidays when the apples, pears and pumpkins are at their peak, I rationalize it all by adding a hefty dose of love to my pies!

What is nice about seasonal fruit desserts is that the fruit should be naturally sweet enough that we don’t need to add too many sweeteners to make them taste fabulous. Typically, I use 4-6 Tablespoons of sweetener in a whole pie which can serve 8-10 people, and I don’t think that’s over the top. Many cakes call for 2 cups of sugar just to provide you with a reference point.

Looking on the bright side, I love how “homemade” pies are. The fruit is peeled and cut by hand, and if you make your own crust, that too is rolled and shaped by your loving hands. In fact, I think pies look better and more special when they have that imperfect crimping and uneven glaze – a telltale sign that this came out of my kitchen.

Many people have told me that making pie crust looks intimidating. But if you’ve ever made and rolled out cookie dough, it’s actually easier than that! Even though I have a pie recipe posted on the site, I thought it would be helpful to include a step-by-step post for how to make pie crust. Here are a few tips to help:
- Necessary tools You don’t need much, but a food processor or a pastry blender are very helpful. If you have neither, I have used 2 knives with success. On the other hand, besides an empty win bottle in a pinch, I haven’t found a good substitute for a rolling pin, which you’ll need to roll out the dough.
- Cold Keeping everything cold is half the battle in making excellent dough. If the butter warms up, it can make your dough too soft and it can melt on you. Butter can be cut ahead and put back in the fridge. Even your flour can be refrigerated. And it is essential that the water you add is ice cold. Some people like to make their pies in the morning, before the kitchen heats up. And keeping this tip in mind, if you have to take a break from making your crust, or if your pie is ready to go in the oven but it seems a little soft and sticky, place everything into the refrigerator to firm it all up.
- Butter I know there are many people who can argue that a combination of butter and shortening or butter and lard make the tenderest, flakiest pie crusts, but you couldn’t pay me to eat Crisco or hydrogenated oils and I don’t have access to organic lard from grass-fed cows, so that’s not an option. Organic butter is a natural, whole food and I’m ok with it in moderation.
- Flour Here’s the problem. I hardly ever use white flour. It’s refined and processed and basically a dead food with no nutrition. I love using whole wheat pastry flour or white whole wheat flours whenever I can in place of white flour, but not in pastry dough. Whole grain flours tend to result in a much drier, more crumbly dough which isn’t very easy to roll out. It also tastes more “whole wheat-y” which my family doesn’t care for when they’re eating an apple pie. If you must include some whole grain in your dessert, you can make the dough with half white and half whole wheat pastry flour. I used to make half my pies like this for Thanksgiving and my sister-in-law and I were the only ones who would eat the wheat ones. What’s the point of that? Another option is to use white spelt flour, which is more water soluble than wheat flour, is a little more digestible and has a sweeter flavor. White spelt flour makes very nice pastry. If you just can’t go there, fruit crisp is always an option!
- Water Pie crust recipes should give you a range for how much water to use because it’s impossible for every cook to be working under the same conditions. Moisture is something that will vary in the air, flour and butter that we use. Always start with the lower range of water listed and increase as needed.
- Don’t over mix Pie crust is not like cake batter. You actually do NOT want to completely blend the butter into the flour. In fact, it is ideal if you have little pea-sized pieces of butter in your dough. When the crust bakes in the oven, the heat will cause the moisture in the butter to steam up, creating the wonderful flakiness you want.
- Give it a rest This is a step you don’t want to skip since it accomplishes two important things. Allowing your dough to chill out in the refrigerator helps the gluten in the dough relax so you don’t have tough pastry and it also firms up that butter again (see second tip above.) 30-60 minutes is enough time to do this, however you can absolutely refrigerate the dough for a couple of days or freeze it for a few months, if necessary.

- Rolling it out If your dough has been in the refrigerator for more than an hour, you may need to let it sit on the countertop for 15 or 20 minutes so that it will be easy for you to roll out. If the dough starts cracking, it’s likely because it’s too cold. Lightly flour your countertop and your rolling pin and start rolling from the center out, regularly checking to make sure your dough can always move around on your countertop without sticking. If you really have a hard time rolling out the dough, you can stick it between two pieces of plastic wrap and roll it out that way. To know if you’ve rolled it out enough, invert the pie plate over the rolled out dough. If you have a good two inches beyond the rim of the plate, you’re good to go.

- Moving the dough to a pie plate It sounds trickier than it is. I usually gently fold the dough in half and transfer it to a pie plate that way, but you can also roll the dough around the rolling pin and then unroll it onto the pie plate. Fit it into the plate.
- Blind baking Sometimes a recipe will tell you to prebake the pie crust before filling it. This is common with liquidy fillings such as custard or pumpkin, or if you cook the filling separately and you won’t be putting the pie in the oven. With the crust inside a pie plate, prick the crust all over the place with a fork. Place a piece of parchment paper on top of the crust and fill the parchment with pie weights or dried beans (the beans won’t be edible after you bake them, though. Just keep them for the next pie. I’ve been using the same dried beans since college –swear!) This prevents the crust from puffing up.
- Finshing It doesn’t have to be perfect. Do your best and have fun. I seal the top and bottom crusts together and use my thumbs and pointer fingers from both hands to pinch the dough. Or an easier method is use the tines of a fork and press the crust all along the rim of the plate. Lastly I cut a couple slits in the center of the top crust so steam can escape and you won’t have a watery pie. Glazing with an egg wash makes the pie look beautiful, but if egg is out of the question, you can use a little cream.

Although I have made many pies in my day, I still love learning how to do things better. Please share your favorite tips and tricks for making pie crusts and pies. I’d also love to hear what desserts you are all making for Thanksgiving!!!!


Pie Crust
Ingredients
- 2 ½ cups all-purpose flour or white spelt flour
- 1 teaspoon cane sugar
- 1 teaspoon sea salt
- 2 sticks unsalted butter cut into pieces
- 5-8 Tablespoons ice water
Instructions
- Place the flour, sugar and salt in the bowl of a food processor fitted with the metal blade and pulse a couple times until blended.
- Add the butter to the flour and pulse until the mixture resembles small peas.
- Pour 5 Tablespoons of ice water on top of the flour mixture and pulse about 10 times. Avoiding the blade, carefully grab a small handful of dough and squeeze together. If the dough holds together without crumbling, it’s ready to be formed into a disc. If it’s too dry, pulse in another few teaspoons of ice water until dough holds together.
- Transfer dough to a piece of parchment and bring dough together to form a ball. Divide in half and shape into two disks. Wrap each disk in parchment and refrigerate at least 30 minutes at which point it will be ready to roll out. Or you can keep the dough refrigerated for 2-3 days, or in the freezer, well wrapped for 2-3 months.
Tried this recipe?Let us know how it was!
Planning a Happy Thanksgiving — 3 Weeks and Counting


Wishing all of you affected by Hurricane Sandy a speedy recovery!
This post was originally published on Thursday, November 3, 2011.
If you followed the advice in my post last Thursday, perhaps you now have a general idea of how many guests you will be hosting on Thanksgiving. If not, it’s time to get on the phone and do some inviting! Do you have a good balanced menu and have you taken guests up on their offers to bring something? This week we have a few more tasks that we can check off the list.
3 weeks before thanksgiving
- Order the Turkey If you eat turkey on Thanksgiving, it’s a good idea to order it now. I have always ordered a fresh, free-range, organic turkey, because in my opinion they have a tasty turkey flavor and are better for you than most other alternatives. The only thing that may be better is a heritage turkey, which has a much stronger turkey flavor and supposed to be more moist. It will have less breast meat though and will be more expensive. Avoid “self-basting” turkeys which are injected with anything from chicken fat to salt to chemicals. True, they are easier to cook, but I think they taste more like salt than turkey and they are just full of stuff you don’t want to feed your family.
Here are some questions that will help you decide size:
How many ovens do you have? If you have one large oven that can accommodate two turkeys side by side and an extra oven to spare (you’re so lucky!), then you have the option of cooking two smaller birds versus one large one. But with two small ovens, you may not want them both being monopolized by turkeys.
Are your guests dark meat-eaters or white meat-eaters? You will get more white meat by weight from one large bird than from two smaller. Likewise, you will get more dark meat from two smaller birds than from one large one.
How big a turkey should you buy? The rule of thumb is one pound of turkey per person. So if you are expecting 16 guests, you should order a 16 pound turkey. That doesn’t mean that you will have 1 pound of meat per person, though. I think this is a good rule if you don’t want leftovers or if your guests are not big eaters. So last year I cooked 2 17-pound turkeys for 20 adults and 5 kids and I had just enough leftovers for the five of us for dinner the next day.
Do you have a bad back? What does this have to do with anything? A very large turkey is mighty challenging to keep pulling out of the oven to baste. I find two smaller turkeys much more manageable, if you have the oven space.

- Planning Your Table Decor I don’t do anything fancy for my table decorations, but it’s nice to make the table look special. Now’s the time to check your linens for stains and make sure you have enough napkins, plates and glassware. I generally like to do something simple with fresh flowers in autumnal colors and add in a few of the kids’ Thanksgiving art projects from years past. I just adore Jenni Kayne’s table setting at the top of the post. Check out all her lovely holiday photos and ideas on her ripplustan.com blog — beautiful! But you can put out bowls of apples and pears or gourds and nuts, add in a few votive candles and it will look beautiful. This year I’m doing something craftsy with the help of my kids and my friend Marcie, who started a very cool line of paper table decor called Mixt Studio. I’m not sure if her stuff will be ready for Thanksgiving, but if it isn’t, I’m going to copy this cute paper flower and use it as a place card attached with an inspiring quote. Love that idea! I have another talented friend, Lee who owns a local flower shop called Growing Wild along with her equally talented (they’re twins!) sister Lisa. I couldn’t help but admire their lovely arrangements, one of which I pictured below to give you some inspiration. If tablescape isn’t your thing, you can always order from your local florist or full service market. Just get on it this week.

- Make your pie crusts and freeze them You can freeze them in disc form or roll them out, fit them into pie plates and freeze them, well wrapped.
- Make your homemade stock and freeze it I use over a gallon of chicken stock on Thanksgiving for soup, stuffing and gravy.

- Make your dry mixes for pie fillings, cornbread and other baked goods. Not only are there never enough ovens on Thanksgiving day, but there are never enough measuring cups and spoons either. I measure out the dry ingredients, store them in a glass jar and label each jar, e.g. “Dry Mix for 2 Pumpkin Pies.” I didn’t label them the first year I did this and let me tell you — pumpkin pie spices smell A LOT like apple pie spices.
- Check your inventory of helpful tools and appliances Here’s my list of Thanksgiving essentials:
- — the only way to know if your turkey is ready.
- Roasting pan(s) and racks(s)
- Fat separator
- Twine for trussing
- Baster
- Potato ricer— for making the best mashed potatoes

More recipes to come, but these would be perfect for Thanksgiving:
Muhammara (roasted red pepper dip)
Butternut Squash, Beet and Apple Skewers (if you only have to make one thing or if the kids can skewer for you)
Sweet Potato-Coconut Soup (it doesn’t taste like coconut!)
Harvest chopped salad


Halloween is tomorrow, but to tell you the truth, I don’t make much of an effort to show my “spirit” with cupcakes that look like spiders or swamp slime green Jell-o. Do my kids really need marshmallow ghosts on top of the candy I have not forbidden them to inhale as they trick-or-treat? Silly question! Actually, my only food strategy on Halloween is to make a very hearty , filling dinner, like vegetable chili with brown rice, so the kids aren’t starving while they carry around a sack o’chocolate. Works for me!

If you checked out my post last Thursday, you probably guessed I have bypassed Halloween and gone straight into Thanksgiving mode. Not only have I already taught two Thanksgiving classes, but I am starting to check tasks off my list. Invites — out. Menu — planned. Turkeys — ordered. So if you’re like me and you’re daydreaming about maple-glazed root vegetables instead of witch cakes, let’s get down to business!


The vegetables are really the only part of the menu that I get to have any fun at all. My family and guests would have a rebellion if I didn’t make roasted turkey, mashed potatoes, stuffing and sweet potato casserole. So every year I try some new salads and vegetables just to mix it up a bit. This salad is one of my absolute favorites and not just for Thanksgiving. I have made this for other holiday dinners and for friends, and I always save a little extra for me for the next day’s lunch. This salad is the perfect complement to a Thanksgiving meal consisting of lots of cooked food, much of it soft and beige. Not only will all of these colors brighten up your holiday buffet table like little jewels, but you’ll be happy to have something juicy, crunchy and (is this a crime?) healthful to eat. Even though there are apples, pomegranates and dates in the salad, it doesn’t feel too sweet. It’s more like a tart-sweet, a perfect complement to roast turkey.

This salad is also ideal for Thanksgiving since you can prep almost all of it the day before. Oh yeah! No need to squeeze anything into your already monopolized oven or dirty any measuring spoons the day of. You can blanche the beans the day before, roast the beets two days before, chop fennel the day before and cover with a damp paper towel, seed the pomegranate several days before, chop walnuts whenever you want, and make the salad dressing several days in advance. The only last minute item is the apples which you can dice a few hours in advance and keep in ice water in the refrigerator. Just drain and pat dry before adding to the salad. How’s that for a plan!

Harvest Chopped Salad
Ingredients
- 6 ounces green beans trimmed
- 3 stalks celery or 1 bulb fennel diced (I prefer fennel.)
- 1 cup pomegranate seeds about 1 medium pomegranate
- 1 large crisp apple e.g. Fuji or Granny Smith, diced (peeled or unpeeled)
- 1 cup walnuts chopped
- 3 dates pitted and diced (easier to cut when they’re cold)
- 1 cup diced roasted golden beets can be done the day before*
- Vinaigrette: can be prepared several days in advance
- 2 Tablespoons fresh lemon juice
- 2 Tablespoons fresh orange juice
- ½ teaspoon fine sea salt
- a few grinds of black pepper
- 2 teaspoons minced shallot
- 2 teaspoons 100% pure maple syrup
- 3 Tablespoons unrefined cold-pressed extra virgin olive oil
- 3 Tablespoons walnut oil or use all olive oil
Instructions
- Prepare a large bowl with ice water. Blanche green beans for 2 minutes in boiling, salted water. Drain and submerge into ice water. Drain, pat dry and slice on the diagonal into bite sized pieces. (Can be done the day before.)
- In a large bowl combine beans, chopped celery, pomegranate, apple, walnuts, dates and beets.
- Prepare the vinaigrette: whisk all the ingredients in a small bowl. Pour enough vinaigrette over vegetables to coat lightly. Taste for salt and pepper.
Notes
*To roast 1-2 beets, wrap each one in parchment and then foil. Or follow the photos above to roast a pan of several beets. Roast in a 400 degree oven until tender when pierced with the tip of a knife. Large ones can take about 60 minutes. Allow to cool and then peel off the skins.
Tried this recipe?Let us know how it was!