Roasted Vegetable and Black Bean Enchiladas Verdes (and a casserole version!)

A few weeks ago, six other families and mine planned to get together for a pot luck at my friend Lana’s house.  One of the families keeps kosher, so we decided to go with a fish and dairy meal.  I thought these vegetable enchiladas verdes would be a great vegetarian option.  At least it seemed like a good idea at the time, but that’s because I wasn’t remembering Mr. Picky’s haircut after school that day and his basketball practice from 4-5.  I think I was just craving enchiladas on the day I volunteered and not thinking it was a bonehead move to offer to make them for 35 people.

Beautiful veggies ready to roast

Homemade enchiladas are one of my absolute favorite things to eat.  But I’m not talking about the overly cheesy and soggy kind.  I love a good (GMO-free) corn tortilla wrapped around either some poached chicken or vegetables and beans and then smothered in fresh tomatillo sauce.  You can even hold the cheese.  We ski a few times each year in Deer Valley, Utah, which is known not only for its great ski runs, but for pretty good lunch on the mountain.  Once in a blue moon they serve the most divine roasted vegetable enchiladas, which is how this recipe was inspired.  I actually prefer vegetable enchiladas over ones with chicken and my husband says he doesn’t miss the meat at all.

Roasted Vegetables

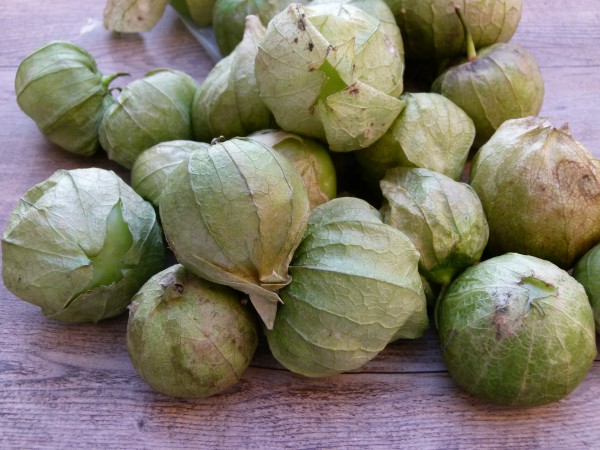
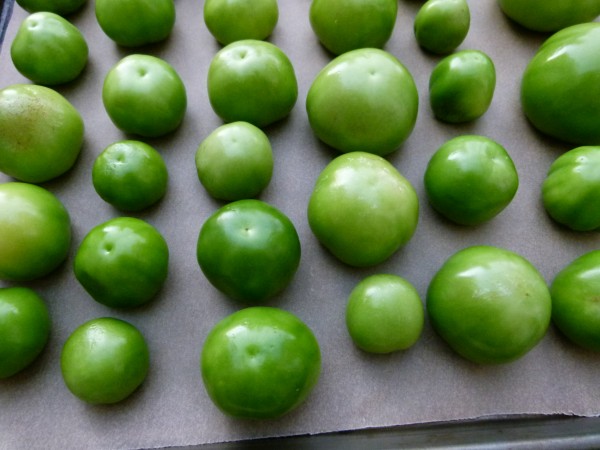
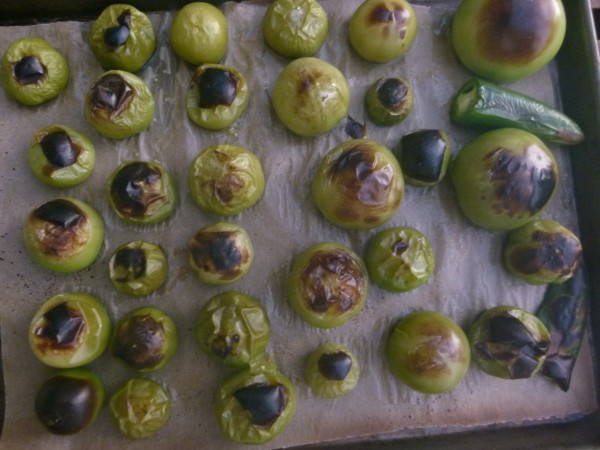
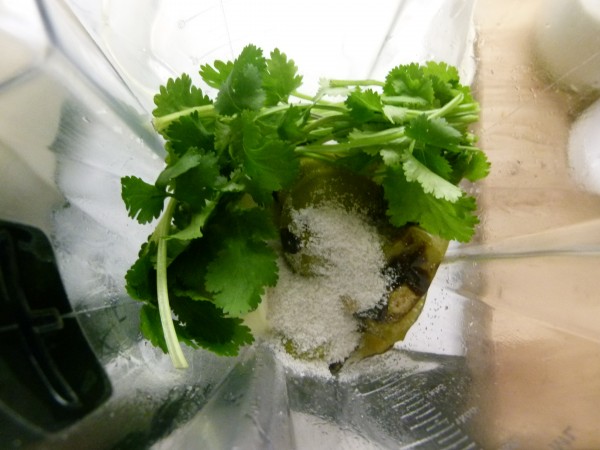
I also prefer the “green” version over the red and I love making tomatillo sauce from scratch.  Have you ever seen one of these cuties?  One of my students thought the supermarket prewraps each tomatillo in these paper husks, but in fact, they grow that way.  Tomatillos are related to tomatoes, but they have a tangy, puckery, sourness that Mr. Picky doesn’t care for, so his enchiladas are made with no sauce for now.  You know what I say?  More for me!  If you eat dairy, that tanginess does go particularly well with cheese or sour cream.  Just saying.  I tried several methods for making tomatillo sauce and broiling them on a sheet pan was not only easy, but that little bit of char on the tomatillos added tons of flavor to the sauce.  You can also boil them, but boiling vegetables, especially ones high in Vitamin C, isn’t usually my first choice.

Tomatillos

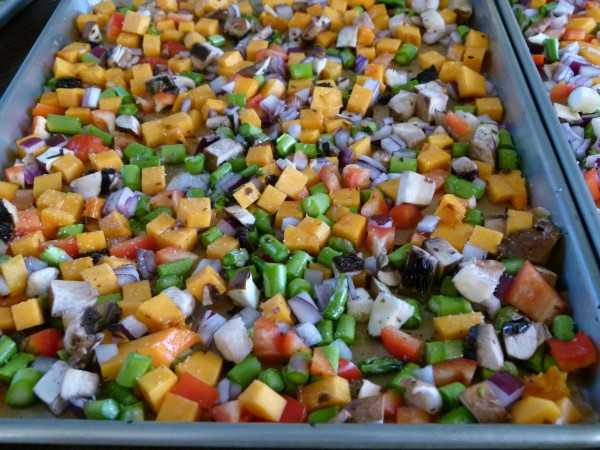
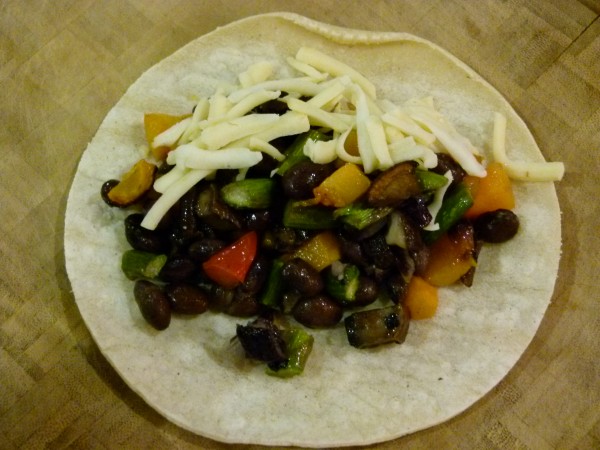
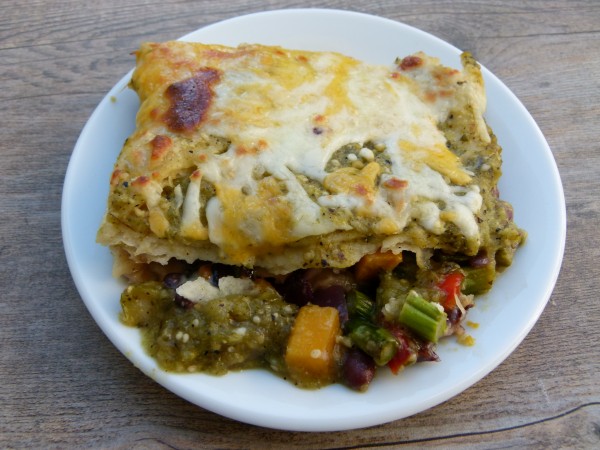
I’m sure you can see from my pictures that dicing up 3 sheet pans of vegetables was a bit of work.  When I do this for my family, it’s no big deal.  But besides the vegetable prep, there is also the task of rolling each tortilla around a small amount of filling and nestling them side by side in a baking dish.  So the first pan started that way until I started cursing myself for not having volunteered a lasagne, the perfect potluck dish to feed a crowd.  LIGHTBULB!  Enchilada Lasagne!  At the rate I was going, there was no way we would make it to dinner even fashionably late.  So I took 6 corn tortillas and made one layer on the bottom of the baking dish, dumped half of the remaining filling on top plus a few sprinkles of cheese, put down another 6 tortillas in one layer and covered the whole thing with tomatillo sauce and a bit more cheese.  2 minutes. Done.  Am I a genius or an idiot?  Toss-up.

Tomatillos Ready to be Broiled

Charred tomatillos and jalapenos

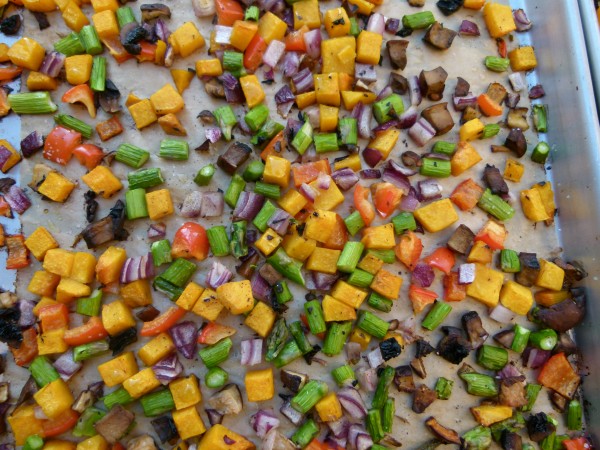
There are so many delicious vegetables you can use, or use up if you have a bunch of random odds and ends in the fridge.  This time around I used butternut squash, sweet bell pepper, shiitake mushrooms, asparagus and red onions, but I have also added sweet potatoes, zucchini, and carrots.  I’ve never used sauteed or blanched greens, such as spinach or Swiss chard, but I think I will the next time around.  I was going to post this recipe next month, but it occurred to me that you all may be entertaining for the Super Bowl this weekend and my new discovery of the Enchilada Casserole would be the perfect thing to serve a crowd.  Here are a few ways to make this even easier for you:

  • Use pre-made enchilada sauce — but only if you have access to a good one or if you can’t find fresh tomatillos.
  • Make your own sauce, but do it the day before.
  • Dice and roast your vegetables the day before or first thing in the morning.  Keep them in a covered container in the fridge until you are ready to assemble your enchiladas.
  • Make the casserole version.  It will take sooooo much less time, especially if you are making more than one pan of it.
  • Assemble it in the morning.  That will give you time to clean up the family room and whip up some guacamole before your guests arrive.
  • Freeze it.  Thaw it out and bake for a delicious dinner another busy night.
Tomatillo sauce ingredients in the blender
About to roll

Are you planning on having people over for Super Bowl Sunday?  Other great options can be Vegetable Chili served over brown rice, quinoa or millet; a Taco bar; a Fajita bar; a Baked Potato bar; and of course, Guacamole and Baked Tortilla Chips.  As you can see, I am happy to cook before the opening kick-off, but then everybody needs to fend for themselves so I can concentrate on the game.  Go Giants!  By special request, my famous cornbread recipe coming up on Friday!

 enchilada casserole | pamela salzman


View this post on Instagram


A post shared by Pamela Salzman (@pamelasalzman)


5.0 from 4 reviews
Roasted Vegetable and Black Bean Enchiladas Verdes (and a casserole version!)
Author: 
Serves: 6
 
Ingredients
  • 5-6 cups mixed vegetables, such as butternut squash, zucchini, sweet bell pepper, red onion, mushrooms, apsaragus, cut into ½-inch cubes
  • Olive oil for drizzling
  • Sea salt and freshly ground black pepper
  • 1 ½ cups cooked black beans or 1 15-ounce can, drained and rinsed
  • Sauce:
  • 20 medium tomatillos, about 2 ¼ pounds, husked and washed
  • 1 jalapeno, stem removed (will make the sauce a 5 on a heat scale of 1 to 10)
  • ½ small onion, peeled
  • 3 garlic cloves
  • 10 sprigs cilantro
  • 1 Tablespoon sea salt
  • 3 Tablespoons olive oil
  • 12 corn tortillas
  • grated cheese, (such as Monterey Jack) if desired or crumbled queso fresco
Instructions
  1. To roast vegetables: Preheat the oven to 375 degrees. Place the vegetables on a parchment-lined baking sheet. Drizzle with oil and toss to coat evenly. Sprinkle with salt and pepper. Roast until tender, but not over-cooked, about 25 minutes. Add the black beans to the vegetables and mix together or put everything into a bowl to combine.
  2. Place all the tomatillos and the jalapeno on a baking sheet. No need to line with parchment paper. Change the oven to broil. Place under the broiler for about 10 minutes, turning over after 5 minutes until tomatillos are lighter in color and contain a few brown spots. Change oven to 350 degrees if baking the enchiladas right away.
  3. Transfer the tomatillos to a blender or a food processor with the jalapeno, 3 garlic cloves, ½ onion, cilantro and sea salt. Process until smooth. You should have 4 cups of sauce.
  4. Heat a skillet over medium heat and warm the olive oil. Add the tomatillo sauce and simmer 5 minutes.
  5. In the meantime, warm the tortillas on a griddle or skillet on both sides until softened.
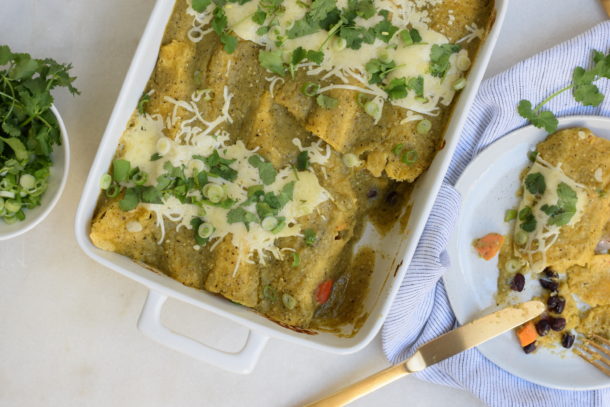
  6. Pour 1 cup of sauce on the bottom of a 13x9-inch baking dish. Place about ⅓ cup of vegetables down the middle of a tortilla and roll tightly. Place seam-side down in the baking dish. Repeat with each tortilla. Cover all the rolled tortillas with remaining sauce. Sprinkle with grated cheese, if desired. Bake until heated through and cheese is melted, about 10-12 minutes. Serve immediately.
  7. Casserole version: Pour 1 cup of sauce on the bottom of a 13 x 9-inch baking dish. Place 6 corn tortillas in one layer on top of the sauce. Spread all of the vegetables and beans on top of the tortillas. Sprinkle with cheese, if desired. Arrange another 6 corn tortillas over the vegetable mixture in one layer. Pour enough sauce to cover well and sprinkle with more cheese, if desired. Bake until heated through and cheese is melted.
Notes
Leftovers? Chop up the enchiladas and add to a pot of chicken broth. Heat and serve. Enchilada Soup!


Roasted Vegetable and Black Bean Enchiladas Verdes | Pamela Salzman


Stir-fried Grass-fed Beef and Broccoli

Happy Chinese New Year! Mr. Picky is very excited to celebrate the holiday at his school today and the girls are happy that I’ll be making a Chinese meal for dinner tonight. I’m fun that way! My whole family loves Chinese food, especially stir-fries which are surprisingly easy to make at home and so versatile. One of their favorite dishes is Beef and Broccoli which I serve with sesame spinach salad, mixed greens with miso-ginger dressing or steamed brown rice.

Typically I make beef more in the winter than in the summer since it is such a warming food, but we have really cut back on our beef consumption in general, mostly due to animal welfare and environmental reasons. When we do eat beef, it’s always grass-fed, which is just so much more nutritious than corn/grain-fed. I am fortunate to have many local farmer’s markets where I can buy excellent quality grass-fed meat. If you don’t have a good resource for grass-fed meat, check the Eat Wild website to locate a source close to you. Grass-fed beef can be a bit trickier to cook since it has a lower fat content than grain-fed beef and it can get dried out. But with this marinade and the quick-cooking of a stir-fry, it’s terrific!

I love loading up stir-fries with lots of fresh vegetables, especially from the cruciferous family. I try not to rant and rave about all the health benefits of plant foods since they are all basically good for you. But there are some vegetables that do deserve special mention here and more regular place in your diet. The cruciferous vegetables contain loads of nutrients, including some very powerful cancer-fighting compounds. Besides broccoli, other members of this group include cauliflower, Brussels sprouts, cabbages, bok choy, kale and a few others.

Don’t let the list of ingredients in this recipe discourage you. This dish is really not complicated and there are many substitutions that can be made. If you’re vegetarian, you can use extra-firm tofu in place of the beef and substitute additional shoyu in place of the oyster sauce. Gluten-free folks can use GF tamari instead of shoyu.

Here are a couple of tips to making a good stir-fry:

  • Have all your ingredients prepped and ready since stir-frying goes very quickly.
  • Cut all your vegetables the same size so that they cook evenly.
  • Don’t double recipes for stir-fries and try to cook it all in one wok/skillet. It’s important for all the food to come into contact with the surface of the pan. If you need to double, cook the recipe in two batches or in two separate pans.
  • You don’t need a wok to stir-fry. A large skillet will be just fine.
  • If you want to vary the vegetables in your stir-fry, keep in mind whether they can be stir-fried raw or if they need to be blanched first. Examples of vegetables you can throw into the pan raw are cabbage, mushrooms, thinly sliced carrots, celery, bean sprouts and snow peas. Broccoli, cauliflower, shelled edamame and big chunks of carrots should all be blanched before adding to the wok.

Although it’s tempting to celebrate Chinese New Year by ordering take-out, it’s so much better for you and your family if you can cook at home. In fact, with this recipe, they might not even know the difference.

For a few more of our favorite Chinese dishes, check out recipes for Vegetable Fried Rice, Asian Noodle Salad and Sesame Spinach Salad (perhaps only Chinese-inspired.)

Stir-fried Grass-fed Beef and Broccoli
Author: 
Serves: 4-6, depending on what else you're serving
 
Ingredients
  • 1 ½ pounds grass-fed top sirloin or flank steak, trimmed of excess fat and cut against the grain into ⅛-inch thick slices*
  • Marinade:
  • 1 Tablespoon arrowroot or non-GMO cornstarch
  • 3 Tablespoons shoyu or gluten-free tamari
  • 3 Tablespoons water
  • 1 ½ Tablespoons dry sherry or Chinese rice wine such as Shao Hsing
  • 1 ½ teaspoons toasted sesame oil
  • Sauce:
  • 2 Tablespoons oyster sauce (or substitute extra shoyu, but oyster sauce makes it taste like it's from a restaurant)
  • 1 Tablespoon shoyu or gluten-free tamari
  • 1 Tablespoons dry sherry or Chinese rice wine such as Shao Hsing (I always use sherry)
  • 3 Tablespoons water
  • 2 teaspoons balsamic vinegar (optional-for sweetness)
  • 1 Tablespoon arrowroot or non-GMO cornstarch
  • 1 bunch broccoli, cut into small florets, stems peeled and thinly sliced
  • 2 Tablespoons unrefined peanut oil
  • 2 quarter-size pieces of fresh, peeled ginger
  • 1 scallion, thinly sliced (optional)
  • 2 cloves of garlic, crushed
Instructions
  1. In a medium bowl, whisk together all marinade ingredients until arrowroot is dissolved. Transfer beef to marinade and stir to coat. Allow to marinate at room temperature for 30-60 minutes.
  2. Make the sauce: place all sauce ingredients in a small bowl and whisk until arrowroot is dissolved. Set aside.
  3. Bring an inch or two of salted water to a boil in the wok and add the broccoli. Cover and steam until crisp tender, about 2 minutes. Drain and reserve.
  4. Heat the wok over medium-high heat. Drain the beef in a colander. Add peanut oil and tilt to coat sides of wok. Add ½ of beef to wok, spreading it in one layer on the surface of the wok and allow to cook undisturbed for 1 minute or until brown. Turn beef over and cook for another 30 seconds. Transfer meat to a medium bowl. Cook remaining beef in the same manner, adding more oil if necessary. When the last batch of beef is almost finished cooking, add the ginger, scallion and garlic and stir-fry until fragrant, about 1 minute.
  5. Add the sauce and reserved meat back to the wok. Bring the sauce to a boil and cook until thickened, about 2 minutes. Toss in the broccoli and stir to coat with the sauce.
Notes
*Freezing the meat for about an hour can make this job easier.


Potato and bean soup (patate e fagioli)

Who invented the idea of “Meatless Monday?”  The U.S. Food Administration did during World War I and urged families to conserve key staples to aid the war effort, but the idea was revived in 2003 by an ad exec-turned health advocate for dietary and environmental reasons.   Ironically, the Food Administration also tried to promote “Wheatless Wednesday” during WWI, which I would love to see make a comeback.  But I have a feeling you won’t see the US government advocating abstaining from any big political donors major food industries anymore.  However if you ask my sisters and me who invented “Meatless Monday,” we would tell you with conviction that it was our mother.   Vegetarian dinners on Mondays were a part of my life growing up.  I loved them since I was a vegetarian from about the age of 10 to 18.  But believe me, my mother was not trying to cater to me at all.  Her thought was that we tended to indulge over the weekend with heavy meals, usually centered on lots of pasta, meat and cheese and that we needed a break.  My sisters, who were most definitely NOT vegetarians called it “Low Budget Night,” since Monday’s dinners tended to be less expensive and less fancy.

Beans or lentils were almost always the star of the show on Mondays and they usually found their way into a soup.  This potato and white bean soup is just a take on a traditional pasta and bean soup or “pasta e fagioli,” as you might see it on a menu.  I love that potatoes, a whole food, take the place of pasta, which is a (processed) food I eat very occasionally.  The recipe requires so few ingredients, many of which you probably have in your pantry.  And if you make your beans from scratch, this soup will cost you practically nothing.  The potatoes and beans both add a rich creaminess to the soup, as well as work together to form a complete protein.  Even though beans are typically bland, this soup has a nice, almost smoky flavor and feels very satisfying despite the lack of fat.  A typical Monday dinner would be a nice big bowl of this soup with a side of sauteed greens or a salad and some crusty bread.  Sometimes my parents would also add a wedge of good cheese (that my father smuggled in his suitcase from Italy) to the table and that was that.

My husband grew up with neither Meatless Mondays nor Meatless Any Days, so getting him to buy into a dinner of potato and bean soup took some time.  Now he loves it and especially how it makes him feel afterwards (“not gross”).   Lest anyone feel cheated, I happily serve both a salad and some roasted vegetables on the side.  All my kids, Mr. Picky included, love this soup.  It’s white!  What kids don’t like white food?  Of course,  I can’t help but stir in some escarole in at the end.  You know me and my greens.  They’re going to save your life, so I’ll find anyway to include them that I can.  If your local market doesn’t carry escarole, feel free to add some spinach, arugula or chard.  I always plan to have extra soup for thermoses in the next day’s lunch boxes, which works out perfectly for “Trash-free Tuesday” at our school!

Have you made any new year’s resolutions?  I’ve been contemplating a few, but what tends to work better for me are measurable resolutions, such as “cook dinner five nights a week” or “do yoga every Sunday.”  I’ve never had luck with “eat better” or “exercise more.”  Most people tend to come up with resolutions about diet and health, but they’re usually about short term weight loss or feeling better after 6 weeks of holiday overindulgence.  I think “Meatless Mondays” is an easy one to try and it doesn’t mean you’re becoming a vegetarian or a vegan, not that there’s anything wrong with that.  It just means a commitment to eating more plant-based foods and acknowledging the heavy environmental footprint of raising animals in this country.  Just a thought.

Talk to me here — am I the only one who grew up with Meatless Mondays?  Does your family currently partake?  I need some inspiration for my new year’s resolutions — feed me!  Or just make this soup.  Here’s to a happy and healthy 2012!

5.0 from 1 reviews
Potato and Bean Soup (Patate e Fagioli)
Author: 
Serves: 8
 
Ingredients
  • 1 pound dried white beans, such as Great Northern or cannellini, about 2 ½ cups*
  • 1 2-3 inch piece of kombu (optional)
  • 2 Tablespoons unrefined, cold-pressed extra-virgin olive oil
  • 1 large onion, halved and thinly sliced
  • 4 large garlic cloves, thinly sliced
  • 8 cups chicken stock, vegetable stock or water
  • 1 pound Yukon Gold potatoes (or other boiling potato), cubed
  • 1 6-inch sprig of fresh rosemary (optional, I like it just as much without)
  • 3-4 teaspoons sea salt (depending on saltiness of the stock)
  • 1 head escarole, leaves coarsely chopped
  • Grated Pecorino-Romano or Parmesan cheese for serving, if desired
Instructions
  1. Wash beans well and pick over for stones and debris. Soak beans with kombu in plenty of fresh cold water overnight or at least 6 hours. This can be done in a covered container or in a pot (I use the same pot for soaking as for cooking the soup) on a countertop. Refrigerate if your kitchen is warm.
  2. Just before you begin cooking, drain the beans into a colander. Heat the oil over medium heat in a large heavy-bottomed pot, and add the onion and garlic. Cook until softened, about 8-10 minutes.
  3. Add the beans and stock to the pot and raise the heat to high. You can add the kombu to the pot, if you like for additional alkalinity. Bring soup to a boil, cover, then lower to a simmer. Cook for 1 hour.
  4. Add the potato, sea salt and (optional) rosemary. Cover and simmer for 30 minutes. Test the beans for tenderness. If they’re not done, continue to simmer until they’re tender. Once beans are tender, you can puree the soup to your desired consistency or leave chunky. Remove the kombu and sprig of rosemary before pureeing.
  5. Stir in the escarole and cook until wilted. Serve with grated cheese, if desired.
Notes
If you want to use canned beans, you will need 4 15-ounce cans, or about 6 cups. I like Eden Organic. Follow the directions below:

Saute onions and garlic.
Add potatoes, stock, salt and (optional) rosemary. Cook for 30 minutes or until tender.
Add beans to pot and cook until heated through. Puree to desired consistency (or don’t). Stir in escarole.


Creamy white bean dip with roasted garlic

Do your kids ask you for things at the last possible second even though they have known about whatever it is they need for weeks?  My husband does this, too.  “If you knew last Friday that you would need to bring a wrapped gift for your party, why are you telling me as we’re getting into the car on the WAY to the party??”  It really messes up the walk I talk about being organized.

One of my daughters was going to a girl scout meeting which started at 6:00 pm, and guess what?  She announced at 5:25 that she needed to bring an hors d’oeuvre.  That 10 pre-teens would actually want to eat.  And “not like something so totally healthy either, Mom.”  Like cool!  Like let’s pretend we’re on an episode of Chopped!  But seriously, even though I like the idea of being able to whip something yummy together with stuff from my pantry in 20 minutes, it’s a little stressful.

Normally, my go-to would have been hummus, which I can make in 10 seconds and I know my daughter and her friends like it.  But of course, on this day I had no cooked chickpeas.  So you know what they say about necessity being the mother of invention.  I found some canned white beans in the pantry and added them to the food processor with a few other staples that generally taste good with white beans and we had ourselves a winner dip.  My daughter even said she liked it better than hummus.  At the time, I made it with a raw garlic clove and it was terrific, but another day when I wasn’t under the gun I tried it with a whole head of roasted garlic and looooooved it more.

I just made the bean dip again recently to bring to a birthday dinner with some health-conscious ladies and served it with some crudites as shown in the picture.  I stole the idea from Martha Stewart of putting the cut veggies in modern drinking glasses.  It always makes for a pretty presentation.  I also included a small bowl of balsamic vinegar and olive oil with a pinch of sea salt — another stolen idea, this time from an Italian restaurant.  We have also used the dip as a sandwich spread with grilled vegetables.  Fabulous with eggplant, sweet bell peppers and zucchini!

Sure I could have gone to the market on the way to the meeting and picked up a tub of salsa and a bag of chips, but thankfully I didn’t because then there would of been two of the same hors d’oeuvre at the meeting that night. (At least it’s not just my kid.)

Creamy White Bean Dip with Roasted Garlic
Author: 
 
Ingredients
  • 1 head of garlic, unpeeled to roast or 1 large clove raw garlic, peeled
  • 2 cups cooked white beans*, such as cannellini or Great Northern, drained and rinsed, if canned
  • ¼ cup cold-pressed, unrefined extra-virgin olive oil
  • 2 Tablespoons freshly squeezed lemon juice
  • 1 teaspoon minced fresh rosemary
  • Several dashes hot sauce
  • ½ teaspoon sea salt
  • a few grinds finely ground black pepper
Instructions
  1. Roast the garlic: preheat oven to 350 degrees. Slice off the top fifth of the head of unpeeled garlic. Add a drop of olive oil. Replace the top. Wrap with parchment paper and then aluminum foil. Bake for 1 hour. Discard foil and parchment.
  2. Take the top off of the garlic and squeeze the softened garlic out of the skins into the bowl of a food processor fitted with the metal blade. Add remaining ingredients and process until smooth and creamy. When I'm ready to serve it, I like to drizzle it with a touch of fruity olive oil. Can be made a day ahead and kept covered and refrigerated.
Notes
I like to serve this as a dip with crudités or blanched vegetables and/or with warm pita bread, chips or toasted slices of baguette. You can even assemble your own crostini with grilled baguette toasts and white bean spread topped with sautéed greens. It is also great as a sandwich spread.

To cook your beans from scratch, soak dried beans in lots of cold water for at least 6 hours or longer. Drain them. Put them in a pot with enough fresh water to cover by 4-6 inches. Bring to boil. Reduce to a simmer. Cook until tender, anywhere from 45 minutes to 1½ hours, depending on the age of the beans. I like to add a tablespoon of kosher salt to the beans and allow them to cool in their cooking liquid for 30-60 minutes, if possible, but it's not necessary. Drain and use immediately or store in the fridge for 3 days. Beans also freeze very well.

Spaghetti squash with kale and chickpeas

Did you participate in the low-carb craze of the 90’s?  If you did, you may have eaten a lot of spaghetti squash with tomato sauce trying to convince your carb-starved body that you were actually eating pasta. The body is no fool, though.  At least mine isn’t.  I ate lots of “spaghetti” for a good year, but never really felt like I was eating pasta and then I had a negative association with this pasta imposter.  The better attitude to take is to acknowledge that spaghetti squash is a delicious food unto itself and that replacing a processed food (pasta) with something whole and full of vitamins and minerals is a fantastic idea.  I had sworn off spaghetti squash for 15 years because I thought the only way to eat it was with marinara sauce and I had O.D.’d on that.  But my lovely summer intern, Hannah, had found this recipe that sparked my interest and I was back.


Spaghetti squash comes into season in the early fall and lasts through the early spring.  Like most winter squashes, spaghetti squash lasts quite a while off the vine without losing nutrients.  In fact, many winter squashes actually get a little sweeter when they’ve been allowed to “cure” on your countertop for a bit.  What is unique about spaghetti squash is that the flesh is not meaty like other winter squashes like butternut squash or pumpkin, for example, but instead stringy after it has been cooked.  It resembles spaghetti strands when you rake your fork through the flesh.  Pretty cool, actually.  The flavor of spaghetti squash is like the glass half empty-glass half full.  It has a very subtle flavor — really subtle — which means it tastes kind of bland, but it also means you’re not that limited with flavors you can use.

Funny enough, the trickiest part about cooking spaghetti squash is actually cutting it open.  I have tried numerous methods and the one that is hands-down the best is what I call the slot machine method.  You can see from the photos that I insert the tip of my big, sturdy chef’s knife into the flesh of the squash a few inches from the bottom and pull down.  Then I inch my way up the squash towards the middle and keep inserting and pulling down the knife.  This is the safest and easiest way to do it.  If you don’t want to try cutting it open and you have extra time, you can pierce the squash a few times with the tip of your knife so it doesn’t explode in the oven (ask me how I know this) and roast it whole.  This way it will soften up and be much easier to cut open, but you’re adding an extra 15-20 minutes to the cook time.  I prefer to roast the squash halves, which takes about 45 minutes.  You can also plunge the halves into a pot of boiling water for about 13 minutes if you’re in a rush, but I think you lose nutrients when you boil vegetables for a long time like that.  Also, it’s easier to overcook it and then the subtle flavor becomes even more subtle (as in, it tastes like water.)  I’m well aware that people also microwave spaghetti squash halves, but this is a site about NOT microwaving food, so you’ll have to figure that one out on your own.


Here I sauteed my BFF kale with garlic and a pinch of chili flakes to toss with the cooked squash strands and then I add cooked chickpeas.  But we’ve hung out enough that by now you know that you can substitute Swiss chard or spinach for the kale and white beans for the chickpeas.  Really the sky’s the limit with how you complement the squash.  Just make sure you add lots of flavor and don’t be stingy with the salt.  I added vegetable chili on top of it one day. Another time I tossed it with chunky braised root vegetables in a spicy tomato sauce.  Daughter #2 found some cooked spaghetti squash in the refrigerator and warmed it up and added olive oil, feta, olives and some leftover broccoli.  It was so darn good and I never had to convince anyone to try it because it was “just like pasta!”

5.0 from 1 reviews
Spaghetti Squash with Kale and Chickpeas
Author: 
Serves: 4-6 (or just me and my intern, both starving, standing over the stove)
 
Ingredients
  • 1 spaghetti squash, about 3½ pounds
  • 3 Tablespoons unrefined olive oil + more for drizzling the squash or unrefined coconut oil or ghee
  • Sea salt and freshly ground black pepper
  • 1 bunch kale, center rib removed, leaves chopped
  • 1 ½ cups cooked chickpeas (rinsed and drained, if canned)
  • 3 cloves garlic, finely chopped
  • ¼ teaspoon crushed red chili flakes or more to taste
  • Parmesan or Pecorino-Romano cheese shaved on top (optional)
Instructions
  1. Preheat oven to 400 degrees. Cut the spaghetti squash in half lengthwise and remove the seeds. Rub the inside of each half with a drizzle of olive oil and season with salt and freshly ground black pepper. Arrange cut-side down on a parchment-lined baking sheet and bake for 45 minutes until tender.
  2. Heat oil in a large skillet over medium. Add garlic and cook until fragrant, about 1 minute or less. Add chili flakes, stir for a few seconds and add chopped kale with a few pinches of sea salt. Sauté kale until the leaves are bright green, about 5 minutes. Add the chickpeas and cook until warmed through. Remove from heat.
  3. Remove squash from oven when it is cooked through and tender. Using a fork, pull the strands of squash from the peel so that it resembles…spaghetti! Place the strands into a serving bowl and add the kale-chickpea mixture. If you do the spaghetti squash in advance and it is no longer hot, add to the kale and chickpeas and sauté over medium heat until warmed through. Toss to combine and taste for seasoning. Since spaghetti squash is rather bland, you will need to add plenty of salt and pepper. Garnish with cheese if desired.

Zucchini “pasta” recipe

We’re in pasta mode this week, but transitioning to zucchini mode, so I couldn’t help but post a recipe which covers both.  In the low-carb craze of the 90’s (although I’m not sure it’s over), I was intrigued by the idea of using things like zucchini and spaghetti squash in place of pasta.  “With the addition of tomato sauce, you will feel the same satisfaction of eating the real thing, but without the carbs!”   Those same people try to make veggie burgers taste like beef.  Don’t make me laugh.

That fact is, the first time I tried this method of cutting zucchini in the shape of papardelle noodles and adding some cooked down tomatoes, basil and garlic, I loved it.  Did I feel like I was eating regular pasta?  Not really.  Did I care?  Not at all.  I think this zucchini is absolutely terrific in it’s own right.  My husband, who is a pasta-lover, said, “I like this because I don’t feel gross after eating it.”  Aww, shucks.

When I taught this in my classes two years ago, I went against my better judgment and cooked the tomatoes and zucchini in the same pan.  I, like most people, enjoy cooking more than I enjoy washing dishes, so I am always conscientious of how many pots and pans I use.  But cooking the zucchini too long can make it watery, as does adding acid and salt too early.  So the best way is to do this is in two separate pans side by side.  If you really detest the idea of washing a second pan or if you don’t have 2 large ones, cook the tomatoes first and transfer them to a serving bowl.  Then cook the zucchini in the same pan and add the tomatoes back.  On the same note, don’t allow this to sit too long before serving, because the zucchini will start to release its water.  Unless of course you’re trying to photograph it, and you need to wait for the steam to subside so it doesn’t fog up your lens.

I know many of you are desperate for things to do with the abundance of zucchini from your gardens.  First of all, let me give you a pat on the back for growing something.  Love that!  But can I give you a little advice?  Stop competing with your neighbor for who can grow the biggest squash on the block.  We’re all guilty of it, but there’s nothing good that comes out of it.  Size does matter here, but smaller is better!  When you allow the zucchini to grow to the size of a regulation baseball bat, you end up with spongy, seedy and not tasty zucchini.  Pick them when they’re small and tender and you’ll be able to keep up with production, too.

If you like to come home from work and have dinner on the table in 15 minutes, then you’re better off cutting your zucchini in the morning or the night before.  I showed two methods for this above, either using a mandoline or a vegetable peeler, but it does take a little longer than normally prepping zucchini.  If you wanted to make this into a full meal, toss all of it with some freshly cooked pappardelle noodles, white beans for protein and a dusting of parmesan cheese, and it will all be worth it.

Zucchini "Pasta"
Author: 
Serves: 4-6
 
Ingredients
  • 2 pounds small zucchini
  • 4 Tablespoons unrefined, cold-pressed extra-virgin olive oil, divided
  • 3 cloves garlic, thinly sliced
  • 2 pounds tomatoes, cored and chopped (seeded and/or peeled if you like)
  • Sea salt and black pepper
  • Small handful of basil leaves, slivered
  • 1 Tablespoon unsalted butter (optional)
  • Grated or shaved Parmiggiano-Reggiano or pecorino-romano cheese (optional)
Instructions
  1. Trim the ends off the zucchini. Cut in half lengthwise. Slice lengthwise on a mandoline very thinly (thinner than ⅛-inch) to resemble pasta noodles. If you don’t have a mandoline, you can use a vegetable peeler.
  2. Heat 2 tablespoons olive oil in a large skillet over medium heat. Add the garlic and cook until the sides begin to turn golden. Add the tomatoes and season with sea salt and pepper. Cook until fragrant, about 3 minutes. Stir in the basil.
  3. In another large skillet, warm 2 tablespoons olive oil over medium heat. Add the zucchini and sauté until just tender, about 4 minutes. Sprinkle with sea salt and transfer to the tomato mixture with tongs, leaving the extra liquid in the pan. Toss to coat with the tomatoes. You can add an optional tablespoon of unsalted butter at this point to enrich the sauce, but not necessary.
  4. Serve with freshly grated cheese, if desired.
Notes
Instead of cooking fresh tomatoes, you can add 1 cup of warmed tomato sauce to the cooked zucchini and serve with grated cheese on the side.


Pasta alla checca recipe

pasta alla checca (raw tomato sauce)

When people tell me they don’t know how to cook, I know what they really mean.  They mean to say they don’t know how to cook well off the fly or they don’t have a deep repertoire of dishes that they can prepare with ease.  I say if you can read, you can cook.  Furthermore, most people can cook something they ate as a child, if nothing else.  If I learned zip about cooking and never stepped foot in a kitchen after I left home, I would at least be able to make Pasta alla Checca.

I actually got a little choked up in a class last month when I reminisced about how I ate this pasta dish weekly during the summers of my youth.  Pasta alla Checca is nothing more than pasta with a raw tomato and basil sauce.  Sounds simple, but the success of the dish relies on the quality of the tomatoes.  If you have divine tomatoes, the pasta will be fabulous.  If not, it will be forgettable.  Therefore, I implore you only to make this dish in the summer when tomatoes have a chance of being splendid.  If you make this dish in January with pale, dreary tomatoes and email me that you don’t know why this didn’t taste like very much, I might just direct you back to this post.

We always had beautiful, tasty tomatoes and basil growing in the backyard and this was an easy weeknight dish for my mom to pull together after a day at the beach or if was too hot to do too much in the kitchen.  My mom was not one for creating extra work for herself, but she always insisted on peeling the tomatoes for this dish.  I have made it both ways and she is totally right — peeling the tomatoes is worth every minute of the 5 minutes it will take you.  When the tomatoes are without their skins, they release more of their juices and flavors and everything just tastes so much richer and more…tomato-y!  My mom used to buy that atrocious plastic-wrapped Polly-O mozzarrella, cube it and marinate it in the tomato mixture while she was cooking the pasta.  When the hot pasta hit the cheese, it melted ever so slightly and yours truly would fight her sisters for it.  If you decide to go this route, keep in mind the garlic cloves are crushed in the sauce and tend to look very much like melted mozzarrella, so you might want to pull out the garlic before serving.


pasta alla checca (raw tomato sauce)

If you are not eating tomatoes right now, you’re missing out.  Even if you don’t eat pasta, make the tomato mixture and put it on top of any number of things — steamed green beans, grilled eggplant, grilled bread, poached or grilled fish or chicken.  The season is short and fleeting and nothing says summer like a real sunkissed vineripened tomato.  To this day, just the aroma of this tomato and basil mixture immediately makes me think summer.  The good news is, you still have plenty of summer left to enjoy it.

pasta alla checca (raw tomato sauce)

Pasta Alla Checca
Author: 
Serves: 4-6
 
Ingredients
  • 2 pounds ripe tomatoes, about 6 medium (or more if you like a high ratio of tomatoes to pasta)
  • 2 cloves garlic, crushed
  • ¼ cup torn or sliced fresh basil leaves
  • ¼ cup unrefined, cold pressed extra-virgin olive oil
  • Sea salt to taste (I think ¾ teaspoon is about right.)
  • 1 pound dried pasta (I like a pasta which catches the tomatoes, such as orrecchiette or conchiglie. My mom always made it with spaghetti.)
  • Kosher salt to season the pasta water
Instructions
  1. In a pot large enough to fit the tomatoes, fill ¾ with water and bring to a boil ("instant hot" from your sink won't work, already tried it.) Cutting through the skin, make an “x” on the bottom of each tomato with a knife. Turn the heat off and submerge the tomatoes in the water for 20-30 seconds, depending on the size of the tomatoes. Remove the tomatoes from the water with a slotted spoon and place on a cutting board. Peel (non-negotiable), core, seed (if you want) and chop the tomatoes.
  2. Place the tomatoes in a serving bowl. Add the garlic, basil, olive oil, and a few healthy pinches of sea salt to taste. Toss to combine.
  3. Bring a large pot of water to a boil. Add 1 Tablespoon kosher salt. Add the pasta and cook according to the package directions or until al dente. Remove 1 cup pasta cooking water and reserve (you won't need it if your tomatoes are juicy.) Drain the pasta. Immediately add to the serving bowl with the tomatoes and toss to combine, adding reserved pasta cooking liquid if necessary to moisten the pasta. Remove garlic before serving, if desired.


Chickpea and deconstructed pesto salad

Summer around my house is very loosey-goosey.  We lack a bit of structure when school is not in session.  On any given night, it varies who will be here for dinner and I often find myself cooking for either just two people or for an army.  This can be tricky for me since I make my menu for the week every Sunday night, but over the years I have also learned how to be flexible and not anxious if I have enough fish for 5 and all of a sudden we’re down to 2.

Daughter #1 and I found ourselves solo for dinner last night, but it was late and neither one of us had the motivation to do anything more than open a can of chickpeas.  Of course we’re girls and we are just fine eating a meal without meat and still calling it dinner.  We made this chickpea salad and grilled up some zucchini, because who can eat a meal without zucchini in it these days?  It’s taking over the world!!  Remind me next spring not to plant so much.  And the two of us stood at the kitchen counter leaning over the salad bowl shoveling in spoonful after spoonful of chickpea salad, exclaiming “this is so good!” after every bite, alternating with dropping ribbons of grilled zucchini in our mouths.

This is hands-down the easiest salad you will ever make and if you are growing your own basil, you likely already have everything you need to put this together in five minutes.  Thank goodness for pantry staples!  This is fabulous to bring to a barbeque or picnic since you can make it ahead and nothing happens to it.  It’s even great the next day.  Last night I added halved cherry tomatoes at the last minute and I have also thrown in chopped, blanched green beans to make it more substantial.  Be forewarned, there is a nice punch of raw garlic which I love, but if you don’t care to eat garlic, you can just smash it and add it for a subtle undertone.  The idea is to make a salad with all the flavors of pesto without having to make pesto.  Actually, the idea of this salad is to barely do anything at all, but still eat something utterly delish.


View this post on Instagram


A post shared by Pamela Salzman (@pamelasalzman)


Chickpea and Deconstructed Pesto Salad
Author: 
Serves: 4
 
Ingredients
  • 3 cups cooked chickpeas or 2 15-ounce cans, rinsed and drained
  • ¼ cup chopped fresh basil leaves
  • 2 small garlic cloves, minced
  • 3-4 Tablespoons freshly squeezed lemon juice (about 1 lemon)
  • 3 Tablespoons unrefined cold-pressed extra-virgin olive oil
  • ½ teaspoon fine grain sea salt or to taste
  • freshly ground pepper to taste
  • ⅓ cup grated pecorino-romano (sheep's milk cheese) or parmesan cheese (cow's milk cheese)
Instructions
  1. Combine all salad ingredients in a serving bowl and toss well to combine. That's it!
Notes
Also delicious with halved cherry tomatoes (see lead photo), arugula and/or blanched green beans. I added some thinly sliced radicchio once and that was nice, too.