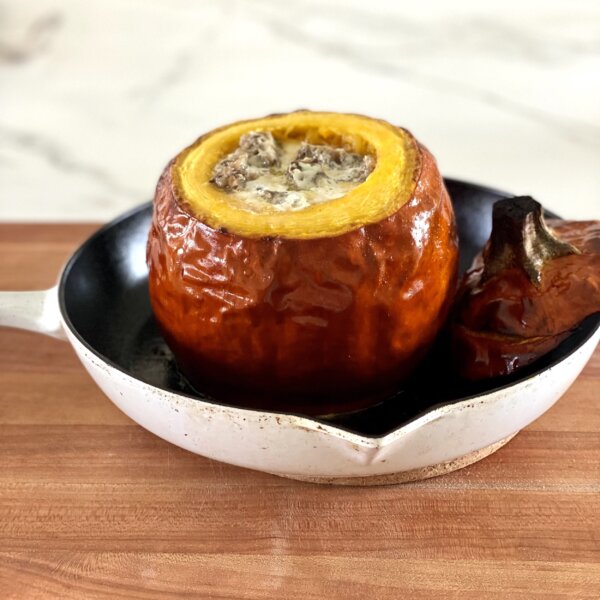
Roasted Stuffed “Fondue” Pumpkin Recipe

Not all pumpkin recipes have to be sweet!  This Roasted Pumpkin Fondue is an old recipe from Gourmet Magazine that I made back in the day but shelved it because it was too rich and heavy.  My friend Katie Morford lightened it up and it’s even better than the original version!  Think soft and gooey cheese on the inside with cubes of whatever bread you like + tender pumpkin.  It’s comforting and delicious and could be a full meal with a simple salad on the side.  After shooting this with an amazing dark multi-grain, seeded bread, I realized that a lighter color bread looks more appetizing.  But this tasted phenomenal!Continue reading

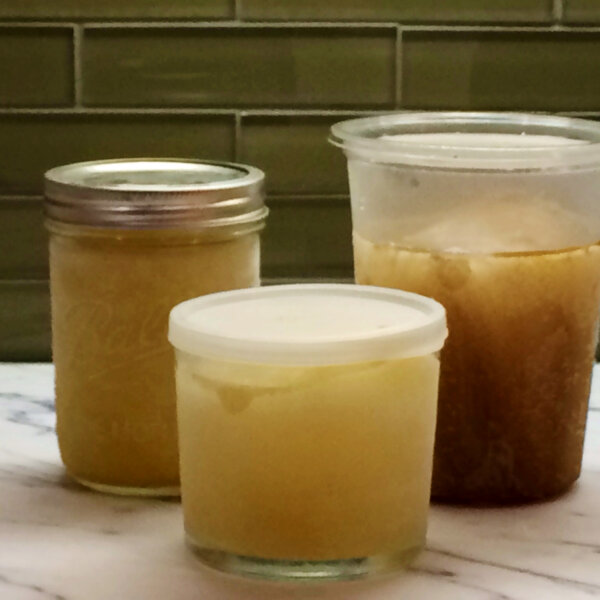
How to Freeze Stock and Other Liquids

how to freeze stock

I am totally obsessed with homemade stock.  It’s one of those foods that you’ll never find the same quality in store-bought, so I always make it for soup-making at home and for my classes, which means I need A LOT of stock.  It’s easier for me to make a few gallons at one time than a batch every few days, so I end up having to freeze quite a bit.  In general, you can keep homemade vegetable or chicken stock in the refrigerator for 4-5 days and in the freezer for up to 3 months, provided it is in the proper container.  If I know I am going to use the stock in the next few days, I will store it in quart-sized glass jars, usually repurposed Vegenaise or yogurt or canning jars.

But like I said, I usually need to freeze quite a bit and I don’t have the space in my kitchen for 2 dozen quart-sized glass jars, so I will often freeze in BPA-free plastic stackable containers which don’t take up too much space when they are not being used to store stock.

I have my own method for freezing stock, as well as other liquids like soups and certain sauces, that I’d like to share with you here.

this glass containers work well in the freezer

1.  Choose your container:

I prefer either glass or BPA-free plastic.  Whichever you choose, your stock should be room temperature or chilled before transferring into containers going into the freezer.

Glass:  I have had success freezing in these canning jars (the straight-sided wide-mouth jars are stronger than the curved jars) as well as different storage containers such as these from Frigoverre (these are nice because they look good on the table too, so you can use them to serve fruit or salad, as well as keep in the fridge), Pyrex and these Glasslock storage containers which I love.  I have NOT had success freezing in cleaned out yogurt jars or Vegenaise jars which are too thin.  Those are fine for storing in the refrigerator, but more often than not they have cracked in the freezer.  Sad face.

Reusable Plastic:  I avoid BPA as much as possible, so I have transitioned all of my plastics in the kitchen to be BPA-free.  Fortunately, there are many options for BPA-free storage containers.

I use these stackable BPA-free containers from www.letsgogreen.biz.  These work well for me because I need a lot of containers and I don’t have a lot of storage space when they’re not being used.  But these are technically not reusable because they are thinner and not as durable as others.  They also will melt in the dishwasher, so I have to hand wash them, which might be a deal-breaker for some folks.  And another downside is that I have had a couple of them crack in the freezer.  But these are super cheap so I can look past a few cracked ones. UPDATE 3.30.14:  I just received a new shipment of these and Let’s Go Green has definitely changed the materials.  They’re so much thinner and NOT great for freezing.  Bummer!  Do  not order these!

If you are not making gallons of stock and you’d like to use plastic, some of the BPA-free containers I like are by Sistema (I like this size container the best,) Gladware (look for the Freezerware products,) and Rubbermaid.  If you are doing your own search for BPA-free plastic containers, do make sure the manufacturer says they are “freezer safe.”  For example, not all Gladware is recommended for the freezer.

You can also freeze in ice cube trays if you tend to use a tablespoon of stock at a time.

Disposable Plastic:  Believe it or not, Ziploc brand plastic bags are BPA-free.  Isn’t it nice when major companies get with the program?  Yes!  So you can freeze in Ziploc bags, and I suppose you can wash them out and reuse them, but that’s not something I have the patience for.  I also don’t love the idea of throwing plastic away after one use, but that’s just me.  Otherwise, using Ziploc bags is a great idea for freezers with limited space since you can freeze the stock flat and stack the bags on top of each other.  A word of caution, if the bags get banged around a lot in the freezer, you risk puncturing them.  Just a heads-up.

freeze containers without the lids

the liquid will expand when it freezes

2.  How to freeze:

Here is my method for freezing stocks and liquids so that the containers (especially glass ones) don’t crack or explode in the freezer.

Since liquids expand when frozen, the key is to fill your container 3/4 full or within 2 inches from the top of the container so you allow room for the liquid to expand.  For a quart-size container, that means you are only pouring in 3 – 3 1/2 cups of liquid.  To freeze in a Ziploc bag, open up the bag in a medium pot or bowl and then pour in the stock (remember to fill only three-fourths full.)  The pot will allow you to have two hands free.  Zip closed and freeze flat.

Next, place your container of stock in the freezer WITHOUT the lid.  Key step!  Allow the stock to freeze solid and then cover with the lid.  If you secure the lid on the jar before freezing, the stock may expand more than you have allowed for and that’s how glass or thin plastics crack.

I don’t recommend freezing in containers larger than a quart.  I’m not sure why, but I haven’t always had success with half gallon glass containers.


3.  How to defrost:

It’s best to defrost your frozen stock for 24 hours in the refrigerator.

If you don’t have that kind of time, you can place the frozen container in a bowl or other container of cold water until the stock defrosts enough that you can transfer it from the container into a saucepan to melt.  Do NOT take a glass container from the freezer and run hot water on it and do NOT submerge the frozen container in hot water.  For sure it will crack!

You can also do what I do which is not approved by the FDA and I feel compelled to tell you may encourage the growth of bacteria, but I do this all the time and I’m still alive.  I just leave a quart of frozen stock in my kitchen sink overnight and then refrigerate it in the morning.  One time there was a crack in my plastic container and I didn’t know it, so 3/4 of a quart of chicken stock trickled down the drain.  Such a sad morning.  Now if I am defrosting plastic, I place the container in a bowl just in case.

I am no expert on the dozens of different containers out there, so I welcome your feedback on ones with which you have had success (or not.)  Anything to encourage my people to make their own stock!

Happiness is a freezer full of stock!

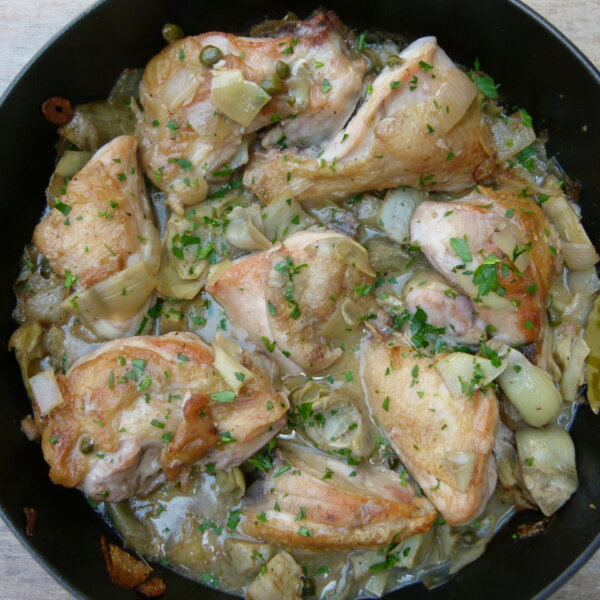
Baked Chicken with Artichokes and Capers Recipe

Something tells me that you organized cooks out there are in the midst of planning your Easter and Passover menus.  Am I right?  My mom had me on the phone the other day trying to get side dish suggestions for her traditional Easter leg of lamb.  After I spoke with her, I took a call from my mother-in-law to go over her Passover menu.  This year we’ll be staying in California for the holidays and I’m on dessert duty.  I’ll be making lots of coconut macaroons, my traditional lemon ice torte and a raw cashew cheesecake that I’m obsessed with.  But if I were hosting Easter or Passover at my home (not that there’s anything wrong with lamb and brisket), I would make this Baked Chicken with Artichokes and Capers.

Normally, I don’t post a recipe until after I have finished teaching it, but I am just so excited about this chicken I can’t wait another day.  It might be my favorite chicken recipe to date, which says a lot since I prepare chicken quite often.  This dish has it all — great flavor, ease of preparation, healthfulness and seasonality.    But really chicken isn’t even the star of this show.  I actually came up with this recipe to work around one of my favorite springtime vegetables, artichokes.

I am going to cheat a little here.  There are times when DIY is the way to go, as in chicken stock.  And there are times when there is not enough patience in the world that could get me through trimming the number of artichokes it would take to fill this saute pan.  (Although I am the same person that trimmed 10 pounds of Brussels sprout leaves for Christmas Eve dinner.)  What’s different about this situation is that Trader Joe’s has come to my rescue with frozen artichoke hearts, an absolute gift and an affordable one, too.   Not only do I always have a bag in my freezer at all times, but the other ingredients here are pantry staples, too — capers, white wine, bay leaves, mustard, which are all delicious with artichokes.

You may have followed similar recipes for chicken and dredged the chicken in flour first before browning it.  The flour does help to the thicken the sauce a bit, but we can avoid the dredging altogether by adding the mustard to the sauce, which gives great flavor, as well as some body.  Be sure to read my latest post on the secret to great-tasting chicken and you can decide if you want to salt the pieces or soak them in a wet brine.  Both ways are very easy and definitely worth doing.  Please note in that post that kosher chicken should not be salted or brined since it has already gone through a salting process.  To make this recipe with boneless, skinless pieces, check out my recipe for Lemon-Thyme Chicken and follow those steps.

For a winner spring holiday lunch or dinner, pair this chicken with this asparagus salad or minted sugar snap peas, and some roasted new potatoes.  I have a seriously fabulous vegan and gluten-free coconut tart coming your way soon!


5.0 from 1 reviews
Baked Chicken with Artichokes and Capers
Author: 
Serves: 4-6
 
Ingredients
  • Brine: (do not brine kosher chicken)
  • 1 cup hot water
  • ¼ cup kosher salt
  • 1 cup ice water
  • 3 pounds bone-in, skin-on chicken pieces
  • 2 Tablespoons unrefined olive oil or coconut oil
  • 1 medium onion, diced or sliced (as you prefer)
  • 3 cloves garlic cloves, sliced
  • a big pinch of sea salt (or more if using unsalted stock)
  • Freshly ground black pepper to taste
  • ⅓ cup dry white wine
  • 2 bay leaves (don’t worry if you don’t have them)
  • 12 ounce bag frozen artichoke hearts or packed in water
  • 2 Tablespoons capers
  • 2 Tablespoons whole grain or stone ground mustard
  • ¾ cup chicken stock, preferably homemade
  • Chopped fresh parsley for garnish (optional)
Instructions
  1. In a large bowl, dissolve salt in hot water. Add ice water and check to make sure brine is cool. Add chicken to brine and allow to soak for 45 minutes, and up to an hour and a half. OR sprinkle ½ Tablespoon of kosher salt on the chicken when you get home from the market. Rewrap it and refrigerate it until ready to cook. (Do not brine kosher chicken.)
  2. Preheat oven to 375 degrees. Remove chicken from brine and pat dry with paper towels.
  3. In an ovenproof skillet or braising pan, over medium heat, add the oil. Brown chicken on both sides. Transfer to a plate and reserve.
  4. Add onions to skillet and cook until tender, about 8 minutes. Add garlic, salt and pepper and sauté another minute or two. Carefully add wine to pan, and deglaze by scraping any brown bits on the bottom.
  5. Add chicken, bay leaves, artichoke hearts, capers, mustard and stock to pan and bring to a boil. Place in oven for 30-35 minutes, until chicken is cooked through, basting after 15 minutes. Garnish with fresh chopped parsley, if available.


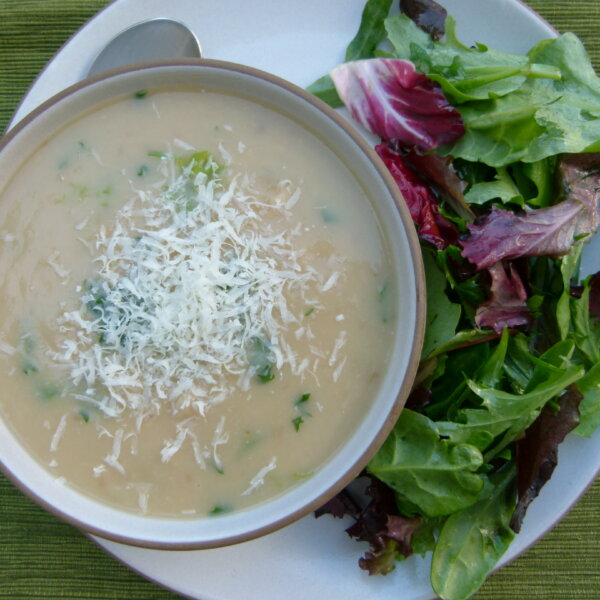
Potato and bean soup (patate e fagioli)

Who invented the idea of “Meatless Monday?”  The U.S. Food Administration did during World War I and urged families to conserve key staples to aid the war effort, but the idea was revived in 2003 by an ad exec-turned health advocate for dietary and environmental reasons.   Ironically, the Food Administration also tried to promote “Wheatless Wednesday” during WWI, which I would love to see make a comeback.  But I have a feeling you won’t see the US government advocating abstaining from any big political donors major food industries anymore.  However if you ask my sisters and me who invented “Meatless Monday,” we would tell you with conviction that it was our mother.   Vegetarian dinners on Mondays were a part of my life growing up.  I loved them since I was a vegetarian from about the age of 10 to 18.  But believe me, my mother was not trying to cater to me at all.  Her thought was that we tended to indulge over the weekend with heavy meals, usually centered on lots of pasta, meat and cheese and that we needed a break.  My sisters, who were most definitely NOT vegetarians called it “Low Budget Night,” since Monday’s dinners tended to be less expensive and less fancy.

Beans or lentils were almost always the star of the show on Mondays and they usually found their way into a soup.  This potato and white bean soup is just a take on a traditional pasta and bean soup or “pasta e fagioli,” as you might see it on a menu.  I love that potatoes, a whole food, take the place of pasta, which is a (processed) food I eat very occasionally.  The recipe requires so few ingredients, many of which you probably have in your pantry.  And if you make your beans from scratch, this soup will cost you practically nothing.  The potatoes and beans both add a rich creaminess to the soup, as well as work together to form a complete protein.  Even though beans are typically bland, this soup has a nice, almost smoky flavor and feels very satisfying despite the lack of fat.  A typical Monday dinner would be a nice big bowl of this soup with a side of sauteed greens or a salad and some crusty bread.  Sometimes my parents would also add a wedge of good cheese (that my father smuggled in his suitcase from Italy) to the table and that was that.

My husband grew up with neither Meatless Mondays nor Meatless Any Days, so getting him to buy into a dinner of potato and bean soup took some time.  Now he loves it and especially how it makes him feel afterwards (“not gross”).   Lest anyone feel cheated, I happily serve both a salad and some roasted vegetables on the side.  All my kids, Mr. Picky included, love this soup.  It’s white!  What kids don’t like white food?  Of course,  I can’t help but stir in some escarole in at the end.  You know me and my greens.  They’re going to save your life, so I’ll find anyway to include them that I can.  If your local market doesn’t carry escarole, feel free to add some spinach, arugula or chard.  I always plan to have extra soup for thermoses in the next day’s lunch boxes, which works out perfectly for “Trash-free Tuesday” at our school!

Have you made any new year’s resolutions?  I’ve been contemplating a few, but what tends to work better for me are measurable resolutions, such as “cook dinner five nights a week” or “do yoga every Sunday.”  I’ve never had luck with “eat better” or “exercise more.”  Most people tend to come up with resolutions about diet and health, but they’re usually about short term weight loss or feeling better after 6 weeks of holiday overindulgence.  I think “Meatless Mondays” is an easy one to try and it doesn’t mean you’re becoming a vegetarian or a vegan, not that there’s anything wrong with that.  It just means a commitment to eating more plant-based foods and acknowledging the heavy environmental footprint of raising animals in this country.  Just a thought.

Talk to me here — am I the only one who grew up with Meatless Mondays?  Does your family currently partake?  I need some inspiration for my new year’s resolutions — feed me!  Or just make this soup.  Here’s to a happy and healthy 2012!

5.0 from 1 reviews
Potato and Bean Soup (Patate e Fagioli)
Author: 
Serves: 8
 
Ingredients
  • 1 pound dried white beans, such as Great Northern or cannellini, about 2 ½ cups*
  • 1 2-3 inch piece of kombu (optional)
  • 2 Tablespoons unrefined, cold-pressed extra-virgin olive oil
  • 1 large onion, halved and thinly sliced
  • 4 large garlic cloves, thinly sliced
  • 8 cups chicken stock, vegetable stock or water
  • 1 pound Yukon Gold potatoes (or other boiling potato), cubed
  • 1 6-inch sprig of fresh rosemary (optional, I like it just as much without)
  • 3-4 teaspoons sea salt (depending on saltiness of the stock)
  • 1 head escarole, leaves coarsely chopped
  • Grated Pecorino-Romano or Parmesan cheese for serving, if desired
Instructions
  1. Wash beans well and pick over for stones and debris. Soak beans with kombu in plenty of fresh cold water overnight or at least 6 hours. This can be done in a covered container or in a pot (I use the same pot for soaking as for cooking the soup) on a countertop. Refrigerate if your kitchen is warm.
  2. Just before you begin cooking, drain the beans into a colander. Heat the oil over medium heat in a large heavy-bottomed pot, and add the onion and garlic. Cook until softened, about 8-10 minutes.
  3. Add the beans and stock to the pot and raise the heat to high. You can add the kombu to the pot, if you like for additional alkalinity. Bring soup to a boil, cover, then lower to a simmer. Cook for 1 hour.
  4. Add the potato, sea salt and (optional) rosemary. Cover and simmer for 30 minutes. Test the beans for tenderness. If they’re not done, continue to simmer until they’re tender. Once beans are tender, you can puree the soup to your desired consistency or leave chunky. Remove the kombu and sprig of rosemary before pureeing.
  5. Stir in the escarole and cook until wilted. Serve with grated cheese, if desired.
Notes
If you want to use canned beans, you will need 4 15-ounce cans, or about 6 cups. I like Eden Organic. Follow the directions below:

Saute onions and garlic.
Add potatoes, stock, salt and (optional) rosemary. Cook for 30 minutes or until tender.
Add beans to pot and cook until heated through. Puree to desired consistency (or don’t). Stir in escarole.


Late summer minestrone

late summer minestrone|pamela salzman

Oh, I am not very good at goodbyes.  And saying farewell to summer is just inevitable now, isn’t it?  My minestrone soup is one of those recipes that bridges summer and fall.  Zucchini and tomatoes are still plentiful in the farmer’s markets, but the weather is showing signs of cooling down.  We’ve had a few chilly and foggy beach days in the last week and that was my signal to make this favorite soup of ours.  The word minestrone means “big soup” in Italian.  To me it means, “use what you’ve got, ” especially lots of veggies.  No matter what, it’s always hearty enough to be called a meal, but light enough for the season.  My mom used to make it with elbow macaroni or the smallest of pastas, but I adore farro and find that it adds a heartiness that the pasta doesn’t.  Plus, it has more to offer in the way of fiber and protein.  Combined with white beans, this is a well-balanced meal that almost always makes its way into thermoses in tomorrow’s lunch box.  Have I mentioned lately that making school lunches is not my favorite morning pastime?  I know, I’m such a whiiiiiner.  But Daughter #1 is trying to be an overachiever this year and start school at 7:00 am.  Do you know what this means?  I need to be making lunch around 6:00 am OR I could just reheat minestrone five minutes before we need to leave the house.  Sounds like a plan!

As the seasons change, so does this soup.  I have used jarred tomatoes instead of fresh, and frozen shelled peas and cabbage for the zucchini.  Don’t be put off by the piece of rind from a wedge of Parmesan cheese.  It’s a little secret ingredient found in so many Italian kitchens.  One you see how delicious it makes this soup, you’ll never throw it out again!   My mom would make this soup or pasta e fagioli whenever we would come to the end of a piece of Parmesan.  In my house, my kids and husband love this soup so much that we buy buy the cheese just for the rind!  Mr. Picky even likes this soup.   His favorite thing to do is add a leftover meatball, chopped up into his bowl and he’ll have seconds, thank you very much.

late summer minestrone|pamela salzman

This week I will be harvesting almost all the basil and parsley in the garden and making a mountain of pesto to freeze in small quantities for the upcoming months.  At least I can make summer last a little longer in my own way.

late summer minestrone|pamela salzman


View this post on Instagram


A post shared by Pamela Salzman (@pamelasalzman)


5.0 from 4 reviews
Late Summer Minestrone
Author: 
Serves: 6
 
Ingredients
  • 2 Tablespoons unrefined, cold-pressed extra-virgin olive oil + more for drizzling
  • 1 onion, coarsely chopped
  • 1 stalk of celery, coarsely chopped
  • 1 carrot, coarsely chopped
  • 2 garlic cloves, thinly sliced
  • 1 pound of fresh tomatoes, peeled, seeded and coarsely chopped or 1 14.5 ounce can, diced with juice
  • 2 Tablespoons chopped, fresh flat-leaf parsley
  • Sea salt
  • Freshly ground black pepper
  • 6 cups chicken or vegetable stock, preferably homemade
  • ¾ cup farro
  • Piece of rind from a wedge of Parmigiano-Reggiano cheese (if you have it)
  • 4 small zucchini, medium dice, about 4 cups
  • 1 ½ cups cooked white beans (e.g. cannellini, Great Northern), rinsed if canned
  • Handful of greens, coarsely chopped
  • Chopped basil leaves or pesto for garnish (optional)
  • Freshly grated Parmigiano-Reggiano or Pecorino-Romano cheese
Instructions
  1. Heat the olive oil over medium-low heat in a large, heavy-bottomed pot, and add the onions, carrot, celery and garlic. Cook until the vegetables have softened, about 10 minutes. Do not allow the vegetables to brown.
  2. Add the tomatoes with the juice, parsley and ½ teaspoon sea salt. Cook for 5 minutes more, until the tomatoes are fragrant.
  3. Add the stock and 2 teaspoons of sea salt and bring to a boil. Add the farro and the parmesan rind and bring to a boil again. Lower the heat so that the soup simmers. Cook about 15 minutes.
  4. Add the zucchini and cook another 10 to 15 minutes, until the farro is tender but still has a little “toothiness.”
  5. Add the cooked beans and heat through. Add more stock, if desired.
  6. Add the chopped greens and stir until wilted. Adjust seasonings and serve with chopped basil leaves and freshly grated parmesan cheese and/or drizzled olive oil on top or a spoonful of pesto.


Homemade chicken stock recipe

Homemade Chicken Stock | Pamela Salzman

I am starting my first post with one of my obsessions – homemade chicken stock.  Since chicken stock is something I use quite regularly, especially during soup season, I thought it would be a good idea to get a recipe out there right off the bat.

A chicken stock made from scratch is heads and shoulders above anything you can buy in a box or (worse) a can.  Not only is the taste superior when you make it yourself, but it is so much more healthful, too.  When the kids go back to school and the weather turns colder, it is very important to nourish ourselves with foods that boost the immune system.  Prepared properly, chicken stock is rich in minerals, aids in digestion, and strengthens the immune system.

homemade chicken stock | pamela salzman


Making stock does not require a lot of work, but it does take some time on the stove to simmer.  I like to make stock on a day when I know I’ll be around for 5 hours or so and I usually make 2 large stockpots at once.  Stock can stay in the refrigerator for 3-5 days or be frozen for up to 3 months.

homemade chicken stock|pamela salzman

Just so you know, I’m all about efficiency, and this is the first of many opportunities to apply “green” principles — which can save you some green.  Let’s say you just made a flavorful roast chicken last night – instead of tossing the carcass in the garbage (this is a simple example of adaptive reuse!), save it for chicken stock, it will yield a very rich broth.  That way you get multiple meals from a single purchase, saving you time and money.  Who said it wasn’t easy to be green?

Pamela Salzman 11

homemade chicken stock|pamela salzman

Tips for making a flavorful, nutrient-rich stock:

  • Bones!  Use fresh chicken parts such as backs, necks, wings and feet, if you can get them.  (Toss the feet in the pot first so they don’t float to the top and stick out.  That really freaked me out the first time I did that!)  You can also use a whole chicken if you like to have poached chicken meat to use afterwards.
  • Cold water – it will draw lots of flavor from the bones.
  • A gentle simmer – this will result in a clear broth.
  • A little acidity (such as vinegar) – to draw lots of minerals and amino acids from the bones.
  • Time – the longer it simmers, the more flavor you will have.
  • Turkey, too – you can do the same thing with your leftover turkey carcass from Thanksgiving.


Let me just warn you right now – once you’ve cooked with homemade stock, you’ll never go back to a box!

homemade chicken stock|pamela salzman


homemade chicken stock | pamela salzman


Photo by Sarah Elliott for Pamela Salzman
5.0 from 1 reviews
homemade chicken stock recipe
Author: 
Serves: Makes about 5 quarts
 
Ingredients
  • 1 whole free-range chicken or 4 pounds of bony chicken parts, such as backs, necks and wings (if you can get chicken feet, use them!)
  • 6 quarts cold water*
  • 1 Tablespoon apple cider vinegar**
  • 1 large onion, peeled and halved
  • 2 carrots, peeled
  • 2 celery stalks, cut if necessary
  • Few sprigs of fresh parsley
  • 2 Teaspoons sea salt
Instructions
  1. Wash the chicken and remove gizzards from the cavity. Place chicken and/or chicken parts in a large stainless steel stock pot. (You can cut the chicken into pieces if you need to in order to fit in the pot.) Add the cold water and vinegar. Put the temperature on high and bring to a boil.
  2. Immediately turn heat to low and skim with a slotted spoon any foam that rises to the surface. Try not to skim any of the fat or you will lose a bit of flavor. At this point, it is important to keep the stock to a bare simmer and NOT a boil.
  3. After skimming off all the foam, add all the vegetables except the parsley. Cook uncovered at the gentlest possible simmer for 4 to 5 hours. (I like to go as long as 12 hours.( You want to see tiny bublles just barely breaking the surface. If the heat from the burner does not go low enough , partially cover the pot or leave your stock pot half on the heat and half off.
  4. About 10 minutes before finishing the stock, add the sea salt and parsley (this will impart additional mineral ions to the broth).
  5. Strain the stock into a large glass bowl. Remove the chicken meat from the carcass, if using a whole chicken, and discard the remaining solids. Cool before refrigerating.
  6. Ladle through a fine mesh sieve into quart-sized containers or whatever size is most useful and refrigerate overnight. The next day, skim off the congealed fat at the top of each container. Refrigerate the stock for up to 5 days or freeze for up to 3 months. I have been using BPA-free containers from letsgogreen.biz as well as Sistema. I also reuse glass quart-size jars from yogurt and Vegenaise. Just soak the labels off and wash before adding your stock.
Notes
*Cold water draws the flavor out of the meat and bones.

**Acidic wine or vinegar adding during cooking helps to draw minerals, particularly calcium, magnesium and potassium, into the broth.