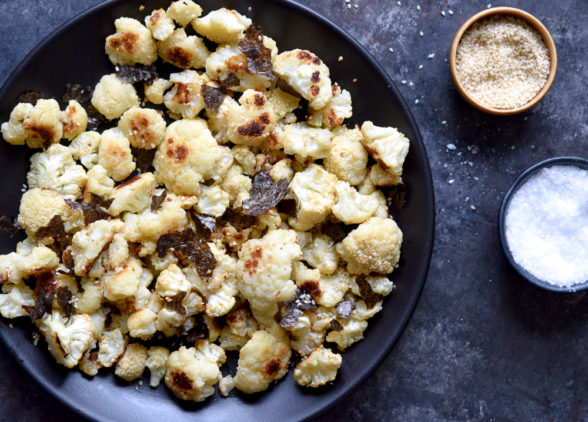
Traditional roast turkey with gravy

My husband and I offered to host Thanksgiving at our new home a few months after we were married in 1995.  We were young and naive, but we were excited to play house with all our new china and crystal.  To prepare for the big day, my husband bought the firewood and I did absolutely everything else.  (You can see who was the naive one.)  I’ll never forget when he suggested I call the local Koo Koo Roo to order a cooked turkey for Thanksgiving dinner, “you know, just so we’re sure it’s good.”  I was slightly insulted at the suggestion, but I knew where he was coming from.  I had never cooked an entire turkey before and I was a bit intimidated.  For most people, the turkey is the centerpiece of the Thanksgiving meal.  If I screwed it up, I thought, the holiday would be a disaster.  So my plan was simple —  don’t screw up the turkey.

I called people I trusted — my mother, my mother-in-law and my aunt.  You know what they say about asking people’s advice.  I got three different opinions on how to cook a turkey which taught me that there’s no one right way to do this.  However in the years that followed I learned that there is more than one way to mess it up.  I’ve had my share of mishaps, which only reinforced to me that no matter what goes wrong, you’ve just got to roll with it because there’s usually a solution.  Like in 1996 when I carved into the turkey and it was rather raw undercooked in the center.  So we just cut it into slices and pan-sauteed them with a little stock.  Everyone complimented me on how moist the turkey was!  Funny enough, my worst disaster came last year when I was really feeling like a pro, having cooked so many Thanksgiving dinners for my family and taught so many of the same classes.  I had my two beautiful turkeys in the garage refrigerator and in the process of transferring 2 pans of stuffing the night before, I was distracted and inadvertently left the garage refrigerator door open.  All night.  When I came down the stairs in the morning and noticed one pan of stuffing still on the countertop, I knew what I did.  My garage is usually about 80 degrees and so were the turkeys.  I sat down and wondered if I had just ruined Thanksgiving.  That’s what you get for being so smug, I thought.  Instead I sent my husband to Whole Foods at 7:00 am where he was able to buy two 17-pound already brined turkeys.  Thanksgiving was saved, although a little saltier than I would have liked.  But you also know what they say about beggars.

Here’s what I’ve learned about turning out a fabulous turkey:

  • Before seasoning, check both the neck and main cavities to remove extra turkey parts like the neck and giblets.
  • Season it well and as early (like 2-3 days before) as possible for the best flavor and a very moist turkey;  I use about 1 Tablespoon kosher salt per 5 pounds of turkey.  See below for where to distribute the salt.
  • Pull the turkey out of the refrigerator a minimum of 1 hour and maximum of 2 hours before roasting.  Your bird will cook more evenly, especially in the center.
  • The heat in most ovens comes from the top, so roast your turkey on the lowest oven rack to protect the breast meat from drying out.
  • If you decide to baste, do so very quickly so the oven door isn’t opened for more than 30 seconds.
  • Use an instant read thermometer to determine if your turkey is properly cooked.  Do not rely on a timer!
  • Start testing earlier than you think you should.  Every oven is different and I’m noticing that the free-range birds are cooking more quickly than not free-range.
Turkey Weight Approximate Roasting Time
10 to 12 lb. 2 1/2 to 3 hours
12 to 14 lb. 2 3/4 to 3 1/4 hours
14 to 16 lb. 3 to 3 3/4 hours
16 to 18 lb. 3 1/4 to 4 hours
18 to 20 lb. 3 1/2 to 4 1/4 hours
20+ lb. 3 3/4 to 4 1/2 hours


Ironically, Koo Koo Roo went out of business years ago, but my kitchen is still open and bustling on Thanksgiving and my husband thinks I make the best turkey in town.


Traditional Roast Turkey with Gravy
Author: 
Serves: 10-12
 
Ingredients
  • 12-14 pound fresh turkey, giblet bag and neck removed, rinsed, patted dry and seasoned with 3 Tablespoons* kosher salt as soon as you bring it home from the market (2-3 days in advance is best)
  • *2 Tablespoons in the cavity, 2 teaspoons on breast and 2 teaspoons on thighs and legs. Whatever is left on your hands, rub on the breast meat underneath the skin.
  • freshly ground black pepper
  • 1 onion, quartered
  • 1 celery stalk, cut into thirds
  • small bunch of parsley sprigs, thyme sprigs and/or sage leaves
  • 1 lemon, quartered
  • 1 apple, quartered or cores from 2 apples
  • 6 Tablespoons unsalted butter, melted
  • 1-2 cups stock or water
  • Gravy
  • ¼ cup white wine
  • 5 Tablespoons all-purpose flour
  • 3 cups chicken or turkey stock, preferably homemade
  • sea salt and freshly ground black pepper to taste
Instructions
  1. The day of roasting, take turkey out of refrigerator and wipe dry with paper towels. Bring to room temperature, about 60-90 minutes.
  2. Preheat oven to 425 degrees. Position a rack in the lowest rung of the oven. Oil a V-shaped rack in a roasting pan.
  3. Sprinkle a little freshly ground black pepper in the cavity and then add in the onion, celery, herbs, lemon and apple. Truss the turkey by tying the legs together. Brush the skin all over with some of the butter.
  4. Place the turkey on the rack in the pan, breast-side down. Bend the wing tips behind the back. Roast for 40 minutes, basting with butter after 20 minutes. Reduce the heat to 325 degrees, turn breast side up (I usually wear clean rubber gloves to do this) and add 1 cup stock or water to the roasting pan. Continue to roast, basting with the remaining butter until used up and then with the pan juices every 20-30 minutes. Add additional stock to the roasting pan if you notice there are no pan juices with which to baste the turkey.
  5. Roast until golden and cooked through. After about 2 ½ hours, start testing for doneness by inserting an instant-read thermometer in the thickest part of the breast away from the bone; it should register 165-170 degrees. You may also test the thigh – it should read 180 degrees. The turkey should roast a total of about 3 hours or 13-15 minutes per pound, but it can range from 2 ½ to 3 ½ hours.
  6. Transfer to a cutting board or warmed platter and cover loosely with aluminum foil until ready to carve, at least 20 minutes (I prefer longer.) Use the pan juices to make gravy.
  7. To prepare the gravy: Pour all the pan juices, including the fat into a gravy separator. Allow the fat to separate from the juices.
  8. Heat the roasting over medium heat on the stove and add the pan juices plus the apple brandy. Bring to a boil and lower heat to a simmer for 2-3 minutes, stirring with a wooden spoon to dislodge any brown bits that stick to the bottom of the pan. Strain into a bowl or you can use the gravy separator again.
  9. In a saucepan over medium heat, warm the reserved fat from the gravy separator until it is bubbly. You should have at least 3-4 Tablespoons. If you don’t, add some olive oil or butter. Add the flour and whisk rapidly to cook the flour, about 2-3 minutes.
  10. Whisk in the strained pan juices and 3 cups of stock to the saucepan until smooth. Bring to simmer and cook until thickened, about 5 minutes. Season to taste with salt and pepper. Keep warm on lowest heat. Add additional stock as needed to achieve desired consistency.


To carve:

Follow the same principles in carving a whole roasted chicken.  Cut into the joints, in between the connecting bones and it will be a breeze.  I carve in this order:

  1. Wings
  2. Drumsticks
  3. Thighs
  4. Breasts, which I take completely off the turkey and slice crosswise against the grain.

Don’t forget to save the carcass and bones for stock!

Brussels Sprouts with (Turkey) Bacon and Dates

My husband and I used to go out to dinner much more than we do now.  When the kids would to go to bed at 7:00 pm, it was a lot easier to tuck them in, leave them with a babysitter after they were asleep and still manage to have dinner out at a reasonable hour.  Well, (bed)times have changed and so has my desire to out to restaurants.  Call me a party pooper, but I’d much rather enjoy a simple meal at home with a few good friends and end the evening with a competitive game of Sequence or Bananagrams.  Can you imagine how much fun I’m going to be when I’m 60?

I do have a few favorite restaurants, though, one of which is the wildly popular, (but not in a cheesy LA-way) Gjelina in Venice, California.  It’s earthy, rustic, but still sophisticated and there’s kale on the menu in three or four different dishes.  And most importantly, they make it all taste divine in a way that I can’t.  Last year, I had these incredible char-grilled Brussels sprouts with bacon and dates that I became obsessed with.  I literally dreamt about them and all that sweet, salty, lightly charred goodness.  I was incredibly excited when my friend Laura had her birthday dinner there a few months later and I was able to enjoy the Brussels sprouts again.  But unfortunately, Gjelina is not the type of restaurant which gives out its recipes.  I knew some version of these sprouts had to be on our Thanksgiving table last year, so I set out to make my version of the dish, which I like just as much and it doesn’t cost me $8/serving.

What’s funny about my obsession with Brussels sprouts is that I despised them as a child most likely because my mother bought them frozen and then boiled the life out of them.  But if you can roast them or sear them in a pan and cook them until they’re tender, they are just amazing.  Brussels sprouts are also incredibly good for you, as are all the cruciferous vegetables.  They contain loads of fiber, folate, potassium, Vitamin C and some very powerful anti-cancer sulfur compounds.  And if Brussels sprouts’ nutritional profile doesn’t impress you, the green color adds some vitality to a normally very beige Thanksgiving spread.

These Brussels sprouts are fabulous and will have an encore appearance at our Thanksgiving buffet this year, although it’s not the best dish to make for an enormous crowd (more than 25 or so.)  Last year I had three large skillets going on the stovetop and I don’t think I could have wedged in another.  I pull the turkeys out of the oven to rest for about 30-40 minutes and start my gravy right away since that can sit on the stove on low heat while I tend to the salads and vegetables in the remaining 20 to 30 minutes or so.  If you would like to make this to bring to someone else’s house, do ask your host if he or she can accommodate your making this on the spot.  Otherwise, you can make it before you leave your house and reheat it gently just before dinner with a few tablespoons of stock.  Of course, these Brussels sprouts are no one-hit wonder.  They’re easy enough to make any night of the week, which you’ll just have to do since Gjelina was crazy enough to take them off the menu!

Brussels Sprouts with (Turkey) Bacon and Dates
Author: 
Serves: 6, depending on how many other sides you are serving
 
Ingredients
  • 2 Tablespoons unrefined, cold-pressed extra-virgin olive oil
  • 2 Tablespoons unsalted butter
  • 1 ½ pounds medium Brussels sprouts, ends trimmed and halved
  • 4 ounces nitrate-free turkey bacon, chopped (optional)
  • 1 large shallot, finely diced
  • 1 garlic clove, minced
  • 4-6 large, pitted dates, chopped (they’re much easier to cut when cold)
  • 2 Tablespoons balsamic vinegar
  • ½ cup chicken or vegetable stock
  • Sea salt and freshly ground black pepper
Instructions
  1. Heat a large skillet (12-14 -inch is good) over medium high heat. Add olive oil and butter.
  2. Make sure you are wearing an apron so any splattering doesn’t mess up your outfit. When butter is melted, add Brussels sprouts cut side down and season them with 1 teaspoon sea salt and a few grinds of black pepper. Allow the sprouts to brown without burning and then turn to brown on the other side. Lower the heat to medium and cook the sprouts another 3-4 minutes, until they soften slightly.
  3. Move the sprouts to one side of the pan and add the diced turkey bacon to the pan and cook for 3-4 minutes until it starts to crisp around the edges.
  4. Stir in the shallots, garlic and dates and cook another minute or so until the shallots are tender.
  5. Pour in the balsamic vinegar to deglaze any brown bits on the bottom of the pan. Add the chicken stock and cook until just a glaze remains. Taste for salt and pepper. Serve immediately.
Notes
Do ahead: Wash, dry, trim and halve the Brussels sprouts the day before and keep refrigerated.

You can dice your bacon, shallot, garlic and dates the day before, too, but I usually do this about an hour before I start the recipe.

If you must make this ahead, reheat gently with an extra few tablespoons of stock.

Butternut squash salad with pomegranates and toasted pumpkin seeds

butternut squash salad with pomegranates and pumpkin seeds | pamela salzman

Although I love planning and cooking the whole Thanksgiving meal, a few years ago I decided I was just plain bored with the same old same old.  The problem was that no one else was.  My family and regular Thanksgiving guests wanted no deviation from tradition.  I hinted at the notion that maybe, perhaps I would replace the standard stuffing with a fabulous grain-based recipe I had been testing.  A rebellion!!!  Oh, come on people.  Like you need more bread?  Fine, the stuffing stays.  But that didn’t prevent me from trying to show everyone how overly starchy Thanksgiving is.  So I asked, “Can we do away with the mashed potatoes or make them more interesting with some roasted garlic or cauliflower puree?”  I’m sure you can guess how that went.


Someone asked me the other day what is my favorite part of the Thanksgiving meal.  I’ll give you three seconds to guess.  Okay, time’s up.  The vegetables!  Too obvious, I know.  Actually, it’s really the salad that is the highlight of the meal for me because I can change it up every year and it’s the only way I get to have any fun at all.  The beautiful colors of the vegetables do a lot to balance out all that beige, not to mention balance out all the carbs.  I also love eating something raw with all that cooked food.  But from a logistical perspective, salads can be made without the use of a stove or oven, which is a saving grace on Thanksgiving.  And, as if it couldn’t get any better, salads, for the most part, can be prepped in advance.

This butternut squash salad is something I made for Thanksgiving a few years ago and I still make it often for entertaining or for potlucks during the fall.  It’s beautiful, healthful, delicious and showcases the season’s great produce.  I have a theory that fruits and vegetables that grow during the same season usually complement each other very well.

On that note, there aren’t too many fall salads that wouldn’t be more fabulous with the addition of a handful of pomegranate seeds.  In fact, I think every Thanksgiving salad I’ve made in the last 8 years has had pomegranate seeds scattered throughout.  My kids and I are obsessed with them.  It was a happy day in our house the day I came home from the farmer’s market with the first pomegranates of the season.  I’ve even taught my kids how to seed them — Mr. Picky, who is a Virgo, is rather meticulous about getting every last seed out.  We open the pomegranates under water and gently push the seeds away from the peel.  It’s actually quite therapeutic, but more importantly, it keeps me from making a trip to the dry cleaner.  Also, people tell me that the already seeded pomegranates always seem a bit soggy.  They’re certainly much more expensive and why would you pay your grocery store a premium when you’ve got kids to do the job?

butternut squash salad with pomegranates and toasted pumpkin seeds | pamela salzman

butternut squash salad with pomegranates and toasted pumpkin seeds | pamela salzman

5.0 from 1 reviews
Butternut Squash Salad with Pomegranates and Toasted Pumpkin Seeds
Author: 
Serves: 6-8
 
Ingredients
  • ⅓ cup raw hulled pumpkin seeds (pepitas) or chopped pecans
  • 3 Tablespoons unrefined, cold-pressed extra-virgin olive oil or unrefined melted coconut oil + 1 teaspoon olive oil for the pumpkin seeds
  • 1 3-pound butternut squash, peeled, seeded and cut into ¾ -inch dice
  • 1 Tablespoon fresh thyme leaves or 2 teaspoons chopped fresh rosemary (I accidentally left it out in this picture.)
  • 1 ½ teaspoons sea salt
  • freshly ground black pepper to taste
  • 8 ounces mixed baby greens
  • ½ cup fresh pomegranate seeds
  • Dressing:
  • 2 Tablespoons fresh lemon juice
  • 2 Tablespoons fresh pomegranate juice (or orange juice)
  • ½ teaspoon sea salt
  • A few twists of freshly ground black pepper
  • 2 teaspoons minced shallot
  • 2 teaspoons maple syrup or raw honey
  • 6-7 Tablespoons cup unrefined, cold-pressed extra-virgin olive oil
Instructions
  1. Preheat oven to 400 degrees.
  2. Place the pumpkin seeds in a skillet and toast over low heat until lightly browned. Drizzle with 1 teaspoon olive oil and a pinch of sea salt. Remove from heat and set aside. Try not to eat them all while you’re cooking everything else.
  3. Toss the squash with thyme and olive oil or coconut oil and place on 2 baking sheets. Season with sea salt and pepper. Roast for 35-40 minutes, turning once until tender and caramelized.
  4. For the dressing: in a small bowl combine lemon juice, pomegranate juice, shallot, maple syrup, sea salt and pepper. Whisk in olive oil until emulsified.
  5. Place salad greens on a platter and toss with enough dressing to coat lightly. Separately drizzle the butternut squash with some dressing and add to the greens. Sprinkle with the pomegranate seeds and pumpkin seeds. Taste for salt and pepper.
Notes
Dressing can be made a few days ahead and kept refrigerated.

Pumpkin seeds can be toasted the day before.

Salad greens can be washed and dried a few days in advance and rolled up in a damp kitchen towel or plastic bag and kept in the refrigerator.

Butternut squash can be cut up the day before and kept refrigerated.

Pomegranate can be seeded several days in advance and kept refrigerated.


Pumpkin pie


There are very few recipes that debuted on my first Thanksgiving menu 16 years ago that are still going strong today.  Roast turkey, cranberry sauce and mashed potatoes are staples year after year, as is a traditional pumpkin pie.  Despite all my rantings about how destructive sugar is to your health,  I honestly can’t imagine Thanksgiving without pumpkin pie.  I wouldn’t even care if no one liked it, I would still make two of them.  I remember the first pumpkin pie I ever made when I was in high school.  I followed the recipe on the can of Libby’s pumpkin puree and poured it into a store-bought pie crust.  Heaven.


Since then I have adjusted the recipe to be much more wholesome, and dare I say, much more delicious.  I traded in store-bought piecrust for homemade, canned pumpkin (bye-bye BPA) for freshly roasted (hello yummy rich pumpkin flavor), refined sugar for maple syrup (and much less of it), and canned evaporated milk for heavy cream.  Sure, heavy cream is rich in saturated fat, but I would rather eat a couple of spoonfuls of a high quality organic cream than canned milk.  Would you ever drink canned milk or feed it to your kids?  I didn’t think so.  I use organic raw cream when I can get it, or I buy a nonhomogenized, but pasteurized organic cream from Straus Family Creamery.  I have made a dairy-free version of this pie using coconut milk and it’s just as delicious (it does not taste like coconut, either.)  Of course there’s still lots of butter in the crust.  Last year, I made one pie with a white flour-based crust and another with a whole wheat pastry flour-based crust.  Only my sister-in-law and I liked the whole wheat one.  As my mother-in-law says, “You two like anything that you know is good for you.”  Partially true.  This year I will go back to all white flour pie crusts and the wholesomeness comes to an end right there.

Speaking of which, I am quite conscientious about consuming very little sugar during the year, but come Thanksgiving I feel like I have earned a piece of pie (or two) and I don’t feel bad about enjoying it.  The problem comes the next day when I’m looking for that sugar fix again at 4:00 in the afternoon.  And the next day.  And the day after that.  Guess what?  I’m not alone.  Thanksgiving starts not only the beginning of the holiday season, but a time when lots of people pack on a few extra pounds from overindulging too often.  I love celebrating just as much as the next person, but I definitely don’t love trying to lose weight (it’s not as easy as it used to be!)  I look forward to Thanksgiving dinner and dessert, especially after I’ve worked so hard to make it special and delicious, but this year I’m going to be a little more mindful the next day.  At least until Christmas.


Pumpkin Pie
Author: 
Serves: makes one 9-inch pie
 
Ingredients
  • Pie Crust:
  • 1 ¼ cups unbleached all-purpose white flour or spelt flour
  • ½ teaspoon fine sea salt
  • ½ cup (1stick) cold unsalted butter, cut into 8 pieces
  • 2-4 Tablespoons ice water
  • Filling:
  • ½ teaspoon fine sea salt
  • 1 teaspoon ground cinnamon
  • ½ teaspoon ground ginger
  • ¼ teaspoon ground cloves
  • pinch of ground nutmeg
  • 1 cup heavy cream or coconut milk (not light)
  • 1¾ cups fresh or canned pumpkin puree (1 15-ounce can)
  • 3 large eggs
  • 6 Tablespoons pure maple syrup or brown sugar
Instructions
  1. Make the crust: Place the flour and salt in the bowl of a food processor fitted with the metal blade. Add the butter and pulse 10 times.
  2. Turn the food processor on and slowly pour in 2 Tablespoons ice water. Stop the machine and carefully (watch the blade!) grab a small handful of dough and squeeze it in your hand. If it holds together well, you’re done. If it’s crumbly, add another tablespoon of ice water and blend. The goal is that when you squeeze the mixture in your hand that it forms a moist, but not sticky ball of dough. Transfer the dough to a piece of parchment paper or plastic wrap and shape into a disc. Wrap well and refrigerate for at least 30 minutes.
  3. Preheat the oven to 375 degrees. On a lightly floured work surface, flour a rolling pin and roll dough into a 12-inch round. While you’re rolling out the pastry, you should always be able to move it easily around the work surface without sticking. Add additional dustings of flour as needed. Fit the circle into a 9-inch pie plate and crimp edges. Refrigerate if it feels too soft.
  4. Prick the bottom of the crust all over with a fork. Line the crust with a piece of parchment (like the one the dough was wrapped in), and fill it with pie weights or dried beans (the ones in the photo I've had since college!). Bake until lightly golden around the edges, about 20 minutes. Remove parchment and weights. Return crust to the oven and bake for another 5 minutes until light golden all over. Cool completely on a wire rack (this can take up to an hour so you may want to turn the oven off.)
  5. Preheat the oven again to 375 degrees. In a small bowl, whisk together the salt and spices (if you are using brown sugar instead of syrup, add the sugar now.)
  6. In a large bowl or with a mixer, whisk together cream, pumpkin puree, eggs and maple syrup. Add spice mixture and combine thoroughly.
  7. Pour mixture into the cooled crust and bake until filling is set (it will jiggle like gelatin, but it will be a little soft in the center), about 50-60 minutes. The filling will firm up as it cools. This can be made the day before. I like to keep it refrigerated.

Pumpkin pancakes with sauteed apples

Now that my daughters are teenagers (sigh), I encourage them to invite their girlfriends to have sleepovers at our house on the weekends.  I don’t always get my wish, but I do like having them home so I can keep an eye on everyone and then I don’t worry so much.  Not only that, but the girls’ friends give me more gossip than they do, and enquiring moms want to know!  Last weekend, my husband and Mr. Picky were away on a guy’s trip and I had 6 girls keeping me company.  I used to dread sleepovers because there would always be one early bird that would wake everyone up at 5:00 am and then you had a Miss Cranky Pants to deal with the rest of the day.  Let me tell you, some sleep mechanism kicks in when the kids hit middle school and then you can’t wake them before noon if your life depended on it.

Last Sunday, I was able to get in a workout and shower before I heard the first signs of life at 10:30 am.  Still foggy and misty out, I wanted to make a cozy breakfast for everyone.  I had cooked some fresh pumpkin puree the day before with pumpkin pancakes in mind — my absolute favorite!  Before I even got started, the 13-year-olds were mumbling something about not being hungry.  I would not be discouraged.  I noticed two sad-looking Golden Delicious apples on the counter that I knew no one would ever eat.   I decided to peel and slice those and gently saute them in a little butter while I preheated the griddle and assembled the pancake batter.

This is just a twist on the classic buttermilk pancake recipe that is a weekly staple in our house.  The pumpkin puree adds a beautiful copper color to the batter as well as a little Beta-carotene.  And then all those fantastic warming spices add the flavor that says Fall!  If you have pumpkin pie spice, I’m sure that would work fine here, too.  Just like my standard pancake recipe, you can make this batter the night before.  I have taught my girls how to cook their own pancakes, so very often I will leave the batter on the counter for them to cook with their friends at whatever time they saunter downstairs and I’m free to get my day going.

I normally just serve these pancakes with a little maple syrup or with this incredible apple cider syrup we picked up at a roadside farm in the Hamptons this summer.  The girls like to add chopped pecans to the pancakes when they’re cooking on the griddle, but the sauteed apples were a special treat and ridiculously simple to make.  When they were tender I drizzled on them the tiniest amount of syrup and a dash of cinnamon.  Crazy good!  I made a plate to photograph and then said to the girls, “Look how pretty this is.”  Their eyes bugged out and someone said, “Yum!  Like that actually looks good.”  Actually??  Like, whatever.

Pumpkin Pancakes with Sauteed Apples
Author: 
Serves: 4-5
 
Ingredients
  • 1 ½ cups whole wheat pastry flour*
  • 1 ½ teaspoons aluminum-free baking powder
  • 1 teaspoon aluminum-free baking soda
  • 1 teaspoon fine sea salt
  • 1 teaspoon ground cinnamon
  • ½ teaspoon ground ginger
  • ¼ teaspoon ground nutmeg
  • pinch of ground cloves
  • 1 ½ cups buttermilk**
  • 2 large eggs
  • ½ cup fresh or canned pumpkin puree (NOT pumpkin pie filling)
  • 1 Tablespoon pure maple syrup
  • 3 Tablespoons unsalted butter, melted
  • Coconut oil for brushing the griddle
  • Sauteed apples as accompaniment, optional:
  • 2-3 apples, peeled, cored and sliced
  • 2 Tablespoons unsalted butter or coconut oil
  • 1 teaspoon maple syrup
  • a dash of cinnamon
Instructions
  1. Preheat a griddle to 400 degrees or medium heat. (On some stovetops, 350 or 375 degrees is fine.)
  2. If you are making the sautéed apples, heat a large skillet over medium heat. Melt the butter and add the apples. Lower the heat slightly and gently sauté until tender, about 10 minutes. Drizzle with 1 teaspoon maple syrup and a dash of cinnamon and toss to combine. Remove from heat.
  3. Combine the flour, baking powder, baking soda, salt and spices in a large mixing bowl.
  4. In a blender or medium mixing bowl, combine the buttermilk, eggs, pumpkin puree, maple syrup and melted butter until well blended.
  5. Pour the wet mixture into the dry ingredients and stir until just combined.
  6. Brush the griddle with coconut oil and spoon about ¼ cup of batter onto the griddle. Add chopped pecans or walnuts to the surface, if desired. When bubbles start to form on the surface of the pancake and the edges turn slightly dry, flip it over and cook until done. Serve warm with sautéed apples or maple syrup.
Notes
To make the pancakes gluten-free, substitute 1 ½ cups of Bob’s Red Mill All-Purpose Gluten-Free Baking Mix + 1 ¼ teaspoons of xanthan gum or substitute ¾ cup brown rice or GF oat flour and ¾ cup buckwheat flour.

**You can also substitute half yogurt and half regular milk for the buttermilk. Or, use 1 ½ cups milk, omit the baking soda, and use 2 teaspoons baking powder instead.


Smoky Braised Lentils with (or without) turkey sausages

Do you have a son younger than college age?  Did you ever have one?  Do you know that he probably doesn’t eat lunch at school?  I know you pack him something wonderful and maybe he even helped pick it all out.  But here’s the reality:  if your school is like mine and permits recess as soon as the kids are “finished” with lunch, most boys are only focused on one thing.  Playing ball.  I have figured out that my son only eats what he can on the way to the field and leaves everything else in the lunchbox.  He eats it all when he comes home, but he does NOT want to miss being picked for the better team or waste time sitting around eating when he can be doing his favorite thing in the world.  Playing ball.

Mr. Picky is in second grade and this has been going on since he started elementary school and from what other moms tell me, it doesn’t end.  So it was a big day in the Salzman household when Mr. Picky announced that he would like to take a thermos to school.  Why?  Did the state cut the budget for soccer balls?  Not yet.  Mr. Picky wanted a thermos so that he could take these lentils to school.  For lunch.  This is big, people.  And the thermos came back empty.

It is not at all important to me why he likes lentils, only that they are an amazing source of low-fat protein and super high in fiber, so they keep him full for a long time and help stabilize his blood sugar.  So I thought I would share this recipe with you just before Halloween since it is keeping in line with my strategy for the big night o’candy.  I can’t/won’t forbid my kids from eating candy on Halloween.  How unrealistic is that?  (Rhetorical question.  Very.)  My strategy is to get them really full with a good dinner before they go out so that they have no room in their bellies for too much candy.

My mom used to make braised lentils which is kind of like making lentil soup, but with less liquid.  Only she used to put a piece of pork or a smoked ham hock in the pot and it gave the lentils great flavor.  I don’t eat pork, but I started adding smoked paprika to my lentils to give a similar smokiness and it’s delicious.  Mr. Picky says it tastes like there’s a hot dog in there.  In fact, that wouldn’t be a bad idea to put a (nitrate-free) hot dog in the pot to persuade your kids to try lentils.  Just a thought.  I very often make them as a vegetarian dish since they have so much protein, but here I served them with my answer to fast food — Applegate Farms (Precooked) Organic Chicken and Turkey Sausages.  No matter how busy you are, I am sure you aren’t too busy to warm up these sausages.  I bake them, which is so much easier than cooking them in a skillet and having to clean up any splattering on the stovetop.  But the best part is that there are no spooky ingredients to worry about!

Smoky Braised Lentils with (or without) Turkey Sausages
Author: 
Serves: 6
 
Ingredients
  • 1 Tablespoon unrefined olive oil
  • 1 large onion, diced
  • 1 carrot, diced
  • 1 clove garlic, finely chopped
  • 2-3 teaspoons smoked paprika (Spice Hunter is a good, easy-to-find brand. Spicely Organic has no flavor.)
  • 1 cup organic black or French lentils* (sorted and rinsed)
  • 1 sprig fresh thyme (optional)
  • 1 teaspoon sea salt (+ ½ teaspoon if you don’t cook sausages with lentils)
  • 2 ½ cups water
  • Freshly ground black pepper
  • 1-2 packages precooked Applegate Farms Sweet Italian or Chicken Apple sausages (4/package)
Instructions
  1. In a medium saucepan, heat the olive oil. Add the onion and sauté over medium heat until tender and translucent, about 8 minutes.
  2. Add the carrots, garlic and paprika. Cook for 2 more minutes.
  3. Add the lentils, thyme, salt and water and bring to a boil. Cover and reduce heat to low and simmer for 30 minutes** or until lentils are tender. Halfway during the cooking process, preheat the oven to 350.
  4. Bake sausages on a baking sheet until heated through, about 15-20 minutes. Slice into thirds and serve with the lentils. Or alternatively, cut the sausages in half or thirds and add to lentils halfway through cooking lentils and heat sausages through.
  5. If lentils seem too liquidy, simmer a little longer uncovered. Taste lentils and season with salt and pepper as needed.
Notes
*There seems to be a wide variety of lentil cooking times. 365 Brand takes about 30 minutes, but I have used some imported varieties that take up to 50 minutes.

Shredded sweet potatoes and apple

Are you confused about the difference between a sweet potato and a yam?  Yep, so is my local supermarket.  In all fairness, I had to do a little research to get to the bottom of it, because I wasn’t sure myself.  The names “sweet potato,” which is not at all related to a regular potato, and “yam” are used interchangeably in the US, but they both generally refer to sweet potatoes, no matter the color.  Even the dark ones called yams are technically sweet potatoes.  True yams are native to Africa and are a staple in tropical and subtropical countries.  I have never actually seen one in our country, but here’s what you might find in your market if you live in the States:

  • Brown or red-skinned (often called called yams) —  these have a soft orange flesh and sweet flavor.  The varieties you will likely see are Garnet, Jewel, and Christmas Beauregard.  Garnets are my favorites and what I used in these photos.
  • Beige-skinned — have a pale yellow flesh.  Varieties include Nancy Hall and Juicy Yellow.
  • Purple skinned — I see these at my farmer’s market.  They have a white flesh and the farmer calls them Japanese sweet potatoes.  I don’t find the flesh to be quite as moist as the others mentioned above.
No matter what you call them, sweet potatoes are delicious and completely underrated.  It baffles me that so many people look to sweet potatoes only at Thanksgiving.  We eat them much more often in our house than regular potatoes and they are just as versatile.  They are also way more nutritious — you probably don’t need me to tell you that.  When you look at that deep orange flesh, you immediately think Beta-carotene, right?  They are loaded with so many vitamins, minerals and fiber, but it’s the antioxidant profile that sweet potatoes are so rich in.
I could eat a plain roasted sweet potato any day of the week for breakfast, lunch or dinner and I make them that way as an easy side dish quite often.  The down side of roasting whole sweet potatoes is that they take a good 50 minutes to cook.  We don’t always have that kind of time.  Here comes “Plan B Sweet Potatoes.”  Is this starting to sound like my “Plan B Salmon” from last week?  I actually shouldn’t call this Plan B, because this is my kids’ favorite sweet potato recipe and the ONLY way my husband enjoys them (Mr. Picky had to come from somewhere.)  The sweet potatoes take on the flavor of apple without getting too sweet.  I cook them long enough that they’re just tender with a little bite to them.  Leaving the peel on would give you more fiber and nutrients, but my kids prefer the skin off so they don’t get random bites of peel.  Last night we had this dish with some steamed whitefish and a green salad, but I think it’s even better suited to chicken, turkey or pork.  Have you located the shredding disc of your food processor?  I live for that thing.  If you have it, this will be on the dinner table in 15 minutes tops.
Speaking of turkey, I’m starting the Thanksgiving countdown this Thursday, which is four weeks from the big day.  We have lots to do to start preparing and getting organized, so tune in and I’ll get you through this with no stress.  It might even be fun!

Shredded Sweet Potatoes and Apples
Author: 
Serves: 6
 
Ingredients
  • 3 medium sweet potatoes, such as Garnet or Jewel, peeled (about 2 pounds)
  • 1 apple, cut into fourths and cored (I love using a tart variety, such as Granny Smith)
  • 3 tablespoons unsalted butter, unrefined coconut oil or unrefined extra virgin olive oil
  • Sea salt and ground black pepper
  • ½ cup water or apple juice
  • 1-2 Tablespoons 100% pure maple syrup (use less if you use juice)
Instructions
  1. Shred the sweet potatoes and apple in a food processor fitted with the grater attachment.
  2. Melt the butter in a large skillet (if you don’t have a large one, do this in two batches. I used a 12-inch.) Add the shredded sweet potatoes and apple and season with sea salt (I use about ½ teaspoon) and black pepper to taste. Saute, stirring occasionally so that the mixture doesn’t stick, about 5 minutes.
  3. Once the sweet potatoes don’t look so raw anymore, stir in the water/juice and maple syrup and bring to a simmer. Cook another 5 minutes or until sweet potatoes achieve desired tenderness. Taste for seasoning.


Tortilla soup

Tortilla Soup | Pamela Salzman

Tortilla Soup | Pamela Salzman

How do I know it’s soup season in my neck of the woods?  Well, we had our annual freaky October heat wave last week and then the temperature plummeted about 20 degrees.  Now every morning we wake up to fog and a chill in the air that doesn’t go away.  Are you under the misconception as I was that living by the beach is all sunshine all the time?  Ha!  I keep telling my husband I want my money back.  It’s chilly here!  But no matter, I’m pulling out the sweaters and the stock pot and I am making SOUP!

Tortilla Soup | Pamela Salzman

From now until late April, my kitchen turns into a stock-making factory every Saturday.  I make gallons of it every week for my classes and us.  I’ll be honest though, the hubby is sooooo over it.  You should see his eyes roll every time I ask him to help me strain the stock.  Inevitably a chicken foot flops out and completely freaks him out.  But he puts up with it because his favorite food group is soup and he knows homemade chicken stock is magic stuff.  If you are getting more and more comfortable in the kitchen, it’s time to step it up and start making stock from scratch.  You will not believe the difference in taste.  Plus it’s a gajillion times better for you than boxed.  Check out my post here on home made chicken stock.  For all you veggies out there, here’s the link to learn how to make vegetable stock from scratch.

Tortilla Soup | Pamela Salzman

Enough about that.  Let’s talk about the soup I actually made, Tortilla Soup.  Y-um!  This is a very different version of the tortilla soup you might be used it.  It’s not thin and brothy, but thick and hearty and it takes about 15 minutes to make, provided you already have stock made.  If I had to make up another name for this, I would call it “Mexican Tomato Soup”  or “Pappa al Pomodoro goes to Mexico.”  Cumin, which is one of my most favorite spices, adds the distinctive earthy flavor that you would recognize from chili or taco seasoning.  But what is so unusual about this soup is that the corn tortillas are pureed with the tomatoes and broth, as opposed to adding fried tortilla chips on top.  The softened corn tortillas add great flavor and thicken the soup at the same time.  (It’s a great use of stale tortillas.)  I wish I had thought of this bit of genius, but I didn’t.  I tweaked a recipe I found in The Real Food Daily Cookbook, based on the vegan LA restaurant by the same name.

Tortilla Soup | Pamela Salzman

I love adding cubed avocado and chopped fresh cilantro on top, but I let everyone do their thing.  There’s always enough leftover for the next day’s thermoses to which I also like to add  a little cooked chicken.   (I’m big on protein at lunchtime so the kids don’t fall asleep in class.)  Fresh tomatoes are on their way out, so if you can use them go for it.  The other night I used Bionaturae organic crushed tomatoes and tomato paste in a glass jar (not a fan of canned tomatoes.)  I made this soup last year on Halloween, which is around the corner.  I always make sure everyone has eaten a proper meal before going out to trick or treat.  Full bellies can’t fit quite as much candy as empty ones.

Here are some of my other favorite soups to warm you up this season:

Sweet Potato and Coconut

Lentil and Brown Rice

Mushroom-Barley with Kale

Cauliflower with Roasted Garlic

Late Summer Minestrone

Vegetable Chili


Tortilla Soup
Author: 
Serves: 6
 
Ingredients
  • 2 Tablespoons unrefined, cold pressed, extra virgin olive oil or coconut oil
  • 2 onions, chopped
  • 3 cloves garlic, finely chopped
  • 1 fresh jalapeno chile, ribs and seeds removed and finely chopped*
  • 2 teaspoons ground cumin
  • 1 teaspoon dried oregano
  • 2 teaspoons sea salt
  • ½ teaspoon freshly ground black pepper
  • 2 Tablespoons shoyu (naturally brewed soy sauce) or tamari
  • 6 cups chicken stock, vegetable stock or water
  • 2 pounds fresh tomatoes, coarsely chopped or 1 27-ounce box of crushed tomatoes or equivalent in a jar or can
  • ⅓ cup tomato paste
  • 8 6-inch corn tortillas, coarsely chopped
  • Chopped fresh cilantro and cubed avocado garnish, if desired
Instructions
  1. Heat the oil in a heavy stockpot over medium heat. Add the onions and garlic and sauté for 5 minutes or until tender and translucent. Add the jalapeno, cumin, oregano, salt, pepper and shoyu, and sauté 1 minute longer.
  2. Stir in the stock, tomatoes with juice, and tomato paste. Bring to a boil. Lower the heat and simmer, partially covered for 10 minutes, or until the tomatoes are tender.
  3. Add the tortillas and simmer 10 minutes longer, or until the tortillas are super soft and falling apart.
  4. Using a handheld immersion blender, blend the soup in the pot until smooth. Or carefully puree in batches in a blender.
  5. Ladle the soup into bowls and garnish with cilantro and avocado.
Notes
*For a little more kick, add the ribs and seeds from the jalapeno to the soup.

Â