Winter fruit salad recipe

Although I’m not 100% strict about it, I do try my best to eat seasonally as well as locally.  This helps to keep our bodies in harmony with nature, and is more healthful for us as well as the planet.  I know, easy for me since I live in Southern California.  It’s true we do have access to such a bounty of wonderful fresh produce all year.  But not even in sunny Southern California do I find locally grown melons and stone fruits in the dead of winter.  You might find a few vendors at local farmer’s markets who sell berries grown in hot houses all year long.  But I haven’t seen any farms with cantaloupes and watermelons in their fields in December.   

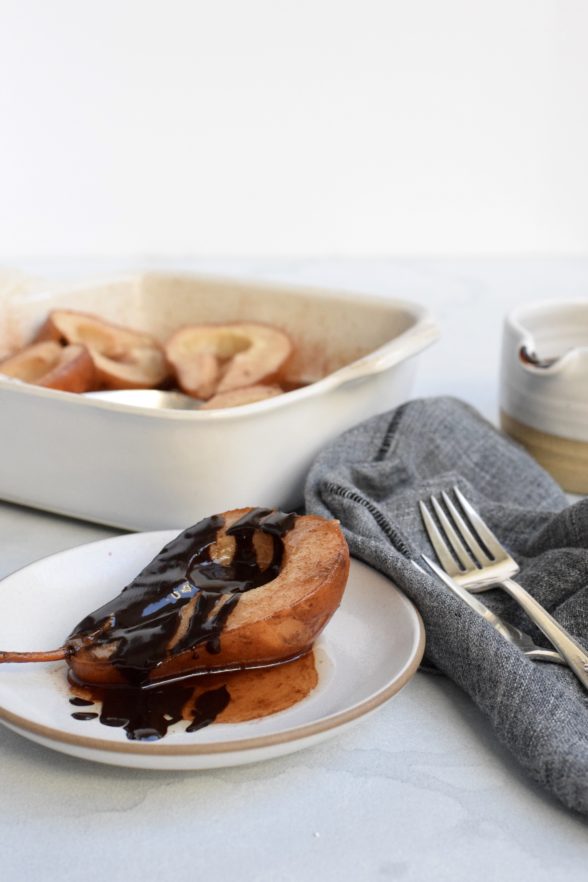
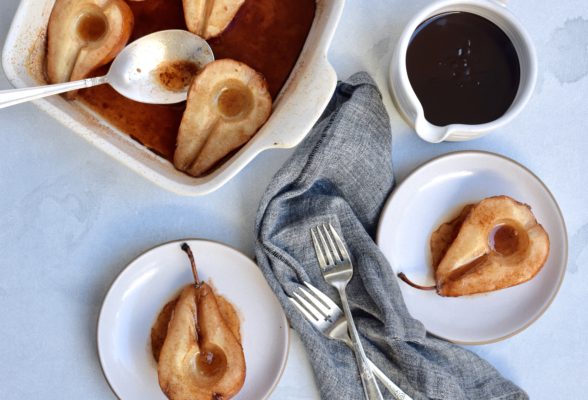
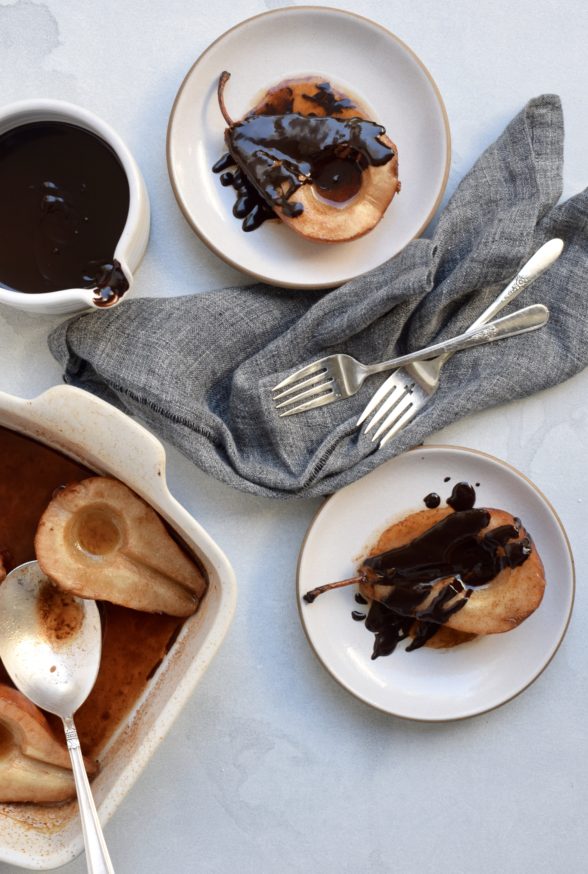
Yet people love a good fruit salad for brunch or after dinner and for some reason I don’t see too many fruit salads without watermelon, honeydew, cantaloupe and strawberries even at this time of year.  Sure these fruits look lovely together and are easy to cut up, but when was the last time you tasted a fabulous piece of watermelon on Christmas?  It’s time to think outside the fruit salad box and try a combination that is a more natural complement to gingerbread and pumpkin and everything else you’re serving for your holiday brunches.  I’ve been making this delicious fruit salad for several years and I am still obsessed with it. I use pears, apples, pomegranate seeds and dried fruit, but it’s the spiced-infused steeping liquid that takes it over the top.  If you’ve never used star anise, it is amazing.  It imparts a beautiful, floral, licorice flavor to the syrup.  If you can’t find it, just sub a cinnamon stick.

Technically I think this would be considered a fruit compote, but we don’t worry about semantics here.   Whatever you call it it’s easy peasy, and the best part — you guessed it — do ahead!   Which is why this fruit salad is really SO perfect for Christmas morning or any of your holiday brunches.  I have also made it for a more healthful after-dinner dessert option which is always so welcome during a season of cookies and pies and cookies and chocolate and… cookies.  But actually my favorite way to eat it is with yogurt and some sliced almonds — what a scrumptious breakfast or snack that is!

Here’s hoping your Christmas is merry and bright and that you can spend it with the ones you love!

Winter Fruit Salad
Author: 
Serves: 4-6
 
Ingredients
  • ¾ cup maple sugar or cane sugar (I used maple sugar in these photos.)
  • 3 star anise or 1 cinnamon stick
  • 1 2-inch piece of ginger, cut into slices
  • ½ of a vanilla bean, split in half lengthwise
  • 4 2-inch long pieces of lemon rind (use a vegetable peeler)
  • 8 dried unsulphured apricots, thinly sliced
  • 4 dried unsulphured figs, thinly sliced
  • Juice of the zested lemon
  • 3 firm Bosc pears or Asian pears
  • 1 firm tart apple
  • Seeds from half a pomegranate
Instructions
  1. Fill a medium saucepan with 4 cups water. Add the sugar, star anise, ginger, vanilla bean and lemon rind. Bring to a boil, and simmer until all the sugar is dissolved. Let it cool for just a few minutes, but still hot and then add the dried figs and apricots. Set aside to cool completely.
  2. Peel and core the pears and apple, if desired. Slice thinly crosswise (1/4-inch slices) and place in a large bowl. Sprinkle with the lemon juice and toss to coat.
  3. Once the syrup with dried fruit has cooled, pour it over the apples and pears. Cover the bowl and refrigerate overnight.
  4. The next morning, remove the fruit with a slotted spoon and transfer it into a serving bowl. You can remove or leave the ginger, vanilla beans, star anise and lemon zest. Sprinkle with the pomegranate seeds and serve.
Notes
Syrup can be made up to two days in advance and kept refrigerated. Salad can be fully prepared and kept refrigerated up to two days. Other dried fruit that works well – dried cherries, raisins, peaches, persimmons


Gluten-Free, Vegan Pear-Cranberry Tart Recipe

Why do so many people go on cleanses on January 2nd?  One word — SUGAR.  It starts on Halloween with an innocent bite of an Almond Joy and keeps coming until New Years Day with that “one last piece” of cake since the big diet will start tomorrow.  I’m the first to admit that although I may be pretty disciplined during the year, a few sweet indulgences here and there during the holidays throw me off for weeks.  Damn!  One of these years I’m just going to say “no, thank you” over and over in November and December because I really am much happier when sugar and I go our separate ways.  I am especially going to reject any food with the word “slutty” in front of it.  Or at least I need to stick to more natural desserts that don’t make me feel like I’m going to hell.

I know what you’re thinking.  It’s fun to give in.  It’s the holidays.  What about everything in moderation?  If you say so.  As for me, sugar is out to get me.   It makes me feel horrible afterwards, saps my energy, ruins my skin, and leaves me craving nourishment, among other things.  The worst part is I go back for that same punishment that next day!

I know it seems hypocritical that I started this post whining about sugar and now I’m encouraging you to make dessert.  HOWEVER, there are desserts out there that deserve a little more respect since they are made of higher quality ingredients that don’t leave you regretting what you’ve just eaten.  Like this Pear-Cranberry Tart!  When Jenni Kayne and The Chalkboard Mag asked me to create a vegan and gluten-free holiday menu which was also healthful, the dessert was what I figured would be the challenge.  But I have to say, this turned out great and may be one of my favorite desserts to date.  It’s seasonal, beautiful and just plain delicious.  The tart is sweet, but in a fresh and clean way that doesn’t make you feel like you just got a sugar injection.  And I love the contrast of the soft pears with the nubby crust and crumbly topping. Whereas this looks impressive, it’s really quite easy.  The press-in crust is the perfect answer for those who don’t feel comfortable making and rolling out pastry dough.  Plus it’s the perfect dessert for the holidays since you can prep much of it in advance (see my notes at the bottom of the recipe.)

Don’t let the gluten-free and vegan label throw you off.  Sometimes people, including my darling husband, rush to judgment about “alternative” desserts without giving them a chance.  But sure enough, my kids all loved it, although Mr. Picky picked out the “sour” cranberries.  No problem, send those over here.  I think you could even eat it with a dollop of whole yogurt and call it breakfast.  I did.  And I didn’t have any regrets in the morning.

Gluten-Free, Vegan Pear-Cranberry Tart
Author: 
Serves: 10
 
Ingredients
  • Crust:
  • 1 cup rolled oats (look for gluten-free oats, such as Bob's Red Mill)
  • ⅔ cup oat or whole spelt flour (look for gluten-free oat flour, such as Bob's Red Mill; spelt flour is not gluten-free)
  • ½ cup walnuts
  • ¼ cup pure maple syrup
  • ¼ cup unrefined coconut oil, melted
  • ½ teaspoon sea salt
  • Filling:
  • 3 firm, but ripe pears, cored and sliced into ⅛th-inch wedges
  • 1 handful fresh cranberries
  • 2 Tablespoons maple sugar or brown sugar
  • 2 Tablespoons pure maple syrup (I use Grade A for a more subtle flavor)
  • 1 Tablespoon arrowroot powder
  • 1 teaspoon freshly squeezed lemon juice
  • ½ teaspoon ground cinnamon
  • Topping:
  • 1 cup oat or whole spelt flour (look for gluten-free oat flour, such as Bob's Red Mill; spelt flour is not gluten-free.)
  • ⅓ cup maple sugar or brown sugar
  • ½ teaspoon aluminum-free baking powder
  • pinch of sea salt (omit if using Miyoko's vegan butter or Earth Balance)
  • 4 Tablespoons cold Miyoko's vegan butter, organic Earth Balance, unsalted butter or unrefined coconut oil, cut into pieces (butter is not vegan; Miyoko's, Earth Balance and butter give a better result than coconut oil, but coconut oil works just fine.)
Instructions
  1. Preheat oven to 350 degrees. Lightly grease a 9-inch tart pan with a removable bottom. If your tart pan tends to leak when baking, you should also line the bottom with unbleached parchment paper.
  2. Place all crust ingredients in the bowl of a food processor fitted with a metal blade and pulse until nuts are finely chopped. Press crust evenly on the bottom of the pan and into the rim. Freeze crust while you assemble the filling.
  3. In a large bowl gently combine filling ingredients and set aside.
  4. In another bowl, squeeze topping ingredients together with your fingers until the mixture looks well combined, pebbly and no longer dry or dusty.
  5. Remove tart pan from freezer and layer the pears and cranberries on top of the crust. Pour any juices from the bowl on top of the fruit. Spread the crumb topping over the fruit.
  6. Place tart on a baking sheet and bake for 40 minutes or until filling is bubbling and topping is lightly browned. Allow tart to cool slightly before serving. Best eaten the same day it’s made, but if you have leftovers, store in the refrigerator. Do ahead: you can make the crust up to a day ahead and keep it tightly covered in the refrigerator. You can also make the topping a up to 3 days ahead and keep that in a tightly covered container in the refrigerator.

Roasted cinnamon pears with dark chocolate sauce

Cinnamon Roasted Pears with Dark Chocolate Sauce | Pamela Salzman

Cinnamon Roasted Pears with Dark Chocolate Sauce | Pamela Salzman

If you’re like most people, you’re probably thinking you’ve got one last hurrah before the parties come to an end and the decorations go back in storage.  A final splurge before you return to your normal routine.  One last dance with the devil before resuming your life of miso and greens.  If you’ve been messing around with too much sugar this holiday season, there’s no point beating yourself up over it.  Hopefully it was worth it, but hopefully it doesn’t send you down that slippery slope of daily dessert.  I’ve got one last treat for you, but nothing you need to feel guilty about.  In fact, these roasted pears just might rock your new year’s eve.

Why don’t pears get more attention?  There are so many delicious varieties and the fragrance of a perfectly ripe pear is completely intoxicating.  Plus, I think they are sooooo beautiful.  I love pear crisps, pear upside-down cake or just simply sauteed pears on top of waffles or pancakes.  But the pear dessert I make most often is simply roasted with a rich dark chocolate sauce or plain vanilla ice cream.  I’ve tried poached pears before, but the flavor is not quite as intense as roasted.  The best part is that these are easy enough to whip together as a last minute sophisticated dessert for a dinner party or just a cozy night at home in front of the fire playing Bananagrams

I love when the sweet end to a meal isn’t loaded with sugar and refined ingredients.  I especially feel that way about fruit desserts, which should taste like fruit and not just sweet.  These roasted pears are certainly fabulous enough to serve without the dark chocolate sauce, but good gracious, the sauce is just heaven.  It’s good to have a perfect chocolate sauce recipe in your back pocket since it can dress up everything from plain berries to ice cream to a simple cake.  Mr. Picky suggested he might even try Swiss chard if he could put this chocolate sauce on it.  I just might let him.  If dark chocolate isn’t sweet enough for your lovelies, you can use semi-sweet or milk chocolate instead.  But just keep in mind, the darker the chocolate the higher the percentage of cacao and the lower the sugar.

Cinnamon Roasted Pears with Dark Chocolate Sauce | Pamela Salzman


What will be your grand finale for 2011?  Whatever is it is, I hope it’s delicious.  Wishing you a happy and healthy 2012!

Cinnamon Roasted Pears with Dark Chocolate Sauce | Pamela Salzman

Roasted Cinnamon Pears with Dark Chocolate Sauce
Author: 
Serves: serves 6 (in the photos, I doubled the ingredients)
 
Ingredients
  • ⅓ cup pure Grade A maple syrup
  • ⅓ cup unsweetened apple juice
  • 3 Tablespoons unsalted butter
  • 1 teaspoon ground cinnamon
  • 3 firm, but ripe pears, such as Bosc or Bartlett
  • ¼ cup heavy cream
  • ¼ cup whole milk
  • 2 Tablespoons natural cane sugar or maple sugar
  • 1 Tablespoon unsalted butter
  • 4 ounces dark or bittersweet chocolate, coarsely chopped
  • ½ teaspoon pure vanilla extract
  • sliced almonds or chopped pecans for garnish (optional)
Instructions
  1. Preheat oven to 400 degrees.
  2. Cut the pears in half through the stem, if possible. I take a knife and start an inch above the stem and slice through the stem, so both halves get a piece of stem – looks pretty! Then take the knife and slice the pear all the way in half, following the original cut. Remove the core with a round metal measuring spoon. Arrange the pears cut side up in an 8 or 9-inch square glass or ceramic baking dish.
  3. In a small saucepan over medium low heat, whisk together maple syrup, apple juice, butter and cinnamon until butter is melted.
  4. Pour the sauce over the pears. Bake for about 30 minutes, or until the pears are tender. Baste occasionally with the pan juices.
  5. In a small saucepan over medium heat, warm together cream, milk, sugar and butter. Stir to dissolve sugar. Turn heat off and add chocolate and vanilla. Stir until chocolate is melted and sauce is smooth.
  6. Serve 1 pear half per person. Drizzle with chocolate sauce and garnish with sliced almonds or chopped pecans, if desired. Any remaining pear basting liquid is delicious over French toast or pancakes.