How to make slow roasted tomatoes

slow roasted tomatoes | pamela salzman

Someone leaked to Mr. Picky that in one of my recent posts I was guessing that he wouldn’t be showering regularly at camp.  It wasn’t a judgment on my part, just an observation from past history.  However, it seems as though Mr. Picky interpreted that as a challenge.  What you might not know about Mr. Picky is that he is competitive to a fault.  He also loves statistics and keeps track of everything, especially when he’s first in something.  But believe me, his “firsts” are not what you might expect.  “Hey, Mom.  Did you know I was the first one down for breakfast 8 days in a row?”  Or not firsts.  “Mom, guess what?  Guess what, Mom?  I was the second youngest at camp.  By 20 days.”  So I wasn’t entirely shocked when Mr. Picky said to me the other day that he’s on a showering streak.  Huh?  “Mom, guess what?  I have showered 37 days in a row!  For real.  I’m not even joking.”  I need to blog more about him not eating cooked vegetables. slow roasting tomatoes

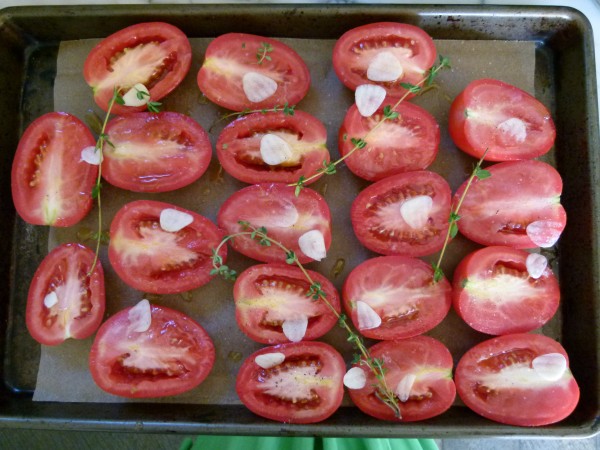
Well, Mr. Picky had to come from somewhere.  Guess what, friends?  I’ve eaten a tomato in some way, shape or form every day for the last 24 days and I’m not even joking.  Whereas I fear Mr. Picky is on a quest to find his way into some imaginary record book for showering, my daily tomato indulgence is for pure pleasure.  Furthermore, I know my streak will come to a sad end in a few months when tomato season is over. raw tomatoes prepped for roasting

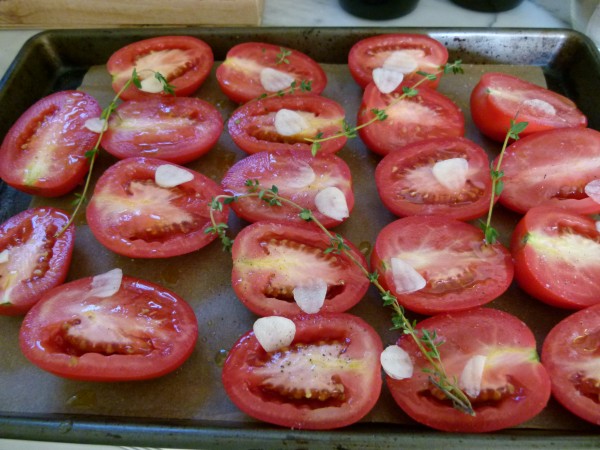
I have a total obsession with summer tomatoes.  I always have.  When I was little, I would take a salt shaker into my father’s garden and have a tomato party.  First, I would pluck a nice ripe tomato off the vine.  For the first bite, I always had to shake a tiny bit of salt in my mouth and then take a bite of tomato.  Salt doesn’t stick to a whole tomato.  After that bite, I would shake the salt on the cut part of the tomato and eat away.  My mother told me a few times I even ate several green (underripe) tomatoes and made myself a bit sick to my stomach.

slow roasted tomatoes | pamela salzman

But I am only interested in local, summer tomatoes.  Nothing else compares and I wouldn’t even waste your time on tomatoes before June or after October, and even that is pushing it.  So right now, I’m in my glory and I am snatching up different varieties every week.   So happy!  And tomatoes are amazing for you – I just posted something on my facebook page yesterday about all their health benefits.

grilled veggie and hummus sandwich with slow roasted tomatoes

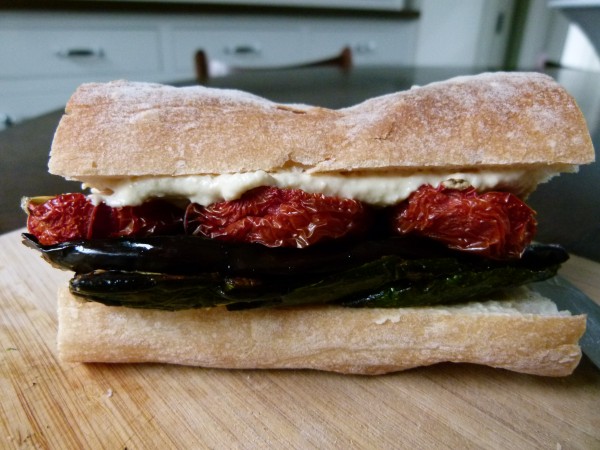
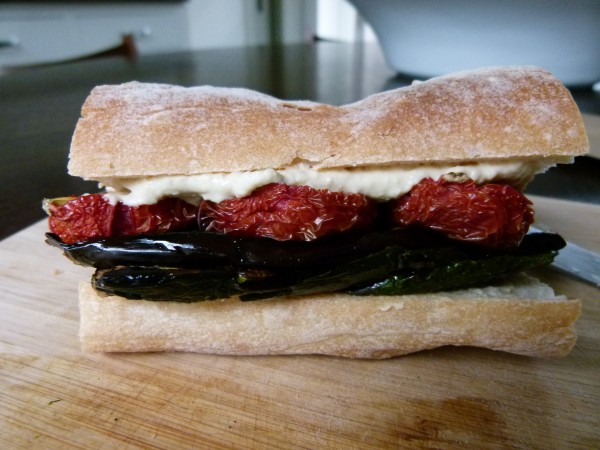
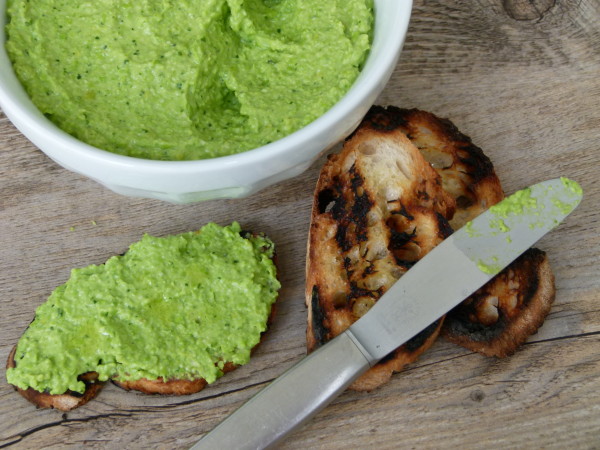
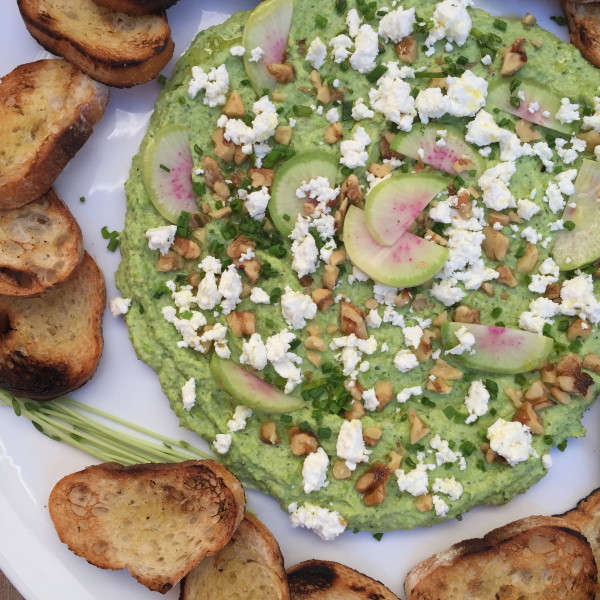
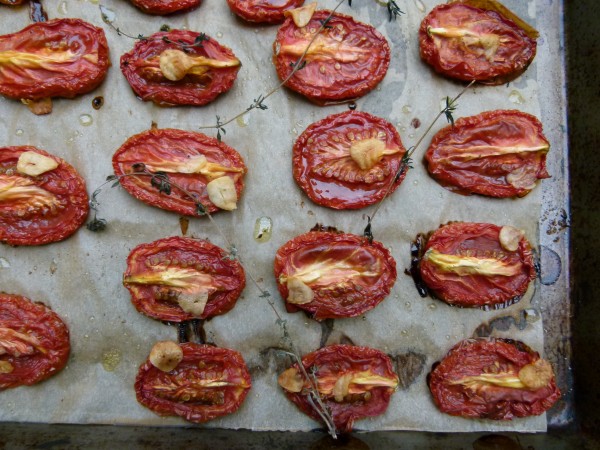
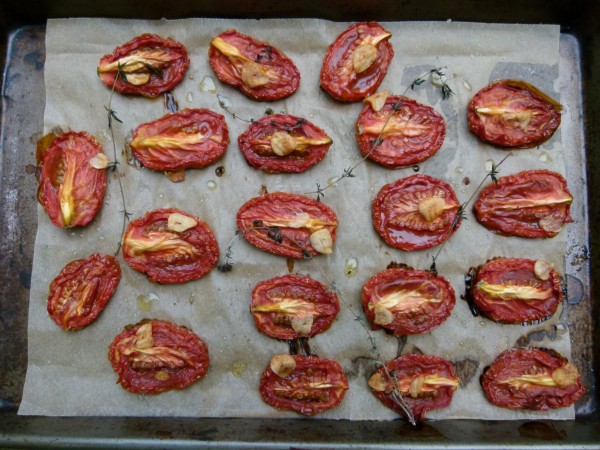
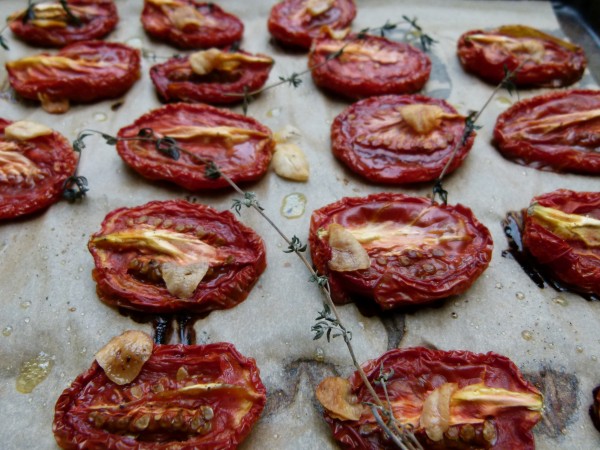
Something I just started making the last few years are slow roasted tomatoes in the oven.  Damn!  Have you ever tried these?  I’m not talking about sundried tomatoes, which for some reason I don’t like.  Slow roasted tomatoes are super-sweet and moist.  You can cook them as long or as little as you like, but I prefer to bake them until their texture is like moist, dried apricots.   So darn good and soooooooo easy!  It’s barely cooking, people.  And you can use them in a million ways.  Delicious on an antipasto platter, with crusty bread, eggs/frittatas, sandwiches, salads, in pasta, etc.  How could I forget straight-off-the-pan?  Such deliciousness if you have patience to slow cook them.  I figure since I waited all winter and spring for tomatoes, what’s a few hours?

slow roasted tomatoes | pamela salzman


View this post on Instagram


A post shared by Pamela Salzman (@pamelasalzman)


Slow Roasted Tomatoes
Author: 
 
Ingredients
  • 12 plum tomatoes*, halved lengthwise
  • 2 cloves garlic, thinly slices
  • a few sprigs of fresh thyme
  • unrefined olive oil for drizzling
  • sea salt
Instructions
  1. Preheat oven to 275 F degrees. Line a small baking sheet with parchment paper or use a 13 x 9 baking dish. If you want to make more tomatoes, use a large baking sheet.
  2. Arrange the tomato halves, cut side up, in one layer on the prepared baking sheet.
  3. Place a sliver of garlic on top of each tomato and scatter the thyme sprigs over. Drizzle a little oil over the tomatoes and sprinkle with a pinch of salt. Bake until desired texture is reached. I like to go 3 hours. More time will result in drier tomatoes. Less time will result in juicier tomatoes. Ovens also vary, so check tomatoes periodically.
  4. Store in the refrigerator in a covered container for up to a week. Covered in oil, the tomatoes will last a few weeks. You can also freeze them right on the sheet pan and when the tomatoes are frozen, transfer them to a covered container to freeze (ideally a freezer bag that is as small as will fit the tomatoes.)
Notes
*You can also use halved cherry or grape tomatoes and cook for less time.


Baked Parmesan Chicken Caprese Recipe

baked parmesan chicken caprese | pamela salzman

I hope you all had a lovely Fourth of July and that you had a day off of work at the very least.  If there’s one thing I think many of us need more of it’s a little rest and relaxation.  We had a nice mellow day with friends and no work all day at all.  Nice.  In fact, I even watched a little tv while I was putzing around the house before going out.  Computer time has wiped out my tv time in the last few years, so watching tv is a real treat for me.  Although it’s funny that when I have time off from work (i.e. cooking), I choose to watch the Food Network or the Cooking Channel.  I have my favorites to be sure, but some of the really popular shows I just don’t get.

Can anyone explain the appeal of “Chopped?”  I’ll tell you one thing — it’s not “reality” tv.  What’s reality about being given a bunch of ingredients not normally found in a regular person’s pantry and being forced to have to make something tasty out of it given the resources of an unbelievably stocked pantry?  I have learned so much from watching Ina and Giada and Tyler, but there isn’t much I get out of seeing what three chefs can do with graham crackers and squid in 30 minutes.  Does that show talent?  What do you think?

Let me tell you what I think takes some skill — making dinner for my family on a typically insane weeknight.  You think the judges on Chopped are tough.  Ha!  They eat everything, even cheese, unlike Mr. Picky.    Try making dinner for Daughters #1 and 2 and Mr. Picky under a time constraint.  During the girls’ finals week earlier last month, I had a day that did not go as planned and I found myself in a dinner prep predicament.  We always eat dinner together every night around 6:30/6:45 and I thought this was one of those nights, but no.  Daughter #1 had a study group at 6:30 and Daughter #2 switched her music lesson without telling me and she would be coming home at 6:15.  I found all of this out at 4:30 and I had soccer carpool to do.  Oh sure, easy, right?

Do the contestants on Chopped have two teenage girls yelling at each other about the last ugly photo one posted of the other on Instagram?  They do not.  And Mr. Picky is not bouncing a basketball in the kitchen while the chefs are trying to figure out what to make for dinner very quickly with the contents of a very basic pantry.  Bounce, bounce, bouncety-bounce!  Ok, think.  Do some prep now, then you have 15 minutes when you get back from soccer drop-off before driving to music.  “But the picture you posted of me was much worse than the one I posted of you!”  Bounce, bounce, bouncety-bounce!  I have chicken, tomatoes, white rice is fast, thank goodness I washed lettuce yesterday.   “Mommmmmmm, did you see what she’s getting away with?  So many people liked that picture already!”  “Really?  They liked it?  That’s good, right?”  “OMG, Mom!  No they didn’t like it!  Make her delete it!”  Bounce, bounce, bouncety-bounce!  I can bread the chicken now and bake later.  “I am NOT letting her drive me to school anymore.”  Whoa there, missy.  Now you’ve got my attention.  “Delete it this minute!”  Bounce, bounce, bouncety-bounce!  “STOP PLAYING BALL IN THE HO– USE, MR. PICKY!!!!”  Can you imagine doing this sober?  Why don’t I drink?  I need to rethink that.

I know this isn’t just my house, or maybe it is and I am deluding myself.  But I think a lot of home cooks have skills that you just can’t learn in culinary school or by watching some pros on tv.  I managed to pull something together that night that we ate at exactly 6:15 and we all liked it!  I would have likely gotten “chopped” on tv for something so unoriginal, but this is the kind of food we like to eat and it’s reasonably healthful.  One of the reasons this worked for me that night is because I was able to bake the chicken instead of sautéing/frying it.  I didn’t know if it would work, but I learned the technique of getting crispy breading by greasing up the chicken with some fat before dredging it from an old Gourmet magazine recipe.  That way, I didn’t have to babysit it on the stovetop, plus baking is more healthful than frying and MUCH less messy!  This would also be a great method to use when cooking for a crowd.

Speaking of cooking for a crowd, for the next episode of “Chopped,” I’d like to see a challenge where the chefs have to prepare a dinner party for 12 guests in Los Angeles.  “Oh, sorry, no gluten for me.”  “If you don’t mind, I don’t eat dairy.  Or meat.  Or eggs.”  “I’m easy.  I eat everything except nuts.  I am deathly allergic to all tree nuts.  Deathly!”  Now that’s something I would watch!


5.0 from 2 reviews
Baked Parmesan Chicken Caprese
Author: 
Serves: 4-5
 
Ingredients
  • 2 cups cherry tomatoes, halved
  • 1 ball fresh mozzarella, cubed (about 4 ounces), optional
  • 2 -3 Tablespoons unrefined olive oil, plus more for coating chicken and pan
  • 2 cloves garlic, crushed
  • 2 large leaves of fresh basil, chopped
  • ¾ teaspoon sea salt, divided
  • ⅔ cup panko bread crumbs
  • ¼ cup grated Pecorino-romano or Parmesan cheese
  • ½ teaspoon paprika
  • 2 boneless, skinless chicken breasts
  • ¼ teaspoon freshly ground black pepper
Instructions
  1. Preheat oven to 425 degrees. Brush a baking sheet generously with olive oil. You can line your baking sheet with parchment paper if you want and then brush the parchment with oil.
  2. In a medium bowl, combine the tomatoes, mozzarella, 2-3 tablespoons olive oil, garlic, basil and ¼ teaspoon salt. Set aside.
  3. In a shallow dish (such as a pie plate), combine the bread crumbs, cheese, and paprika. In another shallow dish, pour a few tablespoons of olive oil.
  4. Slice the chicken crosswise in half so that you have two thin cutlets. Check out this post for a visual on what I'm referring to. You can remove the tenders if you wish and coat those separately. Sprinkle one side of the chicken pieces with ½ teaspoon of salt and ¼ teaspoon of pepper. This is the total amount of salt and pepper for all the chicken.
  5. Dip the seasoned chicken first into the olive oil and turn to coat. Then dip chicken into the breadcrumb mixture and press to coat both sides completely.
  6. Place the breaded chicken pieces on the prepared baking sheet and bake for 15 minutes. Turn chicken with a spatula, not tongs which might break the breading, and bake another 3-5 minutes or until cooked through and golden brown.
  7. Remove garlic cloves from tomato mixture and discard. Spoon tomato mixture on top of chicken.
Notes
This serves our family perfectly with no leftovers, but we're not big meat-eaters.  If one chicken cutlet is not enough per person, then increase the chicken and breading ingredients.


Supersmooth, Light-as-Air Hummus

Supersmooth, Light-as-Air Hummus by Pamela Salzman

Why is the best hummus always in restaurants, especially Middle Eastern ones?  I think I make a delicious, flavorful hummus that has a great consistency and is better than the ones you find in the supermarket.  But, it doesn’t compare to the silky, light and creamy hummus that I’ve had in restaurants.  I want that kind.  The kind that will drip, not plop, off your pita if you’re not careful.  The kind you can suck up with a straw.  You know what I mean.

cook the soaked, drained chickpeas with a little baking soda before boiling

skim off the skins

I got into bed with a book the other night, because reading helps me wind down and relax from my typically crazy day.  But of course, I read cookbooks in bed before I go to sleep which is an absolutely terrible idea because that does nothing to quiet my overactive brain which doesn’t stop thinking, thinking, thinking!  Regardless, I was reading Yotam Ottolenghi and Sami Tamimi’s not-so-new, but gorgeous book , “Jerusalem.”  So many recipes, so little time, people.  I turned to their recipe for “Basic Hummus” and I swear I almost flipped the page without so much as a glance, because like I said, I already have a perfectly great hummus recipe which I have actually turned into four different flavors.  But then I thought “have some respect, you never know.”

drain the chickpeas and process to a chunky paste

love this raw tahini

The word “supersmooth” caught my attention immediately and then I knew I found it — the hummus of my dreams.  Let me jump to the chase.  The Ottolenghi hummus is the kind I love at restaurants and they tell me all their secrets.  Most importantly, the chickpea skins are removed after cooking and before pureeing.  I know!!!  Why didn’t I think of that?  But before you think I have the kind of time to sit around peeling chickpea skins, think again.  After soaking and draining the chickpeas, they are cooked with a little baking soda and then water is added to boil the beans.  Most of the skins float to the top of the pot and you just skim them away.  I know!!!  Brilliant.  They also add a lot more tahini (sesame paste) than I do which makes the hummus so creamy.  And water.  I would never have thought to add water, but it really makes the hummus lighter and cleaner than adding the chickpea liquid which is how I do it.  “Better late than never,” is what I was thinking.

Supersmooth, Light-as-Air Hummus by Pamela Salzman

Supersmooth, Light-as-Air Hummus by Pamela Salzman

I wouldn’t say that my first attempt came out quite as smooth as Ottolenghi’s primarily because not all the chickpeas lost their skins and I was not about to go peeling them, but it was really, really good and very smooth.  You can see the image of that below.  I also tasted the hummus after adding 2/3 cup of tahini instead of the recommended 1 cup + 2 Tbs. and I thought it was divine.  I made it a second time and did take the time to pull off any skins that didn’t come off during the boiling process and the hummus was a tad bit creamier, but I’m not sure it was worth the extra 12 minutes it took me to do that.  You should do whatever makes sense to you and if you have the time, feel free to pick out every last skin.  For that matter, you can buy canned cooked chickpeas and pull off the skins and proceed from there.

This is the one I made first where I did not remove every single last chickpea skin.

I served this to friends the other night, friends who have had my hummus a million times and they all said “where did you get this?  This is so good.”  I know, a tad insulting since the implication was that I could not have made it, but I was totally fine with that.  Since then, we’ve enjoyed this immensely with pita bread and raw veggies (wow, I could actually hear you yawn through the computer), slathered on a baguette with grilled veggies and slow roasted tomatoes (my recommendation), and dolloped on a Greek salad with chicken souvlaki (we had this for dinner the other night — major hit!).  There is an insanely beautiful picture in the book of the hummus topped with whole cooked chickpeas, pine nuts, chopped parsley, cooked lamb and the whole thing drizzled with olive oil.  A-mazing.

Grilled veggies, slow roasted tomatoes and hummus on baguette | pamela salzman

No matter how you make it, hummus is rather nutritious and especially high in protein and fiber.  It’s one of the more healthful spreads and dips, provided you don’t go to crazy on the pita bread or chips.  I have even used it in place of mayonnaise in chicken salad.  I have even eaten it with a spoon.  I have even dreamt about it.  You will too, until you make it!

Supersmooth, Light-as-Air Hummus by Pamela Salzman

jacked up hummus | pamela salzman

4.7 from 10 reviews
Supersmooth, Light-as-Air Hummus
Author: 
 
Ingredients
  • 1 ¼ cups dried chickpeas (garbanzo beans)*
  • 1 teaspoon baking soda
  • 6 ½ cups water
  • 1 cup light tahini paste (Ottolenghi recommends 1 cup + 2 Tablespoons, but I thought anywhere between ⅔ and 1 cup was great)
  • ¼ cup freshly squeezed lemon juice
  • 4 medium cloves garlic, crushed
  • 1 ½ teaspoons sea salt
  • 6 ½ Tablespoons ice cold water
  • Unrefined olive oil and sweet paprika for finishing, if desired
Instructions
  1. Place the chickpeas in a large bowl and cover with at least 4 inches of cold water. Allow to soak 6-8 hours.
  2. Drain the chickpeas. In a medium saucepan over high heat, add the drained chickpeas and the baking soda. Cook for about 3 minutes, stirring constantly. Add the water and bring to a boil. Make sure the water covers the chickpeas by at least 2 inches. Reduce heat and simmer, skimming off and foam and any skins that float to the surface. The chickpeas cook faster this way and may only need from 20-40 minutes to become tender, but possibly longer. You know they’re done if you can squish a chickpea in between your thumb and forefinger.
  3. Drain the chickpeas. You will have about 3⅔ cups. Transfer the chickpeas to a food processor fitted with the metal blade and process until you get a stiff paste. With the machine running, add the tahini, lemon juice, garlic, and salt. Lastly, slowly drizzle in the ice water and allow it to mix for about 5 minutes until you get a really smooth and creamy paste. I actually set my timer for 5 minutes and washed the dishes in the meantime.
  4. Transfer to a serving bowl and allow the hummus to rest for at least 30 minutes. If not serving right away, refrigerate until needed. Make sure to remove it from the refrigerator at least 30 minutes before serving. If desired, drizzle with olive oil and sprinkle with paprika.
Notes
*Or you can use 2 15-ounce cans of cooked chickpeas, drained, and peel the skins manually. Place the peeled chickpeas in the food processor and proceed with Step 3.

Cilantro-Lime Rice and an Unexpected Rice and Bean Burrito Bowl

Cilantro-Lime Rice from Pamela Salzman

We all love to cook, right?  Ok, maybe some us just like to cook.  And I know that I’m the biggest cheerleader of planning your meals ahead so that dinnertime is stress free and a walk in the park.  Yeah.  Well, gotta tell you that this week did not go as planned.  One day especially was just a doozy.  There was a lot of traffic on the way home from work.  AND I forgot to defrost the chicken I wanted to make for dinner.  AND I had to pick up one daughter who I thought had a ride home.  AND my other daughter wanted “to go study at the library, can I please have dinner right now?” AND I had a headache.  Can you see my grumpy face?

cilantro and lime

I had this whole orange chicken thing planned with spicy sweet potatoes and sautéed spinach.  Sounds nice, right?  Well, the chicken was frozen solid and I had no time to roast sweet potatoes.  You know what cooks really fast?  White rice.  I know, it has nothing going for it.  A totally devoid food, nutritionally-speaking.  However, white rice is a bit easier to digest than brown and as the well-respected nutritionist Linda Prout claims, you can close the nutritional gap with white rice by eating a few extra forkfuls of spinach.  And did I mention my headache?  Sold!  White rice it is!  And with some doctored up black beans out of a (BPA-free can), I would figure something else out so that I wouldn’t need to get take-out.

chopped cilantro, lime juice, olive oil

It’s not that I am completely opposed to take-out once in a while.  But where I live, there really aren’t too many good take-out options and what is decent is so expensive.  Even with a headache, it doesn’t make me happy to spend $80 on dinner for the five of us when I know I can make something good for under $20.  And the meal I put together on this particular night probably cost me under $10.  For the five us.  And I didn’t have the guilt of throwing away a hundred plastic to-go boxes and bags.

One fast-food restaurant that my family likes is Chipotle, which we never get here at the beach, but I always google when I am traveling for a soccer tournament with Mr. Picky and I’m in the middle of who-knows-where.  We all love rice and beans, especially the kids and Chipotle has a yummy cilantro rice that I thought would be perfect with beans and some quick veggies.  It ended up being a really satisfying, nutritious and easy meal that the kids asked me to make again.  I’ve noticed that anytime the kids get to “assemble” their own dinner, they are very pleased.  I put out the cilantro-lime rice, black beans, two fresh salsas that I purchased at the farmer’s market, my cheater guacamole, leftover grilled asparagus and some quick-roasted carrots.  Everyone except Mr. Picky made deconstructed burrito bowls which were DELICIOUS.  He, of course, can’t have have different food groups touch each other, so 4 bowls and 1 plate, please.

rice and bean burrito bowl

I know a few of you will frown at my white rice, but I also believe in keeping it real.  The internet and social media allow people to show the side of themselves that they want to be shown, which is usually only what is positive and perfect and sometimes unrealistic.  It can be a bit daunting to think that the grass is always greener on the other side or that every food blogger can seamlessly put together a visually perfect, well-balanced, delicious meal every night.  That is certainly not me and I can’t say that I aspire to that level of competence.  But rather I hope that whatever curveball life throws me whether it’s in the kitchen or out, I will find a way to roll with it and not worry about the fiber content.

rice and bean burrito bowl

3.0 from 2 reviews
Cilantro-Lime Rice
Author: 
Serves: 4-6
 
Ingredients
  • 1 cup long-grain rice or basmati rice, brown or white
  • 2 cups water
  • 2 teaspoons unrefined olive oil, coconut oil or unsalted butter
  • 1 clove garlic, crushed
  • 1 teaspoon sea salt
  • juice of ½ lime
  • 3 Tablespoons chopped fresh cilantro (chop, then measure)
  • 2 teaspoons unrefined olive oil
Instructions
  1. If you have time, soak the rice in a bowl with lots of water to cover. Allow to sit at room temperature for 1-8 hours. Drain. If you're not sure why you should soak your rice, read this post on arsenic and rice.
  2. In a small saucepan, add drained rice, 2 cups water, 2 teaspoons oil or butter, garlic and salt. Bring to a boil, lower to a simmer and cook covered for 15 minutes for white rice or 45 minutes for brown rice. (If you didn’t have a chance to soak your rice, cook another few minutes.) Turn off the heat and allow to sit covered for an additional 5 minutes.
  3. In your serving bowl, combine lime juice, cilantro, remaining 2 teaspoons oil and cooked rice. Toss to combine.

Tex-Mex Stuffed Sweet Potato Skins Recipe

Tex-Mex Stuffed Sweet Potato Skins by Pamela Salzman

I know time flies when you’re having fun, but these days I think it flies because everything moves at warp speed, whether you’re having fun or not.  And sometimes I think it’s not very fun when life happens so quickly, especially when you’re eating good food!  Eating is one of my greatest pleasures in life.  Thankfully I get to do it several times a day, every day.  But very few things annoy me more than having to rush through a very delicious meal.

Tex-Mex Stuffed Sweet Potato Skins by Pamela Salzman

That’s what I was thinking the other day when I made these stuffed sweet potato skins.  I enjoyed them so much that I didn’t want them to end.  Need help with your math homework?  No problem!  Come back in 20 minutes.  Ooops.  Forgot to call my mom back.  She can wait.  I have a sweet potato party on my plate and I’m not ready to leave.

Tex-Mex Stuffed Sweet Potato Skins by Pamela Salzman

Tex-Mex Stuffed Sweet Potato Skins by Pamela Salzman

Cinco de Mayo, one of my favorite food holidays, is just around the corner.  I know.  It’s MAY in like 5 days!  I had no plans to include this recipe on the blog but I made it on a whim last week and I knew I had to share it with you.  Although I can say with 99% confidence that you will never find this recipe on the menu of any Mexican restaurant, so maybe it’s not Cinco de Mayo fiesta fare if you are having people over.  BUT, the flavors here are totally South of the border and it’s such a healthful and satisfying meatless meal, you should make it no matter what day it is.

Sauteed onions, jalapeño, spices and cilantro

If you are not a sweet potato fan (stop it!  really?), then maybe substitute a baked potato.  But sweet potatoes are sooooooo nutritious and I never feel like I need dessert afterwards.  They’re the perfect natural antidote to my sweet tooth.  The best part of this recipe is the contrast between the creamy sweet potato and the smoky corn and a hint of spice.  I made these about as spicy as my family would like them, but you can go as hot as you want.  Serve with a green salad or some grilled asparagus and you’re all set.  My girls and I loved them, and Mr. Picky ate half of one and said they were “okay.”  I think if I had let him eat it with corn tortilla chips, he would have finished the whole thing.

sweetpotato

Tex-Mex Stuffed Sweet Potato Skins by Pamela Salzman

For those of you like me, who very much like to either prep some or all of your meals in advance, it’s your lucky day.  You can make this entire thing ahead and bake it just before dinner until it’s nice and hot.  Or assemble different parts of this ahead, like baking the sweet potatoes or sauteing the onions.  The cheese on top is very optional.  I had mine without, as did Mr. Picky, and still loved it.  My daughters added extra on top of theirs and asked me to tell you that they don’t think the cheese is optional and that if they were writing the recipe, they would double the cheese.  Okay, girls.  Have it however way you want.  Just don’t rush me.

Tex-Mex Stuffed Sweet Potato Skins by Pamela Salzman

5.0 from 1 reviews
Tex-Mex Stuffed Sweet Potato Skins
Author: 
Serves: 6
 
Ingredients
  • 3 medium sweet potatoes, scrubbed clean
  • 1 ½ cups fresh or frozen corn kernels, defrosted
  • 1 ½ cups cooked black beans or 1 15-ounce can, drained and rinsed
  • 1 Tablespoon unrefined olive oil, coconut oil or unsalted butter
  • ½ of an onion, chopped
  • 1 jalapeno, seeds removed and diced
  • ½ teaspoon chili powder
  • ¼ teaspoon chipotle powder (more if you like it spicy)
  • 1 ½ teaspoons sea salt
  • ½ cup cilantro leaves and tender stems, chopped
  • ½ ripe avocado, flesh scooped out
  • 6 Tablespoons shredded cheese, such as Cheddar or Monterey Jack or dairy-free Daiya (optional)
Instructions
  1. Preheat oven to 400 degrees. On a parchment-lined baking sheet, bake sweet potatoes until tender, about 45-60 minutes.
  2. While sweet potatoes are baking, place corn in a medium heavy cast-iron skillet over medium-high heat. Do not add anything else to the pan and do not stir so that the corn gets a little charred. Then toss a little and cook corn until browned and toasted on the outside. Transfer to a medium bowl. Add the black beans to the corn.
  3. You can use the same skillet to sauté the onion and jalapeno. Warm the oil in the skillet and sauté the onion and jalapeno until tender and translucent. Stir in the spices and salt and cook for 1 minute more. Add the cilantro to the pan and turn off the heat. Toss to combine the mixture and transfer to the bowl with the corn and beans.
  4. Remove the sweet potatoes from the oven. Allow to cool slightly so you can cut them easily or use rubber gloves if you’re in a rush and you don’t want to burn your fingers. Slice the sweet potatoes in half lengthwise. Scoop most of the flesh out and leave the skins intact. I like to leave a thin layer of sweet potato to help these stay together better. Transfer the scooped out sweet potato to a large bowl and leave the skins on the parchment-lined baking sheet.
  5. Add avocado to the sweet potato in the bowl and coarsely mash together, but don’t make a puree. Add the corn, bean and onion mixture to the mashed sweet potatoes and stir gently to combine.
  6. Preheat the broiler in your oven and arrange the oven rack to the second level from the top. Scoop the filling into the skins. It might seem like you have too much, but you should use it all and make them nice and full. Sprinkle each with cheese if desired and broil for a couple minutes or until cheese is melted.
Notes
*If making this in advance, remove prepared sweet potato skins from the refrigerator and bake in a 350 degree oven until heated through, about 15-20 minutes.

Chicken adobo recipe

Well, dear people, all good things come to an end and our trip to England came and went too quickly.  We had such a good time and just as importantly, we traveled there and back in one piece.  But there was way too much to see and I am already thinking about when we can go back.  Even the food was better than expected!  I didn’t say it was the most nutritious fare, but we had very delicious meals.  I used to get stressed out about eating on vacation since it isn’t always easy to find kale salads and date-sweetened muffins when you’re away.  I have since let that thinking go since I realize that that kind of negative thinking can’t be doing anything good for my body.  However, this trip I think I may have “enjoyed” the local cuisine a little too much.  It’s one thing to eat a scone and it’s another to eat three.  At one time.  With clotted cream.

Alas, I eagerly pulled out my juicer as soon as I returned home and got back to a simpler way of eating.  It’s a weird feeling for me to not cook at all for 8 days, so I was perfectly happy to get back in the kitchen and make all my familiar staples, quinoa and millet, almond milk, and lots of fresh veggies.  For our first dinner home I made chicken adobo, one of the easiest things I can make that everyone likes.  It is a traditional Filipino dish where chicken or pork are braised in vinegar and soy sauce with garlic. It’s a little sour, a little salty and a touch of sweet.  And the soy really tenderizes the chicken so that it’s super soft.  I usually shred it for the kids and serve it over rice with a green vegetable on the side.  Simple dimple!

This dish is really only made with thighs and/or drumsticks and there’s a reason for that.  Breast meat gets too dried out when simmered.  I tried this with breast meat and it just wasn’t as good as the dark meat.  What I will say is that because the sauce is dark, no one will know that the thighs are thighs and not white meat.  I have made a few variations of chicken adobo and I’m giving you the easiest here with boneless, skinless chicken pieces.  If you use pieces with the skin, you’ll end up having to brown the chicken to start in order to render some of the fat from the skin and to make it look more attractive (rubbery chicken skin gives me the creeps.)  My family doesn’t eat the skin anyway so it was an easy decision for me to leave it out.  This isn’t the most beautiful chicken dish you’ll ever eat, but I make no apologies because it’s very tasty and beyond easy!  Also, it’s way more healthful to cook animal protein in a liquid or by steaming.  A few carcinogens are created anytime animal protein comes into contact with high heat, like a pan or a grill.  Total bummer, but that’s the facts.

I think you could also make a chicken adobo rice “bowl” with a big scoop of rice, shredded chicken and some steamed or roasted vegetables with a few spoonfuls of sauce on top.  Believe me, no matter how you make it, this is a no-brainer for a busy weeknight especially if you’ve been on vacation from the kitchen for a bit!


5.0 from 1 reviews
Chicken Adobo
Author: 
Serves: 6
 
Ingredients
  • ¼ cup apple cider vinegar or white vinegar
  • ¼ cup naturally brewed soy sauce or shoyu or GF tamari (I like Ohsawa)
  • 4 whole garlic cloves, crushed
  • 4 bay leaves
  • 6 black peppercorns
  • 2 pounds skinless chicken thighs and/or drumsticks, bone-in or boneless* (I used 8 boneless thighs)
  • ⅓ cup water
Instructions
  1. Mix vinegar, soy sauce, garlic, bay leaves and peppercorns in a container just small large enough to hold the chicken, such as a glass mixing bowl or a small Pyrex. Cover and marinate 1 hour to overnight. Longer is better.
  2. Transfer chicken and marinade to a medium or large saucepan with a tight-fitting lid and add water. Bring to a boil, lower to a simmer and cook covered for 30 minutes.
  3. Uncover, raise the heat and gently boil an additional 10 minutes to reduce sauce. Serve hot over steamed rice.
Notes
*Breasts don’t work well here. Skin-on chicken is fine, but the skin doesn’t look attractive unless you broil or brown it after.


Minted Sweet Pea Dip


minted pea dip | pamela salzman

In as much as I promote buying and preparing fresh produce, I really have no problem with using frozen sometimes.  Frozen vegetables are supposedly picked at their peak and frozen immediately, allowing less deterioration of nutrients.  I can’t, however, say the same about canned.  Thumbs down on that one.  In general, I tend to use frozen vegetables more in cooked dishes than in raw.  There are quite a few frozen vegetables which are staples in my kitchen including artichoke hearts, edamame, corn, chopped spinach and especially peas.

everything into the food processor and you're done!

Believe me, I adore fresh peas.  If they are picked off the vine and prepared right away, they can be so amazingly tender and sweet.  But if they’ve been sitting around for too long, those sugars become a little starchy.  Plus, they do take a bit of time to remove from the shell, which sadly I don’t have the leisure to do on a busy weeknight.

if you decide to grill bread, brush with a little olive oil first

Peas are a great source of protein and fiber, so I love adding them to pastas, soups, stews and grain-based dishes for a complete protein.  Peas also contain substantial amounts of many other vitamins and minerals, including Vitamins C and K, as well as Folate and Manganese.  I post the contents of my kids’ lunch boxes every Monday on Facebook, so I know many of you saw a lunch Mr. Picky made a month or so ago with frozen peas as the entrée and frozen corn as the side dish. (They defrost by lunchtime!)  That was by far the quickest healthful lunch we’ve packed all year!

grilled bread

Although fresh peas come into season in the Spring, I use frozen the whole year long.  I first taught this delicious dip in a December holiday hors d’oeuvres class, but I made it recently for a dinner and it really sang spring.  This dip is a bit like hummus, the Mediterranean dip made from pureed chickpeas, tahini (sesame paste) and garlic, although not quite as thick and rich.

light and fresh

Instead, this has such a lovely light, fresh flavor from the mint and lemon zest.  It  would be such a nice addition to your Easter festivities, whether you’re doing a brunch, lunch or dinner.  Even if you have your whole menu planned,  I bet you have almost all the ingredients to make this dip today.  Best of all, it can be made in about 5 minutes or less.  Seriously!  You can definitely serve this dip with pita chips or toast points.  But I love it with crudités like carrots or endive leaves or my favorite (and more indulgent), slices of grilled baguette.  If you have some nice Pecorino-Romano cheese, shave a little sliver onto each crostini and you will be in heaven!

a little indulgent on bread, but delicious!

I wish you all a beautiful and joyous Easter.  My husband and I were feeling brave enough to take the three kiddies to Europe again, so we’ll be in London for the next week.  I hope to post some pictures of our adventures on Facebook!  Always interested to hear about your faves and must-sees!

minted pea dip | pamela salzman

Minted Sweet Pea Dip
Author: 
 
Ingredients
  • 2 cups fresh (already shelled) or frozen green peas, defrosted (original recipe used 3 cups)
  • zest of one lemon
  • 3 Tablespoons fresh lemon juice
  • 1 small garlic clove, chopped
  • ¼ cup packed fresh mint leaves
  • 2 Tablespoons extra-virgin olive oil
  • 1-2 Tablespoons raw tahini
  • ¼ teaspoon sea salt
  • Crostini
  • French baguette, cut into ½ inch slices
  • ¼ cup extra-virgin olive oil
  • ¼ cup grated Parmesan or Pecorino cheese (optional)
Instructions
  1. If using defrosted frozen peas, skip to Step 2. If using fresh peas, fill a large bowl with ice water. Bring a pot of water to a boil, add peas and cook for 2-3 minutes. Plunge them into the ice bath to halt the cooking process. Drain well and pat dry.
  2. Place all the dip ingredients in a food processor and puree. Serve with crostini and/or raw crudités. If you assemble the dip on crostini, you can also shave pecorino or parmesan on top of each hors d’oeuvre or sprinkle grated cheese on top and drizzle a good olive oil over all of them.
Notes
Crostini Instructions:

Preheat oven to 350 degrees.  Line a baking pan with parchment paper.
Brush each side of bread with olive oil and place on pan.
Bake for 15 minutes, turning after 7 or 8 minutes.  Use immediately or store in an airtight container for several days.
Or preheat a grill over medium heat and grill the bread (brushed with a little olive oil) until slightly charred on both sides.  This only takes a couple of minutes.

Slow cooker whole chicken and stock recipe

slow cooker whole chicken | pamela salzman

Daughter #2 asked me the other day if I was “ever going to put that thing away?”  She was referring to my slow cooker, of course.  Not that Daughter #2 is complaining since she’s the first one to the dinner table every night and has always been the easiest one to cook for.  But she had a point.  That slow cooker has has become part of the family!

salting the chicken early is key!

But I wasn’t about to shelve my new baby so soon.  Just when I thought cooking a whole chicken couldn’t get any easier, I decided to put my Easy No-Fail Roast Chicken method to the test in…the slow cooker.  Believe me, I don’t normally mess with the easiest, most popular dinners in my repertoire.  But roasting a whole chicken is something that needs to be started well before I get home some days and I need a back-up.  That and I was on a roll and feeling lucky, so I figured this was going to work like everything else I’ve been trying.  I decided to prep the chicken in basically the same way I do an oven-roasted chicken — rubbed on the inside and out with some kosher salt early on, stuffed with a bit of fresh thyme and some crushed garlic and cooked on a bed of onions.  I usually add cut lemons to the cavity, but I was nervous that cooking the lemons for a long time would result in a bitter taste, so I left those out.  The only other change I made was to rub the outside of the chicken with a little olive oil mixed with paprika so that the skin would get a little color and not be pale and unattractive.

sprinkle with paprika and olive oil

The conclusion is that I think I should call this recipe “Easier than Easy No-Fail Roast Chicken and Still So Darn Good.”  The chicken was predictably fall-off-the-bones.  In fact, I had a hard time getting the chicken out of the slow cooker in one piece!  My kids love super soft meat and my husband likes chicken that is beyond well done.  I’ve made chicken once or twice a week for the last 17 1/2 years and he has asked me every single time if the chicken is cooked through.  No comment on whether or not that is annoying since my husband occasionally reads my blog AND Valentine’s Day is coming up.  Get my drift?  My point is that this chicken satisfies everyone, including me since it takes all of 5 minutes to prep and you can do it 8 hours before you want to eat dinner.  “Is this cooked through?”  “Darling, it’s been cooking for 8 hours.”

slow cooker whole chicken

So you all know I am completely obsessed with making homemade chicken stock.  I swear, if teaching cooking classes and blogging doesn’t work out, I will go into the homemade stock-making business.  The world must know the goodness of homemade stock somehow!  So before I served this chicken to the family, I removed and reserved all the bones.  I put the bones back in there with a chicken back I had in the freezer plus some stock veggies (onions, carrots, celery) and water and I made chicken stock overnight.  It was delicious.  And because there was no skin and foam and such, it turned out to be such a clear stock with minimal fat.  It’s crazy not to try this!  (Sorry I don’t have photos.  It was too dark in my kitchen and the images didn’t turn out well.)

lovely juices on the bottom can be used for gravy

Cooking a whole chicken in a slow cooker opens up so many possibilities for what you can do with the meat.  You don’t have to cut the chicken into traditional breast, thigh, drumstick pieces.  You can use the meat just as you would rotisserie chicken meat and heaven knows there have been more articles on what to do with rotisserie chicken meat than how to get your baby to sleep through the night.   Just to remind — chicken soup, enchiladas, tacos, pot pie, sandwiches, salads and so on.  For those of you who do not have a slow cooker and feel excluded, please revisit the Easy No Fail Roast Chicken Recipe.  I still love you and I will put away the slow cooker and come back to you.  Eventually.  Wink, wink.

falling off the bones


Slow Cooker Whole Chicken and Stock
Author: 
Serves: 6
 
Ingredients
  • 1 whole roasting chicken, about 4-5 pounds (save the neck for stock)
  • kosher salt and freshly ground black pepper
  • 4-5 cloves garlic, crushed
  • ½ bunch fresh thyme or a couple sprigs of fresh rosemary
  • 2 Tablespoons unrefined olive oil
  • 1-2 teaspoons paprika
  • 1 brown onion, peeled and sliced into thick slices
  • For the stock:
  • Some additional bony chicken pieces if you have them, such as backs, necks, wings and/or feet, up to 2 pounds
  • 2 brown onions, cut into large pieces
  • 3 carrots, cut into large chunks
  • 3 celery stalks, cut into large chunks
  • 1 Tablespoon apple cider vinegar
  • water (amount depends on size of your slow cooker)
Instructions
  1. When you get home from the market, unwrap the chicken and remove any giblets from the cavity. Save the neck for stock.
  2. Take a heaping tablespoon of kosher salt and rub it around the inside of the cavity. Any remaining salt on your hands can be rubbed on the outside of the chicken. Rewrap the chicken and refrigerate until ready to cook. This can be done up to two days in advance.
  3. The day you are making the chicken, remove it from the wrapping and sprinkle a few pinches of black pepper, as well as the garlic and thyme in the cavity of the chicken.
  4. Truss the chicken by tying the legs together. Rub the outside of the chicken with olive oil and paprika.
  5. Place the onion slices on the bottom of the slow cooker insert and place the chicken on top of the onions. You do not need any liquid, I promise. Cover and cook on LOW for 7- 8 hours or HIGH 4-5 hours.
  6. Serve with the cooked onions and pan juices, if desired.
Notes
Leave whatever you didn’t use in the slow cooker (juices and onions).
Remove all the bones from the entire chicken and place in the slow cooker with any additional chicken parts you have, including the neck from the chicken you just cooked. Add vegetables, vinegar, and enough water to come up to about an inch from the top.
Cover and cook on LOW for 8 hours or overnight. My slow cooker automatically goes to WARM mode after 8 hours.
Strain and use immediately if you don’t see too much fat at the top or cool slightly and refrigerate. When cold, skim and discard any fat from the top. Stock can be kept in the refrigerator for up to 4 days or frozen for up to 3 months.