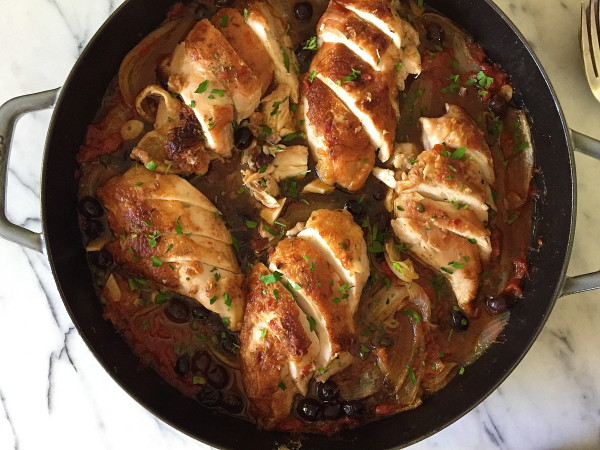
Baked chicken with tomatoes, olives and capers recipe (variations for GF and vegan!)


baked chicken with tomatoes, olives and capers | pamela salzman

I just finished teaching this recipe in my March classes and it was a huge hit!  I don’t even like chicken and I seemed to always be looking for a bite at the end of class.  I had so many requests to post this recipe that I had to oblige, even though the images aren’t totally the best.  I think this would be perfectly appropriate to prepare for Passover, with one minor adjustment.  And it’s a great recipe to adapt as cherry tomatoes and beefsteak tomatoes become available.

pepper the chicken before dredging

The recipe is basically a braise, but the chicken is cooked uncovered for most of the time, which is why I call it Baked Chicken, versus Braised Chicken.  But the formula is still very much the same — browning the meat first to create flavor and color, sauteing onions, deglazing, putting meat back in and baking in the oven until cooked through.  Once you understand the steps, you can start making up your own recipe or adapting recipes like this one with other ingredients or flavors.

dredge the chicken lightly with flour

I personally like using bone-in, skin-on pieces of chicken since I think they taste better and stay a little moister, especially breast pieces.  Unfortunately, cooking with bone-in, skin-on pieces takes longer than boneless, skinless and may not be a great option for those of you needing a really fast recipe for after work.  Fortunately, this recipe can be adapted for cutlets and even a slow cooker, so look for those options in the instructions.

olives, capers, thyme, jars of tomatoes

This dish produces very tender, flavorful chicken, as well as the accompanying onions and sauce.  In the ingredient list it offers the option of draining the juice from the jar of tomatoes or keeping it.  Here’s my thought process on that one:  if you will be serving the chicken with noodles or pasta, polenta, mashed potatoes or something that would welcome a lot of sauce, then you should keep the juice.  Otherwise, drain the juice and just use the tomato pieces.  I also love this dish during cherry tomato season, when I will use 1 1/2 pounds of  halved sweet cherry tomatoes in place of the jarred, and basil leaves instead of the thyme.  Large vine-ripened tomatoes that have been blanched and chopped are also great.  Both of these options create a much lighter, fresher dish.  But every variation is very delicious.

deglaze with wine and tomatoes

Other adaptations I discussed in class:

  • subbing fennel for half the onion
  • omitting the olives and adding chopped mushrooms with the onions
  • adding a healthy pinch of crushed red pepper flakes with the garlic
  • in the summer, subbing sliced sweet bell pepper for some of the onion
  • searing cauliflower steaks and using those in place of the chicken for a vegetarian/vegan option

add the olives capers and thyme


nestle chicken in the tomato mixture

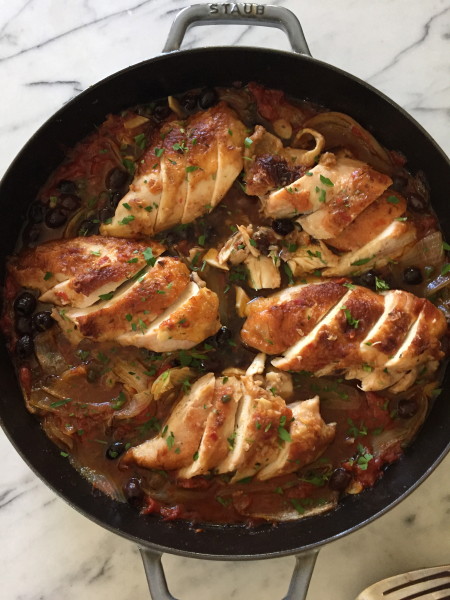
I always use breasts when I teach because most of my students prefer white meat, and therefore it’s just easier for me to buy all breasts.  You can certainly use any part of the chicken you want.  In fact, it’s more economical to buy a whole chicken and have the butcher cut it into pieces for you.  But I highly recommend not buying 1 breast per person.  It’s too much meat to eat in one sitting, unless you are an Olympian or a body builder!  I have never actually seen anyone at my house or at a dinner party eat an entire breast.  I have seen people cut them in half and push one piece off to the side and just each one half.  What I love to do is prepare the breasts, allowing for 1/2 per person, and removing the bones after the chicken is cooked and has rested a bit.  Then I slice the meat on an angle.  It’s much more manageable to eat it this way, as well as more elegant and attractive to serve.  See this post on the gloves I use to get down and dirty when I carve chicken!

Let me know if you have specific questions about timing or with what sides to serve this.  Hope your holiday planning is going well!

baked chicken with tomatoes, olives and capers | pamela salzman


View this post on Instagram


A post shared by Pamela Salzman (@pamelasalzman)


5.0 from 4 reviews
Baked Chicken with Tomatoes, Olives and Capers
Author: 
Serves: 6
 
Ingredients
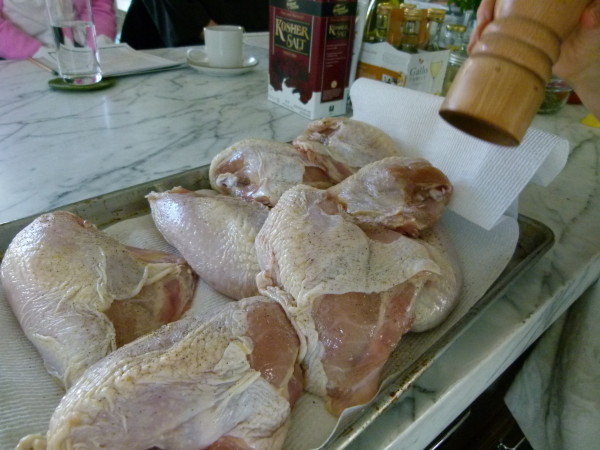
  • 3 ½ pounds bone-in, skin-on chicken pieces, sprinkled with 2 teaspoons kosher salt when you get home from the market unless you are using kosher chicken which you should not salt (read this post on how and why to season your chicken in advance)
  • ¼ teaspoon freshly ground black pepper
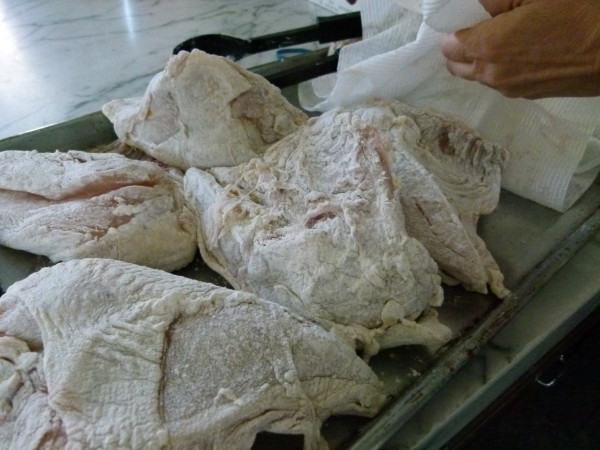
  • Flour for dredging (all-purpose, spelt, GF flour, etc.) -- use matzoh cake meal for Passover
  • 2 Tablespoons unrefined, cold-pressed, extra-virgin olive oil, divided
  • 1 ½ medium onions, cut through the root into sixths or eighths (or sliced thinly, but I like wedges better in this recipe)
  • 3 cloves garlic, thinly sliced
  • 1 teaspoon sea salt
  • 1 18-ounce jar diced tomatoes with the juice (or drain juice for less sauce) (I like Jovial in glass jars. Read this post why.)
  • ¼ cup dry white wine
  • ¼ cup chicken stock, vegetable stock or more white wine
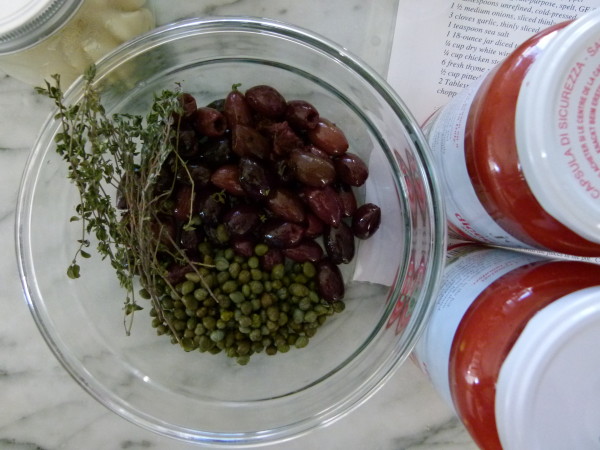
  • 6 fresh thyme sprigs or large basil leaves in the summer/fall
  • ½ cup pitted olives, such as kalamata or Bella di Cerignola
  • 2 Tablespoons capers, drained
  • chopped parsley for garnish, if desired
Instructions
  1. Preheat the oven to 400 degrees. Pat the chicken dry and season with black pepper. Dredge in flour, shaking off any excess.
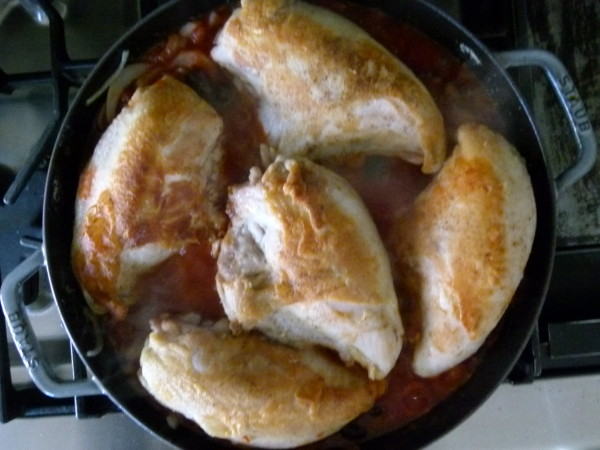
  2. In a 12-inch ovenproof skillet or Dutch oven, heat 1 Tablespoon of the olive oil over medium heat. Add the chicken pieces in one layer and brown on both sides. Transfer to a plate and reserve.
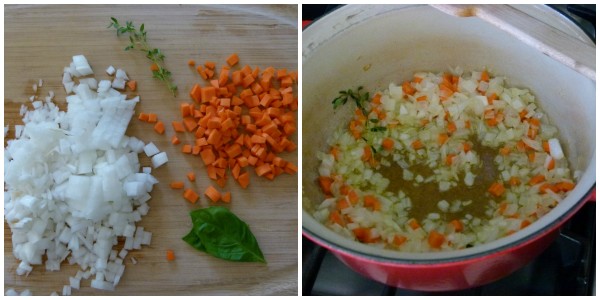
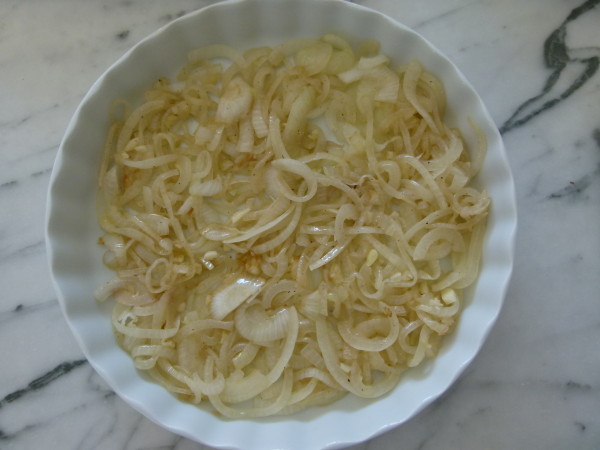
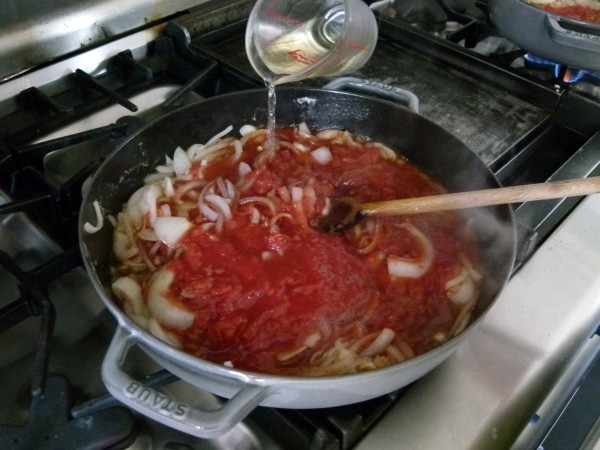
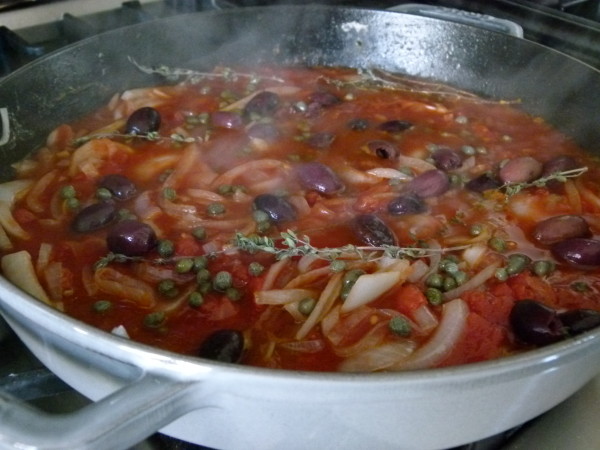
  3. If the pan looks dry, add a little oil. If it looks like there’s more than 2 Tablespoons oil, drain a bit off. Add the onions, cook over medium heat, stirring occasionally, until softened and lightly browned. Add the garlic and sea salt and cook until fragrant, about 1 minute.
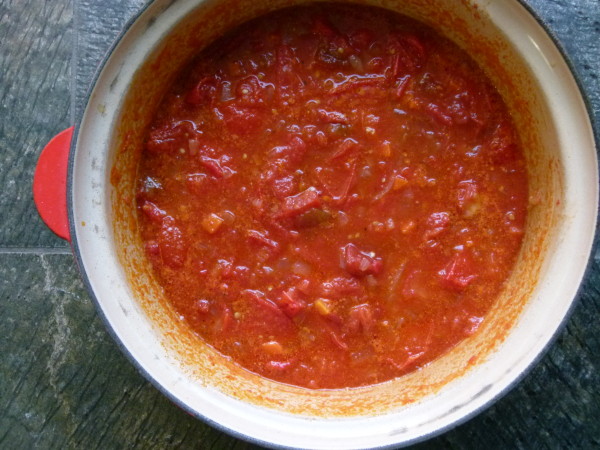
  4. Add the tomatoes, white wine, stock and cook, scraping any brown bits on bottom of the pan.
  5. Arrange the thyme, olives and capers over the onion mixture. Place the browned chicken pieces side by side on top. Bring the mixture to a simmer. Cover and place in the oven.
  6. After 15 minutes, baste the chicken with the juices in the pot. Continue cooking, uncovered, for an additional 30-40 minutes (depending on thickness), basting every 10 minutes if you have time. Sprinkle with parsley and serve. (You can also cook covered on the stove over low heat for 30 minutes.)
Notes
For a boneless, skinless version, check out my recipe for Lemon –Thyme Chicken Cutlets and follow the same directions.

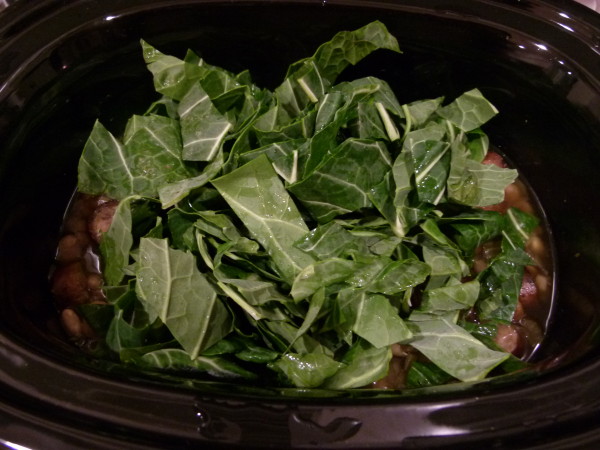
For a slow cooker version, use skinless chicken and  3 Tablespoons each of stock and wine instead of 4.  Follow same directions, but after deglazing, pour everything into the slow cooker and cook for 4-5 hours on HIGH or 6-8 on LOW.


Fresh tomato soup recipe

fresh tomato soup recipe | pamelasalzman.com

The moment we arrived in Lake Garda on Wednesday for the last leg of our trip, I looked at my husband and said, “Good luck getting me on that plane back home.”  The vistas are breathtaking, the air is clean, and the food is to die for.  Total heaven here.  Check out my Instagram and Facebook page for some pictures.

aromatics for tomato soup

One food combination that I will never tire of is tomatoes and basil.  And if you add some high quality mozzarella, I am even happier.  I do so many combinations of tomatoes and basil in the summer, whether it be in soups, salads, pasta, eggs, grains, on toast, and on and on.  Needless to say, I have been indulging like crazy in Italy, where I will argue you find the best tomatoes!

tomatoes

I made this soup at home before I left.  The recipe is from Angelini Osteria, one of my favorite Italian restaurants in LA, and was printed in the LA Times recently.  I didn’t waste any time making it!  Trust me when I tell you that you must use great, flavorful tomatoes here. Otherwise, the soup will probably taste like nothing.  I’ve tasted other Italian tomato soups in the past and they’ve all tasted like tomato sauce.  Not this one!  It’s so light and fresh with just a little essence of basil.  It is summer in a bowl!  Also, did you know that tomatoes are very rich in lycopene, a powerful antioxidant and anti-cancer compound.  But the lycopene becomes more available when the tomatoes are cooked.  Bonus!

cooked soup

I couldn’t help but drizzle some good olive oil on the soup and tear a smidge of burrata into it, too.  If you want to keep this dairy-free or vegan, just forget the burrata and add a piece of grilled bread rubbed with some garlic.  You really can’t go wrong.

puree and strain

Sadly, this vacation is coming to an end soon.  But I am excited to get back in the kitchen in a few days and cook again.  I’ve been so inspired by all the places we have visited.  I am also looking forward to seeing many of you next week in class.  Lots of stories to share and yummy food to make!

burrata

zuppa di pomodoro (fresh tomato soup) | pamela salzman

zuppa di pomodoro (fresh tomato soup) | pamela salzman

5.0 from 1 reviews
Fresh Tomato Soup
Author: 
Serves: 4-5 (although the original recipe said serves 6-8)
 
Ingredients
  • 2 Tablespoons unrefined, cold pressed, extra virgin olive oil, plus extra for drizzling
  • 1 small onion, finely diced
  • ½ carrot finely diced
  • 2 large basil leaves
  • 1 sprig fresh thyme
  • 3 pounds fresh tomatoes, coarsely chopped
  • ¾ teaspoon sea salt + additional to taste
  • ¼ teaspoon freshly ground black pepper
  • optional garnishes: burrata, grated Parmesan cheese, croutons
Instructions
  1. In a medium, heavy bottomed pot, heat 2 Tablespoons olive oil over medium heat. Add the onion, carrot, basil and thyme. Cook, stirring frequently until the vegetables are tender; 10-12 minutes.
  2. Stir in the tomatoes, along with ¾ teaspoon salt and ¼ teaspoon pepper. Simmer for 20 minutes to break down the tomatoes and meld the flavors.
  3. Remove from the heat and puree the soup in a blender or food processor, then strain through a strainer.  Taste for seasoning.  I added a bit more salt.
  4. Serve the soup hot or warm, with desired garnishes and a drizzle of olive oil.

Roasted summer vegetable tian recipe

roasted summer vegetable tian | pamelasalzman.com

After Barcelona, we went to Aix-en-Provence, which is the center and heart of Provence, France.  I adore the South of France!  We had a guide for the day since I don’t know the area well and I had no time before we left to do proper research.  I absolutely love hearing about the history of European towns because it puts everything in context.  This wall was here for this reason.  These two towns were perched on opposite hills facing each other for that reason.  Plus the only way to keep my son interested is if you talk drama – wars, fighting, weapons, who won, who got killed, etc.

make a bed of sautéed onions and garlic

More than that, I love seeing how other people live.  Do they drive or walk?  What do they eat for lunch and when?  How much vacation do they get every year?  What’s the coffee shop for locals?  I am very, very nosy!   I was so excited to find and experience the local farmer’s market in Aix and see what is sold here and how it is different from my market in Manhattan Beach.  It thought I was so lucky to be here on market day, until our guide told me the market is open every day until 1:00.  People in Provence prefer to shop daily for their food so it’s really fresh.  Heaven.  It was such beautiful market, where they sold everything from tomatoes, herbs, melons and lettuce, to eggs and the freshest fish, to the most delicious olives ever and lavender sachets with lavender from the fields in Provence.  I could get used to that.

slice vegetables about the same thickness


While I was in Provence, I remembered the recipe for this Roasted Summer Vegetable Tian that I taught when I was in France 2 years ago and in my cooking classes in LA last summer.  It’s a very simple, easy, seasonal vegetable side dish and of course, it’s quite delicious.  Who wouldn’t love a casserole with gently cooked onions on the bottom and then a mélange of tomatoes, zucchini and potatoes on top, where the tomato juice kind of infuses everything and mixes with a bit of fresh thyme and some Parmesan cheese?  Yum!  I love it because it goes with anything, whether you are making a piece of grilled fish or some roasted chicken or you want a light vegetarian meal with either a frittata or a simple green salad.  Don’t forget a cold glass of rosé, too!

arrange in dish

It does take some time to cook, so it’s not a last-minute deal.  But you also don’t have to time it perfectly with your meal, since I think it actually tastes just as good warm and even room temp.  You know how I love a good do-ahead!

roasted summer vegetable tian | pamela salzman


The one thing I miss when I’m on vacation is cooking at home, especially when I see such beautiful ingredients around me.   For now, I’m picking up inspiration everywhere I go.  Next stop – Italy!

roasted summer vegetable tian | pamela salzman

Roasted Summer Vegetable Tian
Author: 
Serves: 6
 
Ingredients
  • 2 Tablespoons unrefined, cold pressed extra-virgin olive oil + more for drizzling
  • 1 large onion, halved and thinly sliced
  • Sea salt and freshly ground black pepper
  • 4 cloves garlic, finely chopped
  • 2 medium Yukon Gold potatoes, about ¾ pound, sliced ¼-inch thick
  • 2 small tomatoes, about ¾ pound, sliced ¼-inch thick
  • 1 medium zucchini, about ½ pound, sliced ¼-inch thick
  • 1 Tablespoon fresh thyme leaves
  • 2 Tablespoons freshly grated Pecorino or Parmesan cheese
Instructions
  1. Preheat oven to 375 degrees. Warm oil in a skillet over medium heat and add onions and a pinch of salt and pepper. Sauté until tender and lightly golden, about 6 to 8 minutes. Add garlic and sauté until fragrant, about 2 minutes.
  2. Transfer onion and garlic on the bottom of an 11 x 9 gratin dish or a 10-inch round baking dish. Overlap potatoes, tomatoes and squash over the onion mixture. Season with salt (I use about ½ teaspoon) and pepper. Sprinkle with thyme and Pecorino/Parmesan and drizzle with olive oil.
  3. Cover and bake for 30 minutes. Uncover and bake another 30 minutes until golden and potatoes are tender. You can serve this hot, warm or at room temperature.
Notes
Try to find potatoes, zucchini and tomatoes with approximately the same diameter so the casserole looks balanced.

You can also add shredded gruyere or buttered bread crumbs to the top for an extra special finish.


How to make slow roasted tomatoes

slow roasted tomatoes | pamela salzman

Someone leaked to Mr. Picky that in one of my recent posts I was guessing that he wouldn’t be showering regularly at camp.  It wasn’t a judgment on my part, just an observation from past history.  However, it seems as though Mr. Picky interpreted that as a challenge.  What you might not know about Mr. Picky is that he is competitive to a fault.  He also loves statistics and keeps track of everything, especially when he’s first in something.  But believe me, his “firsts” are not what you might expect.  “Hey, Mom.  Did you know I was the first one down for breakfast 8 days in a row?”  Or not firsts.  “Mom, guess what?  Guess what, Mom?  I was the second youngest at camp.  By 20 days.”  So I wasn’t entirely shocked when Mr. Picky said to me the other day that he’s on a showering streak.  Huh?  “Mom, guess what?  I have showered 37 days in a row!  For real.  I’m not even joking.”  I need to blog more about him not eating cooked vegetables. slow roasting tomatoes

Well, Mr. Picky had to come from somewhere.  Guess what, friends?  I’ve eaten a tomato in some way, shape or form every day for the last 24 days and I’m not even joking.  Whereas I fear Mr. Picky is on a quest to find his way into some imaginary record book for showering, my daily tomato indulgence is for pure pleasure.  Furthermore, I know my streak will come to a sad end in a few months when tomato season is over. raw tomatoes prepped for roasting

I have a total obsession with summer tomatoes.  I always have.  When I was little, I would take a salt shaker into my father’s garden and have a tomato party.  First, I would pluck a nice ripe tomato off the vine.  For the first bite, I always had to shake a tiny bit of salt in my mouth and then take a bite of tomato.  Salt doesn’t stick to a whole tomato.  After that bite, I would shake the salt on the cut part of the tomato and eat away.  My mother told me a few times I even ate several green (underripe) tomatoes and made myself a bit sick to my stomach.

slow roasted tomatoes | pamela salzman

But I am only interested in local, summer tomatoes.  Nothing else compares and I wouldn’t even waste your time on tomatoes before June or after October, and even that is pushing it.  So right now, I’m in my glory and I am snatching up different varieties every week.   So happy!  And tomatoes are amazing for you – I just posted something on my facebook page yesterday about all their health benefits.

grilled veggie and hummus sandwich with slow roasted tomatoes

Something I just started making the last few years are slow roasted tomatoes in the oven.  Damn!  Have you ever tried these?  I’m not talking about sundried tomatoes, which for some reason I don’t like.  Slow roasted tomatoes are super-sweet and moist.  You can cook them as long or as little as you like, but I prefer to bake them until their texture is like moist, dried apricots.   So darn good and soooooooo easy!  It’s barely cooking, people.  And you can use them in a million ways.  Delicious on an antipasto platter, with crusty bread, eggs/frittatas, sandwiches, salads, in pasta, etc.  How could I forget straight-off-the-pan?  Such deliciousness if you have patience to slow cook them.  I figure since I waited all winter and spring for tomatoes, what’s a few hours?

slow roasted tomatoes | pamela salzman


View this post on Instagram


A post shared by Pamela Salzman (@pamelasalzman)


Slow Roasted Tomatoes
Author: 
 
Ingredients
  • 12 plum tomatoes*, halved lengthwise
  • 2 cloves garlic, thinly slices
  • a few sprigs of fresh thyme
  • unrefined olive oil for drizzling
  • sea salt
Instructions
  1. Preheat oven to 275 F degrees. Line a small baking sheet with parchment paper or use a 13 x 9 baking dish. If you want to make more tomatoes, use a large baking sheet.
  2. Arrange the tomato halves, cut side up, in one layer on the prepared baking sheet.
  3. Place a sliver of garlic on top of each tomato and scatter the thyme sprigs over. Drizzle a little oil over the tomatoes and sprinkle with a pinch of salt. Bake until desired texture is reached. I like to go 3 hours. More time will result in drier tomatoes. Less time will result in juicier tomatoes. Ovens also vary, so check tomatoes periodically.
  4. Store in the refrigerator in a covered container for up to a week. Covered in oil, the tomatoes will last a few weeks. You can also freeze them right on the sheet pan and when the tomatoes are frozen, transfer them to a covered container to freeze (ideally a freezer bag that is as small as will fit the tomatoes.)
Notes
*You can also use halved cherry or grape tomatoes and cook for less time.


Roasted smashed potatoes recipe

roasted smashed potatoes by pamela salzman

Everyone thinks it’s so funny when I whine that I don’t get invited much to peoples’ houses for dinner.   There is an assumption that I’m an accomplished chef and I must have such high standards for eating therefore it’s too intimidating to have me over for dinner.  Ha!  Nothing could be farther from the truth.  I’m a home cook who never went to culinary school and I don’t ever make recipes with three sauces.  I could never work in a restaurant or hotel or be on one of those shows where you have to figure out what to do with octopus and cornflakes in 20 minutes.  Just for the record, I love simple food.  I don’t need anything fancy or chef-y.  I am very easy to please as long as it’s fresh and natural.  And I’ll bet that you are as good a cook, if not better than I am.  Anyone can have a food blog, friends!

red new potatoes

What I do love is sharing recipes that work for me, because I think we’re a lot alike.  And it makes me happy if more people are cooking at home, even if I’m not invited.  Wink, wink.  These roasted smashed potatoes are my favorite kind of recipe — uncomplicated, tasty, easy and healthful.  They go with whatever I’m serving and every single person in my family loves them.  If you’ve never made smashed potatoes, you are totally missing out.   They’re both fluffy on the inside and crispy on the outside and if you add enough salt, damn delicious.  I could just eat a half dozen of these and some scrambled eggs and call it a night.  If you invited me over for dinner and made these potatoes with scrambled eggs, I would be in heaven.  Yep, that’s all it takes.

pierce potato with paring knife to determine doneness

The other night at our dinner table, there were several ways to eat these.  My husband makes up for my dairy abstinence by melting cheese on everything, including these potatoes.  Mr. Picky dipped his in mustard and Daughter #2 topped hers with guacamole, salsa and sour cream.  Daughter #1 and I ate these plain and simple.  I’m going to start teaching the little miss how to make easy recipes like this because she’ll be off to college before I know it.  Sigh.  Wait, what am I talking about?  Yippee!

toss boiled potatoes in a little oil

These are divine out of the oven, but I don’t love potatoes reheated.  To do some of the work ahead of time, boil the potatoes and refrigerate them.  Then, smash them and roast them to crispy perfection.  What is great is that you’ll use the whole potato, since most of the nutrients are in the skin or just underneath the skin.  And if you follow the Body Ecology Diet, red new potatoes are the only potatoes permitted since they have the fewest sugars of any potato.  Just an FYI.  Of course, most of you are not on the Body Ecology Diet, so use whatever baby potatoes you can get your hands on, like Yukon Golds.

arrange the potatoes evenly spaced apart

put another baking sheet on top to flatten potatoes

press down on the baking sheet to flatten the potatoes

When I taught in France last year, I did some roasted potatoes in duck fat, which I know doesn’t sound healthful, but to be honest, I think animal fats can be good to cook with at high temperatures, unless you’re a vegetarian.  Unsaturated fats (vegetable oils) can oxidize at high temperatures (above 350 degrees) which create free radicals.  Yuck!  Those are pro-inflammatory compounds that will age you from the inside out.  Saturated fats don’t do that.  Listen, I use olive oil at higher temperatures sometimes if it’s the only fat that works, but you’re better off with coconut oil, ghee or duck fat, in this case.  Do what you’re comfortable with because you’ll love these no matter what!

roasted smashed potatoes by pamela salzman

roasted smashed potatoes by pamela salzman

4.5 from 2 reviews
Roasted Smashed Potatoes
Author: 
Serves: 6
 
Ingredients
  • 2 pounds baby potatoes, such as red-skinned or Yukon Gold (about 15-18)
  • 1 Tablespoon kosher salt for boiling the potatoes
  • 4 Tablespoons fat of choice, divided (e.g. olive oil, duck fat, or ghee)
  • 1 teaspoon chopped fresh thyme or rosemary
  • ½ teaspoon sea salt
  • freshly ground black pepper to taste
Instructions
  1. Preheat the oven to 425 degrees.  Line a large rimmed baking sheet with parchment paper.
  2. Scrub the potatoes and place them in a large pot with 1 tablespoon of kosher salt.  Fill the pot three-fourths with cold water.   Place the pot on the stove over high heat.  Bring the water to a boil, lower to a simmer and cook until the potatoes are tender, about 20-25 minutes.  You should be able to insert the tip of a paring knife easily into the center of a potato.
  3. Drain the potatoes in a colander and shake to get off as much moisture as possible.  Place the potatoes back into the pot and drizzle with 2 tablespoons of oil.  Roll them around to coat with the oil.
  4. Arrange the potatoes on the prepared baking sheet and evenly space them apart from each other.  Take another large rimmed baking sheet and position it right on top of the potatoes and press down, smashing the potatoes to about a half inch thick.  Remove the top baking sheet.
  5. Drizzle the remaining 2 tablespoons of oil on top of the potatoes and sprinkle with the chopped thyme and salt and pepper.
  6. Bake until potatoes are golden and crisp.  I took them out after 30 minutes, but you can go much longer if you want them really crispy.  Serve hot or warm.

Slow cooker white bean soup with sausage and collard greens recipe (stovetop version, too)

hearty and filling | pamela salzman

I know so many of you are fighting cold weather and stuffy noses, so I thought I would share with you a new favorite soup in our house.  My friend and student Lynette gave me the recipe because it has been popular with her family.  Nothing beats a warm and hearty bowl of soup when you’re not feeling 100% and this one is particularly fantastic since you place everything into a slow cooker in the morning and it’s ready by dinnertime (also great when you’re not feeling 100%.)

always rinse your beans before using

People in my classes have been begging me for more slow cooker recipes, especially the dump-and-start kind.  If you don’t have a slow cooker, do not fear.  I will give you directions for a stovetop version.  Whereas I normally prefer to saute aromatic vegetables before using them in a soup or stew since it adds more flavor, in this recipe the extra step doesn’t make much difference.  Lucky us!  Although the original recipe doesn’t call for it, I prefer to soak my beans to neutralize the phytic acid, a hard-to-digest anti-nutritient.  Soaking is optional though, as the slow cooker will easily cook the beans to a creamy softness without soaking.

I think these are pretty "clean."

put the ingredients in the insert and press "start"

This was a perfect entree soup for dinner paired with corn muffins and a green salad.  More importantly, all my kids, including the picky one, just loved it.  I know some people can’t get into the idea of “just” soup for dinner.  But I promise this is a hearty one.  Beans are loaded with protein and fiber which both help keep you full for longer.  There is also a small amount of sausage in the soup (I used chicken sausage) which you can omit if you’re vegetarian or vegan or use your favorite vegan sausage to add a little smokiness to the soup.  For a more affordable dish, you can use a small ham hock for flavor instead of the sausage.

gorgeous collard greens

remove the stems and chop the greens

add collard greens 20 minutes before serving

In my opinion everything is better, more alkalizing and more nutritious with dark leafy greens.  I hope you are finding new and delicious ways to incorporate this food group into your diet.  Kale seems to be the “it” leafy green of the moment, that it’s nice to see another leafy green in a recipe.  Collard greens are used in this soup, but I’m sure cabbage or kale would be equally delicious here.  This recipe is a keeper no matter how you make it!

white bean and sausage soup | pamela salzman

5.0 from 1 reviews
Slow Cooker White Bean Soup with Sausage and Collard Greens
Author: 
Serves: 6
 
Ingredients
  • 1 pound dried beans (such as cannellini or great Northern), picked through for stones or debris, soaked* for at least 6 hours in cold water and drained
  • ½ pound andouille sausage links, halved lengthwise and sliced crosswise (I used a 12-ounce package of Applegate Farms chicken apple sausage)
  • 1 large onion, chopped
  • 2 stalks celery, chopped
  • 4 sprigs fresh thyme
  • 8 cups low-sodium or unsalted chicken or vegetable broth, preferably homemade
  • 1 bunch collard greens, stems discarded and leaves cut into-bite-size pieces (about 8 cups)
  • 1 Tablespoon apple cider vinegar or red wine vinegar
  • sea salt and black pepper to taste (salt will vary based on what stock or sausage you use)
  • unrefined olive oil for drizzling (optional)
Instructions
  1. In a 4-6 quart slow cooker (mine is a 6.5 quart and it turned out great), combine the beans, sausage, onion, celery, and thyme. Add the broth and stir to combine.
  2. Cover and cook until the beans are tender, on LOW for 7 to 8 hours or HIGH for 4-5 hours.
  3. minutes before serving, remove and discard the thyme sprigs and add the collard greens. Cover and cook until the greens are tender, about 15 to 20 minutes. Stir in the vinegar and salt and pepper to taste.
  4. Drizzle with olive oil, if desired.
Notes
*You don’t have to soak the beans if you don’t have time, but it makes them more digestible. You do need to soak them for the stovetop version.

For a stovetop version, sauté onions and celery in 2 Tablespoons olive oil. Add soaked, dried beans, sausage, thyme and stock. Bring to a boil, lower to a simmer and cook covered until beans are tender, bout 60-90 minutes. Add greens and cook until tender, about 10-15 minutes. Stir in vinegar and season with salt and pepper to taste. Drizzle with olive oil if desired.


Roasted Whole Bone-In Turkey Breast Recipe

This is it, friends!  We’re in the home stretch and I’ve got one last recipe to share before the big day.  By now you know I get most excited about the side dishes, but in my classes I spend more time answering questions about turkey.  What size should I order?  What kind of turkey should I buy?  Why does my turkey always turn out dry?  How do I know when it’s done?  What do you think about deep frying a turkey?  (I don’t.)  And so on.  Even though I’ve been around this block quite a few times, and I’ll admit that I can get a little unnerved when it’s time to make the turkey.  With so many factors at play here, e.g. size, temperature of the bird, variance in oven temperatures, and so many methods, e.g. dry brine, wet brine, kosher, breast side down, basting every 20 minutes, etc., it can be a little tricky knowing how to achieve the best result.  I think most of my turkeys have turned out great.  But I’ve had my mishaps and I have learned there’s always a solution, even when I forgot to close the door to my garage refrigerator and my turkeys were about 80 degrees the next morning.  Total rookie move, and that was three years ago. (I didn’t cook them, by the way.  I went to Whole Foods at 7:00 am and bought 2 brined turkeys.  Problem solved!)

I’ve really only cooked two different versions of turkey, a whole roasted bird and a whole roasted breast.  Like I said, I get more excited and have more fun with the side dishes!  But traditionally since the turkey is the star of the show, I like to put my best foot forward and prepare a delicious bird.  Normally I roast two whole turkeys on Thanksgiving, but a whole roasted breast can come in handy for a smaller crowd or to supplement a whole turkey if most of your guests prefer white meat.  I’ve tested many methods for cooking a breast and this is hands-down my favorite.  It is also a little different from how I cook a whole turkey.  Whereas I prefer dry brining a whole turkey, I’ll go for the wet brine with a turkey breast which is much more easy to maneuver in a ziptop bag full of brining liquid. (Unlike the time in 2001 when my bag o’brine surrounding my 20-pound turkey exploded all over my kitchen floor.  Cleaning that mess was definitely NOT on the schedule.)  Either way, it is key to get that meat pre-seasoned with salt so it’s tasty and stays moist.  It makes a huge difference!

I’ve made a dozen of these whole breasts over the last couple weeks and each one has turned out moist and flavorful.  The best part is that with this straightforward method, there’s no constant basting and no worrying about wether or not the thigh meat will cook at the same rate as the breast.  Funny, the question I received the most after classes this month was “why do we only make turkey on Thanksgiving?”

Roasted Whole Bone-In Turkey Breast
Author: 
Serves: 10-12
 
Ingredients
  • For the brine: (do not brine a kosher turkey)
  • 1⅓ cups Kosher salt (such as Diamond Crystal)
  • ¼ cup light brown sugar
  • 1 ½ teaspoons whole peppercorns
  • 1 quart water
  • 4 quarts ice water
  • 1 brining bag or heavy duty gigantic Ziploc bag
  • For the turkey:
  • 1 , 6-7 pound whole bone-in, skin-on turkey breast
  • 2 Tablespoons fresh thyme leaves, chopped
  • 2 teaspoons freshly ground black pepper
  • 6 Tablespoons softened unsalted butter or unrefined, cold pressed, extra virgin olive oil
  • 1 cup chicken or turkey stock or water (stock will allow you to make gravy)
  • Gravy
  • ¼ cup white wine
  • 5 Tablespoons all-purpose flour (or a gluten-free flour blend, such as King Arthur's Multi-purpose)
  • 3- 3 ½ cups chicken or turkey stock, preferably homemade
  • Sea salt and freshly ground black pepper to taste
Instructions
  1. Make the brine: In a medium saucepan over high heat, combine the salt, brown sugar, peppercorns and 1 quart water. Bring to a boil and continue boiling, stirring until the salt and sugar are dissolved, about 3 minutes. Remove from the heat and transfer to a large bowl. Stir the ice water into the brine and make sure this mixture is cool before proceeding, otherwise add more ice.
  2. Place the brining bag in a large bowl or pot and transfer the turkey to the bag. Pour in the brine into the bag with additional ice, if needed. Seal the bag securely! Refrigerate the turkey for 12 to 18 hours.
  3. About an hour before cooking, remove the turkey from the brine, rinse thoroughly with cold water and pat dry with paper towels.
  4. Preheat the oven to 425 degrees. Combine the thyme, black pepper and butter in a small bowl. Loosen the skin from the breast and open it to make a pocket. Spread the butter mixture directly on the meat. Rub a little all over the skin. Place the turkey breast-side down in a v-shaped rack in a roasting pan. Add the stock. Roast the turkey for 30 minutes.
  5. Reduce oven temperature to 325 degrees. Turn turkey breast-side up (I wear rubber gloves to flip) and tent with foil. Continue to roast until an instant read thermometer registers 160-165 degrees when inserted into the thickest part of the breast, about an additional 1 ½ to 2 hours, depending on the size of the turkey. The temperature of the meat is more important than how long the turkey is in the oven!
  6. Remove from oven and keep covered with foil and allow to rest at room temperature at least 30 minutes. Carve and serve with pan juices or prepare gravy. Don't forget to save the carcass for making stock!
  7. To make gravy: remove the turkey from the roasting pan, pour the pan drippings into a fat separator.
  8. Pour the wine and the pan juices (that have been separated from the fat) back into the roasting pan, and place over medium heat. Bring to a boil and boil for 2-3 minutes, scraping the bottom of the pan with a wooden spoon to dislodge any brown bits. Strain into a bowl and set aside.
  9. In a saucepan over medium heat, warm the reserved fat until it is bubbly. If you don't get 3-4 Tablespoons of fat from the drippings, add some olive oil. Add the flour and whisk rapidly to cook the flour.
  10. Strain the mixture from the roasting pan into the saucepan and 2 cups of stock. Cook, while rapidly stirring, until smooth and thickened, 1-2 minutes. Add the remaining stock as needed to achieve desired consistency. Season to taste with salt and pepper.
Notes
Check out my video on how to make gravy and carve the breast at the bottom of this post!


Mushroom and leek stuffing recipe

When I married my husband over 17 years ago (gasp!), I was more than excited to start hosting some of the holidays at our new home.  But I soon realized that my husband’s traditions were slightly different from the ones I grew up with, especially on Thanksgiving.  What?  No first course of pasta with marinara sauce?  Strange, I thought, but I could adapt!  My mother-in-law kindly shared with me the way things were done on the West Coast.  She liked to serve everyone a salad to start and plate the main dinner for each person in the kitchen.  Turkey and gravy, mashed potatoes and stuffing were all givens, and their stuffing of choice was Pepperidge Farm.  No problem!

My husband and I have hosted every Thanksgiving since 1996 and enjoy the comfort that develops when you do something over and over again.   I have since incorporated my own traditions like buffet – easier and much less waste – and soup to start.  About 6 years ago I decided to examine the ingredients on the seemingly innocuous bag of Pepperidge Farm stuffing.  Holy crap.  I couldn’t believe the garbage that went into breadcrumbs!  One thing I knew for certain was that Pepperidge Farm was uninvited to Thanksgiving…forever!

Actually, if it were up to me, I would drop stuffing from the menu altogether.  I really don’t get it.  With ALL the delicious food on the Thanksgiving table, many of the dishes starchy, we’re going to eat gussied up bread, a food we already overeat on every other day of the year??  I was trying to explain to my husband that mashed potatoes, sweet potatoes and butternut squash are all starches, as is the obligatory cornbread.  We should balance out the meal with additional vegetables, like Brussels sprouts!  “You’re taking this health food thing a little too far.  The stuffing stays!”

Although I like to think of myself as the dictator of my kitchen empire, the director of Thanksgiving, I’m really a democratic leader.  I figured my only option was to create a delicious, higher quality stuffing that looked like Pepperidge Farm and tasted enough like it, but even better.  So here’s my take on a good classic stuffing that’s not too gourmet, in fact tastes very close to our old preservative-laden standby.    I usually make two for our dinner, one with mushrooms to suit me and one without for my hubby.

I’ve tried this stuffing with whole grain breads like whole wheat or spelt, but truthfully it tastes a little “wheat-y.”  There was a fantastic bread I used to buy from Whole Foods called Miche, which was a sourdough bread made of a blend of whole wheat and white flours.  That was about as whole grain as my family could take on Thanksgiving.  Truth be told,  I prefer to go down in our family history as the benevolent one who said, “ let them eat stuffing!”


5.0 from 1 reviews
Mushroom and Leek Stuffing
Author: 
Serves: 8-10 (although I make 2 for 24 people on Thanksgiving and it is plenty)
 
Ingredients
  • 1 ½ pounds rustic whole wheat or white bread, hard crust removed
  • 6 Tablespoons unrefined, cold-pressed extra-virgin olive oil
  • ½ pound shiitake mushrooms, wiped clean, stems removed and discarded, caps sliced
  • ½ pound cremini mushrooms, wiped clean, quartered
  • 2 stalks celery, chopped
  • 1 large onion, chopped
  • 2 leeks, cleaned and sliced
  • 3 garlic cloves, minced
  • 1 ½ teaspoons fresh thyme, chopped
  • 1 teaspoon dried sage or poultry seasoning or 2 teaspoons fresh sage, chopped
  • 2 Tablespoons flat-leaf parsley, chopped
  • 2 teaspoons sea salt or 3 teaspoons if using unsalted stock
  • ½ teaspoon black pepper
  • 3-4 cups chicken, turkey or vegetable stock (depending on if you like it wet or dry)
  • 2 Tablespoons unsalted butter, cut into small dice (optional)
Instructions
  1. Preheat oven to 350 degrees.
  2. Place bread in a food processor and process into large crumbs or cut into ½-inch dice. (I like to do a combination.) You should have 10 cups. Spread bread over 2 large shallow baking pans and bake in upper and lower thirds of oven, stirring occasionally and switching position of pans halfway through baking, until completely dry, about 25 minutes. Transfer bread to a large bowl.
  3. Increase oven temperature to 450 degrees and grease a 13x9-inch baking dish.
  4. Heat olive oil in a large skillet over medium heat. Add mushrooms, celery, onion, leeks, and garlic, and sauté, stirring occasionally until softened, 10 minutes.
  5. Stir in thyme, sage, parsley, salt and pepper. Add vegetables to bread, tossing to combine.
  6. Pour chicken broth over the bread mixture, tossing to coat evenly.
  7. Spread stuffing in a baking dish, dot with butter and cover tightly with foil. Bake in upper third of oven until heated through, about 20 minutes. Remove foil and bake stuffing until top is browned, 10 – 15 minutes more. Stuffing can also be baked in a well-greased 12-cup muffin tin.
Notes
Bread crumbs can be prepared several days in advance.
Vegetables can be chopped the day before.
Entire casserole can be prepared up to the point of baking the day before and refrigerated or frozen and then thawed and baked according to the directions.