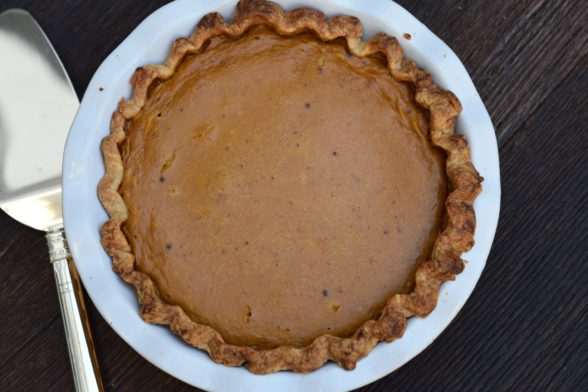
Pumpkin pie


There are very few recipes that debuted on my first Thanksgiving menu 16 years ago that are still going strong today.  Roast turkey, cranberry sauce and mashed potatoes are staples year after year, as is a traditional pumpkin pie.  Despite all my rantings about how destructive sugar is to your health,  I honestly can’t imagine Thanksgiving without pumpkin pie.  I wouldn’t even care if no one liked it, I would still make two of them.  I remember the first pumpkin pie I ever made when I was in high school.  I followed the recipe on the can of Libby’s pumpkin puree and poured it into a store-bought pie crust.  Heaven.


Since then I have adjusted the recipe to be much more wholesome, and dare I say, much more delicious.  I traded in store-bought piecrust for homemade, canned pumpkin (bye-bye BPA) for freshly roasted (hello yummy rich pumpkin flavor), refined sugar for maple syrup (and much less of it), and canned evaporated milk for heavy cream.  Sure, heavy cream is rich in saturated fat, but I would rather eat a couple of spoonfuls of a high quality organic cream than canned milk.  Would you ever drink canned milk or feed it to your kids?  I didn’t think so.  I use organic raw cream when I can get it, or I buy a nonhomogenized, but pasteurized organic cream from Straus Family Creamery.  I have made a dairy-free version of this pie using coconut milk and it’s just as delicious (it does not taste like coconut, either.)  Of course there’s still lots of butter in the crust.  Last year, I made one pie with a white flour-based crust and another with a whole wheat pastry flour-based crust.  Only my sister-in-law and I liked the whole wheat one.  As my mother-in-law says, “You two like anything that you know is good for you.”  Partially true.  This year I will go back to all white flour pie crusts and the wholesomeness comes to an end right there.

Speaking of which, I am quite conscientious about consuming very little sugar during the year, but come Thanksgiving I feel like I have earned a piece of pie (or two) and I don’t feel bad about enjoying it.  The problem comes the next day when I’m looking for that sugar fix again at 4:00 in the afternoon.  And the next day.  And the day after that.  Guess what?  I’m not alone.  Thanksgiving starts not only the beginning of the holiday season, but a time when lots of people pack on a few extra pounds from overindulging too often.  I love celebrating just as much as the next person, but I definitely don’t love trying to lose weight (it’s not as easy as it used to be!)  I look forward to Thanksgiving dinner and dessert, especially after I’ve worked so hard to make it special and delicious, but this year I’m going to be a little more mindful the next day.  At least until Christmas.


Pumpkin Pie
Author: 
Serves: makes one 9-inch pie
 
Ingredients
  • Pie Crust:
  • 1 ¼ cups unbleached all-purpose white flour or spelt flour
  • ½ teaspoon fine sea salt
  • ½ cup (1stick) cold unsalted butter, cut into 8 pieces
  • 2-4 Tablespoons ice water
  • Filling:
  • ½ teaspoon fine sea salt
  • 1 teaspoon ground cinnamon
  • ½ teaspoon ground ginger
  • ¼ teaspoon ground cloves
  • pinch of ground nutmeg
  • 1 cup heavy cream or coconut milk (not light)
  • 1¾ cups fresh or canned pumpkin puree (1 15-ounce can)
  • 3 large eggs
  • 6 Tablespoons pure maple syrup or brown sugar
Instructions
  1. Make the crust: Place the flour and salt in the bowl of a food processor fitted with the metal blade. Add the butter and pulse 10 times.
  2. Turn the food processor on and slowly pour in 2 Tablespoons ice water. Stop the machine and carefully (watch the blade!) grab a small handful of dough and squeeze it in your hand. If it holds together well, you’re done. If it’s crumbly, add another tablespoon of ice water and blend. The goal is that when you squeeze the mixture in your hand that it forms a moist, but not sticky ball of dough. Transfer the dough to a piece of parchment paper or plastic wrap and shape into a disc. Wrap well and refrigerate for at least 30 minutes.
  3. Preheat the oven to 375 degrees. On a lightly floured work surface, flour a rolling pin and roll dough into a 12-inch round. While you’re rolling out the pastry, you should always be able to move it easily around the work surface without sticking. Add additional dustings of flour as needed. Fit the circle into a 9-inch pie plate and crimp edges. Refrigerate if it feels too soft.
  4. Prick the bottom of the crust all over with a fork. Line the crust with a piece of parchment (like the one the dough was wrapped in), and fill it with pie weights or dried beans (the ones in the photo I've had since college!). Bake until lightly golden around the edges, about 20 minutes. Remove parchment and weights. Return crust to the oven and bake for another 5 minutes until light golden all over. Cool completely on a wire rack (this can take up to an hour so you may want to turn the oven off.)
  5. Preheat the oven again to 375 degrees. In a small bowl, whisk together the salt and spices (if you are using brown sugar instead of syrup, add the sugar now.)
  6. In a large bowl or with a mixer, whisk together cream, pumpkin puree, eggs and maple syrup. Add spice mixture and combine thoroughly.
  7. Pour mixture into the cooled crust and bake until filling is set (it will jiggle like gelatin, but it will be a little soft in the center), about 50-60 minutes. The filling will firm up as it cools. This can be made the day before. I like to keep it refrigerated.

Pumpkin pancakes with sauteed apples

Now that my daughters are teenagers (sigh), I encourage them to invite their girlfriends to have sleepovers at our house on the weekends.  I don’t always get my wish, but I do like having them home so I can keep an eye on everyone and then I don’t worry so much.  Not only that, but the girls’ friends give me more gossip than they do, and enquiring moms want to know!  Last weekend, my husband and Mr. Picky were away on a guy’s trip and I had 6 girls keeping me company.  I used to dread sleepovers because there would always be one early bird that would wake everyone up at 5:00 am and then you had a Miss Cranky Pants to deal with the rest of the day.  Let me tell you, some sleep mechanism kicks in when the kids hit middle school and then you can’t wake them before noon if your life depended on it.

Last Sunday, I was able to get in a workout and shower before I heard the first signs of life at 10:30 am.  Still foggy and misty out, I wanted to make a cozy breakfast for everyone.  I had cooked some fresh pumpkin puree the day before with pumpkin pancakes in mind — my absolute favorite!  Before I even got started, the 13-year-olds were mumbling something about not being hungry.  I would not be discouraged.  I noticed two sad-looking Golden Delicious apples on the counter that I knew no one would ever eat.   I decided to peel and slice those and gently saute them in a little butter while I preheated the griddle and assembled the pancake batter.

This is just a twist on the classic buttermilk pancake recipe that is a weekly staple in our house.  The pumpkin puree adds a beautiful copper color to the batter as well as a little Beta-carotene.  And then all those fantastic warming spices add the flavor that says Fall!  If you have pumpkin pie spice, I’m sure that would work fine here, too.  Just like my standard pancake recipe, you can make this batter the night before.  I have taught my girls how to cook their own pancakes, so very often I will leave the batter on the counter for them to cook with their friends at whatever time they saunter downstairs and I’m free to get my day going.

I normally just serve these pancakes with a little maple syrup or with this incredible apple cider syrup we picked up at a roadside farm in the Hamptons this summer.  The girls like to add chopped pecans to the pancakes when they’re cooking on the griddle, but the sauteed apples were a special treat and ridiculously simple to make.  When they were tender I drizzled on them the tiniest amount of syrup and a dash of cinnamon.  Crazy good!  I made a plate to photograph and then said to the girls, “Look how pretty this is.”  Their eyes bugged out and someone said, “Yum!  Like that actually looks good.”  Actually??  Like, whatever.

Pumpkin Pancakes with Sauteed Apples
Author: 
Serves: 4-5
 
Ingredients
  • 1 ½ cups whole wheat pastry flour*
  • 1 ½ teaspoons aluminum-free baking powder
  • 1 teaspoon aluminum-free baking soda
  • 1 teaspoon fine sea salt
  • 1 teaspoon ground cinnamon
  • ½ teaspoon ground ginger
  • ¼ teaspoon ground nutmeg
  • pinch of ground cloves
  • 1 ½ cups buttermilk**
  • 2 large eggs
  • ½ cup fresh or canned pumpkin puree (NOT pumpkin pie filling)
  • 1 Tablespoon pure maple syrup
  • 3 Tablespoons unsalted butter, melted
  • Coconut oil for brushing the griddle
  • Sauteed apples as accompaniment, optional:
  • 2-3 apples, peeled, cored and sliced
  • 2 Tablespoons unsalted butter or coconut oil
  • 1 teaspoon maple syrup
  • a dash of cinnamon
Instructions
  1. Preheat a griddle to 400 degrees or medium heat. (On some stovetops, 350 or 375 degrees is fine.)
  2. If you are making the sautéed apples, heat a large skillet over medium heat. Melt the butter and add the apples. Lower the heat slightly and gently sauté until tender, about 10 minutes. Drizzle with 1 teaspoon maple syrup and a dash of cinnamon and toss to combine. Remove from heat.
  3. Combine the flour, baking powder, baking soda, salt and spices in a large mixing bowl.
  4. In a blender or medium mixing bowl, combine the buttermilk, eggs, pumpkin puree, maple syrup and melted butter until well blended.
  5. Pour the wet mixture into the dry ingredients and stir until just combined.
  6. Brush the griddle with coconut oil and spoon about ¼ cup of batter onto the griddle. Add chopped pecans or walnuts to the surface, if desired. When bubbles start to form on the surface of the pancake and the edges turn slightly dry, flip it over and cook until done. Serve warm with sautéed apples or maple syrup.
Notes
To make the pancakes gluten-free, substitute 1 ½ cups of Bob’s Red Mill All-Purpose Gluten-Free Baking Mix + 1 ¼ teaspoons of xanthan gum or substitute ¾ cup brown rice or GF oat flour and ¾ cup buckwheat flour.

**You can also substitute half yogurt and half regular milk for the buttermilk. Or, use 1 ½ cups milk, omit the baking soda, and use 2 teaspoons baking powder instead.


Smoky Braised Lentils with (or without) turkey sausages

Do you have a son younger than college age?  Did you ever have one?  Do you know that he probably doesn’t eat lunch at school?  I know you pack him something wonderful and maybe he even helped pick it all out.  But here’s the reality:  if your school is like mine and permits recess as soon as the kids are “finished” with lunch, most boys are only focused on one thing.  Playing ball.  I have figured out that my son only eats what he can on the way to the field and leaves everything else in the lunchbox.  He eats it all when he comes home, but he does NOT want to miss being picked for the better team or waste time sitting around eating when he can be doing his favorite thing in the world.  Playing ball.

Mr. Picky is in second grade and this has been going on since he started elementary school and from what other moms tell me, it doesn’t end.  So it was a big day in the Salzman household when Mr. Picky announced that he would like to take a thermos to school.  Why?  Did the state cut the budget for soccer balls?  Not yet.  Mr. Picky wanted a thermos so that he could take these lentils to school.  For lunch.  This is big, people.  And the thermos came back empty.

It is not at all important to me why he likes lentils, only that they are an amazing source of low-fat protein and super high in fiber, so they keep him full for a long time and help stabilize his blood sugar.  So I thought I would share this recipe with you just before Halloween since it is keeping in line with my strategy for the big night o’candy.  I can’t/won’t forbid my kids from eating candy on Halloween.  How unrealistic is that?  (Rhetorical question.  Very.)  My strategy is to get them really full with a good dinner before they go out so that they have no room in their bellies for too much candy.

My mom used to make braised lentils which is kind of like making lentil soup, but with less liquid.  Only she used to put a piece of pork or a smoked ham hock in the pot and it gave the lentils great flavor.  I don’t eat pork, but I started adding smoked paprika to my lentils to give a similar smokiness and it’s delicious.  Mr. Picky says it tastes like there’s a hot dog in there.  In fact, that wouldn’t be a bad idea to put a (nitrate-free) hot dog in the pot to persuade your kids to try lentils.  Just a thought.  I very often make them as a vegetarian dish since they have so much protein, but here I served them with my answer to fast food — Applegate Farms (Precooked) Organic Chicken and Turkey Sausages.  No matter how busy you are, I am sure you aren’t too busy to warm up these sausages.  I bake them, which is so much easier than cooking them in a skillet and having to clean up any splattering on the stovetop.  But the best part is that there are no spooky ingredients to worry about!

Smoky Braised Lentils with (or without) Turkey Sausages
Author: 
Serves: 6
 
Ingredients
  • 1 Tablespoon unrefined olive oil
  • 1 large onion, diced
  • 1 carrot, diced
  • 1 clove garlic, finely chopped
  • 2-3 teaspoons smoked paprika (Spice Hunter is a good, easy-to-find brand. Spicely Organic has no flavor.)
  • 1 cup organic black or French lentils* (sorted and rinsed)
  • 1 sprig fresh thyme (optional)
  • 1 teaspoon sea salt (+ ½ teaspoon if you don’t cook sausages with lentils)
  • 2 ½ cups water
  • Freshly ground black pepper
  • 1-2 packages precooked Applegate Farms Sweet Italian or Chicken Apple sausages (4/package)
Instructions
  1. In a medium saucepan, heat the olive oil. Add the onion and sauté over medium heat until tender and translucent, about 8 minutes.
  2. Add the carrots, garlic and paprika. Cook for 2 more minutes.
  3. Add the lentils, thyme, salt and water and bring to a boil. Cover and reduce heat to low and simmer for 30 minutes** or until lentils are tender. Halfway during the cooking process, preheat the oven to 350.
  4. Bake sausages on a baking sheet until heated through, about 15-20 minutes. Slice into thirds and serve with the lentils. Or alternatively, cut the sausages in half or thirds and add to lentils halfway through cooking lentils and heat sausages through.
  5. If lentils seem too liquidy, simmer a little longer uncovered. Taste lentils and season with salt and pepper as needed.
Notes
*There seems to be a wide variety of lentil cooking times. 365 Brand takes about 30 minutes, but I have used some imported varieties that take up to 50 minutes.

Shredded sweet potatoes and apple

Are you confused about the difference between a sweet potato and a yam?  Yep, so is my local supermarket.  In all fairness, I had to do a little research to get to the bottom of it, because I wasn’t sure myself.  The names “sweet potato,” which is not at all related to a regular potato, and “yam” are used interchangeably in the US, but they both generally refer to sweet potatoes, no matter the color.  Even the dark ones called yams are technically sweet potatoes.  True yams are native to Africa and are a staple in tropical and subtropical countries.  I have never actually seen one in our country, but here’s what you might find in your market if you live in the States:

  • Brown or red-skinned (often called called yams) —  these have a soft orange flesh and sweet flavor.  The varieties you will likely see are Garnet, Jewel, and Christmas Beauregard.  Garnets are my favorites and what I used in these photos.
  • Beige-skinned — have a pale yellow flesh.  Varieties include Nancy Hall and Juicy Yellow.
  • Purple skinned — I see these at my farmer’s market.  They have a white flesh and the farmer calls them Japanese sweet potatoes.  I don’t find the flesh to be quite as moist as the others mentioned above.
No matter what you call them, sweet potatoes are delicious and completely underrated.  It baffles me that so many people look to sweet potatoes only at Thanksgiving.  We eat them much more often in our house than regular potatoes and they are just as versatile.  They are also way more nutritious — you probably don’t need me to tell you that.  When you look at that deep orange flesh, you immediately think Beta-carotene, right?  They are loaded with so many vitamins, minerals and fiber, but it’s the antioxidant profile that sweet potatoes are so rich in.
I could eat a plain roasted sweet potato any day of the week for breakfast, lunch or dinner and I make them that way as an easy side dish quite often.  The down side of roasting whole sweet potatoes is that they take a good 50 minutes to cook.  We don’t always have that kind of time.  Here comes “Plan B Sweet Potatoes.”  Is this starting to sound like my “Plan B Salmon” from last week?  I actually shouldn’t call this Plan B, because this is my kids’ favorite sweet potato recipe and the ONLY way my husband enjoys them (Mr. Picky had to come from somewhere.)  The sweet potatoes take on the flavor of apple without getting too sweet.  I cook them long enough that they’re just tender with a little bite to them.  Leaving the peel on would give you more fiber and nutrients, but my kids prefer the skin off so they don’t get random bites of peel.  Last night we had this dish with some steamed whitefish and a green salad, but I think it’s even better suited to chicken, turkey or pork.  Have you located the shredding disc of your food processor?  I live for that thing.  If you have it, this will be on the dinner table in 15 minutes tops.
Speaking of turkey, I’m starting the Thanksgiving countdown this Thursday, which is four weeks from the big day.  We have lots to do to start preparing and getting organized, so tune in and I’ll get you through this with no stress.  It might even be fun!

Shredded Sweet Potatoes and Apples
Author: 
Serves: 6
 
Ingredients
  • 3 medium sweet potatoes, such as Garnet or Jewel, peeled (about 2 pounds)
  • 1 apple, cut into fourths and cored (I love using a tart variety, such as Granny Smith)
  • 3 tablespoons unsalted butter, unrefined coconut oil or unrefined extra virgin olive oil
  • Sea salt and ground black pepper
  • ½ cup water or apple juice
  • 1-2 Tablespoons 100% pure maple syrup (use less if you use juice)
Instructions
  1. Shred the sweet potatoes and apple in a food processor fitted with the grater attachment.
  2. Melt the butter in a large skillet (if you don’t have a large one, do this in two batches. I used a 12-inch.) Add the shredded sweet potatoes and apple and season with sea salt (I use about ½ teaspoon) and black pepper to taste. Saute, stirring occasionally so that the mixture doesn’t stick, about 5 minutes.
  3. Once the sweet potatoes don’t look so raw anymore, stir in the water/juice and maple syrup and bring to a simmer. Cook another 5 minutes or until sweet potatoes achieve desired tenderness. Taste for seasoning.


Tortilla soup

Tortilla Soup | Pamela Salzman

Tortilla Soup | Pamela Salzman

How do I know it’s soup season in my neck of the woods?  Well, we had our annual freaky October heat wave last week and then the temperature plummeted about 20 degrees.  Now every morning we wake up to fog and a chill in the air that doesn’t go away.  Are you under the misconception as I was that living by the beach is all sunshine all the time?  Ha!  I keep telling my husband I want my money back.  It’s chilly here!  But no matter, I’m pulling out the sweaters and the stock pot and I am making SOUP!

Tortilla Soup | Pamela Salzman

From now until late April, my kitchen turns into a stock-making factory every Saturday.  I make gallons of it every week for my classes and us.  I’ll be honest though, the hubby is sooooo over it.  You should see his eyes roll every time I ask him to help me strain the stock.  Inevitably a chicken foot flops out and completely freaks him out.  But he puts up with it because his favorite food group is soup and he knows homemade chicken stock is magic stuff.  If you are getting more and more comfortable in the kitchen, it’s time to step it up and start making stock from scratch.  You will not believe the difference in taste.  Plus it’s a gajillion times better for you than boxed.  Check out my post here on home made chicken stock.  For all you veggies out there, here’s the link to learn how to make vegetable stock from scratch.

Tortilla Soup | Pamela Salzman

Enough about that.  Let’s talk about the soup I actually made, Tortilla Soup.  Y-um!  This is a very different version of the tortilla soup you might be used it.  It’s not thin and brothy, but thick and hearty and it takes about 15 minutes to make, provided you already have stock made.  If I had to make up another name for this, I would call it “Mexican Tomato Soup”  or “Pappa al Pomodoro goes to Mexico.”  Cumin, which is one of my most favorite spices, adds the distinctive earthy flavor that you would recognize from chili or taco seasoning.  But what is so unusual about this soup is that the corn tortillas are pureed with the tomatoes and broth, as opposed to adding fried tortilla chips on top.  The softened corn tortillas add great flavor and thicken the soup at the same time.  (It’s a great use of stale tortillas.)  I wish I had thought of this bit of genius, but I didn’t.  I tweaked a recipe I found in The Real Food Daily Cookbook, based on the vegan LA restaurant by the same name.

Tortilla Soup | Pamela Salzman

I love adding cubed avocado and chopped fresh cilantro on top, but I let everyone do their thing.  There’s always enough leftover for the next day’s thermoses to which I also like to add  a little cooked chicken.   (I’m big on protein at lunchtime so the kids don’t fall asleep in class.)  Fresh tomatoes are on their way out, so if you can use them go for it.  The other night I used Bionaturae organic crushed tomatoes and tomato paste in a glass jar (not a fan of canned tomatoes.)  I made this soup last year on Halloween, which is around the corner.  I always make sure everyone has eaten a proper meal before going out to trick or treat.  Full bellies can’t fit quite as much candy as empty ones.

Here are some of my other favorite soups to warm you up this season:

Sweet Potato and Coconut

Lentil and Brown Rice

Mushroom-Barley with Kale

Cauliflower with Roasted Garlic

Late Summer Minestrone

Vegetable Chili


Tortilla Soup
Author: 
Serves: 6
 
Ingredients
  • 2 Tablespoons unrefined, cold pressed, extra virgin olive oil or coconut oil
  • 2 onions, chopped
  • 3 cloves garlic, finely chopped
  • 1 fresh jalapeno chile, ribs and seeds removed and finely chopped*
  • 2 teaspoons ground cumin
  • 1 teaspoon dried oregano
  • 2 teaspoons sea salt
  • ½ teaspoon freshly ground black pepper
  • 2 Tablespoons shoyu (naturally brewed soy sauce) or tamari
  • 6 cups chicken stock, vegetable stock or water
  • 2 pounds fresh tomatoes, coarsely chopped or 1 27-ounce box of crushed tomatoes or equivalent in a jar or can
  • ⅓ cup tomato paste
  • 8 6-inch corn tortillas, coarsely chopped
  • Chopped fresh cilantro and cubed avocado garnish, if desired
Instructions
  1. Heat the oil in a heavy stockpot over medium heat. Add the onions and garlic and sauté for 5 minutes or until tender and translucent. Add the jalapeno, cumin, oregano, salt, pepper and shoyu, and sauté 1 minute longer.
  2. Stir in the stock, tomatoes with juice, and tomato paste. Bring to a boil. Lower the heat and simmer, partially covered for 10 minutes, or until the tomatoes are tender.
  3. Add the tortillas and simmer 10 minutes longer, or until the tortillas are super soft and falling apart.
  4. Using a handheld immersion blender, blend the soup in the pot until smooth. Or carefully puree in batches in a blender.
  5. Ladle the soup into bowls and garnish with cilantro and avocado.
Notes
*For a little more kick, add the ribs and seeds from the jalapeno to the soup.


Basmati rice with roasted cauliflower

We are well into fall and I couldn’t be more excited.  At the farmer’s market the other day I was happy to see the return of some familiar faces — winter squash, apples, pomegranates, persimmons and the entire Cruciferous family of vegetables.  Have we talked about this group and why you should be inviting them to dinner as much as possible?  Broccoli, cabbage, Brussels sprouts, collard greens, kale, watercress, mustard greens and cauliflower are the most popular around here, but there are others and they are all loaded with powerful anti-inflammatory and anti-cancer compounds.  You may hear the term “super food” liberally thrown around a lot, but these guys are the real deal.


Remember when I told you I have a favorite way of eating every vegetable?  Well, my most favorite way to eat cauliflower is roasted.  Have you done this?  It becomes tender and sweet and my kids can’t keep their hands out of the baking dish.  When was the last time you said that about cauliflower?  When I saw this recipe in the Los Angeles Times food section a few years ago and noticed the roasted cauliflower element, I knew I was in.  It’s an adaptation of a Thomas Keller recipe, one that I would not normally look at  since he’s very cheffy, but it didn’t look complicated.  I wanted to change it a bit and substitute brown rice for white and cut out what looked like unnecessary amounts of fat.  What still baffles me about this recipe is that Mr. Keller calls for 1/2 head of cauliflower and 1 cup of rice to to feed 8-10 people.  I actually upped both to feed half the amount of people.  Are my kids bigger eaters than the people who gather at Ad Hoc?  Mr. Picky eats more Basmati Rice with Roasted Cauliflower than Ad Hoc patrons?  Maybe Mr. Picky ain’t so picky!

All I know is that this has become one of our favorite side dishes.  Yes, go ahead and use whatever rice you’ve got, but if you haven’t tried basmati, let me change your life right now.  It rocks the rice world.  Basmati rice (I like brown) has this lovely fragrance and grassy flavor which you can taste without even adding anything to it, although a little butter and salt never hurt.   As you can see, I made this the other night with Spice-rubbed Wild Salmon.  Since Daughter #2 is still being stubborn about not eating fish and seafood and I’m not making more than one meal for dinner, I tossed some sliced almonds onto her rice and cauliflower and called it a vegetarian entree.  After all, this ain’t no restaurant.

Basmati Rice with Roasted Cauliflower
Author: 
Serves: 4-6
 
Ingredients
  • 1 ½ cups brown basmati rice, rinsed
  • 2⅔ cups water**
  • ½ teaspoon red chili flakes (optional)
  • 2 Tablespoons unsalted butter
  • 1 small head of cauliflower or ¾ large head, cut into bite-size florets, about 6 cups
  • 3 Tablespoons melted coconut oil (or unrefined olive oil)
  • Sea salt and freshly ground black pepper
  • ½ teaspoon curry powder* (the original recipe calls for a pinch, but I think it's better with a touch more)
  • 3 Tablespoons chopped chives
Instructions
  1. Preheat oven to 400 degrees.
  2. Make the rice: In a medium saucepan, add the water and 1 teaspoon sea salt and bring to a boil over high heat. Add the rice, butter and chili flakes and reduce the heat to a gentle simmer. Cover and cook the rice until the liquid is absorbed and the rice is tender, about 50 minutes. Fluff with a fork.
  3. While the rice is cooking, toss the cauliflower with the coconut oil in a large bowl and season with sea salt and ground black pepper to taste. Save the bowl for later.
  4. Place the cauliflower on a stainless steel baking sheet or one lined with parchment paper and roast until tender and golden brown, about 20 to 30 minutes. You can turn it a couple times for even cooking and coloring.
  5. Place the roasted cauliflower back in the bowl and toss with the curry powder. Season with sea salt and pepper, if desired.
  6. Add the cooked rice to the bowl and gently toss. Sprinkle with chopped chives and serve.
Notes
Suggestions: you can add sliced almonds if you are serving this as a main dish.

*”Spicely Organic” use ½ teaspoon or more, “Simply Organic” use ¼ teaspoon or more

**If you double this recipe, do not double the water. Use just under 5 cups.


Spice-rubbed wild salmon

Spice-Rubbed Salmon | Pamela Salzman


Spice-Rubbed Salmon | Pamela Salzman
Photography by Erica Hampton

Although the best descriptor for this recipe is “Spice-Rubbed Wild Salmon,” I could just as easily call it what it better represents to me, which is “7-minute Salmon.”  Or “Plan B Salmon.”  Or my favorite “I-Cannot-Believe-This-Game-Is-Going-Into-Extra-Innings Salmon.”  Of course, you can replace most of that phrase with “Orthodontist Is So Late Today” (Salmon)  or “How Long Have You Known You Needed The Posterboard?” (Salmon.)  My point is that sometimes no matter how organized I am about meal planning and how good my intentions are, life can get in the way.

But in this case, desperate times do not call for desperate measures, nor do they call for take-out.  They call for Plan B recipes!  The other night I had every intention of making salmon in parchment, which isn’t brain surgery, but takes a few minutes.  Things were not going my way — a conference call rescheduled for later in the day; a canceled carpool forcing me to do an extra pick-up; and hitting every single red light possible on the way home.  I would normally just make everyone eat a little later, but Daughter #2 was starting a music class and she had somewhere to be pronto.  Parchment was not happening, but I always have time to rub a few spices mixed with salt and pepper on some fish and cook it for 7 minutes.

Spice-Rubbed Salmon | Pamela Salzman

The combination of the earthy cumin, sweet cinnamon and slightly spicy chili powder is really tasty and not one flavor dominates, so do not fear that the chili powder will make it spicy.  Mr. Picky does not like spicy at all and he does like this salmon, as does Daughter #1.  Hubby is still “allergic” to salmon, so I made him a piece of spice-rubbed halibut instead.  What’s nice about these spices is that they don’t confine you to one particular cuisine.  I have served this with cauliflower and pomegranate salad, roasted root vegetables, a dozen different rice pilafs, tortilla soup and so on.  What’s nice is that you feel like you’re eating something more special than just a plain piece of fish.

Spice-Rubbed Salmon | Pamela Salzman

Speaking of fish, I am rather particular about salmon.  In my opinion, wild is really the only way to go.  I am hooked (pun not intentional) on Vital Choice wild salmon, which we eat about 3-4 times a month.  I believe the data that most Americans are lacking in Omega-3 fatty acids, or at least have a whacked out balance of Omega-6s and Omega-3s.  Wild salmon is one of the best and most realistic (my kids aren’t going for herring anytime soon) sources of Omega-3s, which are anti-inflammatory and super critical for brain and cardiovascular health.  Kind of sounding like anything with salmon should be called “Plan A.”

Spice-Rubbed Salmon | Pamela Salzman

5.0 from 5 reviews
Spice-Rubbed Wild Salmon
Author: 
Serves: 4-6 (depending on how large your salmon fillets are)
 
Ingredients
  • 1 teaspoon chili powder
  • ¼ teaspoon ground cumin
  • ⅛ teaspoon ground cinnamon
  • ½ teaspoon fine grain sea salt
  • a few grinds of black pepper
  • 24-ounce side of wild salmon or equivalent amount of fillets
  • 2 Tablespoons ghee or unrefined coconut oil (or olive oil, but doesn’t hold up to heat as well)
Instructions
  1. In a very small bowl, stir together the chili powder, cumin, cinnamon, salt and pepper. Place the side of salmon on a cutting board, skin side down. Pat fish dry with a paper towel. Rub the spice mixture evenly over the top of the fish. Cut into 4 or 5 (or 6) individual servings (if using 24-ounce side). If you have time, allow the fish to sit coated with the spices for 15 minutes at room temperature.
  2. Heat a large skillet over medium-high heat. Add the ghee or coconut oil. When the oil is hot, but not smoking, place the salmon spice-side down in the skillet. Sear for 3 minutes.
  3. Turn all the pieces over and cook for an additional 3-4 minutes. Do not overcook! Serve immediately.
Notes
If you are using a salmon that is thicker than wild sockeye, you may need to finish it off in a 350 oven for about 6 minutes. You want the fish to get to the point where it starts to flake with a fork, but is still slightly rare in the center – it will keep cooking off the heat.


Broccoli Crunch Salad Recipe

Do you ever get in a rut with a particular food?  I am ever so grateful that everyone in my house likes broccoli, which is one of the most nutritious foods out there, but I get a little bored with broccoli with garlic and oil, broccoli with lemon and parmesan cheese or sesame-ginger broccoli.  I have even pureed it in a food processor with butter and salt — oh, we should make that together some time! — but I have a new fun recipe for you.  I am really digging this Broccoli Crunch Salad.  It’s based on a salad I saw in the prepared food case at Whole Foods, but I think it’s better.

Broccoli is in season all year here in California, and I have made this salad to accompany lots of different dishes.  In the summer it goes really well with anything spicy or slathered with barbeque sauce.  I also love it as a quick do-ahead salad to go with Saturday sandwiches in the fall when we’re all rushing around.  The other night we had a bunch of people over to break the fast (what fast?).  Even though I made a few casseroles, Swiss chard frittata in a sheet pan, tuna salad and a green salad, my husband still likes the traditional bagel and deli platter.  Yom Kippur comes once a year and the poor guy doesn’t eat for 24 hours.  I’ll give him a bagel.  But you know how I feel about coleslaw, and I just can’t bring myself to go there so I made this broccoli salad instead.  Crunchy, tangy with a little sweet.  Everyone loved it, or maybe they were just starving.

I have seen lots of broccoli salad recipes that call for completely raw broccoli and although it’s way easier to skip the steaming step, I’m just not a fan.  First of all, raw broccoli is a tad hard to digest for many people and I actually prefer the sweeter taste of it lightly steamed.  But this is called Broccoli Crunch Salad for a reason, so you need to follow the recipe and only steam it for 60 seconds.  The crunch in the broccoli, plus the crunch in the apples and walnuts is entirely addictive.  I will admit, Mr. Picky has yet to try anything with dressing, so I saved some broccoli, apples, walnuts and dried fruit for him on the side and he gobbled it up.  I’m so flexible, aren’t I?  You can be flexible, too, with this salad.  Use sunflower seeds or cashews for the walnuts, any kind of dried fruit, and I surmise you can even use shredded cabbage for the broccoli, but it wouldn’t be a Broccoli Crunch Salad,  now would it?  Just don’t be calling it coleslaw.

5.0 from 1 reviews
Broccoli Crunch Salad
Author: 
Serves: 4-5 (the salad in the photo was tripled)
 
Ingredients
  • ¾ pound broccoli crowns, cut into small bite-size florets and stems diced, about 5 cups
  • 1 crisp apple, cored and diced*
  • ⅓ cup unsulphured currants, dried blueberries or dried cranberries
  • ⅓ cup chopped raw walnuts
  • ¼ cup finely diced red onion
  • Dressing:
  • ½ cup whole, unsweetened plain yogurt
  • 1 ½ Tablespoons tahini (sesame paste) (I would imagine raw almond butter would work, too.)
  • 2-3 Tablespoons 100% pure maple syrup
  • ¼ cup apple cider vinegar, preferably unpasteurized
  • 1 teaspoon coarsely ground black pepper
Instructions
  1. In a saucepan with a steamer insert, bring a few inches of water to a boil. Place the broccoli on the steamer basket and cover with the lid. Steam for 1 minute. Transfer broccoli to a large plate in a single layer and allow to cool.
  2. In a large bowl toss together broccoli, apples, currants, nuts and red onion.
  3. In a small bowl whisk together dressing ingredients. Taste and add more maple syrup if you like the dressing sweeter. Pour over broccoli mixture and toss until broccoli is well coated.
  4. Let sit for 30 minutes so that broccoli can absorb some of the dressing.
Notes
*If prepping the apples in advance, let the apples sit in a bowl of water with a good squeeze of lemon juice.

This can be made with raw broccoli, too.