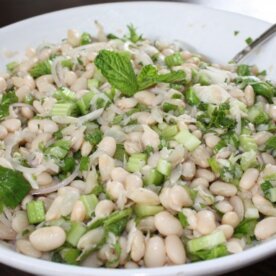
White bean salad with celery and mint (and sometimes tuna)

Happy summer!  I really can’t believe it’s here, but I am just thrilled to bits.  Even though I still teach during the summer, I find that my schedule with the kids is a little easier and frees me up to spend a bit more time cooking.  The ironic thing is that during the summer, we don’t need to “cook” as much.  The weather is warmer and our bodies can tolerate more raw or lightly cooked foods.  But this has to be my favorite season for just the sheer bounty of vegetables and fruits available.  You can find me literally bouncing around the farmer’s markets in the summer overbuying berries and stone fruits, corn, eggplant, greens and tomatoes.  This past Saturday I bought a bushel of mint that was so gorgeous and fragrant, I couldn’t resist.  But I should have since already I GROW mint on my patio.

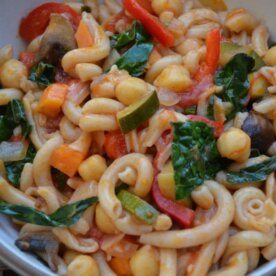
I also love summer since we entertain much more frequently and it’s a wonderful chance to catch up with friends.  I enjoyed a little quiet time this morning planning some weekend meals with guests in mind.  I have several new recipes I’ll be trying out, like chicken and vegetable kabobs with chimichurri sauce, black bean burgers with a smoky red pepper spread, and cantaloupe and cucumber salad.  I’m hoping they get the thumbs-up and I’ll post them before the end of the season.  Also, the kids and I have been having fun dipping big chunks of peeled ripe bananas into melted dark chocolate and freezing them.  But in as much as I get excited about experimenting, I also love my favorite stand-bys.

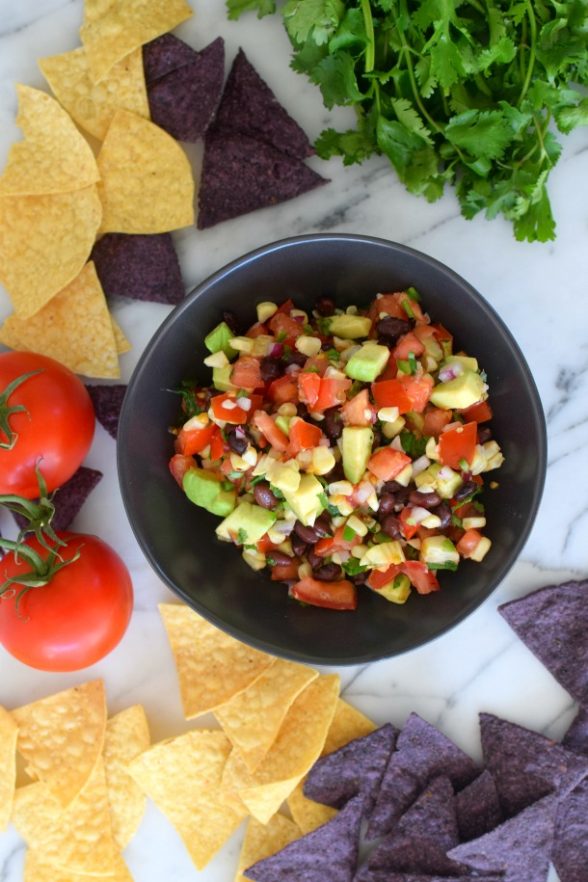
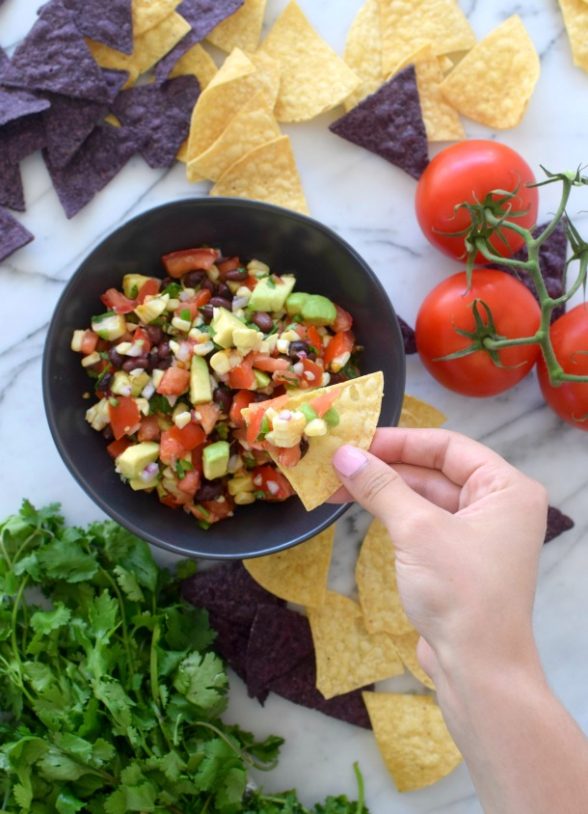
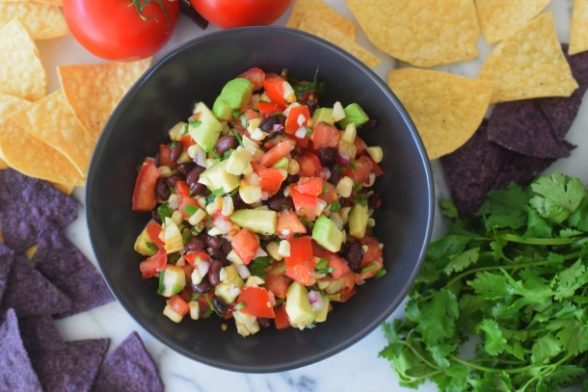
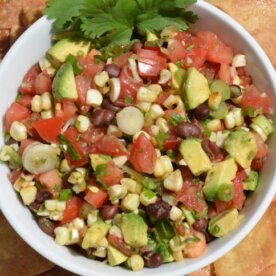
One of my regular dishes in the summer is this white bean, celery and mint salad.  By now you know I have a thing for creamy and crunchy together and I clearly have no self-control when a healthy bunch of mint seduces me.  On a beach day, I like to put the fixings out for a make-your-own sandwich bar.   Whether we choose to eat a quick bite at home or pack the sandwiches to go, this bean salad is always the perfect side to chicken salad, grilled vegetables or a humble turkey on wheat.  It is a great salad to bring on a picnic since the beans and celery don’t suffer after sitting in dressing for hours.  But the recipe is so easy that you might find yourself at home for lunch one day and decide that you can pull a beautiful healthful salad together with that can of white beans in your pantry and a simple vinaigrette.

Beans are a great source of inexpensive, low-fat protein and contain a ton of soluble fiber — so great for helping balance the LDL and HDL levels.  I am pretty good about planning meals in advance, so I will usually soak dried beans and make them from scratch, but opening up a can of Eden Organic beans is just fine, although a tad more expensive.  Sometimes I add canned tuna to this salad and you really need nothing more, although my girls love to take crusty bread and scoop up the salad and eat it that way.  Now would be a good time to mention that I dread BPA, which is a plastic and resin ingredient found in the linings of most cans, as well as water bottles and is associated with several health problems including breast cancer and infertility.  Thankfully, Eden Organics and Vital Choice Seafood do not use BPA in their can liners.

Please stop in again for more fresh, healthful and seasonal recipes to share with family and friends.  I’m looking forward to a great summer!


5.0 from 1 reviews
White Bean Salad with Celery and Mint (and Sometimes Tuna)
Author: 
 
Ingredients
  • 1 pound dried Great Northern or cannellini beans*
  • 1 medium onion, quartered
  • 1 stalk celery, quartered
  • 1 clove garlic, crushed
  • 1 2-inch piece kombu (if you have it)**
  • 1 Tablespoon kosher salt
  • Dressing:
  • ¾ cup unrefined, cold-pressed extra-virgin olive oil
  • ¼ cup raw apple cider vinegar, preferably unpasteurized
  • ½ teaspoon raw honey
  • 1 clove garlic, crushed
  • 1 teaspoon sea salt
  • ½ teaspoon freshly ground pepper
  • 1 ½ cups chopped celery
  • 1 shallot, cut into thin half-moon slices ar ½ red onion, small dice
  • 1 ½ cups loosely packed mint leaves, chopped
  • 1 7-ounces can albacore tuna packed in oil or water (optional), flaked
Instructions
  1. Rinse the beans and pick over for small stones or debris. Soak the beans in cold water overnight with a 2-inch piece of kombu.
  2. Discard the soaking liquid, and place the beans and the other ingredients for cooking them in a 6-quart pot. Add enough cold water to fill the pot half full. Bring to a boil. Simmer 1 to 1 ½ hours, until the beans are tender. Turn off the heat, add the tablespoon of kosher salt and allow to cool in the cooking liquid. Drain and discard the cooking liquid, onion, celery and kombu.
  3. Whisk the dressing ingredients in a small bowl until emulsified.
  4. To make the salad, transfer the cooked beans to a serving bowl. Add the celery, sliced shallot, fresh mint and (optional tuna.) Pour the dressing over the beans and toss to blend. Serve at room temperature.
Notes
*Or you can use 6 cups drained and rinsed canned beans, approximately 3 or 4 cans.

** Kombu is a seaweed which helps tenderize the beans and make them more digestible. If you also cook the beans with the kombu, it adds alkalinity. I buy Eden kombu at Whole Foods or from amazon.com


white bean salad with celery and mint (and sometimes tuna)

serves 8


1 pound dried Great Northern or cannellini beans*

1 medium onion, quartered

1 stalk celery, quartered

1 clove garlic, crushed

1 2-inch piece kombu (if you have it)**

1 Tablespoon kosher salt


Dressing:

¾ cup unrefined, cold-pressed extra-virgin olive oil

¼ cup raw apple cider vinegar, preferably unpasteurized

½ teaspoon raw honey

1 clove garlic, crushed

1 teaspoon sea salt

½ teaspoon freshly ground pepper


1 ½ cups chopped celery

1 shallot, cut into thin half-moon slices ar ½ red onion, small dice

1 ½ cups loosely packed mint leaves, chopped

1 7-ounces can albacore tuna packed in oil or water (optional), flaked

  1. Rinse the beans and pick over for small stones or debris.  Soak the beans in cold water overnight with a 2-inch piece of kombu.
  2. Discard the soaking liquid, and place the beans and the other ingredients for cooking them in a 6-quart pot.  Add enough cold water to fill the pot half full.  Bring to a boil.  Simmer 1 to 1 ½ hours, until the beans are tender.  Turn off the heat, add the tablespoon of kosher salt and allow to cool in the cooking liquid.  Drain and discard the cooking liquid, onion, celery and kombu.
  3. Whisk the dressing ingredients in a small bowl until emulsified.
  4. To make the salad, transfer the cooked beans to a serving bowl.  Add the celery, sliced shallot, fresh mint and (optional tuna.)  Pour the dressing over the beans and toss to blend.  Serve at room temperature.


*Or you can use 6 cups drained and rinsed canned beans, approximately 3 or 4 cans.

** Kombu is a seaweed which helps tenderize the beans and make them more digestible.  If you also cook the beans with the kombu, it adds alkalinity.  I buy Eden kombu at Whole Foods or from amazon.com


Grilled corn and black bean salsa

Grilled Corn and Black Bean Salsa | Pamela Salzman

Grilled Corn and Black Bean Salsa | Pamela Salzman

I live in Southern California, where the seasons are like salsas, mild or hot.  No one is complaining here.  I love living in a place where the weather doesn’t pose a challenge — isn’t life challenging enough?  But I grew up in New York, the land of can’t-catch-a-freakin’-break weather, where you must pray to the weather gods if you are brave enough to plan an outdoor event and where you learn to expect the unexpected, like snow in April.  This I do not miss.  BUT I love an East Coast summer.  When I was a kid, summer was party, a time to celebrate and take advantage of the brief window of enjoyable weather.  You could actually feel the change in people’s energy.  Not here.  Summer in So Cal?  Oh, it’s just more of the same old, same old.  72 and sunny today?  What a shocker!

Grilled Corn and Black Bean Salsa | Pamela Salzman

Well you know what they say — you can take the girl out of New York…….  With Memorial Day around the corner, I still get excited for the start of “the season.”  I am ready for the unofficial start of summer, which begins Memorial Day weekend and ends on Labor Day.  So this weekend I am ready to party! (in my own way, of course.)  No same old, same old here.  It’s funny that I mentioned salsa earlier, because that’s just what I’m going to change up a bit.  Instead of the expected pico de gallo, which is just a fresh tomato salsa, I’m making my favorite grilled corn and black bean salsa with baked tortilla chips.  I take smoky grilled corn mixed with creamy black beans and avocado to take salsa to the next level.

What I love about this good-for-you nosh is that it’s not just for chips.  You’re better off with big sticks of jicama to scoop up the dip.  Or we had it last night over some grilled wild salmon that I had bathed at room temperature with equal parts lime juice and olive oil and sprinkled with sea salt and pepper.  It’s one of my favorite light, but super flavorful meals.  You’re not much for chopping?  No problem.  Go buy a high quality pico de gallo (made from fresh tomatoes and not containing garlic powder, citric acid and other things that have no business being in salsa), and mix in some black beans, grilled corn and diced avocado.  It’s like Semi-Homemade with Pamela and not a boxed cake mix in sight!

No fresh corn yet where you live?  Awww, too bad.  You must not live in Southern California.

Have a terrific weekend and safe grilling!

Grilled Corn and Black Bean Salsa
Author: 
Serves: makes about 3 cups
 
Ingredients
  • 1 ear of corn
  • 2 large ripe tomatoes, diced
  • ½ cup cooked black beans
  • ¼ cup diced red onion or 2 scallions, white and light green parts thinly sliced
  • 1 jalapeno pepper, seeded and minced or a few dashes of hot sauce to taste
  • 1 clove garlic, minced
  • 2 Tablespoons chopped fresh cilantro
  • 2 Tablespoons fresh lime juice
  • 1 teaspoon sea salt plus more to taste
  • 1 ripe avocado, diced
  • accompaniments: baked tortilla chips
Instructions
  1. Heat the grill to medium heat. Pull the husks back from the ear of corn and remove the silks. Replace one layer of the husks and soak the corn in cold water until the grill is ready. Place the corn directly on the grill and cook, turning every 5 minutes. Remove from the grill and cool until easy to handle.
  2. Pull all the husks back and cut the kernels off the cob. Place the corn in a serving bowl.
  3. Add the diced tomatoes, black beans, onion, jalapeno or hot sauce, garlic, cilantro, 1 Tablespoon lime juice and salt. Toss to combine.
  4. In a small bowl, mix the diced avocado and remaining Tablespoon of lime juice. Add to the salsa and combine gently. Cover and refrigerate until ready to serve. If you are preparing this several hours in advance, place in the smallest container that will fit the salsa.

Pantry pasta recipe

My father called me the other day.  My father never calls.  He always jumps on the phone when I’m speaking with my mother, but he is not in a habit of actually dialing my number unless there is something that is nagging him.  “I have looked at your website, and I want to ask you a question.”  Here it comes.  “I think you do not have enough Italian food represented.  You are Italian!”   That’s not a question, but a partially true statement nonetheless.  I am definitely Italian (and proud of it), but I wouldn’t say the majority of the recipes on my website are Italian.  I have, however, eaten and cooked more than my share of Italian food in my life.  Growing up, we probably ate pasta four times per week with crusty bread on the side.  It’s a wonder we aren’t all gluten-intolerant!  Or are we?  Hmmm…

The food I teach in my classes is very representative of the food I make for my family and those recipes are making their way to my website.  I love Italian food and I love pasta, and a satisfying pasta dish is one I can whip up even if I have nothing more than salt, olive oil and garlic.  However I don’t consider pasta a “health food” that I want to be eating regularly.  So I have come to rely on it as a weekly lunch box staple with pesto for the girls and something to make when I need to clean out the fridge.  Very often at the end of the week and before a farmer’s market shop, I have a few stray vegetables lingering in the crisper.  Last night I found a few mushrooms, 1 1/2 zucchini, a couple of carrots, a red bell pepper and a handful of kale or chard.  When I pair these with a few pantry staples such as canned chick peas, jarred tomatoes, onion and garlic, I’ve got the makings of “Pantry Pasta!”

As you can imagine, I’ve never made Pantry Pasta the same way twice because it’s really just a way of using up what I’ve got.  But it always manages to be tasty and a more healthful way to eat pasta since the dish ends up being half veggies & beans and half pasta.  Even better is that everyone loves it, even Mr. Picky who will just pick out any color that is out of favor at the moment.  I love Pantry Pasta because I feel good that I am using my food efficiently and I can pull together an easy dinner in very little time.  Chop your vegetables first, put the pot of water on for pasta and then start sauteing the vegetables.  The key to this recipe is saving a good cup or two of the pasta cooking water just before you drain the pasta.  This is a valuable ingredient in many pasta dishes since the starchy liquid can add a nice richness for the foundation of a good sauce without having to add extra oil or cream.  When I had more time to exercise, I used to add a pat of butter to the pasta just before serving and before I had Mr. Picky, I would stir grated cheese into the pasta at the same time as the pasta water.  He claims he doesn’t like parmesan cheese.  Would it do any good if his grandfather reminded him that Mr. Picky himself is half Italian?  Of course, you can make these delicious vegetables and serve them atop cooked millet or quinoa instead of pasta.  Just don’t tell my dad.

Buon appetito!

Pantry Pasta
Author: 
Serves: 6
 
Ingredients
  • 1 pound whole wheat or other pasta of your choice
  • Kosher salt
  • 2 Tablespoons unrefined, cold-pressed extra-virgin olive oil
  • 1 onion, chopped
  • 3-4 garlic cloves, thinly sliced
  • Vegetables in the fridge, such as last night's lot:
  • 2 carrots, julienned or roughly chopped
  • a handful of mushrooms, roughly chopped
  • 1½ zucchini, roughly chopped
  • 1 sweet bell pepper, sliced
  • 6 leaves of black kale, stems removed and discarded, leaves coarsely chopped
  • Sea salt and freshly ground black pepper to taste
  • 1 jar or half a jar chopped tomatoes or whole tomatoes, chopped
  • 1 ½ cups cooked beans, such as chickpeas or Great Northern
  • A couple tablespoons chopped fresh herbs, such as basil, parsley, thyme, mint or a combination
  • Grated Pecorino-Romano or Parmigiano-Reggiano cheese
Instructions
  1. Bring a large pot of water to a boil.
  2. In the meantime, heat oil in a large skillet over medium heat. Add onion and garlic and sauté until tender and translucent. Stir in remaining prepared vegetables, except the leafy greens. Season with two pinches of sea salt and a few grinds of black pepper and sauté until just tender, about 5 minutes.
  3. To the pot of boiling water, add kosher salt and pasta. Cook pasta according to package instructions.
  4. Into the skillet pour in the chopped tomatoes and beans and simmer ten minutes. Sprinkle with another pinch of sea salt. Stir in chopped greens and fresh herbs and cook until wilted.
  5. When pasta is cooked until al dente, remove two cups of pasta cooking water and reserve. Drain the pasta and add it to the skillet with the vegetables and toss. Add enough pasta water to coat the vegetables and the pasta. Taste for seasoning and serve with grated cheese if desired.
Notes
Other additions: chopped celery, cauliflower florets, peas, chopped Swiss chard, beet greens or baby spinach leaves instead of kale

Notes: You can also add a splash of white wine to the vegetables as you are sauteing.

Do ahead: chop your vegetables in the morning and store in an airtight container in the refrigerator.

Mexican black beans from scratch recipe

Mexican Black Beans | Pamela Salzman

Mexican Black Beans | Pamela Salzman

When I am coming up with a menu for entertaining mixed company, e.g. kids and adults or carnivores and vegans, I steer most often towards Mexican food.  It is always a crowd pleaser, easy to prepare and I can very often employ a topping bar of sorts.  It is no surprise to me that my Mexican-themed cooking classes are my most popular of the year.  I always teach them in April so that my students have some fun, healthful recipes to use for Cinco de Mayo (May 5th.)   You know I am a sucker for themed family dinners on “holidays.”  That and I just don’t enjoy taking the kids to crowded, greasy Mexican restaurants on one of the busiest and most inebriated nights of the year for something I can easily make at home.

Black Beans

These versatile black beans are a staple in our house all year long.  They’re close to Frijoles Refritos, meaning “well-cooked beans” (as opposed to “twice-cooked beans,” which is what I thought it meant for years.)  But I’m not frying anything in lard or vegetable oil, instead cooking the beans with some onion, garlic, jalapeno and cilantro for great flavor.   We eat them simply over rice, wrapped in a burrito, as a side with fajitas or tacos, or with huevos rancheros.  Daughter #1 and her friends like to toast corn tortillas over the gas flame on the stove (they’re 14 years-old) and eat the beans like a dip.  They are a must with any Mexican meal.  The good news is that I can tell you how to easily make them from scratch (soaking dried beans) or from a can.  Even though I avoid canned food like the plague, you have a great option with Eden Foods which does not use BPA in its can liners.

Mexican Black Beans | Pamela Salzman

Beans are an incredible source of low-fat protein and fiber, especially soluble fiber which has been shown to help lower cholesterol and stabilize blood sugar levels.  Black, red and pinto beans are crazy high in anti-oxidants, too.   Another bonus is that they are rather inexpensive, especially if you buy them dried and cook them yourself.  1 pound of dried beans might cost you about $1.00.  One pound dried equates to approximately 3 15-ounce cans of black beans at about $2.19 per can for Eden Organic in my natural foods store (other brands are much less, but you’re also getting that pesky BPA.)  You can also buy the cans by the case from Amazon and save some money (12 cans for $16.60 at the time of this post.)  Making beans from scratch is as easy as boiling water, but you need to plan at least 6 hours in advance to soak them and an hour and a half to cook them.  Or just make a ton over the weekend and freeze them.  Love that!

Over the next week and a half, I’ll be posting some of my favorite Mexican-inspired dishes to wow your family and friends without letting your healthful eating take a siesta!

Mexican Black Beans | Pamela Salzman

5.0 from 4 reviews
Mexican Black Beans
Author: 
Serves: 6
 
Ingredients
  • 1 pound dried black beans (aka turtle beans), picked over for stones or foreign objects, and rinsed*
  • 1 (2- to 3-inch) piece kombu**(optional)
  • 2-3 Tablespoons unrefined, cold-pressed extra-virgin olive oil
  • 1 onion, finely chopped
  • 3 cloves garlic, finely chopped
  • 1 jalapeno chile, minced (take the seeds out if you want to cut the heat)
  • 1 Tablespoon sea salt or kosher salt
  • 1 Tablespoon chopped cilantro
  • Fresh lime juice (optional)
Instructions
  1. Place the beans and the kombu in a large glass bowl or pot. Add enough cold water to cover the beans by at least 3 inches. Let stand overnight or at least 6 hours. (If the weather is warm, put the beans in the refrigerator to soak.)
  2. Drain and rinse the beans, reserving the kombu. Place the beans and kombu in a large, heavy pot with enough water to cover by 3 inches. Bring to a boil over high heat, skimming the foam that rises to the top. Lower the heat to low and simmer gently, covered, for 1 hour.
  3. Heat the oil in a large, heavy-bottomed skillet over medium heat. Add the onion and garlic and sauté gently until tender, about 10 minutes. You can cover the skillet with a lid to soften the onions and garlic without allowing them to brown. Add the jalapeno and cook 1 minute, until tender.
  4. Remove the kombu from the beans and discard. Add the sautéed onion mixture, sea salt and cilantro to the beans and simmer uncovered for 30 minutes, or until very tender.
  5. Drain the beans and reserve 2 cups of cooking liquid. Pour 1 cup of liquid back into the beans and mash the beans with the back of a spoon until you have the desired consistency. Add more liquid, if necessary. Taste for seasoning and squeeze some fresh lime juice on top, if desired.
Notes
*Or you can use 3 15-ounce cans of cooked black beans, undrained. Follow along here:

Saute onion and garlic in olive oil in a medium saucepan until softened.
Add jalapeno and cook for 1 minute.
Add beans and liquid from the can (usually about ⅓ cup liquid per can) plus 2-3 teaspoons sea salt, 1 tablespoon chopped cilantro and simmer uncovered for 30 minutes.
You can serve the beans as is or I like to mash them up a bit so they’re nice and creamy. Squeeze a little lime on top if you like.
**Kombu is a sea vegetable which helps tenderize the beans and improves their digestibility. It is also rich in many vitamins and minerals.


Harira recipe

Harira (Moroccan stew with chicken, chickpeas, lentils and rice) | pamela salzman

Harira is a Moroccan stew that is traditionally served during Ramadan to break the daily fast.  In my house it is a nourishing one-pot meal that is perfect for a chilly winter evening.  I have seen many versions of recipes for Harira.  Typical ingredients include lentils, chickpeas, rice or vermicelli pasta, tomatoes, onions, fresh herbs, spices and a small amount of meat, such as lamb or beef.  I have come up with my own version that is heavier on the grains and legumes with a few handfuls of greens thrown in at the end.  This is my kind of food!

One thing I love about Harira is that it’s rich in health-supportive spices.  In our country, we tend to shy away from spices like turmeric and ginger which is such a shame, because not only are they delicious, they are incredibly healing, too.  These spices and the others used in this Harira are full of phytonutrients, as well as anti-inflammatory  and cancer-preventative compounds.  Turmeric, in particular, has been hailed as the rock-star spice of late.  You may have eaten turmeric before if you’ve had curry.  It is what gives curry powder its yellow color.  Turmeric is a very powerful liver detoxifier, it improves circulation, is anti-bacterial and to repeat myself — one of the most potent anti-inflammatory substances out there.

I have heard from some parents that they are reluctant to try new flavors at the dinner table, for fear that their kids won’t like them.  The best way I have found to introduce new spices is gradually, by adding a little here and there to foods that are already in their comfort zone, such as pasta sauce or stew.   You will be giving your family such a gift by opening them up to a whole other world of flavors and healthful foods.

For the vegetarians and vegans out there, don’t pass this recipe by.  Just use water or vegetable stock for the chicken stock and double the chickpeas.  It’s already gluten-free, in case you were wondering.  This recipe makes enough for the 5 of us for dinner, but I double it quite often to get a lunch for the girls the next day.  Whatever doesn’t get eaten will freeze beautifully.  That wedge of lemon is recommended per person to squeeze on top, and before you think it’s something you can do without, think again!  The lemon really brightens the dish and adds the perfect complement to all the earthy flavors.

Harira (Moroccan stew with chicken, chickpeas, lentils and rice) | pamela salzman

harira (Moroccan stew with chicken, chickpeas, lentils and rice) | pamela salzman


5.0 from 3 reviews
Harira
Author: 
Serves: 5-6
 
Ingredients
  • 2 Tablespoons unrefined coconut or olive oil (I use coconut)
  • 1 pound boneless, skinless chicken breast or thighs (or a combination of both), cut into 1-inch pieces
  • 1 onion, chopped
  • 1 stalk celery, chopped
  • 1 carrot, chopped
  • 1 teaspoon ground turmeric
  • ½ teaspoon ground cinnamon
  • ½ teaspoon ground ginger
  • ¼ teaspoon ground cumin
  • 4-5 grinds of black pepper
  • 1 pound fresh tomatoes, peeled, seeded and chopped OR 1 14.5 ounce can of diced tomatoes with the juice (I used ½ box of Pomi since I'm not a fan of canned tomatoes)
  • 1½ teaspoons sea salt
  • 1 cup cooked chickpeas
  • 3 cups chicken stock or vegetable stock, preferably homemade
  • ½ cup dried lentils
  • ¼ cup long-grain brown rice
  • ¼ cup chopped fresh cilantro leaves
  • ¼ cup chopped fresh parsley
  • A couple handfuls of fresh baby spinach leaves (optional, but leafy greens are your friend)
  • 1 lemon, cut into wedges
Instructions
  1. Season the chicken with sea salt and pepper as early as possible.
  2. Heat the oil in a large saucepan over medium heat. Add the chicken pieces in 2 batches and brown on both sides. Remove the chicken from the pot and set aside.
  3. Add the onion, celery and carrot and cook until softened. Add all the spices and cook for 1 minute, stirring constantly to prevent scorching. Add the tomatoes with their juice, chickpeas and 1½ teaspoons of sea salt. Cook until fragrant.
  4. Return the chicken to the pot with any accumulated juices. Add the stock, lentils and brown rice and bring to a boil. Reduce heat to low and simmer, covered for 50 minutes.
  5. Add cilantro and parsley and cook uncovered for 5 minutes or until the chickpeas are heated through. Stir in the spinach leaves, if using. Ladle into individual bowls and serve with a wedge of lemon.


Lentil and brown rice soup recipe + Instant Pot version

lentil and brown rice soup | pamela salzman
Everyone needs a lentil soup recipe in the repertoire.  This is a classic and a nourishing one at that.  I grew up on lentil soup and my mom was into creating “complete proteins” when we had a vegetarian meal.  The thought back then was that if you were eating a meatless meal, then you would need to combine certain foods to create the same complete protein profile as animal protein.   Now we know that it is not necessary to eat those complementary foods in the same dish to gain the benefits of consuming all the essential amino acids, but I still adore the combination of lentils and brown rice in my soup.

brown rice and lentil soup | pamela salzman

I prefer to use French lentils, which hold their shape much better than the flat brown ones, but really you can use what you’ve got.  I vary this soup often, sometimes adding a few chopped up green beans or a teaspoon of ground cumin for an earthy twist.  I always throw in a few handfuls of dark green leafies at the end, spinach and kale being my favorites.  And tomatoes only get to join the party if they’re in season since I almost never buy canned tomatoes (ugh, aluminum.)  Try garnishing with freshly grated pecorino-romano, it adds a great zest to the soup.

lentil and brown rice soup | pamela salzman

For you lunchbox-packers out there, lentil soup is fabulous the next day in a thermos.  And the kiddos get a lunch that will provide stable blood sugar levels, great protein for the brain, and long-lasting energy.

brown rice and lentil soup | pamela salzman

5.0 from 1 reviews
lentil and brown rice soup + Instant Pot version*
Author: 
Serves: 8
 
Ingredients
  • 3 Tablespoons unrefined, cold-pressed extra-virgin olive oil or coconut oil
  • 3 large carrots, peeled and diced
  • 3 celery stalks, diced
  • 1 large onion, diced
  • 3 cloves garlic, minced
  • 1 pound fresh tomatoes, peeled, seeded and chopped or 1 14.5-ounce can, drained ( I used ½ box Pomi)
  • 8 cups chicken stock, vegetable stock, turkey stock, or water
  • 2 cups French lentils, picked over and rinsed (you can use whatever lentils you can find, such as black or Puy, but note that cook times may vary)
  • 2 sprigs fresh thyme
  • Sea salt and freshly ground black pepper
  • 2 big handfuls spinach, kale or chard (ribs removed), coarsely chopped in large pieces
  • ½ cup brown rice, cooked according to package directions or add with lentils and increase liquid by an additional 1 cup
Instructions
  1. Heat oil in a large stock pot over medium heat. Add carrots, celery, onion and garlic and cook, stirring until tender. Stir in tomatoes and cook for a minute. Add stock, lentils, uncooked brown rice (if you’re adding it here), thyme and 2 teaspoons salt.
  2. Bring to a boil, reduce heat to a simmer and cook until lentils are tender, about 45 minutes.
  3. Pull out the thyme sprigs and discard. Add greens and stir until wilted.
  4. Season to taste with salt and pepper. If you didn’t add raw brown rice to the pot with your lentils, add the cooked brown rice to the pot now or put a little in each bowl and ladle the soup on top.
Notes
*To make in the Instant Pot:
Press the "saute" button and wait a couple minutes for the insert to heat up. Add the oil, carrots, celery, onions and garlic and saute until tender, about 5 minutes.
Add the tomatoes and cook for a minute.
Add stock, lentils (I tested with French green and black), raw brown rice, thyme and salt. Press the "Keep Warm/Cancel" button to turn the machine off. Secure the lid on top of the insert and lock closed. Make sure the vent is closed. Press manual and make sure it's on High Pressure. I cooked it for 12 minutes and thought that was perfect. The Instant Pot will take a few minutes to come up to pressure, so it will say ON for a few minutes. Once the machine is done cooking, you can manually release the pressure or opt for natural release. Check the manual for an explanation of both.