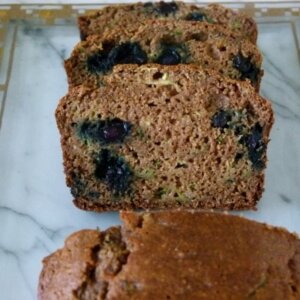
Lemon ice torte recipe

I went to my first Passover seder when I was in college in Philadelphia.  I was dating a nice Jewish boy from California who had some relatives living outside the city.  Aunt Lulu and Uncle Stanley invited us over for the holiday and I knew it was special for my boyfriend to be with family and to be able to participate in the ritual meal.  When I saw that the otherwise cantankerous Uncle Stan had a stack of food magazines, I knew we would be fast friends.  Not surprisingly, he did most of the cooking that night and he did it with love.

My first Passover meal did not disappoint.  Everything was delicious, and not just because I was a college student who wasn’t eating homemade meals very often.  I enjoyed my first brisket and charoset, the traditional chunky paste made from apples, dried fruit and nuts.  I was putting it on everything, from matzoh to asparagus (even my oatmeal the next morning.)  The showstopper was the Lemon Ice Torte that was served for dessert.  It was featured in Bon Appetit that month (April 1991) and my boyfriend went crazy for it.  The torte was an almond crust filled with a lemon sorbet and served with a strawberry-rhubarb sauce on the side.  It was simple, but delicious, refreshing and apparently a welcome change from the ubiquitous brick of a honey cake that is usually served.  I went out right away to buy a copy of the magazine (no internet yet, people) and my first springform pan so I could make it again.

I can’t find the lipstick I bought last week, but I still have the same magazine and the same pan 20 years later.  The boyfriend is still in the picture and I was lucky enough to marry him.  Every year for 20 years, I have made that lemon ice torte for Passover with the same springform pan, but every few years I have added a new twist.  I started making my own lemon sherbet when I moved to California.  Wouldn’t you with all those amazing lemons?  I dropped the layer of preserves from the original recipe and substituted fresh berries for the fruit sauce.  More recently I experimented with sucanat instead of granulated sugar and coconut oil for butter.  Sometimes, I’ll even surprise my family by filling the nut crust with homemade frozen yogurt on a day that’s not a holiday.

Uncle Stanley passed away last year, but I think he would be happy to know his grand finale that evening was the beginning of a new tradition carried on lovingly by a nice Italian girl from New York.  Although I think I can hear him saying, “what the #!@ is sucanat?!”


View this post on Instagram


A post shared by Pamela Salzman (@pamelasalzman)

To all my Jewish students and readers, have a beautiful holiday and remember ~ it’s never too late to start a tradition.

5.0 from 1 reviews
Lemon Ice Torte
Author: 
Serves: 8
 
Ingredients
  • Crust:
  • 12 ounces blanched* almonds (either slivered or whole), toasted**
  • ½ cup sucanat (dehydrated cane juice) or cane sugar (I'm sure maple sugar or coconut sugar would work, but I haven't tried them)
  • 5 Tablespoons melted unsalted butter or coconut oil
  • ¼ teaspoon ground cinnamon
  • 3 pints lemon ice (or sorbet, sherbet or frozen yogurt of your choice)
  • Fresh berries
  • __________________________
  • Lemon Sherbet (makes 6 cups):
  • 4 cups water
  • 1¾ cups granulated sugar
  • Zest of 3 lemons
  • ½ cup freshly squeezed lemon juice
  • ½ cup heavy cream
Instructions
  1. If the bottom of your springform pan is not attractive and you want to remove the torte to serve on a pretty cake dish, brush the bottom of a 9-inch-diameter springform pan with melted butter or oil. Line with parchment paper. If you don't care what the torte is served on, skip this step.
  2. To make the crust: Combine almonds and sugar in food processor and chop finely. Transfer to a medium bowl.
  3. Add melted butter or coconut oil and cinnamon to almond mixture and combine well.
  4. Transfer to the springform pan. Press almond mixture firmly 1 ½ inches up sides and over the bottom of the pan. (A metal dry measuring cup can help do this.) Freeze 15 minutes.
  5. Preheat oven to 350 degrees. Place pan with crust on cookie sheet and bake 20 minutes. If crust sides slip, press back in place with back of a fork. Transfer pan to rack and cool completely.
  6. To make lemon sherbet: combine the water, sugar and two-thirds of the lemon zest in a saucepan and heat to a simmer. Cover and simmer 10 minutes. Stir in the remaining lemon zest and lemon juice and allow to cool to room temperature.
  7. Whisk the cream into the mixture and refrigerate it until chilled, at least 2 hours.
  8. Freeze in an ice cream maker according to the manufacturer's directions.
  9. Soften lemon ice very slightly and spread over crust. Freeze until firm. When ready to serve, unmold sides of springform pan. If you lined the pan with parchment, you will be able to transfer (carefully) the torte to another serving platter. Garnish with berries on top and serve extra on the side, if desired.
Notes
*To blanche your own almonds, place raw whole almonds in a heat-proof bowl and add boiling water to cover. Let sit for 2 minutes, but not longer or they will get soggy. Drain in a colander. The skins will slip off very easily.
**To toast the almonds, place them on a cookie sheet in a 350 degree F oven until lightly golden. Toasting freshly blanched whole almonds takes longer than slivered almonds out of a bag. The process can take anywhere from 8 to 20 minutes, depending. Watch them closely! Nuts can go from toasted to burned in seconds.


lemon ice torte

adapted from Bon Appetit

serves 8

Crust

12 ounces blanched* almonds (either slivered or whole), toasted**

½ cup sucanat (dehydrated cane juice) or cane sugar (I’m sure maple sugar or coconut sugar would work, but I haven’t tried them)

5 Tablespoons melted unsalted butter or coconut oil

¼ teaspoon cinnamon

3 pints lemon ice (or sorbet, sherbet or frozen yogurt of your choice)

Fresh berries

  1. If the bottom of your springform pan is not attractive and you want to remove the torte to serve on a pretty cake dish, brush the bottom of a 9-inch-diameter springform pan with melted butter or oil.  Line with parchment paper.  If you don’t care what the torte is served on, skip this step.
  2. To make the crust:  Combine almonds and sugar in food processor and chop finely.  Transfer to a medium bowl.
  3. Add melted butter or coconut oil and cinnamon to almond mixture and combine well.
  4. Transfer to the springform pan.  Press almond mixture firmly 1 ½ inches up sides and over the bottom of the pan.  (A metal dry measuring cup can help do this.)  Freeze 15 minutes.
  5. Preheat oven to 350 degrees.   Place pan with crust on cookie sheet and bake 20 minutes.  If crust slides slip, press back in place with back of a fork.  Transfer pan to rack and cool completely.
  6. Soften lemon ice very slightly and spread over crust.  Freeze until firm.  When ready to serve, unmold sides of springform pan.  If you lined the pan with parchment, you will be able to transfer (carefully) the torte to another serving platter.  Garnish with berries on top and serve extra on the side, if desired.


*To blanche your own almonds, place raw whole almonds in a heat-proof bowl and add boiling water to cover.  Let sit for 2 minutes, but not longer or they will get soggy.  Drain in a colander.  The skins will slip off very easily.

**To toast the almonds, place them on a cookie sheet in a 350 degree oven until lightly golden.   Toasting freshly blanched whole almonds takes longer than slivered almonds out of a bag.  The process can take anywhere from 8 to 20 minutes, depending.  Watch them closely!  Nuts can go from toasted to burned in seconds.

lemon sherbet

(not dairy-free) adapted from The Silver Palate Goodtimes Cookbook

makes 6 cups

4 cups water

1 3/4 cups granulated sugar

Zest of 3 lemons

1/2 cup fresh lemon juice

1/2 cup heavy cream (I use raw cream from Organic Pastures)

  1. Combine the water, sugar and two-thirds of the lemon zest in a saucepan and heat to a simmer.  Cover and simmer 10 minutes.  Stir in the remaining lemon zest and lemon juice and allow to cool to room temperature.
  2. Whisk the cream into the mixture and refrigerate it until chilled, at least 2 hours.
  3. Freeze in an ice cream maker according the manufacturer’s directions.

Chocolate coconut macaroons recipe

Chocolate Coconut Macaroons

If I am going to eat dessert, it better be good.  It better be worth falling off the wagon for.  Usually Passover desserts do nothing to tempt me from my sugar abstinence and that’s not necessarily a bad thing.  But I cannot in good conscience be the bringer of a sticky, heavy honey nut cake or one of those Maneschewitz Passover cakes from a mix.  I want to share a dessert that I would be happy to eat any time of the year, not just on this 8-day hiatus from flour and other ingredients crucial to baking.  Enter coconut macaroons!

I have tried more coconut macaroon recipes than I care to admit (about 5 pounds worth on the hips and thighs), but this is truly the best.  This recipe is adapted slightly from pastry chef and cookbook author, David Lebovitz.  It is exactly what I want in a macaroon — toasted on the outside, dense and chewy on the inside, but not so sweet that it will make your teeth ache (probably because I cut the sugar a bit.)  I use almond meal instead of flour so that they are Passover-ready and gluten-free, because these days everyone knows someone who is not eating gluten.  I have a news flash — don’t be put off by the use of almond meal.  It’s nothing more than blanched almonds ground up (in the food processor, if you wish) to a fine meal.  My natural foods supermarket even sells almond meal in the bulk bins.

I happen to love coconut and I am a believer in all the health benefits that coconut has to offer.  It is rich in good fats, especially lauric acid which is an immune-boosting fat otherwise only found in breast milk.  The key is to start with unsweetened, shredded coconut which you can find in the bulk bins at the natural foods supermarket or in bags.  I try my hardest to use unrefined sweeteners whenever possible, but only if it makes for the best result.  In this case, granulated sugar is best here, so let’s make these cookies small, ok?

If you would like to bake these for Passover, or for your child’s mock Seder in religious school this week, then you can start cooking lickety-split.  You all know how I love a do-ahead!  You can make the macaroon batter a week ahead and keep it covered in the refrigerator or even freeze it.  The cookies can be baked a few days in advance and kept in an airtight container far away from recovering sugar addicts, especially if they’re dipped in dark chocolate.  Stay tuned for another fabulous Passover-appropriate or all-around yummy dessert later this week!

5.0 from 1 reviews
Chocolate Coconut Macaroons
Author: 
Serves: makes 30 cookies
 
Ingredients
  • 2 ½ cups unsweetened shredded coconut
  • 1 cup granulated sugar
  • 1 Tablespoon raw honey or Grade A maple syrup
  • ¼ cup almond meal or flour
  • ½ teaspoon fine grain sea salt
  • 4 large egg whites
  • ½ teaspoon vanilla extract
  • 4 ounces, bittersweet or semi-sweet chocolate, chopped (optional)
Instructions
  1. In a large skillet combine coconut, sugar, honey, almond meal, salt, and egg whites. Please do as I say and COMBINE everything BEFORE placing over heat, otherwise you will end up with a coconut frittata. I'll give you one guess how I know this. Place over medium-low heat on the stove, stirring constantly. When the mixture just begins to stick to the bottom of the pan, almost about to scorch, remove from the heat and stir in the vanilla. You are going for sticky, not dry and pasty.
  2. Transfer to a bowl to cool to room temperature. You can refrigerate the dough for up to one week or freeze up to one month.
  3. Preheat the oven to 350 degrees. Line 2 baking sheets with parchment paper or a silicone baking mat.
  4. Using a small ice cream scoop, form the dough into little mounds and space them evenly on the prepared sheet pans. Shape them into little pyramids, if desired.
  5. Bake for 18-20 minutes or until golden brown. Transfer to a cooling rack to cool completely.
  6. If desired, melt chocolate in a heat -proof bowl set over a saucepan of simmering water, aka a double boiler. Dip cooled macaroons in chocolate (wherever you like -- tops, bottoms, sides) and allow to cool completely on cooling rack or on a parchment-lined baking sheet if you dipped the bottoms. If history repeats and you need to make like an Isrealite, stick the chocolate covered macaroons in the fridge to harden the chocolate quickety-quick.
Notes
You can also add some mini-chocolate chips to the cooled macaroon batter, then shape and bake.


Swiss chard frittata recipe

Swiss Chard Frittata Recipe

The conversation went like this:  Daughter #1, “I don’t like eggs.”

Me, “Did you change your name to Sam-I-Am?  You do like eggs.”

Daughter #1, “You’re not funny.  No, I don’t.”  Me, “You like frittatas, so you like eggs.”

Daughter #1, “That’s different.”

Really?  Frittatas are basically baked omelets, usually with some vegetables and/or cheese mixed with the eggs.  Unlike many recipes where you can substitute an ingredient and still have the same basic dish, you can’t substitute anything for the eggs in a frittata because it wouldn’t be a frittata.  However, I really wasn’t going to argue with a 14 year-old about why frittatas are different from just eggs, because all I care about is that fact that she really does like them.

Eggs have been so misunderstood.  For a while there, people stopped eating eggs because it was thought the cholesterol in the yolks would cause high blood cholesterol.  Well guess what?  There’s now a strong consensus among the medical community that food containing dietary cholesterol does not have a significant impact on the blood cholesterol level of most healthy individuals.  The evidence points to saturated fat as the leading culprit, not dietary cholesterol, and eggs happen to be two-thirds unsaturated fat.  Furthermore, the yolks are rich in several important nutrients including choline (a B vitamin and key component of healthy brain cells, nerves and cell membranes), lutein (a phytonutrient which supports eye health) and iodine (important for healthy thyroid function).  Eggs are also a good source of inexpensive protein.  If you have been advised by your physician to cut back on egg yolks, get a new physician you can substitute two egg whites for every whole egg and do this for a few of the eggs.  Try to buy organic, free-range eggs whenever possible.

Frittatas are my friend.  They are versatile as a breakfast, lunch or dinner, especially during Lent.  I have even made mini-frittatas in greased muffin tins or as an hors d’oeuvre cut into bite-size pieces.  They can be served hot, room temperature, or cold.  I like them with a side salad or with a ladleful of warm tomato sauce.  The girls have taken them to school tucked inside a pita.  This frittata is one of my favorites.  It is packed with lovely Swiss chard, which is everywhere right now.  It is very typical of how I like to eat something rich like eggs, by balancing it with loads of vegetables.  I love the flavor from the raw Gruyere, but feel free to skip it if you’re dairy-free.  However, it’s only about an ounce of cheese per serving.  If I ever have any leftover turkey bacon from breakfast, I will dice that up and add it in.

Mr. Picky claims he likes neither eggs nor frittatas and I believe him, although I was THIS close to getting him to try the frittata in a warm corn tortilla, one of his favorite foods.  I’ll offer ketchup next time.  As for me, I can eat them in a house.  I can eat them with a mouse.  I can eat them here or there.  I can eat them anywhere.

5.0 from 3 reviews
Swiss Chard Frittata
Author: 
Serves: 4-6
 
Ingredients
  • 1 bunch Swiss chard
  • 2 Tablespoons cold-pressed extra-virgin olive oil or clarified butter
  • 1 medium onion, sliced thinly
  • 4 garlic cloves, chopped
  • 8 large free-range eggs
  • ⅓ pound grated gruyere, optional
  • Handful of grated Parmesan cheese
  • ¼ cup milk or water
  • Sea salt
  • Freshly ground pepper
Instructions
  1. Preheat the oven to 350 degrees.
  2. Wash the Swiss chard but do not dry all the way and chop the stems off the leaves. Coarsely chop the stems and keep separate from the leaves. Coarsely chop the leaves.
  3. Heat olive oil or clarified butter in a 10-inch oven-proof pan. Cook the onions and chard stems over medium heat for about 5 minutes. Add garlic and cook for 1 minute. Add the chard leaves and season lightly with a pinch of sea salt and pepper and sauté until wilted.
  4. Whisk eggs together and add cheeses and milk. Stir in the chard mixture and blend well.
  5. Add extra oil or butter to the pan if it seems dry. Put the egg-chard mixture back in the pan and place in the oven for about 50 minutes until puffed and golden. (If you're making minis, spoon the mixture into greased muffin tins and bake for about 25-30 minutes or until puffed and golden.)
Notes
Variations: substitute lightly steamed broccoli or sautéed spinach for the chard;

Use sautéed onions and peppers with parboiled diced potatoes for a Spanish classic;

Can add 3 ounces of diced cooked turkey bacon and/or 1 c. ricotta cheese;

Can be served with a ladleful of warm tomato sauce.


What to buy organic

My sisters and I always freaked out when we picked vegetables from the garden that came with uninvited guests.  If we saw a little green worm squirming while rinsing a head of broccoli, we would let out a scream.  My father couldn’t understand it.  “It’s either that or I use pesticides.  Why would you want to eat chemicals that are poisonous enough to kill insects?  That’s crazy!”  Decades later, my father still grows beautiful fruits and vegetables organically, that is without the use of pesticides or synthetic fetilizers, and so do I.  I also teach gardening at a local school and manage its organic garden.  Occasionally we have to share our bounty with Nature’s creatures, but at the end of the day, it’s worth it.

I have several reasons for buying as much organic food as possible.  First off, as my father said, pesticides are designed to be toxic and I am convinced of the health risks associated with consuming only conventionally-grown food especially when it comes to feeding the kids.  Second, there are a few studies demonstrating that organic food has higher levels of nutrients than non-organic.  Third, in my own non-scientific study, I think organic food actually tastes better.  Lastly, even though there are certain foods such as bananas which we don’t necessarily need to buy organic because the pesticide load is lower relatively speaking, we have to consider that the pesticides go somewhere and will affect us sooner or later.  I believe in supporting the organic industry whenever I can because I also want to promote sustainable farming practices, protect our water supply and our soil, as well as the laborers who work in the fields.

Unfortunately, organic goods usually come with a higher price tag and most people need to make choices as to what are the more important items to buy organic. Here’s my own organic buying guide to help you get the most (or fewest pesticides) for your dollar.

Butter — many toxins, including pesticides, are fat soluble and tend to concentrate in the fat of animals and humans.  Since butter is 100% fat, it is not surprising that non-organic butter can contain up to 20 times as many pesticides as non-organic vegetables.  In California, we can buy raw butter by Organic Pastures.  Otherwise, I like Straus Family Farms or Organic Valley cultured butter.

Meat and Poultry — According to Elson Haas in his book, “Staying Healthy with Nutrition,” [conventionally-raised] meat is among the most contaminated products in our food supply.  The animals are raised under inhumane and unsanitary feedlot conditions and result in very unhealthy animals treated with antibiotics, steroids and hormones.  Organic meat is free of these things, all of which can make their way into our bodies and the environment.  In addition, organic meat indicates animals which have been fed food that is pesticide-free.  To locate organic beef or poultry in your area, visit organicconsumers.org or your local farmers’ market.

Dairy Products — In general, I’m not a big fan of pasteurized milk, but I realize many of you don’t have access to or are uncomfortable with the idea of raw dairy, so if you do choose to consume dairy, please buy organic and preferably non-homogenized.  Conventional milk can contain high levels of antibiotics and hormones, as well as pesticides. Many pediatricians are concerned that these hormones could initiate early puberty, given how much milk kids drink on a daily basis.

Produce “Dirty Dozen” — According to the Environmental Working Group (EWG), the top 10 fruits and veggies with the highest pesticide load are:

  1. Celery
  2. Peaches
  3. Strawberries
  4. Apples
  5. Blueberries
  6. Nectarines
  7. Bell Peppers
  8. Spinach
  9. Kale
  10. Cherries
  11. Potatoes
  12. Grapes (imported)

Just by buying the organic versions of these fruits and vegetables will reduce your exposure by up to 90%.

Corn, Soybeans, Canola – Along with cotton, these are the largest genetically-modified crops in the America.  A genetically-modified organism, or GMO, is a food that has been spliced with the genes of another organism, like a tomato with a fish gene.  There is plenty of controversy as to whether or not GMO foods are safe especially since their effects haven’t been studied over a long period of time.  My gut tells me to stick with foods that are natural, whose DNA hasn’t been tinkered with in a lab, so I try to avoid GMO foods like the plague.   Corn, soybeans and canola labeled organic is supposed to mean that they are not only grown without pesticides, but have also NOT been genetically modified.

Peanut Products — Peanuts have a tendency to grow a toxic mold called aflatoxin, so they are very heavily sprayed.  According to the Pesticide Action Network, peanuts rank among the top 10 foods contaminated with persistent organic pollutants.  I know a lot of children who eat a lot of peanut butter.  I like the organic versions from Arrowhead Mills or Justin’s, which claims to be aflatoxin-free.

Baby Food — Babies and children eat more for their body weight than adults do and their bodies can’t process as many toxins as adults can.  Their immune and nervous systems are more vulnerable, so I wouldn’t think twice about it.  You can easily make your own organic baby food or choose from many high-quality brands.

Foods That You Consume Regularly — I think this is important for minimizing your overall exposure to chemicals.  For example, if you consume olive oil, oats, rice and bananas most days of the week, then those would be good to buy organic.

The bottom line is that we should all do the best we can to make informed choices when it comes to our well-being.  The decision to buy organic may cost a bit more, but you are making an investment in your health, that of  your family, and the environment.

Almond butter and chia seed cookie recipe

Remember the commercials for Chia Pets, the clay animals with a green furry layer of sprouted chia seeds covering their bodies?  Did your parents let you have one?  I SO wanted a chia puppy!   I can’t help but chuckle at the fact that 30 years ago chia seeds were popular as an arts and crafts project and now they are the latest super food.  Chia is giving flax and hemp a run for their money.  So what’s all the hype?  Chia seeds are a great source of Omega-3 fatty acids, contain lots of protein and fiber and are rich in antioxidants.  Unlike flaxseeds, chia seeds do not need to be ground up or soaked for you to be able to benefit nutritionally.  What’s kind of cool about chia seeds, though, is their gelatinous quality.  If you add them to a smoothie or yogurt, they swell up and thicken whatever they’re in.  My Whole Foods sells them in the bulk bins if you just want to buy a few spoonfuls and play round with them in your oatmeal or salad dressing.

But chia seeds are not in these cookies because I think they will magically turn this dessert into a healthful food — it’s still a cookie, or as my husband calls them — the “Chia Pet Cookies.”  Nutrition aside, chia seeds just add a really fun crunch, almost like a poppy seed.  You can add more crunch and texture if you like by adding finely chopped almonds, dried cranberries or chocolate chips.  No matter how you make them, these cookies are really quite tasty and a nice change from peanut butter, which Mr. Picky eats enough of.

My friend Peggy invited me to a large dinner at her house a few weeks ago and asked if I would bring a dessert.  The dinner happened to fall on a busy day for me (whom am I kidding?  Everyday is a busy day, isn’t it?), so I whipped up two batches of batter the night before and hid them in the fridge way back there so certain people who can’t keep their fingers out of raw cookie dough wouldn’t see them.  The next day while I tested someone on vocabulary words, I scooped dough onto cookie sheets and baked them off.  Everyone at the dinner asked, “what kind of cookies are these?”  “Almond butter and chia seed,” I replied.  “Like the Chia Pet??!!”  Never fails.


5.0 from 1 reviews
Almond Butter and Chia Seed Cookies
Author: 
Serves: makes 20 3½-inch cookies
 
Ingredients
  • ½ cup (1 stick) unsalted butter, softened
  • ½ cup natural cane sugar (e.g. Sucanat) or regular granulated sugar
  • ½ cup brown sugar
  • ½ cup raw, unsalted, creamy almond butter
  • 1 large egg
  • ½ teaspoon 100% pure vanilla extract
  • 1 ¼ cups whole wheat pastry flour or gluten-free oat flour*
  • ¼ cup ground almond meal (buy this already ground or make your own by processing blanched almonds in a food processor until powdery)
  • ½ teaspoon fine grain sea salt
  • ¾ teaspoon aluminum-free baking soda
  • 2 Tablespoons chia seeds (optional, but fun!)
Instructions
  1. Preheat the oven to 350 degrees. Line 2 baking sheets with parchment paper.
  2. Cream the butter, sugars and almond butter with an electric mixer until light in color, about 4 minutes. Add the egg and vanilla. Beat until well blended.
  3. In a small bowl, whisk together the flour, almond meal, sea salt, baking soda and chia seeds. Add to the mixing bowl and stir until just combined.
  4. Using a 1 ¾ -inch ice cream scooper, drop batter onto prepared pans. Press down lightly on the cookie with the tines of a fork, making criss-cross marks. Bake 14-15 minutes or until golden brown around the edges.
  5. Cool on the baking sheet for 1 minute and then transfer to a cooling rack.
Notes
To make a smaller cookie, use a 1 ¼-inch scooper and bake for 9-10 minutes.

If you like a thicker cookie, refrigerate the dough for a few hours before scooping.

*Oat flour results in a more tender, cake-ier cookie.


Orange and rosemary glazed chicken recipe

It’s not my husband’s fault he can’t find his way around the kitchen.  He grew up with a mother who is a very willing and capable cook.  She made hot breakfasts every morning and power lunches for school.  Each night she lovingly prepared a fresh, well-balanced dinner.  Then I came along.  I met my husband in college when I was 18 and I already loved cooking for people.  I remember sophomore year my husband and his roommates fasted for Yom Kippur, as in they didn’t eat for 24 hours.  Who doesn’t love cooking for people who are ravenous??  We dated and I cooked.  We married and I cooked.  We had kids and I cooked a lot, and I was happy to do it.

I had two unusual days in a row last week where I had to work past dinner time.  I verbally clued my husband in to all the dinner possibilities using staples from the pantry and the fridge.  There was pesto, poached chicken meat, enough leftover soup for two, cooked brown rice, washed salad greens and vinaigrette in a jar.   With pasta and a can of beans in the pantry, I was sure he could come up with something.  Or so I thought.

I came home from a long day last Monday night and there it was on the kitchen counter — the take-out pizza box.  Sigh.  I don’t know what I was thinking that I could expect the poor guy to throw something together after a hard day of work that he and the three kiddos would want to eat.  I’m sure no one suffered eating pizza that night, but what would he do the next day??  I knew I needed to plan for an easy dinner that everyone would like and that my husband could handle — orange and rosemary-glazed chicken.  This is one of the simplest things you can make and so delicious.  This chicken has saved my life on busy weeknights and has delighted dinner guests alike.  Just marinate the chicken in a few ingredients ahead of time and pour everything into a casserole dish and bake.

I use all-fruit orange or kumquat preserves in the marinade, but I have used apricot, too.  Just make sure it’s all fruit without the addition of any sugar.  The preserves will be sweet enough.  I love rosemary with orange and with chicken, and I happen to have an out-of-control rosemary bush on my front lawn so I never have enough uses for it.  If you don’t have rosemary, thyme works well here, too.  The best part of this dish is the yummy, glaze-y sauce which we spoon over the chicken on the plate, but doesn’t get wasted if you serve this with something like rice or millet to sop it up.  With some steamed or roasted asparagus or sauteed spinach, someone looks like he knows a little something about something.  My hero.


View this post on Instagram


A post shared by Pamela Salzman (@pamelasalzman)


5.0 from 7 reviews
Orange and Rosemary Glazed Chicken
Author: 
Serves: 6
 
Ingredients
  • 2 ½ - 3 pounds bone-in, skin-on chicken pieces* (breasts cut in half), seasoned with 1 ½ teaspoons sea salt or kosher salt as soon as you get home from the market
  • 8 ounces all-fruit orange, kumquat, apricot or peach marmalade, about ¾ cup (such as St. Dalfour or Sorrell Ridge)
  • 1 ½ Tablespoons whole grain or stone-ground mustard
  • 2 Tablespoons shoyu or wheat-free tamari (or coconut aminos)
  • 2 Tablespoons unsalted butter, melted (or plant butter)
  • 2 Tablespoons finely chopped fresh rosemary (or fresh thyme leaves)
  • ½ teaspoon freshly ground black pepper
Instructions
  1. Combine orange marmalade, mustard, shoyu, melted butter, rosemary, and pepper in a glass or nonreactive container that is just big enough to hold the chicken. Add the chicken to the marinade and coat each piece well. Cover and refrigerate for 6-8 hours, or longer if that’s more convenient.
  2. Remove chicken from the refrigerator and preheat the oven to 400 degrees. If you’re not in a rush, allow the chicken to sit out at room temperature for 30 minutes. Transfer the chicken pieces and any marinade to a baking dish, such as a 13 x 9 - inch. Bake for 45 minutes or until cooked through and browned on top. Remove from the oven and allow to sit for 10 minutes before serving, if possible.
Notes
*such as 2 breasts cut in half and 2 drumsticks


Spring green cleaning and a sesame spinach salad recipe

Spring Green Cleaning and a Sesame Spinach Salad Recipe | Pamela Salzman

Spring Green Cleaning and a Sesame Spinach Salad Recipe | Pamela Salzman

Did you miss the January 1st detox craze?  While your friends downed maple syrup and cayenne pepper smoothies, were you cozying up to a bowl of chicken and vegetable stew?  How smart you are!  The winter is not the ideal time to detox.  Granted, if you were overindulging on alcohol, sweets and late night snacks during the holidays, going back to a more normal diet would have been a good idea.  But winter is our time to keep warm and insulated by eating warming foods and hunkered down at home to replenish our energy reserves.

The good news is that the time to start fresh is Springtime.  The energy is ascending from the ground and coming alive.  Now would be a good time to do a little physical spring cleaning, but you don’t necessarily need to go on a liquid diet to do that.  How timely that what is bountiful in the garden right now are nature’s natural detoxifiers — greens!  I always say that if you can eat seasonally and locally grown food, you don’t even need to know why it’s good for you.  Nature gives us just what we need at just the right time.  Dark green leafy vegetables are loaded with chlorophyll which helps to protect the liver and eliminate toxins from the body.  Leafy greens, especially watercress and arugula, can be slightly diuretic and help the liver flush out those toxins, but build strength in the blood with their high mineral content.

Spring Green Cleaning and a Sesame Spinach Salad Recipe | Pamela Salzman

It’s always important to keep dark green vegetables in regular rotation in the diet whether in juices, salads, lightly sauteed or in soups and stews.  At the moment, I am juicing kale and parsley with carrots, apple, lemon, ginger and celery.  Delish!   You can try adding greens to soups — try my Mushroom-Barley Soup with Kale or Vegetable Chili with Swiss Chard or lightly cooked, such the Braised Collards and Cannellinis.  Salads are an easy and familiar way to eat greens.  The Raw Kale Salad with Citrus Vinaigrette is always a winner, especially with the lemon juice in the dressing which helps convert toxins into their water-soluble form so they are easily flushed from the system.  Or try my favorite everyday salad dressing with lemon juice.

Today I’ll offer a new recipe for Sesame Spinach Salad which is one of the most delicious and easy salads you will ever love.  My farmer’s market sells pre-washed baby spinach so you really have no excuse not to make this.  Today I made it plain and simple with a couple handfuls of mung beans sprouts I found at the farmer’s market, but really you can add a zillion different things that would be great — grated carrots, thinly sliced red pepper, blanched broccoli florets, rehydrated seaweed, poached chicken, you get my drift?  A zillion things.   Make the dressing days in advance if you want.  No excuses.

Spring Green Cleaning and a Sesame Spinach Salad Recipe | Pamela Salzman

Sesame Spinach Salad
Author: 
 
Ingredients
  • 3 Tablespoons sesame seeds, toasted
  • ½ pound fresh baby spinach leaves, washed and dried
  • 2 handfuls bean sprouts (such as mung bean sprouts)
  • DRESSING:
  • 3 Tablespoons unrefined extra virgin olive oil (can substitute up to half flax seed oil)
  • 1 Tablespoon unrefined toasted sesame oil (dark)
  • 1 Tablespoon unseasoned rice vinegar
  • ¼ - ½ teaspoon of fine grain sea salt
  • a couple grinds of black pepper
Instructions
  1. Place the spinach leaves, toasted sesame seeds and the bean sprouts in a large salad bowl or serving platter.
  2. Place all the dressing ingredients in a small bowl and whisk until emulsified or place them in a screw-top jar and shake vigorously.
  3. Dress the salad to coat lightly. Taste for seasoning.
Notes
This is a basic recipe that can be adapted in terms of what is added to the salad. Feel free to add julienned carrots, sweet bell pepper, grilled shrimp, blanched broccoli, cooked soybeans etc. Depending on how much you add, you may need to increase the amount of dressing you make.


Spring Green Cleaning and a Sesame Spinach Salad Recipe | Pamela Salzman

Artichoke and spinach barley “risotto” recipe

Artichoke and Spinach Barley "Risotto" | Pamela Salzman

Artichoke and Spinach Barley "Risotto" | Pamela Salzman

When I invited some friends over for dinner last Friday night, it seemed like a great idea.  After I finished teaching a class and picking up the kids from school, I would have a few hours to get the house organized and prepare a proper meal before our guests arrived at 6:30.  You know what they say about best laid plans.  My husband didn’t make it home in time to take Mr. Picky to baseball practice.  My girls each needed a ride here and there and then baseball practice was cut short because it was too dark to see the ball.  So my uninterrupted time in the kitchen turned into Pamela’s taxi service.  Has this ever happened to you?

It’s a very good thing that barley risotto was on the menu.  Traditional risotto is one of my favorite comfort foods, but it definitely requires a bit of babysitting.  Maybe I had a hunch that Friday would not be the night to stir a pot of rice on and off for 20 minutes, because I planned for a version of risotto which I could pop in the oven and say “see ya later.”  Barley takes the place of the classic arborio rice in this dish.  Like arborio rice, barley releases that nice starchiness which is essential to make the risotto creamy and rich.  Barley also packs a nice bit of protein and soluble fiber, which helps reduce cholesterol levels and support digestive health, but is missing from white rice.  Unfortunately, barley does contain gluten and is not appropriate for people who are gluten-intolerant.

This risotto almost parallels nature’s transition from winter to spring.  It is hearty with the barley being a bit nutty and chewy, but the leeks, artichokes and lemon help keep everything tasting light and fresh.  I am a huge fan of leeks and how grassy and mild they taste.  If you don’t have leeks, feel free to use shallots or onions.  I am not embarrassed to admit that I don’t enjoy trimming artichokes, so I keep frozen or water-packed artichoke hearts in the kitchen at all times.  Or adapt your favorite risotto recipe to use barley instead.

There’s something about risotto which is like a warm blanket, encouraging you to slow down and relax for a bit.  After a long week and a busy afternoon of shuttling children to and fro, it was so nice to sit down to a civilized dinner with friends.  It didn’t even matter that the house never got organized.

Artichoke and Spinach Barley "Risotto" | Pamela Salzman

5.0 from 1 reviews
Artichoke and Spinach Barley "Risotto"
Author: 
Serves: 6 as a side dish
 
Ingredients
  • 3 Tablespoons unsalted butter
  • 2 cups thinly sliced leeks, white and green parts (about 2 medium leeks), washed well
  • 2 garlic cloves, minced
  • Sea salt
  • 1 cup barley, semi-pearled or hulled (do NOT rinse)
  • Zest and juice of 1 lemon
  • ½ cup dry white wine
  • 3 ½ cups chicken stock or vegetable stock, preferably homemade
  • 6 oz. artichoke hearts (frozen or water-packed is fine), quartered
  • ½ cup grated Parmesan or Pecorino-Romano cheese or to taste
  • Freshly ground black pepper
  • 2 large handfuls of spinach
Instructions
  1. Preheat the oven to 350 degrees.
  2. In a medium ovenproof pot or Dutch oven, melt 2 Tablespoons of the butter over medium heat. Add the leeks and sprinkle with sea salt. Sauté until softened, about 5 minutes. Stir in the garlic and cook for another minute. Add the barley and the lemon zest and stir to combine. Add the wine, raise the heat, and simmer, uncovered, until the wine has evaporated, about 5 minutes.
  3. Add all the stock, the artichokes and 1 teaspoon sea salt (add more to taste if your stock is unsalted), and bring to a boil.
  4. Cover the pot with a lid and transfer it to the oven. Say "see ya later!" Bake for about 1 hour, until the barley is tender and most of the liquid is absorbed.
  5. Remove the pot from the oven and uncover it. If it seems too liquidy, place over low heat and simmer a couple of minutes to reduce the liquid to your liking. I like it it a little looser than a pilaf. Otherwise, stir in the Parmesan, 1 Tablespoon butter, lemon juice, black pepper to taste and the raw spinach. Taste for seasoning and serve immediately. To reheat leftovers, add a little hot water in a saucepan or add enough stock to change it into a soup.


Artichoke and Spinach Barley "Risotto" | Pamela Salzman