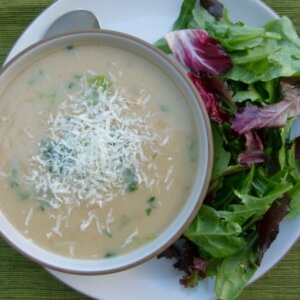
Potato and bean soup (patate e fagioli)


Who invented the idea of “Meatless Monday?” The U.S. Food Administration did during World War I and urged families to conserve key staples to aid the war effort, but the idea was revived in 2003 by an ad exec-turned health advocate for dietary and environmental reasons. Ironically, the Food Administration also tried to promote “Wheatless Wednesday” during WWI, which I would love to see make a comeback. But I have a feeling you won’t see the US government advocating abstaining from any big political donors major food industries anymore. However if you ask my sisters and me who invented “Meatless Monday,” we would tell you with conviction that it was our mother. Vegetarian dinners on Mondays were a part of my life growing up. I loved them since I was a vegetarian from about the age of 10 to 18. But believe me, my mother was not trying to cater to me at all. Her thought was that we tended to indulge over the weekend with heavy meals, usually centered on lots of pasta, meat and cheese and that we needed a break. My sisters, who were most definitely NOT vegetarians called it “Low Budget Night,” since Monday’s dinners tended to be less expensive and less fancy.

Beans or lentils were almost always the star of the show on Mondays and they usually found their way into a soup. This potato and white bean soup is just a take on a traditional pasta and bean soup or “pasta e fagioli,” as you might see it on a menu. I love that potatoes, a whole food, take the place of pasta, which is a (processed) food I eat very occasionally. The recipe requires so few ingredients, many of which you probably have in your pantry. And if you make your beans from scratch, this soup will cost you practically nothing. The potatoes and beans both add a rich creaminess to the soup, as well as work together to form a complete protein. Even though beans are typically bland, this soup has a nice, almost smoky flavor and feels very satisfying despite the lack of fat. A typical Monday dinner would be a nice big bowl of this soup with a side of sauteed greens or a salad and some crusty bread. Sometimes my parents would also add a wedge of good cheese (that my father smuggled in his suitcase from Italy) to the table and that was that.

My husband grew up with neither Meatless Mondays nor Meatless Any Days, so getting him to buy into a dinner of potato and bean soup took some time. Now he loves it and especially how it makes him feel afterwards (“not gross”). Lest anyone feel cheated, I happily serve both a salad and some roasted vegetables on the side. All my kids, Mr. Picky included, love this soup. It’s white! What kids don’t like white food? Of course, I can’t help but stir in some escarole in at the end. You know me and my greens. They’re going to save your life, so I’ll find anyway to include them that I can. If your local market doesn’t carry escarole, feel free to add some spinach, arugula or chard. I always plan to have extra soup for thermoses in the next day’s lunch boxes, which works out perfectly for “Trash-free Tuesday” at our school!

Have you made any new year’s resolutions? I’ve been contemplating a few, but what tends to work better for me are measurable resolutions, such as “cook dinner five nights a week” or “do yoga every Sunday.” I’ve never had luck with “eat better” or “exercise more.” Most people tend to come up with resolutions about diet and health, but they’re usually about short term weight loss or feeling better after 6 weeks of holiday overindulgence. I think “Meatless Mondays” is an easy one to try and it doesn’t mean you’re becoming a vegetarian or a vegan, not that there’s anything wrong with that. It just means a commitment to eating more plant-based foods and acknowledging the heavy environmental footprint of raising animals in this country. Just a thought.

Talk to me here — am I the only one who grew up with Meatless Mondays? Does your family currently partake? I need some inspiration for my new year’s resolutions — feed me! Or just make this soup. Here’s to a happy and healthy 2012!
Potato and Bean Soup (Patate e Fagioli)
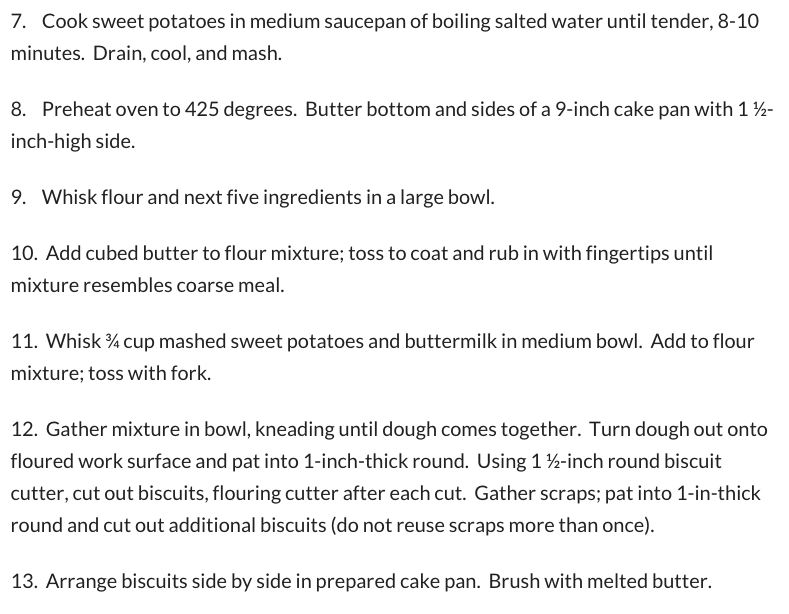
Ingredients
- 1 pound dried white beans such as Great Northern or cannellini, about 2 ½ cups*
- 1 2-3 inch piece of kombu optional
- 2 Tablespoons unrefined cold-pressed extra-virgin olive oil
- 1 large onion halved and thinly sliced
- 4 large garlic cloves thinly sliced
- 8 cups chicken stock vegetable stock or water
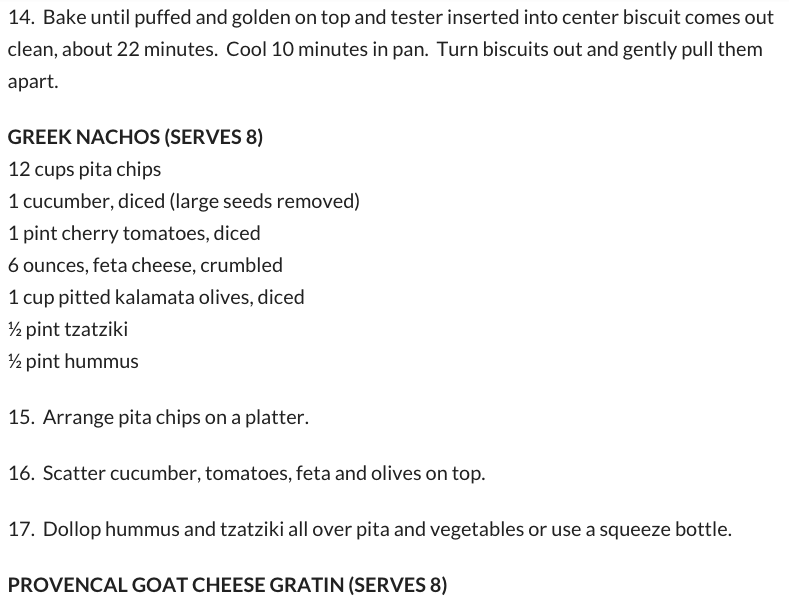
- 1 pound Yukon Gold potatoes or other boiling potato, cubed
- 1 6- inch sprig of fresh rosemary optional, I like it just as much without
- 3-4 teaspoons sea salt depending on saltiness of the stock
- 1 head escarole leaves coarsely chopped
- Grated Pecorino-Romano or Parmesan cheese for serving if desired
Instructions
- Wash beans well and pick over for stones and debris. Soak beans with kombu in plenty of fresh cold water overnight or at least 6 hours. This can be done in a covered container or in a pot (I use the same pot for soaking as for cooking the soup) on a countertop. Refrigerate if your kitchen is warm.
- Just before you begin cooking, drain the beans into a colander. Heat the oil over medium heat in a large heavy-bottomed pot, and add the onion and garlic. Cook until softened, about 8-10 minutes.
- Add the beans and stock to the pot and raise the heat to high. You can add the kombu to the pot, if you like for additional alkalinity. Bring soup to a boil, cover, then lower to a simmer. Cook for 1 hour.
- Add the potato, sea salt and (optional) rosemary. Cover and simmer for 30 minutes. Test the beans for tenderness. If they’re not done, continue to simmer until they’re tender. Once beans are tender, you can puree the soup to your desired consistency or leave chunky. Remove the kombu and sprig of rosemary before pureeing.
- Stir in the escarole and cook until wilted. Serve with grated cheese, if desired.
Notes
Add potatoes, stock, salt and (optional) rosemary. Cook for 30 minutes or until tender.
Add beans to pot and cook until heated through. Puree to desired consistency (or don’t). Stir in escarole.