-
 1 × $27.00
Subtotal $27.00


Could you pick collard greens out of line-up? It’s not an easy thing to do considering how many varieties of leafy greens are available. The bigger question is, have you ever picked up collard greens at all??

I avoided collard greens for a long time because they looked so intimidating, and because I didn’t know how to cook them. I had never seen a recipe that didn’t boil those beautiful leaves to oblivion. A typical collard greens recipe is from the South where they simmer the greens with bacon and pork stock for an hour so that they’re tender and the bacon masks some of the bitterness that goes along with collards. I’m sure they’re tasty, but I try to lightly cook my vegetables as much as possible, especially greens to keep that beautiful bright green color and the vital nutrients.
The only time I had actually tried collard greens was raw, wrapped around hummus, sprouts and shredded vegetables — kind of like a veggie wrap, but a raw collard leaf instead of a tortilla. Not delicious. Fine, but who wants to eat fine?

I am obsessed with dark green leafy vegetables and I am always trying to find new ways to incorporate them into our diet. I always say they should be their own food group since they are some of most nutrient-dense foods available to us and they can be prepared in so many delicious ways. Dark green leafies are incredibly rich in calcium, magnesium, beta-carotene, Vitamin K and iron. They also contain loads of fiber, Vitamin C, folate and antioxidants. Collards, specifically, are also members of the cruciferous family of vegetables which studies have shown may reduce the risk of many cancers. I knew I needed to give collards a chance.

Collards can be a little bitter, which is not a flavor picky children and formerly picky children husbands warm up to. My first attempt to simply saute chopped collards with garlic olive oil was not the solution. But I found that if you blanche collards first in plenty of salted water, it cuts the bitterness significantly. I am aware that blanching, which means to boil in water for a short amount of time, reduces the vitamin content more than steaming. But you still keep most of the vitamins.

This recipe for collard greens has become one of my favorite ways to eat greens. After the greens are blanched, they join garlic, olive oil and high-protein, creamy white beans for a very satisfying side or vegetarian main dish. The addition of grated Pecorino-romano is optional, but adds a nice richness. I have enjoyed collards this way by themselves or over cooked millet or rice. Daughter #1 loves this on top of a toasted wedge of whole grain bread. Maybe you’re not sure if your family is ready for collards. Even if that’s the case, do try this recipe anyway with another favorite leafy green, such as kale, Swiss chard, or escarole (even broccolini.) In time, you’ll want to pick this recipe out of your menu line-up, trust me!


In light of the recent discovery that Taco Bell’s meat for its beef tacos is mostly, um, NOT beef, I thought it was necessary to get a high quality taco recipe out there. One of the things I find so interesting about this news is how surprised everyone is to find out that there are incredibly low quality ingredients being used by a national fast food chain. Hell-oooooooo? People, they are charging $.99 per taco AND making a profit. Do you really think this is a high quality food? Rhetorical question. Answer is no.
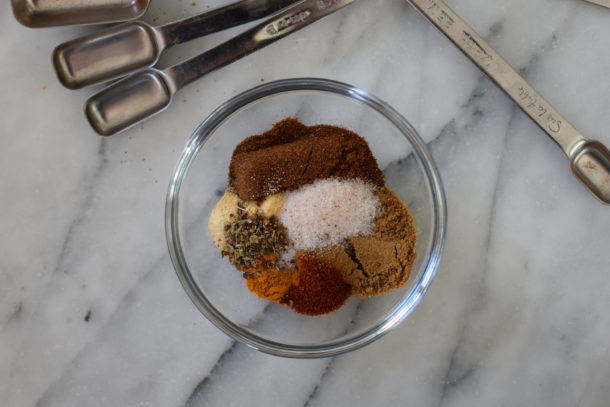
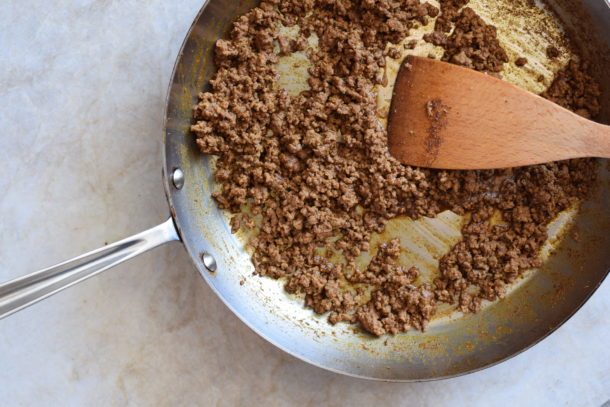
I have been making my own taco seasoning mix for years and years ever since it occurred to me to actually read the label on the taco seasoning packet I was using. Scary! Is it really necessary to use food coloring and MSG and stabilizers just to season some ground meat? Another rhetorical question. So I copied down the actual spices from the ingredient list and left out the chemicals that could only be made with a centrifuge in a lab, and after a few tries, I had a taco seasoning that was just right, meaning my kids still thought I was using the store-bought packet. Success!

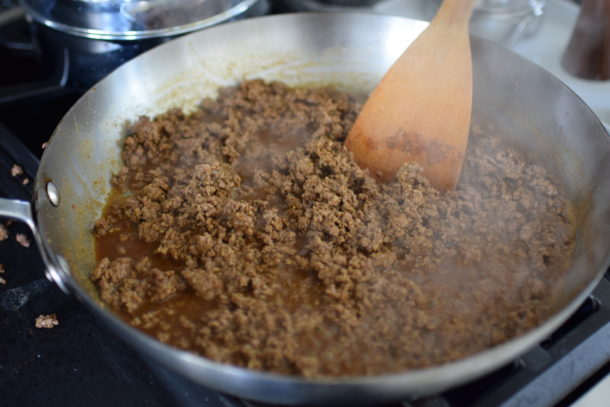
Because we are limiting our beef consumption, I will very often make tacos using ground turkey meat, preferably half dark meat for flavor and half white. Of course you can use grass-fed ground beef or bison, too. If you are a vegetarian, just finely crumble the same amount of your favorite tempeh and saute it in some olive oil until just browned and use the seasoning mixture in the same way. (Next two photos are of tempeh.) I like tempeh tacos just as much as the ones made from meat!
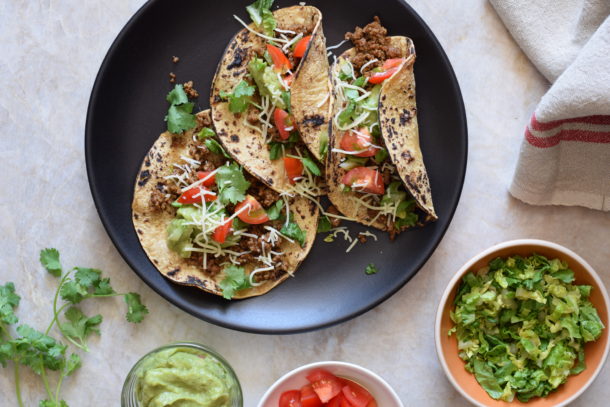
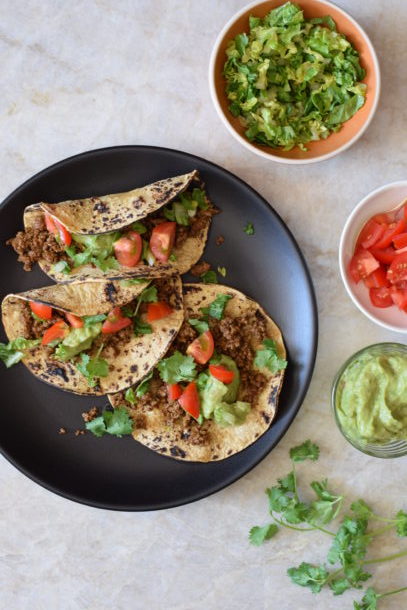
A student reminded me a few days ago that Little League season is right around the corner and would I please add some post-game dinner recipes to the website. Since I have a child in Little League, I know that she is looking for meal that can be prepared as quickly as possible when she walks in the door at 6:15 for starving children, and preferably a warm meal since everyone’s been freezing outside for several hours on metal bleachers. This is a 10- minute dinner if you have all the toppings prepared ahead of time. I like to use soft corn tortillas and set out bowls of guacamole, pico de gallo (fresh tomato salsa) if it’s tomato season, finely shredded lettuce and some shredded raw cheese, if I have it. The topping bar is one of my favorite techniques to make everyone feel as though he or she is getting the meal of his or her choice — and no additional work for me. Serve with a large salad with homemade vinaigrette which you can prepare days in advance and dinner is done!
Since I have a feeling this may become a regular dinner item for you, why not triple or quadruple the recipe for the spices and keep the mix in the pantry so that’s one less thing you need to worry about.
And you thought you couldn’t make tacos without maltodextrin! Hmph.


Packaged pancake mixes confuse me. The idea behind packaged food is to provide the consumer convenience. That is, it should be more convenient for you to use a boxed pancake mix than to make pancakes from scratch. But let’s think about this one. When you use a packaged mix, you need to measure the mix, measure the different liquids you will be adding to the mix, crack eggs, mix it all together, grease your griddle and cook the pancakes. So basically you are paying a premium so that you don’t have to measure the baking soda, baking powder and salt. And you have to take whatever else the manufacturer decides is necessary to add in there, such as preservatives. Sure, you can buy a mix with dehydrated milk powder and dehydrated eggs, so that you’re only adding water, but really, you can do better. A lot better.

First of all, you can make absolutely delicious pancakes very easily without a mix and with more nutritious ingredients. I love using whole wheat pastry flour for this which is lighter than whole wheat flour, but still still milled from the whole grain, so nothing important has been removed and you still keep all the fiber, protein and nutrients. More importantly, the pancakes don’t taste whole wheat-y or feel heavy. Gluten-free people — do not fret. I make pancakes twice per week and if the kids are getting wheat in their lunchboxes, I always make gluten-free pancakes for breakfast by substituting GF oat flour, brown rice flour and buckwheat flour for the wheat. They are just as tasty and just as “normal” as wheat flour pancakes, although the buckwheat imparts a slight lavender color to the batter. Also, don’t be put off by the buttermilk. If you don’t have it, substitute half yogurt and half milk and the pancakes will turn out the same.

For those of you who think pancakes are strictly for the weekends, I have excellent news. You can make your batter the night before and keep it refrigerated until the morning. I was always taught that the leavening agents lose their potency if the batter, dough or whatnot is not cooked immediately. Not so. I actually did a side-by-side test with 12-hour old batter and freshly made, and they both rose equally. If cooking pancakes on a weekday is positively out of the question, then make a huge batch on the weekends and freeze them with pieces of wax or parchment paper in between each one. Just promise me you won’t use a microwave to reheat them!

Pancakes are a winner breakfast in our house because everyone can customize his or her own pancakes without creating more work for me. After I pour batter on the griddle, the kids come over with their favorite add-ins. Daughter #1 likes raspberries or diced strawberries; Daughter #2 prefers diced bananas; Mr. Picky chooses mini chocolate chips; and the Husband drops in blueberries. The key here is to wait until the batter has set slightly on the griddle so that when you add your fruit or chips the batter doesn’t spread and thin out.

If you decide you love these pancakes and you will make them regularly, by all means quadruple the dry ingredients, combine well and store your “mix” in the pantry in a glass container with directions: “Use 1 1/2 cups + 1 Tablespoon of mix for pancake recipe.” Now that’s convenience!
Update 1/30/12: I accidentally mismeasured the buttermilk today and used 2 cups, so I decided to use 2 cups of flour as well, but keep all the other measurements the same. The pancakes were still light and fluffy, but just a bit more substantial. The kids liked them a lot. So if you like your pancakes a little heavier, you can adjust those measurements accordingly.

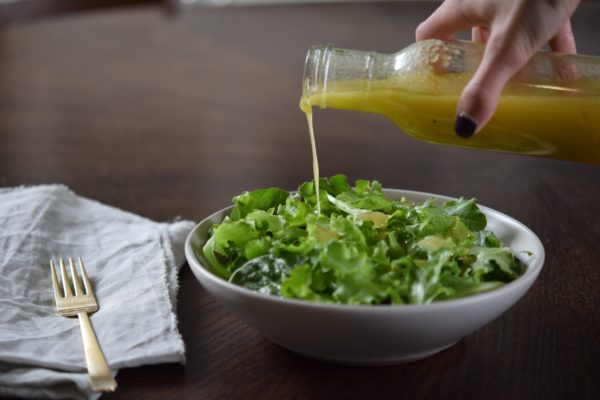
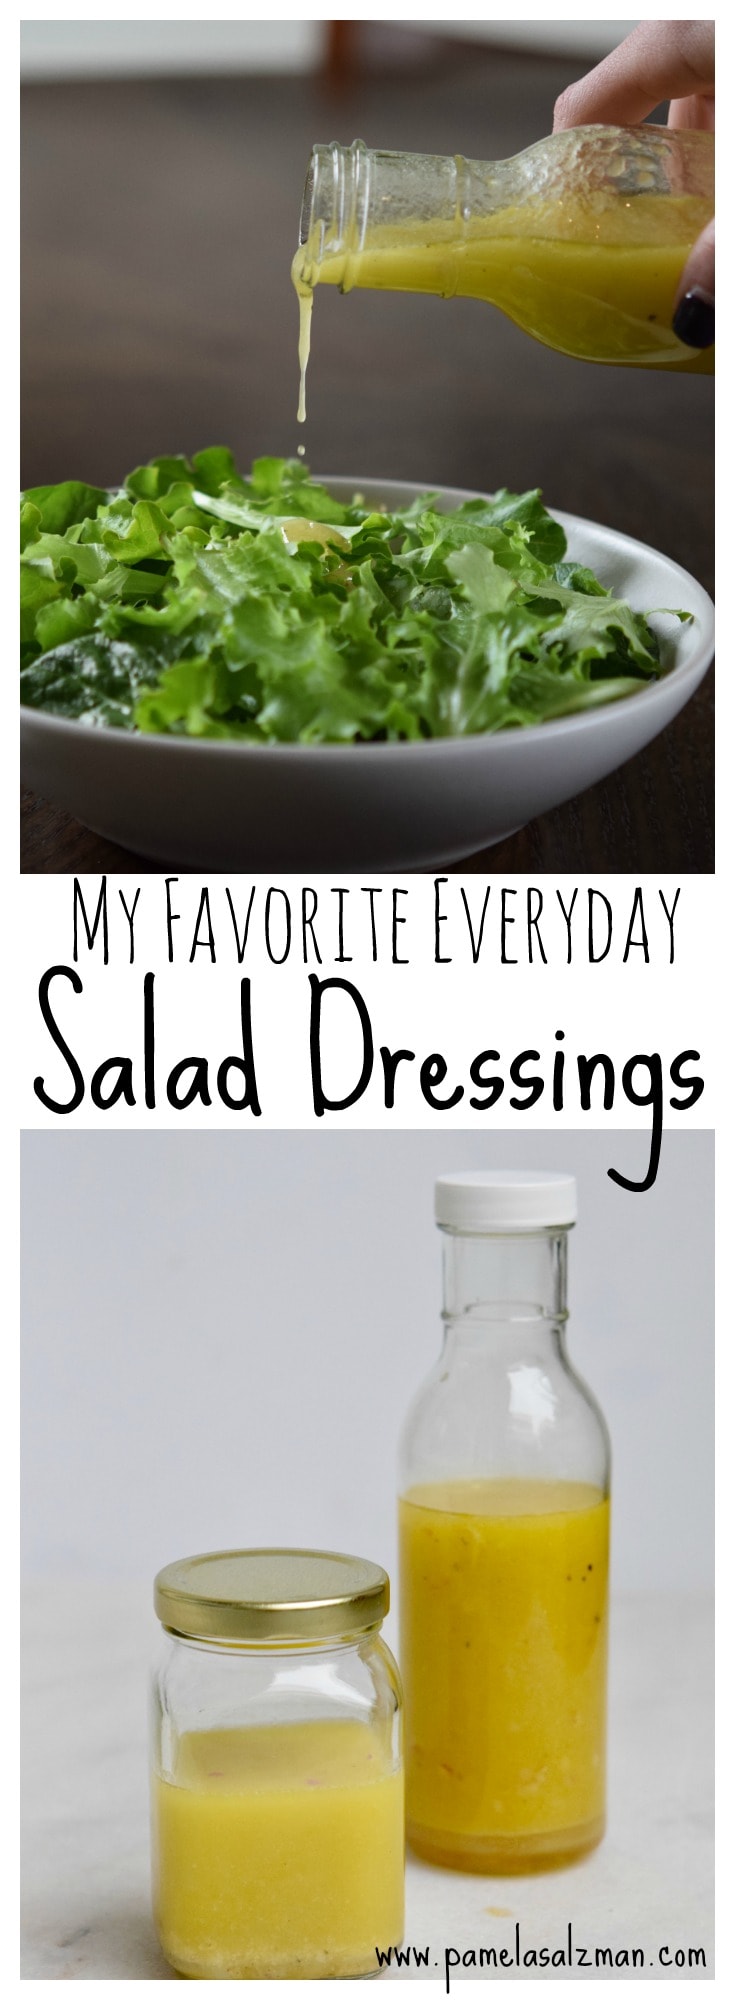
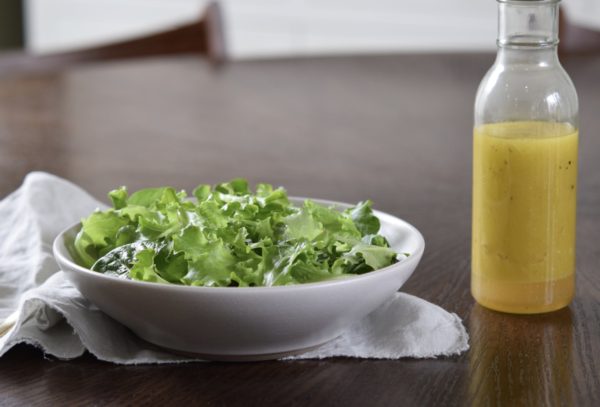
If you’re just starting to tinker with the idea of eating more healthfully, but don’t know where to begin, may I nudge you toward making your own salad dressings? Why? First of all, salad dressings or vinaigrettes are something you probably use regularly. Second, they are simple to make. And last but not least, I have never found a bottled salad dressing that uses the kind of high-quality oils and ingredients I prefer to use. In fact, most bottled dressings not only contain refined oils, but also sugar or high-fructose corn syrup, preservatives, stabilizers and lots of other mysterious things I can’t even pronounce — never a good sign.
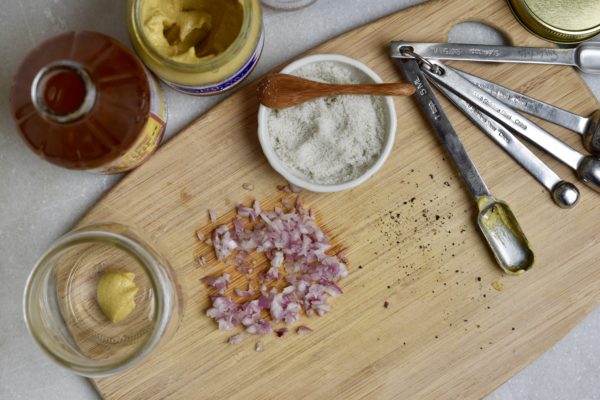
Truthfully, when I was growing up, we ate loads of fresh salads and we never made vinaigrettes. It was my job to dress the salad and all I did was drizzle the olive oil over the greens about three or four times around the salad bowl and the vinegar over once. I would sprinkle it with a little salt and voila! Sometimes I still do that if I’m in a rush and I don’t have dressing already made in the fridge. But more often than not, in the beginning of the week I will combine a few simple ingredients in a clean jar with a lid (love reusing nut butter jars for this) and shake, shake, shake!
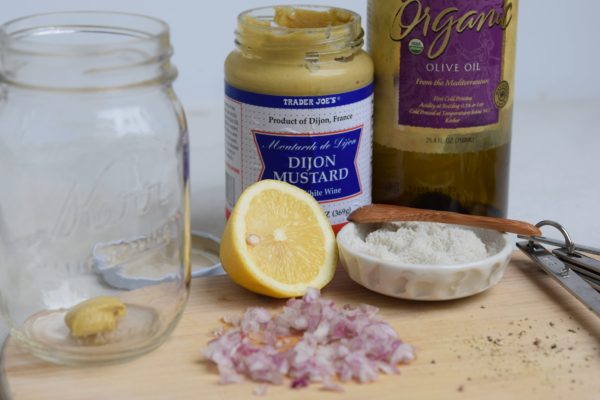
I have lots of dressings I use for different salads, but there are two that are my standbys for a bowl of simple mixed greens. Both have a base of unrefined extra-virgin olive oil which is very rich in oleic acid, a very stable monounsaturated fatty acid, as well as Vitamin E and loads of antioxidants. All bets are off when you use refined olive oil where all the nutrients have been stripped away and you’re basically left with a bottle of free radicals. The olive oil I buy is in a dark glass bottle and after the word “Ingredients” it says in the tiniest print that I can barely read since I turned 40, “unrefined extra-virgin organic olive oil.” Forget low-fat or non-fat salad dressings. Most of those contain MSG or MSG-derivatives with tricky names like “hydrolyzed vegetable protein” or “autolyzed yeast extract.” We need fat on our salad to help us assimilate all the fabulous fat-soluble vitamins in the vegetables! What a waste to eat Vitamins A, D, E and K without the presence of fat to help our intestines absorb those nutrients.
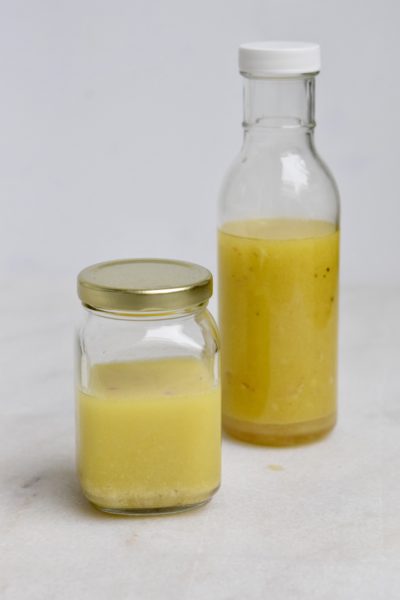
Lemon juice is super alkalizing to our bodies and raw, unpasteurized apple cider vinegar is so enzyme-rich — both are my favorite acids for dressings. I personally love the lemon juice dressing, but I came up with the apple cider vinegar/brown rice vinegar dressing when I was at my mother-in-law’s house and she asked me to whip up a salad dressing that she would like. I was thrilled to make her something delicious so that she would stop using a packaged brand that rhymes with Shmood Shmeasons. Alas a convert! It has become a very popular dressing in my house and hers.
The basic rule of thumb with a vinaigrette is to mix 1 part acid (lemon juice, vinegar) with 3-4 parts oil. Adjust the ratios to suit your taste and build from there with salt and pepper, garlic or shallots, mustard or fresh herbs, if you have them. Once you get into the habit of making salad dressings regularly, you won’t even have to measure your ingredients anymore. So long Shmishbone!


A funny thing happens when people start cooking healthful food for family and friends. They feel the need to announce that fact to everyone before serving it. “Ok, guys. Wait until you try this muffin! It’s made with flaxseeds and almond meal and it has no sugar! It’s unbelievable!” Of course everyone else is thinking it’s probably unbelievably bad and unbelievably tasteless. Or students will come to my class and go home very motivated (a good thing) to overhaul the pantry, the refrigerator and the family diet. And even though I urge them not to, they feel compelled to sit the family down and tell them how “things are going to change around here! There will be no more sugar! Or processed snacks! Suzy, spit out that gum. Don’t you know aspartame is the number one food-related complaint to the FDA?” Unfortunately, despite our well-meaning intentions, this strategy rarely elicits a positive response.

On the other hand, I love being able to share recipes that are delicious, easy, and just so happen to be good for you. Take these chocolate chip oatmeal cookies, for example. Using a base of walnuts, maple syrup and a touch of coconut oil in place of butter and eggs, these are just darn tasty and not-so-shabby, nutritionally-speaking.


Valentine’s Day is right around the corner and if your school or office allows treats to be brought in, why not make a batch of these? Like many cookie recipes, you can make the dough several days in advance and keep it covered in the refrigerator. Take it out when you’re ready to bake and scoop it onto your cookie sheets. You can even freeze the cookies unbaked. Arrange them in a single layer on the baking sheet and place the pan in the freezer. Once the cookies are frozen solid, transfer them to an airtight container and keep them frozen until you’re ready to bake. Then just place them on a prepared baking sheet directly from the freezer and add another minute or two to the baking time.

Yes, I know it is so very exciting that they are full of fiber and contain no refined sugar. No animal products either, if that’s important to you. You can even make them gluten-free by using gluten-free oats. But no need to go around saying, “OMG! Try these cookies! They’re gluten-free and they’re VEEE-GAN!” Unless your motivation is to discourage any takers and to keep them all for yourself. Hmmmmm……


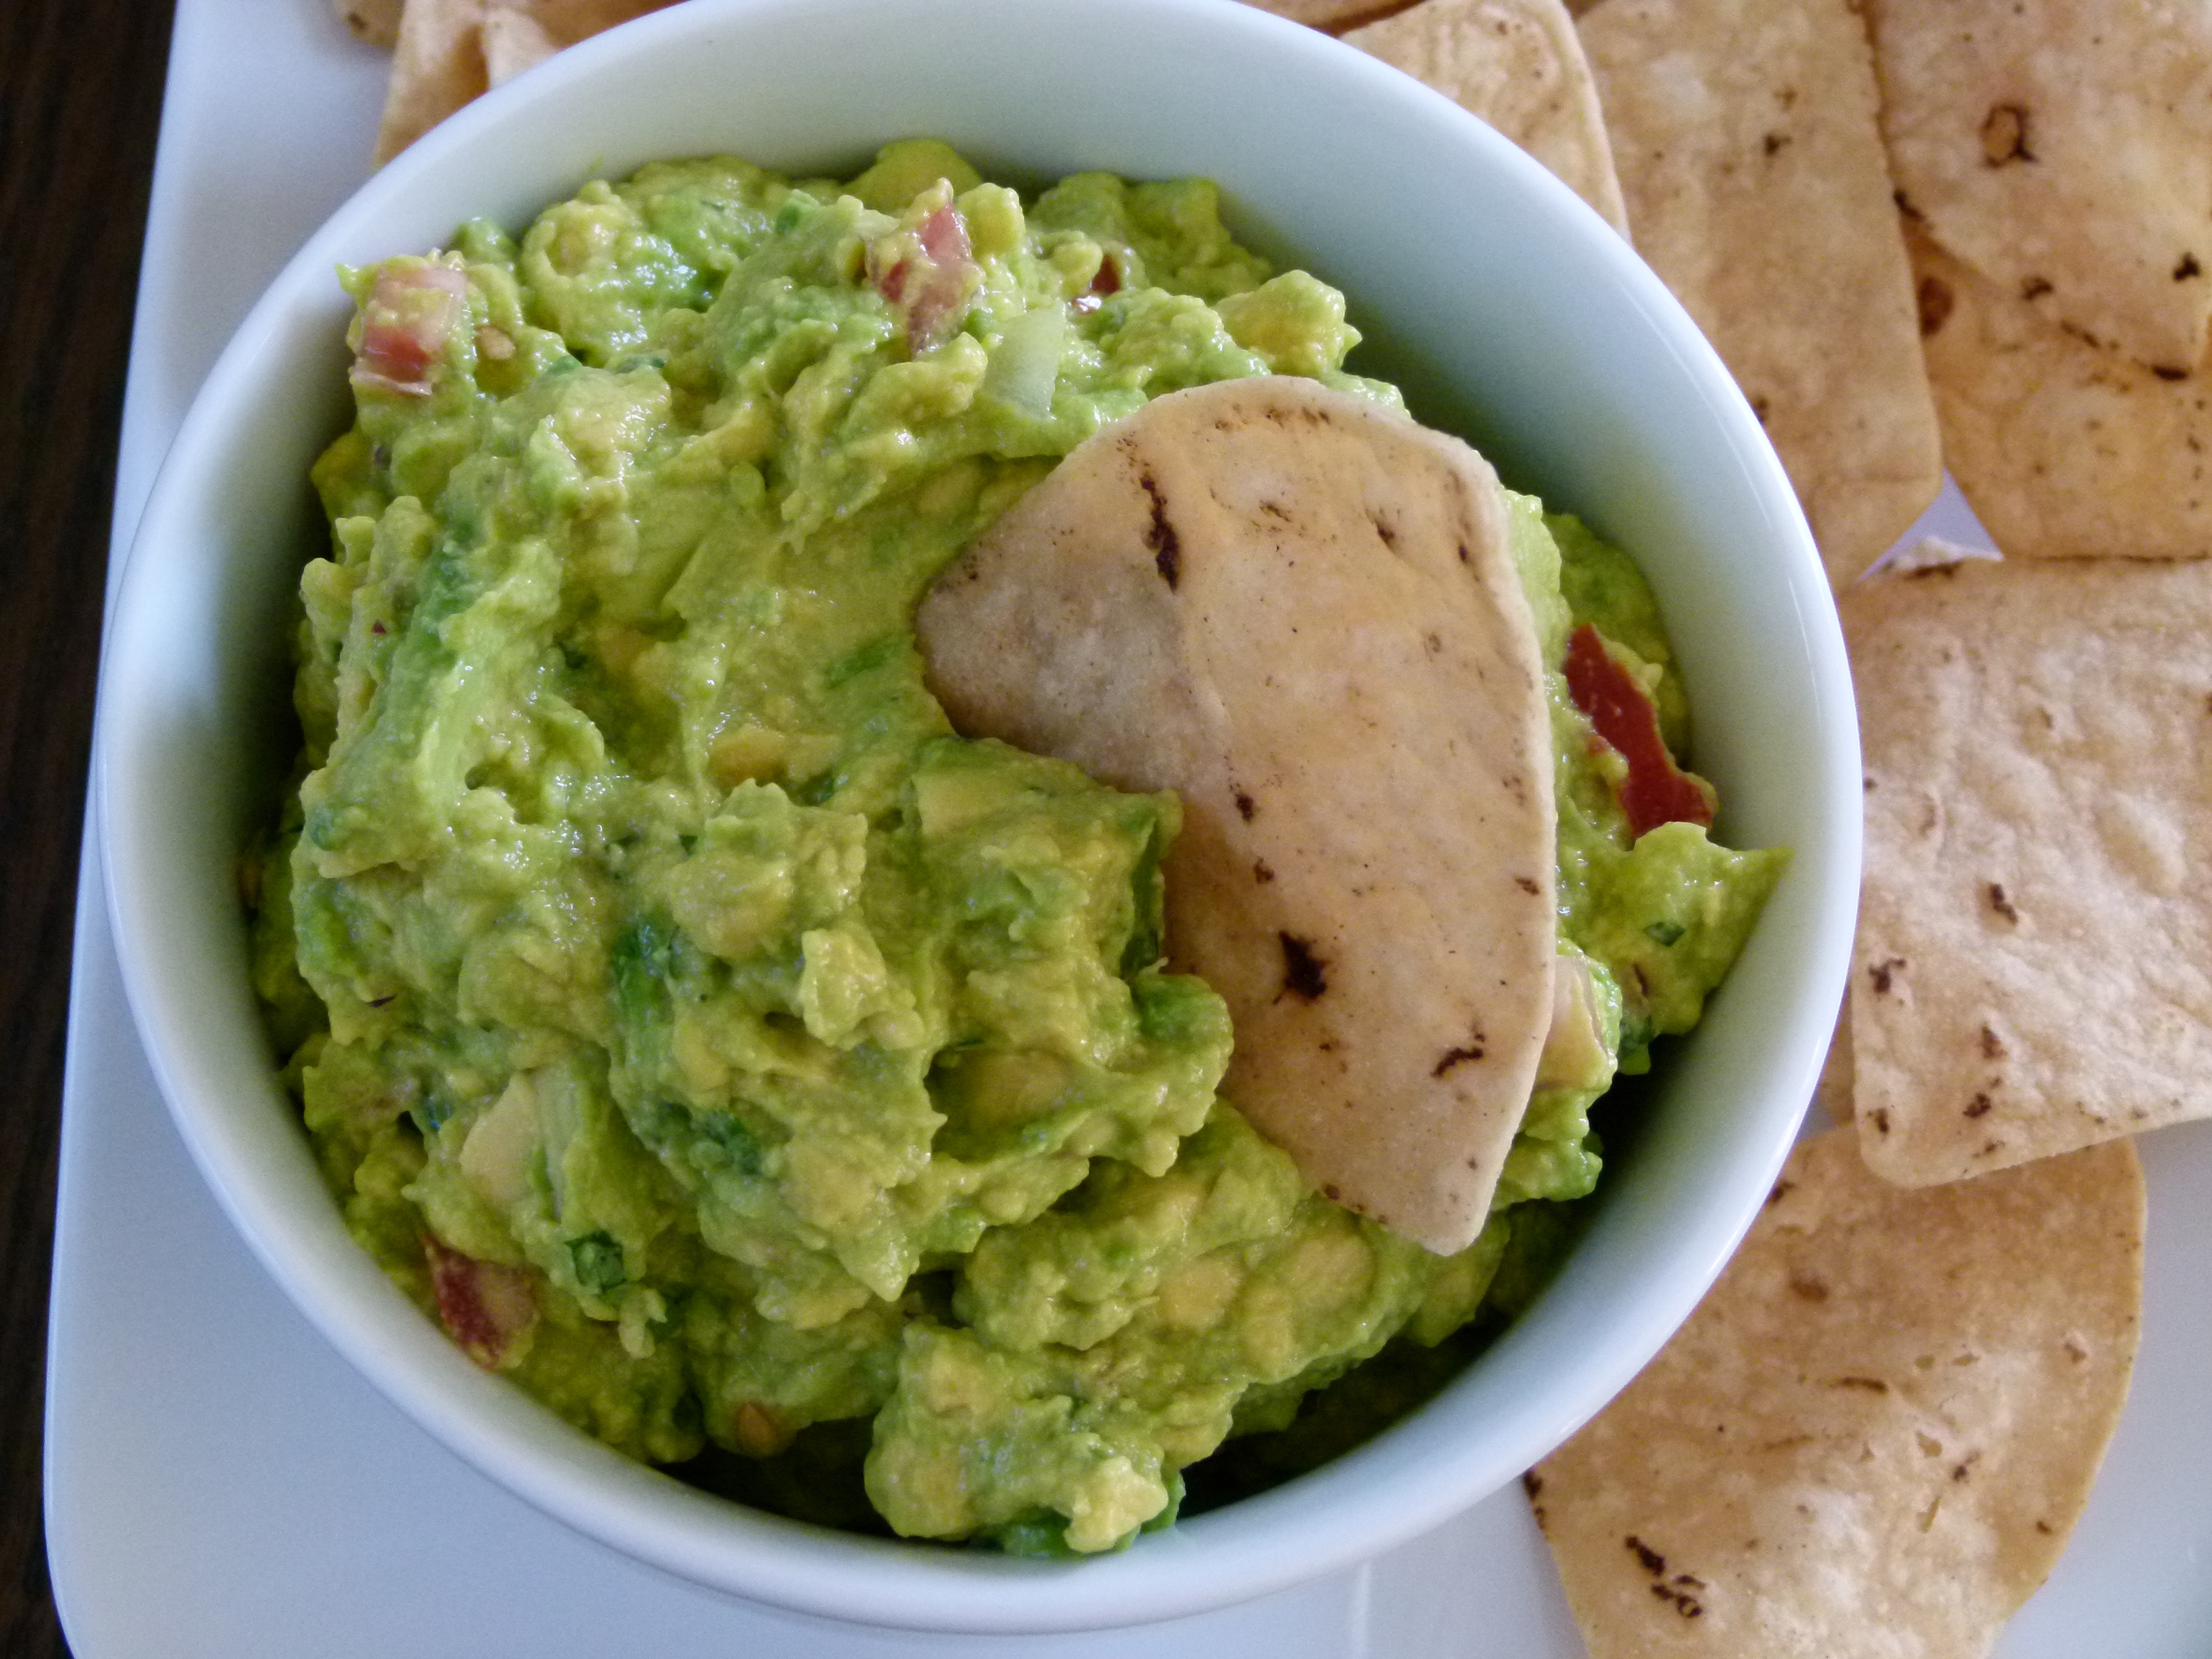
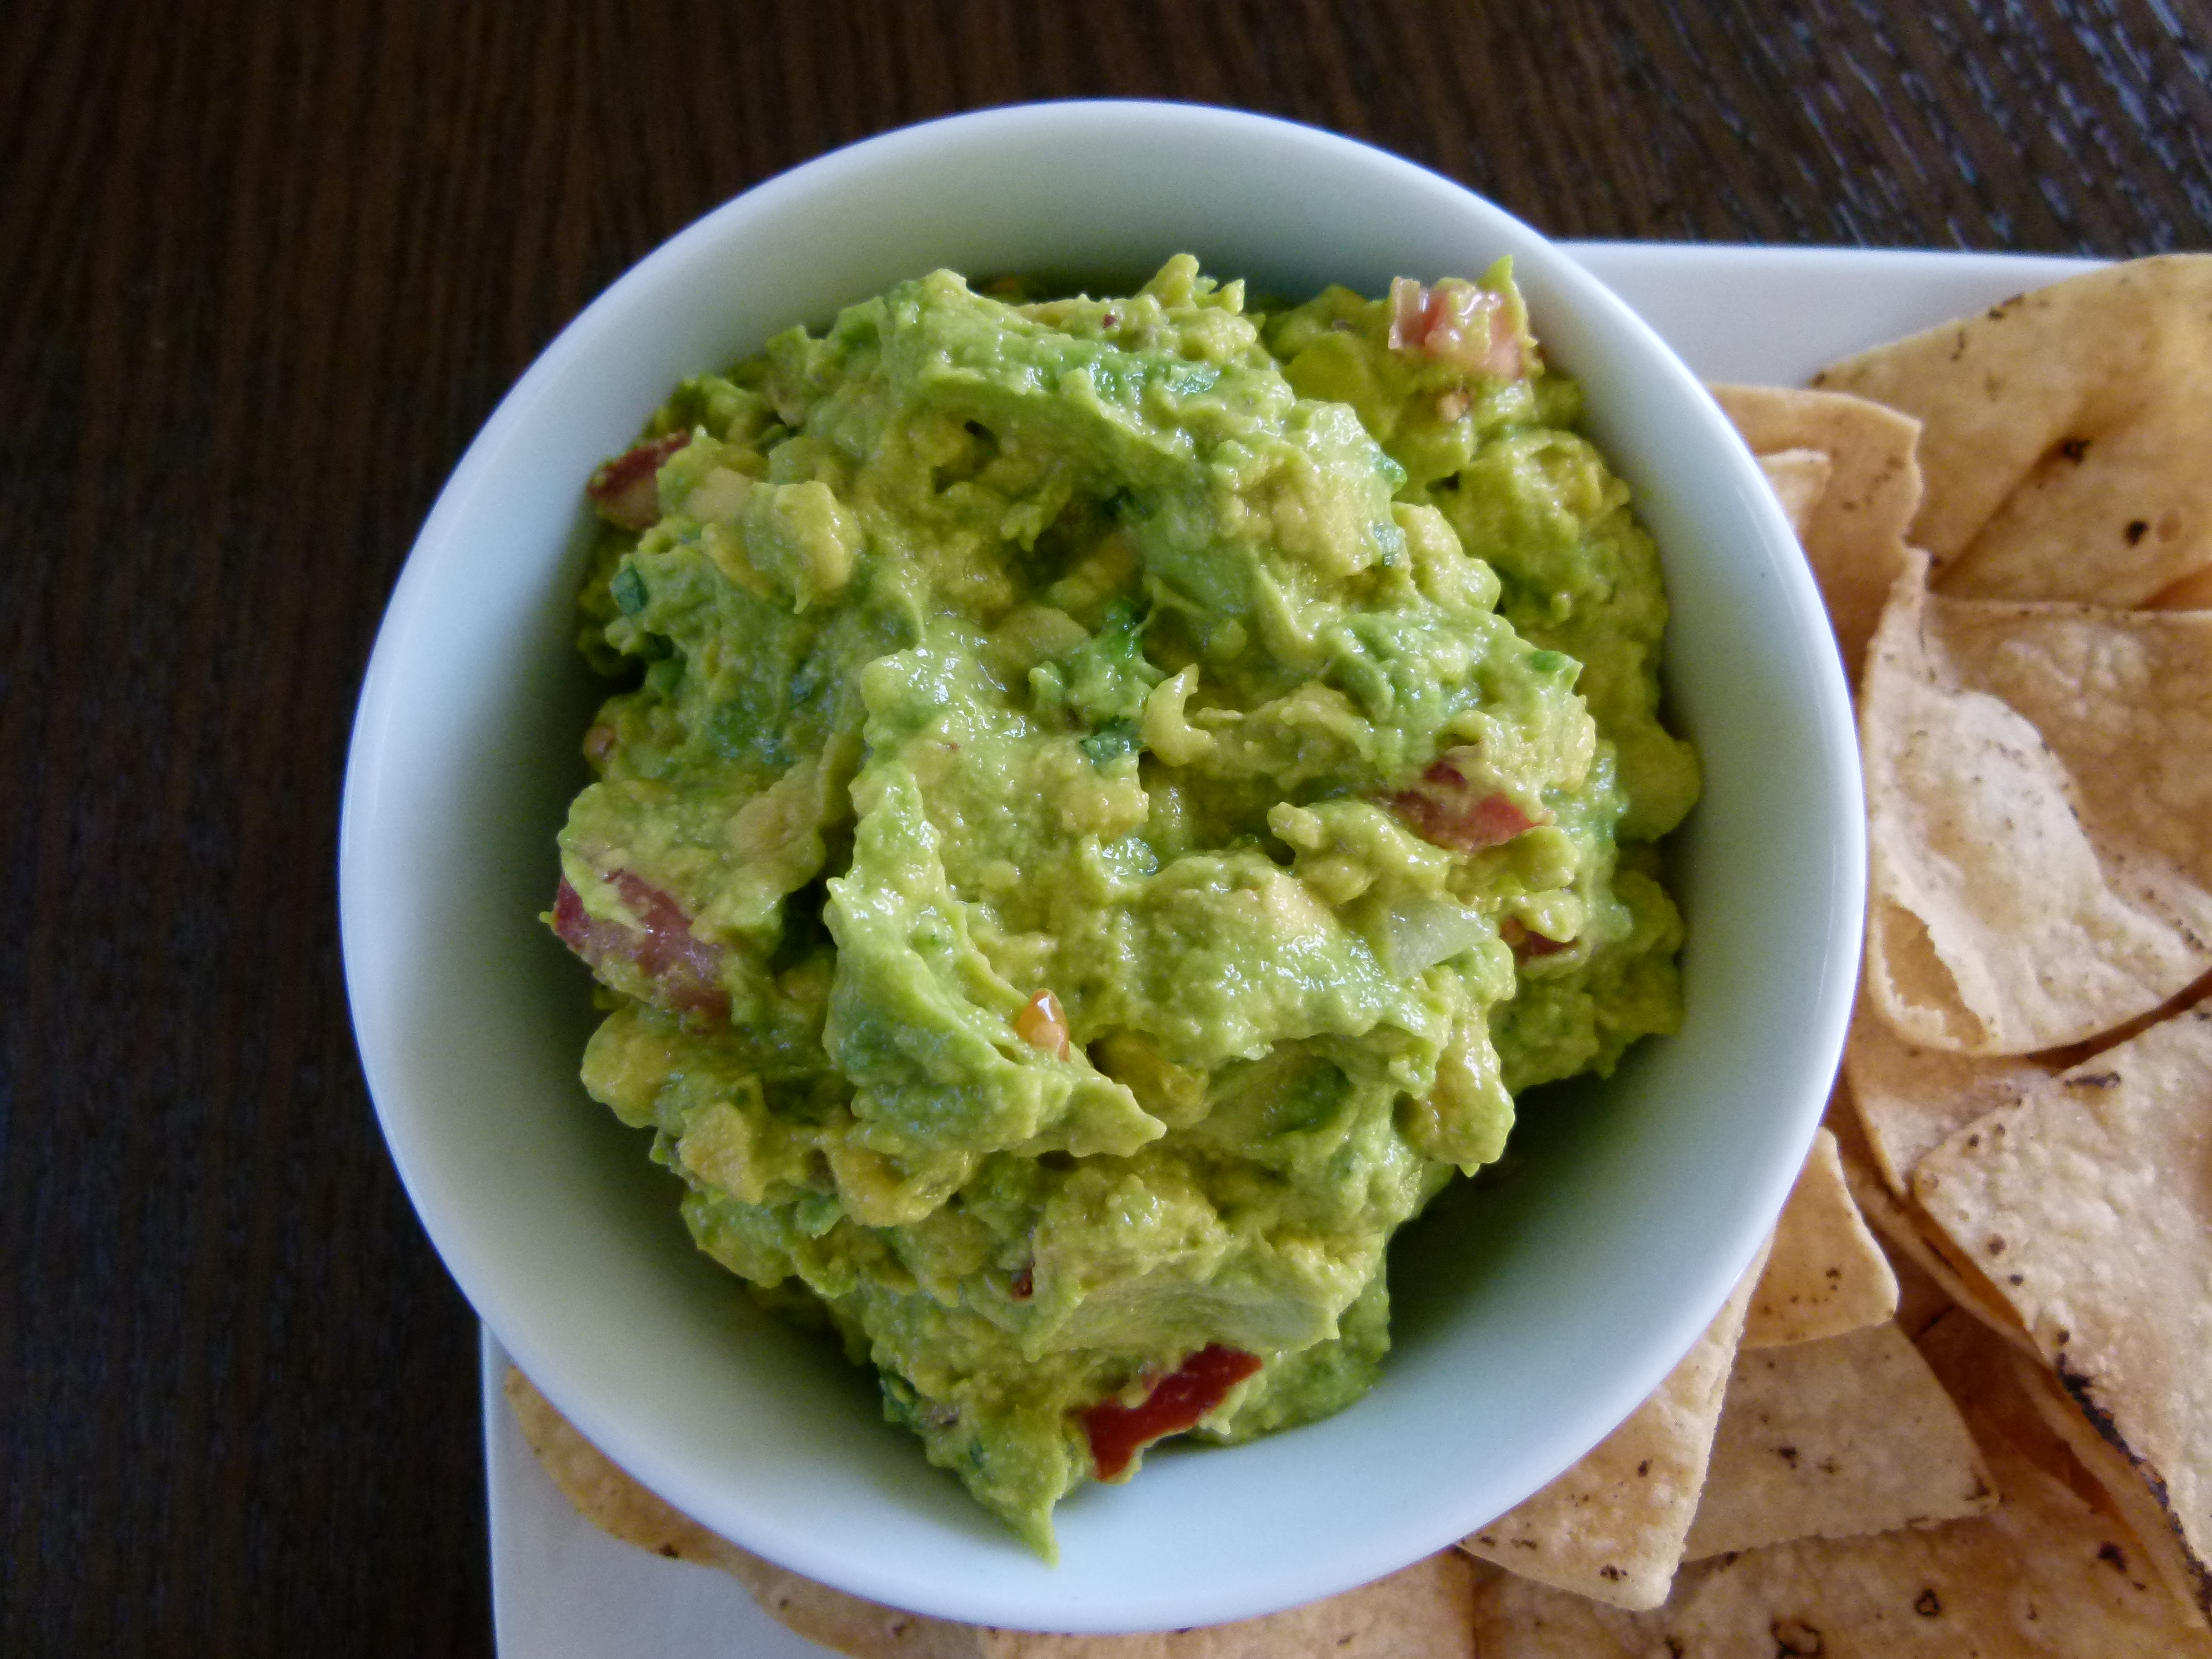
Do not be under the misconception that because I teach people how to cook healthful food that I myself eat only whole foods all day every day. Didn’t you read about my 90/10 plan? 90% of the time I try my best to eat super high-quality food — as whole and unprocessed as possible. The other 10% of the time (which basically leaves Friday and Saturday nights), I eat whatever I want and I don’t feel bad about it. Want to know what my guilty pleasure is? Nope, not chocolate or candy, not booze or burgers. It’s guacamole and chips. I could eat bowls full of the stuff at any time.

When I moved to California from New York almost 20 (gasp!) years ago, I was introduced to the avocado and guacamole. I couldn’t believe such a wonderful thing existed and I had just had my first taste (like when my husband took my son at 3 years old for his first Slurpee and the boy asked “why I not have this before?”). Creamy, rich guacamole on a crispy, salty chip was my idea of delicious and addictive, especially if the chip was folded over. I was also finding lots of other ways to enjoy avocados — chopped into salads, as a garnish on chili, and my favorite, thin wedges on whole grain toast with or without a slice of lox. Divine, I tell you.

You can imagine the cause for celebration when I discovered that avocados are actually good for you! Really good for you! Who knew that something so creamy and buttery could have loads of fiber, Beta-carotene and minerals, such as potassium, magnesium and iron? While it is absolutely true that avocados are very high in fat, it’s the kind of high quality fat that you want to eat. It is the freshest kind of fat, one that hasn’t been exposed to air or processing and its profile is mostly monounsaturated fat, like the kind found in olive oil. Hooray! Avocados are also loaded with Vitamin E, a very powerful anti-oxidant.


So let’s chow down on the guacamole, right? Well, you’ve heard it before — it’s not the guacamole that’s the problem, it’s what you eat with it that’s a whole lot of trouble. I am referring to chips, especially the kind that are made from genetically-modified corn and fried in some low-quality corn or soybean oil. Do not fret. There is hope! You can buy organic soft corn tortillas and make your own baked chips without a big commotion. I am whipping up a few batches right now in preparation for tomorrow’s holiday. What, you don’t celebrate the Super Bowl?? While you’re at it, check out a great vegetable chili recipe and you’ll be all set for the big day. Go Steelers!


Today is the first day of the Chinese New Year. Many of our children are learning about different celebrations from around the world in school and I love reinforcing these traditions at home. My son is always excited to share details about the Chinese New Year parade at his school and any special foods he ate. I usually make a simple Chinese-themed meal at home to get everyone in the spirit. Two recipes I posted recently are Vegetable Fried Rice and Asian Noodle Salad. But to fully understand the significance of Chinese New Year, I turned to my sister-in-law, Andrea Hutter, a student of Traditional Chinese Medicine and a licensed acupuncturist in Los Angeles.
Andrea:
February 3, 2011 marks this year’s Chinese Lunar New Year, or Spring Festival. Chinese New Year has been celebrated for nearly 5,000 years and is the most significant holiday in China. It can be likened to our Christmas and New Year’s celebrations combined into one. This is the year of the Metal Rabbit.
Metal represents this year’s five elements energetic phase (the five elements include metal, water, wood, fire and earth), which predicts the global trends that affect us on a personal level. Metal types are brave, disciplined, trained, organized, authoritative, honorable, determinative, routine, firm, resolute and have an urge to win. They are sensitive in grief and sadness.
 The Rabbit represents the zodiac animal year, or ben ming nian. The Rabbit person is diplomatic, and has grace, culture and beautiful manners. Although rabbit people get on well with everyone, at heart they are basically reserved creatures, and are only really happy when they are engrossed in some sort of scholarly or intellectual activity. The Rabbit year brings an inward focus, which includes taking better care of our health and well being.
In keeping with the Rabbit’s inward focus, there are many ways that we can take better care of ourselves using another 5 thousand year old tradition, Chinese Medicine, which encompasses acupuncture, tui na, qi gong and Chinese herbal medicine. Chinese medicine is based on the precept that you can prevent illness from occurring in the first place, through acupuncture treatment, meditation, or qi gong, and by eating healing foods and taking herbs that possess healing properties. Many people are surprised to find out that foods commonly found in the Western kitchen are actually also deeply effective Chinese “herbs.” Some examples of these herbs are spices like cinnamon, nutmeg and cloves, which warm the digestion and help dispel dampness in the body that is brought on by eating fatty, fried and processed foods. Rice is commonly added to Chinese herb formulas to lessen the harsh properties of some stronger herb combinations, and honey is used to help the body rid itself of phlegm and calm coughs.
In keeping with Chinese Medicine, elements and zodiac years, the feast of Chinese New Year is paramount to the whole holiday celebration. The dishes served during Lunar New Year are symbolic of things positive and hopeful. Since we all love an excuse to celebrate, why not break out your favorite red clothing, commonly donned by Chinese people for good fortune, and cook up some delicious Citrus Chicken, a symbolic Chinese New Year dish. In China, the orange or tangerine symbolizes gold, which in turn represents good fortune and wealth in the coming year. I would serve this with rice and some stir-fried green vegetables.
This recipe uses several common foods that are also Chinese herbs. Examples are orange zest, or chen pi, which removes stagnation in the body, including the GI tract; ginger root, also known as sheng jiang is anti-bacterial, anti-oxidant, and anti-inflammatory, and effectively aids in curing the common cold, or wind cold invasions, while its warming actions calm stomach upset; green onions or scallions, known as cong bai, release exterior pathogens and induce sweating in the early stages of the common cold, aid in abdominal pain and nasal congestion and/or can be applied topically for dispersing masses – abscesses, sores, etc. The healing properties of this recipe will make your celebratory meal both delicious and healthful.
Happy New Year, or Xīnnián kuàilè!
Andrea Hutter, aCHIeve acupuncture
424.234.9974
a@achieveacupuncture.com
1 1/2 cups water
2 tablespoons orange juice
1/4 cup lemon juice
1/3 cup rice vinegar
2 1/2 tablespoons shoyu (naturally fermented soy sauce)
1 tablespoon grated orange zest
1/2 cup packed brown sugar
1/2 teaspoon minced fresh ginger root
1/2 teaspoon minced garlic
2 tablespoons chopped green onion
1/4 teaspoon red pepper flakes
Chicken:
2 boneless, skinless chicken breasts, cut into 1/2 inch pieces
1 cup all-purpose flour
1/4 teaspoon salt
1/4 teaspoon pepper
3 tablespoons olive oil
3 tablespoons arrowroot powder or non-GMO cornstarch
2 tablespoons water


When parents struggle with “what to make for dinner,” one tip I like to offer is to find a dish that everyone likes to eat when you go out, and try to make it at home. Fried rice, however, is a food that I thought I could never make at home. I don’t know why it seemed to be out of my cooking league and only something the family could enjoy on the three annual birthday trips to Benihana. But the last time we were there for Mr. Picky’s birthday, I watched in amazement at what it took for our chef to make fried rice — not a lot! I could make this at home! I took mental notes of what was used on the griddle — cold rice, beaten eggs, a few vegetables, soy sauce and a curious creamy spread our chef told me was “garlic butter.” Hmmm…..
Before I gave this a go at home, I needed to check around a bit to see if there was anything else I needed to know. It seems that fried rice is actually pretty straightforward provided you do one very important thing — use cold, cooked rice. Warnings abounded wherever I turned — one can never, ever, possibly even consider making fried rice with fresh rice otherwise you will have a mushy, disastrous mess. One thing you need to know about me is that I am a naysayer. Oh, really? Well I need to see it to believe it. And I that’s how I learned….never to use fresh rice when making fried rice because I’m here to tell you that you will indeed have a mushy, disastrous mess.

Fried rice is something that was invented in order to use up leftover rice and whatever bits of vegetables and meat you have from the night before. It is eaten as a snack in China, never as a meal. Don’t tell my kids, because they’re getting it as an entree. When you add scrambled eggs, peas, shiitake mushrooms and broccoli to long-grain brown rice, you have yourself plenty of protein. I often pack this the next day in a stainless thermos for the kids’ lunch and I have enjoyed it for breakfast as well. It is actually the perfect little meal with protein, good carbs, and some fat for stable blood sugar and long-lasting energy.

Stir-frying anything requires all your chopping to be done in advance since things move so quickly. You can get this out of the way as early as the night before, if you want. If you have leftover rice and all your vegetables are prepped ahead, fried rice can be cooked in minutes. Traditionally in China, the eggs are added with the rice so that the egg coats each grain of rice. I do it a little differently since Mr. Picky doesn’t enjoy eggs yet. I cook the beaten eggs in ghee (a clarified butter great for higher heat cooking) first and then remove them, chop them up and add them in at the end. That way Mr. Picky can pick out all the egg easily.

You can really add whatever vegetables you have on hand and you certainly don’t need to use as many as I do. (The vegetables above were used in fried rice I made for a class where the recipe was doubled.) The key is to dice everything pretty small, about the size of peas, although the broccoli can be slightly larger. That way you can stir-fry them in the wok or pan and you don’t need to blanche them in a separate saucepan. I like washing dishes as much as Mr. Picky likes eggs. If your picky eater won’t go for brown rice, he’ll never know it here. The shoyu is going to change the color of the rice to brown anyway. To make this gluten-free, substitute wheat-free tamari and you’re all set. Vegans can drop the egg, use all sesame oil and still enjoy a high-protein dish. Don’t forget — Chinese New Year begins on February 3rd!