

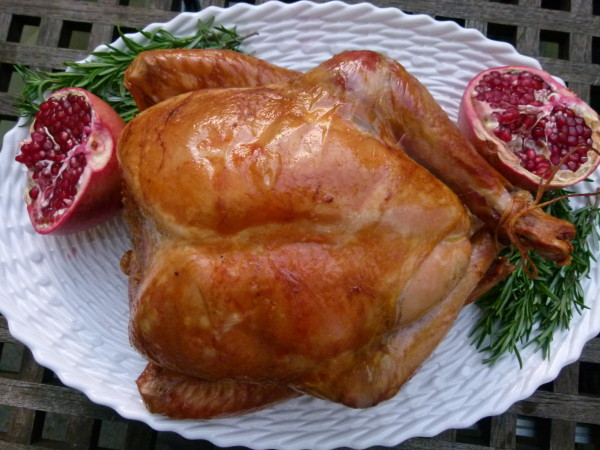
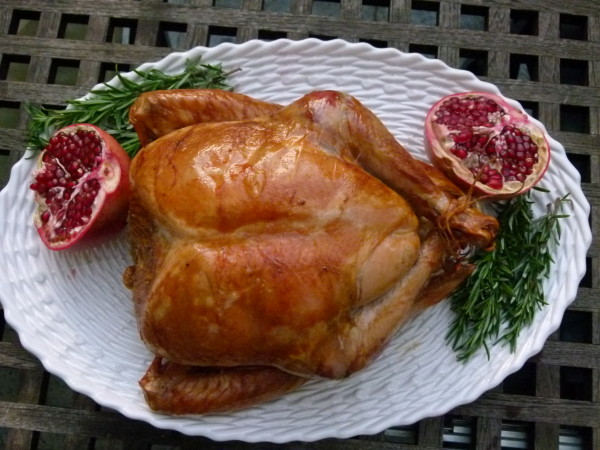
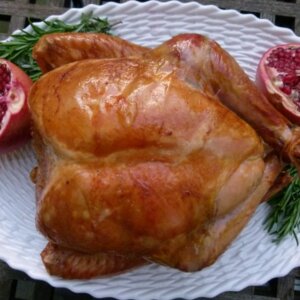
This is it, my last Thanksgiving recipe for you. And it’s my favorite way to make turkey as of late. I taught this method in all my November classes last year and a few this year and I was consistently thrilled with the results. I don’t even like turkey, but this was juicy and so flavorful. Even if you have solidified your Thanksgiving menu, I’m not too late with this one since you are probably making turkey of some sort. Let’s get down to the nitty gritty of making a good turkey:
Buy a fresh, organic turkey (they taste better than frozen and/or Butterball chemically-injected ones). If you bought a frozen turkey, plan for a few days to defrost in the fridge. Do not thaw in brine!
Don’t forget to remove the neck and giblet bag from the cavities (including the neck.)
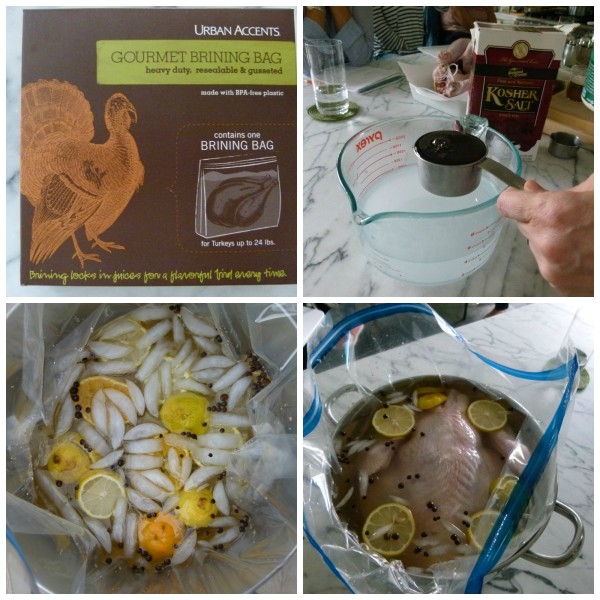
Brine it. You can dry brine (which means you’re rubbing the turkey inside and outside with kosher salt 2-3 days before) or wet brine 24 hours in advance. A wet brine is a salt-water solution, usually with brown sugar and some other flavors. Brining gets the salt deep into the meat to season it well and keeps the turkey juicy. Both brines do this. The advantage of a dry brine is that it’s easier, especially if you’re cooking a super large turkey. All you have to do is rub it with salt. ANd it takes up less space in the fridge. The advantage of a wet brine is that it’s faster and you can add different flavors to the solution. The only time you don’t want to brine a turkey is if it is a KOSHER bird. Those have already been brined. If you can find a good quality organic, kosher turkey, go for it. You don’t have to prep it in advance = easier. I have tried NOT brining a turkey, and instead seasoning it just before cooking. Not the same. DO the brine. If you don’t have room in your fridge, place the turkey in the brine in a pot in a cooler with ice and it will be just fine.
Allow the turkey to come to room temperature before cooking. Promise me you’ll take the turkey out of the refrigerator at least one hour before cooking it, otherwise the interior will be underdone and the exterior will be overcooked and dry. That does not have to happen. For the largest birds (over 20 pounds), leave out of the fridge and out of the wet brine (if you’re using it) for 2 hours before roasting. 12-18 pounds leave out for 90 minutes before roasting. Less than 12 pounds leave out for at least an hour before roasting.
Use a meat thermometer to determine whether or not your turkey is ready. You cannot go by the chart on the turkey wrapping or by a recipe. I have made over 150 turkeys in my life in lots of different ovens and trust me, you need a meat thermometer to say the thickest part of the breast, which is on the side closer to the neck, registers between 160-165 degrees. The thigh should register around 175 degrees. Check this post here to see if your thermometer is accurate!
Allow the turkey to rest for at least 20 minutes before carving. The juice will redistribute and the turkey will be juicer. If you take the turkey out and cut it too soon the juices with pour onto your cutting board. That would be sad. Feel free to allow the turkey to rest a little longer, up to 40 minutes is fine. But keep it covered with a piece of foil so it stays warm while you make gravy and bake your stuffing. Click on this post for carving help.
You don’t have to follow this recipe for a great turkey, but you should employ the above strategy. Here are my other turkey recipes on my site:
Whole Roasted Dry -Brined Turkey (this post has videos and more details about cooking, carving and making the gravy!)
Herb-Roasted Whole Turkey Breast
You will have a delicious turkey, I am sure. But, if something goes wrong, here are some tips:
If you have dry turkey meat: carve the turkey and pour hot chicken or turkey stock over it. No one will know!
If your turkey is undercooked and you’ve already cut into it, remove the thigh and drumstick and take the breasts off the carcass. Put all the pieces into the roasting pan and put back in the oven until they reached the desired temp.
Good luck!! Leave a comment on any recipe if you have questions!
Whole Roasted Maple-Brined Turkey
Ingredients
- 12-14 pound fresh turkey, giblet bag and neck removed, rinsed
- For the brine:
- 1 1/3 cup kosher salt, such as Diamond Crystal
- ½ cup maple syrup or brown sugar
- 1 quart hot water
- 1 orange, cut into crosswise slices
- 1 lemon, cut into crosswise slices
- 1 Tablespoon black peppercorns
- 2 teaspoons allspice berries
- 1 gallon ice cold water
- 1 onion, quartered
- 3 or 4 parsley sprigs, thyme sprigs and or sage leaves
- 3 sprigs of fresh rosemary
- 1 apple, quartered or cores from 2 apples
- 6 Tablespoons unsalted butter, melted or olive oil
- 1-2 cups stock or water
- Gravy
- ¼ cup dry white wine
- 5 Tablespoons all-purpose flour
- 3 -3 ½ cups chicken or turkey stock, preferably homemade
- sea salt and freshly ground black pepper to taste
Instructions
- I like to brine the turkey for about 14-18 hours. You can brine it, remove it from the brine and then store it in the refrigerator for a day until you are ready to cook it. To make the brine: Dissolve the salt and maple syrup in the hot water. Take the orange slices and carefully squeeze them into the mixture. Add the lemon, peppercorns and allspice berries.
- Place the brining bag in a large stockpot. Add the cold water to the bringing bag and then the warm mixture. Place the turkey in the brine breastside down and make sure the whole bird is covered with liquid. Seal the bag securely and place pot in the refrigerator for 12-18 hours.
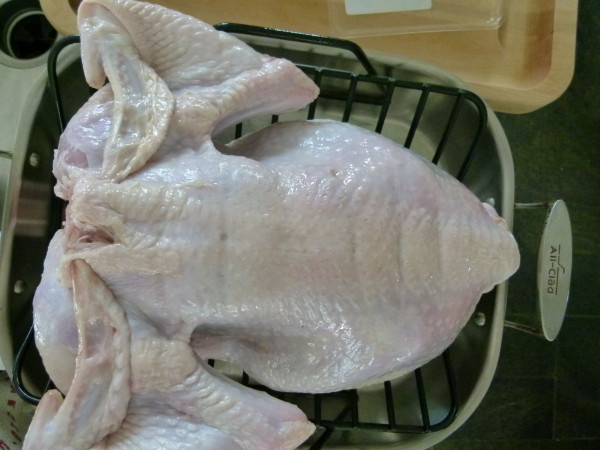
- Remove the bird from the brine and rinse with cold water. Pat dry. Refrigerate until ready to cook or proceed with recipe.
- The day of roasting, take turkey out of refrigerator and wipe dry with paper towels. Bring to room temperature, about 60-90 minutes.
- Preheat oven to 425 degrees. Position a rack in the lowest rung of the oven. Oil a V-shaped rack in a roasting pan.
- Sprinkle a little freshly ground black pepper in the cavity and then add in the onion, herbs, and apple. Truss the turkey by tying the legs together. Brush the skin all over with some of the butter or oil.
- Place the turkey on the rack in the pan, breast-side down and pull the wings behind the back. Roast for 40 minutes, basting with butter or oil after 20 minutes. Reduce the heat to 325 degrees, turn breast side up (I usually wear clean rubber gloves to do this) and add 1 cup stock or water to the roasting pan. Continue to roast, basting with the remaining butter or oil until used up and then with the pan juices every 20 minutes. Add additional stock to the roasting pan if you notice there are no pan juices with which to baste the turkey.
- Roast until golden and cooked through. After about 2 hours, start testing for doneness by inserting an instant-read thermometer in the thickest part of the breast away from the bone; it should register 165-170 degrees. You may also test the thigh – it should read 180 degrees. The turkey should roast a total of about 2 ¾ hours, but it can range from about 2 ½ - 3 hours or 12-14 minutes/pound.
- Transfer to a cutting board or warmed platter and cover loosely with aluminum foil until ready to carve, at least 20 minutes (I prefer longer.) Use the pan juices to make gravy.
- Prepare the gravy:
- Pour all the pan juices, including the fat into a fat separator. Allow the fat to separate from the juices.
- Heat the roasting pan over medium heat on the stove and add the pan juices, leaving the fat in the fat separator. Add the wine to the roasting pan. Bring to a boil and lower heat to a simmer for 2-3 minutes, stirring with a wooden spoon to dislodge any brown bits that stick to the bottom of the pan. Strain into a bowl or you can use the gravy separator again or wait until Step 4 and strain into the gravy saucepan.
- In a saucepan over medium heat, warm the reserved fat from the gravy separator until it is bubbly. You should have at least 3-4 Tablespoons. If you don’t, add some olive oil. Add the flour and whisk rapidly to cook the flour, about 2-3 minutes.
- Whisk in the strained pan juices and 3 cups of stock to the saucepan until smooth. Bring to simmer and cook until thickened, about 5 minutes. Season to taste with salt and pepper. Keep warm on lowest heat. Add additional stock as needed to achieve desired consistency.
 Like this recipe? Rate & comment below!


Hi Pamela,
I was just wondering if putting the turkey breast side down in the oven will potetntially dry out the breast?
Will oiling the rack be enough to prevent this from happening. This is my first time making a turkey for my entire family this Thanksgiving and I am so greatful to have found your recipes and plan!
Hi! Oiling the rack prevents the turkey from sticking to the rack. Putting the turkey breast-side down pulls the juices into the breast so that it isn’t dry. Remember the most important tips about cooking turkey: good seasoning, pull it out of the fridge an hour ahead so it doesn’t go into the oven cold, use a meat thermometer to check turkey temp, and allow resting time out of the oven. Let me know if you have any other questions. You’re going to make a delicious turkey!
Thanks so much Pamela! Just got all of my shopping done today so I am starting to feel more at ease!
Good for you! Sounds like you are in good shape 🙂
Since I have a pasture raised bird will I still be cooking it at the same temperature and the same amount of time that the recipe says to? I have heard that since the pasture raised birds have less fat on them the cooking temp and time could be different.
Absolutely correct. Less fat means faster cooking time. I would still stick with the method outlined here and the same temp, but be prepared for it to cook more quickly. Start checking the temp of the bird earlier. For a 12 pound turkey, you could be looking at about 2 1/2 hours total cooking time. But always check with a thermometer and do not rely on a chart or a recipe to indicate when a turkey is done
The recipe for the brine is for a 12 -14 lb turkey. I’m making 2 22b turkeys ( I have 32 people coming) would you double the amount of brine for that size turkey? Also, I know I read somewhere on your blog – to use 5 gallon buckets to brine the turkeys. I assume that you put the brining bag in the bucket – place the turkey in the brining bag and then pour in the brine. Is that correct? I’m not sure if I will have room in my refrigerator for 2 5 gallon buckets – if I can’t fit them in the fridge – should I place each bucket in a cooler and then pack in ice? That will be safe for the turkeys for 24 hours? thanks for your help. I’ve made many turkeys – but I’ve never brined one myself. Want to be sure I’m doing it right.
Brining is the best, so I’m glad you’re giving it a shot. Personally, with such a large birds, I would dry brine them which means to rub them inside and out with kosher salt. They will be easier to manage and you’ll probably be able to put them in the refrigerator. And they will still be delicious. They just need 2-3 days, as opposed to 24 hours. I would take 1/4 cup of salt and rub it in the cavity, a couple tablespoons outside the bird and a little under the skin on top of the breast meat. Cover it with plastic wrap and stick it in the fridge. Much easier than trying to deal with wet brine and huge turkeys. See this recipe here: https://pamelasalzman.com/traditional-roast-turkey-with-gravy/ If you insist on wet brining, you’ll probably only be able to use the amount of brine in the recipe because the bags only hold up to a 23 pound turkey. It will be enough to submerge the bird. Let me know if you have any questions!
I did not brine my turkey, as I was short of time, but I used the cooking method described in the recipe, and the turkey was delicious. Also new for me was letting the bird come to temperature an hour or so ahead of time. My mother said ‘it was the best turkey she ever had’, and she eats my turkeys every holiday! Thanks.
Nice job! Sounds like a big success for you! Thanks for writing in. I loved reading about your experience!
Hi There,
I noticed on your one week and counting that you show brining on Tuesday this year. I would prefer to just brine on Wed and rinse right before cooking. What do you recommend?
Absolutely fine! I just have too much stuff in the fridge Wednesday night that I need make more room, so I’m brining early, but taking them out early. Just make sure you pat the turkey dry with paper towels after rinsing.
Thank you, I’m going to give it a try! Enjoy your Thanksgiving!
thanks for sharing Pamela! I will be making my day-after-thanksgiving feast because my inlaws only ever ask me to bring drinks. Their loss! 🙂
What?? And you’re such an incredible cook! Enjoy the next day then! xo
Happy Thanksgiving Pamela! Somewhere, maybe on this site, I read that taking the wrap off of the turkey the night before while it is in the fridge, dries the skin and helps make the wonderful crispy skin when it is roasted. Would this still be the case if I used this recipe instead of the traditional dry brine that I usually do?
Thanks!
Yes, you did read that on another turkey post of mine. I try not to complicate things for people, so it’s just another thing to try if it sounds interesting to you. Truthfully, NOT basting the turkey also results in a very crispy skin, but I’m a baster, so my turkey skin always turns out nice and golden and crispy enough for me, but not crackling crisp. Worth a try though, if it appeals to you! Here’s how you do it: soak the turkey in brine Tuesday afternoon until Wednesday afternoon. Remove from the brine, rinse and pat try with paper towels. Place in the refrigerator UNCOVERED until Thursday morning. 🙂