Muesli


My husband and I have a division of labor approach to managing our home, kids and life. For example, he is in charge of sports, car issues, and electronics, and I handle meal preparation, communication with teachers and writing the checks (with mostly his money.) But the last few months I have been much busier than normal for me and I have begged asked my husband for help in the mornings with breakfast and lunch-making. On days I need to leave by 7:00am, we have worked out an arrangement where we split meal preparation duties. He’s does lunch and I’m on breakfast. You won’t tell him that I got the easier job, right?

Since I love prepping in advance, most of our breakfasts are done the night before, at least in part. Typical morning meals in our house are oatmeal (soaked the night before), pancakes (batter made the night before and kids taught how to cook them), yogurt and granola, egg and vegetable stratas (prepared the night before and baked in the morning), and muesli, the ultimate do-ahead, meal-in-a-bowl breakfast. I first discovered muesli eons ago while on vacation in Hawaii. The hotel breakfast buffet is always a little tough for me with the choices being either sugar (sweet pastries) or hi-fat, low-quality animal protein (sausages, ham.) But once, right there with the platters of inflammation, was this curious bowl of creamy raw oats and fruit. One bite and I was hooked on muesli’s subtle, natural sweetness and the long-lasting energy it gave me. Everytime I traveled, I searched for muesli on every breakfast buffet and never considered making it at home. Little did I know how easy it was to make.

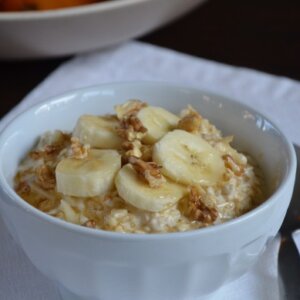
Muesli is essentially raw oats soaked overnight in yogurt, fresh juice and grated apple. The soaking process actually helps make the oats more digestible and the minerals more absorbable. I love it because it tastes creamy and delicious and makes me feel satisfied all morning long. Muesli tends to replace hot oatmeal in our house when the weather turns warmer. I usually make a batch once per week and it becomes an instant, but nourishing breakfast-to-go if I’m running late or for the kids if I need to leave before they come down for breakfast. It is a must-try if you are hosting house guests this summer! What you will also love about this recipe is that it is easily adaptable to the various palates in the house. Mr. Picky tops his muesli with strawberries, bananas and pecans and the girls have taken to raw cacao nibs, chopped almonds and blueberries. But really the sky’s the limit!

Muesli
Ingredients
- 3 cups old-fashioned rolled oats use gluten-free oats to make a gluten-free muesli
- zest of 1 lemon
- 1 1/2 cups freshly squeezed orange juice or apple juice
- 1/2 cup water or use all juice for more sweetness
- 2 cups unsweetened whole yogurt (use almond milk to make a dairy-free or vegan muesli)
- 2 apples unpeeled and grated (I use my food processor with the grater attachment, but grating them by hand is fine, too)
- Toppings: fresh berries or sliced bananas dried fruit, chopped nuts, flaked coconut, raw cacao nibs, raw honey or maple syrup
Instructions
- The night before: In a large bowl, mix all the ingredients, except toppings, in a large bowl. Cover and refrigerate overnight.
- The next morning: add sweetener to taste, if necessary. Divide the muesli among four bowls and top with favorite nuts or fruits.
Notes