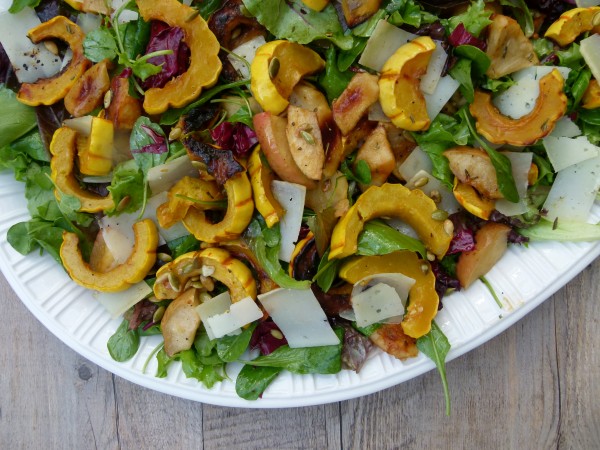
Roasted delicata squash and apple salad recipe

delicata squash and apple salad | pamela salzman

Oh, I know your Thanksgiving menu is probably planned and I think that is great!  I actually had no intention of trying to convince you today, this late in the game, that you absolutely must include such and such recipe on your holiday table.  I know you’re committed and that’s that.  But for the rest of you slackers, it’s your lucky day!  This is your Thanksgiving salad.  Period.  I have taught it umpteen times already this month, with another class to go and I am more obsessed with it than ever.  I think this salad actually makes turkey taste better!! Make some room on that menu!

prepping delicata and apples

Delicata squash should be nicknamed “THE Thanksgiving squash” because it’s seasonal, adorable, and minimal work.  You don’t peel it!  You eat the skin!  It tastes amazing! How much do you love me right now?  Forget butternut squash this year.  Give yourself a break and go with delicata.  I have no idea if you can find it where you live, but in Southern California it’s all over the place at every supermarket, farmers market and Trader Joe’s.  Sometimes it’s off-white with yellow stripes, sometimes pale yellow with orange and lots of in-betweens.

toss everything with coconut oil and maple syr

roasted and delicious

As much as I love delicata squash, my favorite part of this salad just might be the big wedges of roasted apples.  Pink Ladies are my favorite and I think are perfect here, but Honeycrisp, Fuji, Jonagold are all great, too.  Granny Smith is a little too tart in my opinion.  Leave the peel on to not only make your life easier, but I think the apples look prettier that way and hold their shape better.

delicata squash and apple salad | pamela salzman

Here’s your game plan for this salad:

  • make the dressing this weekend and store in a glass jar with a lid in the refrigerator
  • wash and dry your salad greens on Tuesday and store in the refrigerator
  • if you are using nuts or pumpkin seeds, toast them Tuesday and store at room temperature
  • wash, seed and cut delicata squash into slices on Wednesday and store in a container or ziploc in the refrigerator
  • shave Manchego cheese with a vegetable peeler and store in the refrigerator in a tightly sealed container
  • Thursday morning you can roast the delicate squash and apples and take the dressing out of the refrigerator to bring to room temp; store cooked squash and apples at room temp until dinnertime
  • right before carving the turkey, assemble and dress the salad!

Have an amazing Thanksgiving!!!

delicata squash salad


5.0 from 2 reviews
Roasted Delicata Squash and Apple Salad
Author: 
Serves: 6
 
Ingredients
  • 2 delicata squash, washed but not peeled, cut in half lengthwise, seeds removed, and cut into ½-inch slices
  • 2 large apples, cored, sliced into ½-inch slices (I cut them crosswise)
  • 3 Tablespoons olive oil or unrefined coconut oil, melted
  • 1 Tablespoon pure maple syrup
  • 1 teaspoon minced fresh rosemary (optional, but I think it’s delicious)
  • 1 teaspoon sea salt
  • freshly ground black pepper, to taste
  • 10 cups mixed greens including some bitter varieties such as radicchio and/or arugula
  • Dressing:
  • 2 Tablespoons apple cider vinegar, preferably raw
  • 5 Tablespoons unrefined, cold-pressed extra-virgin olive oil
  • ¾ teaspoon Dijon mustard
  • ½ teaspoon sea salt
  • freshly ground black pepper, to taste
  • 2 teaspoons pure maple syrup
  • Toppings: shaved manchego cheese, ½ cup buttered and salted toasted pecans or toasted, salted pumpkin seeds
Instructions
  1. Preheat oven to 400 degrees and line 2 baking sheets with parchment paper.
  2. Place the squash and apples in a large bowl and add the melted coconut oil and 1 Tablespoon maple syrup. Toss to coat. (You can also add the apples to the salad raw instead of roasted.)
  3. Place the apples and squash in one layer on the baking sheets and sprinkle with rosemary, salt and pepper. Roast until tender, approximately 20-30 minutes. Remove from the oven and set aside to cool.
  4. For the dressing: in a small bowl or screw top jar combine apple cider vinegar, olive oil, Dijon, salt, pepper and maple syrup and whisk or shake to combine. You may have more dressing than you need for this recipe.
  5. Place salad greens on a platter and toss with enough dressing to coat lightly. Separately drizzle the squash and apples with some dressing and add to the greens. Sprinkle with any desired toppings. Taste for salt and pepper and serve.


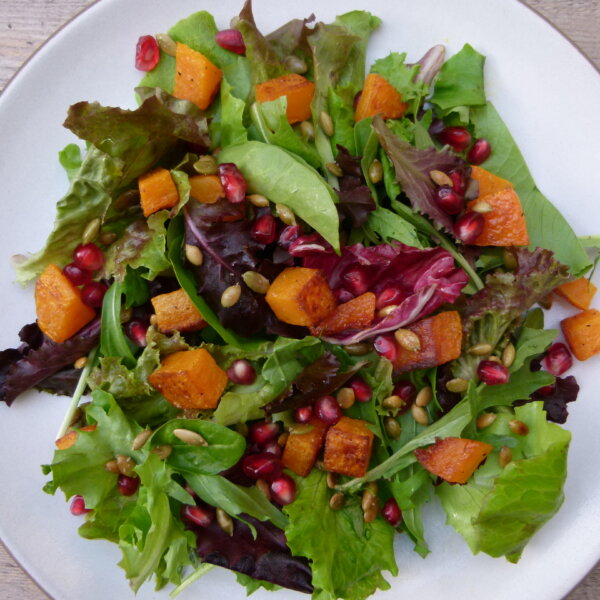
Butternut squash salad with pomegranates and toasted pumpkin seeds

butternut squash salad with pomegranates and pumpkin seeds | pamela salzman

Although I love planning and cooking the whole Thanksgiving meal, a few years ago I decided I was just plain bored with the same old same old.  The problem was that no one else was.  My family and regular Thanksgiving guests wanted no deviation from tradition.  I hinted at the notion that maybe, perhaps I would replace the standard stuffing with a fabulous grain-based recipe I had been testing.  A rebellion!!!  Oh, come on people.  Like you need more bread?  Fine, the stuffing stays.  But that didn’t prevent me from trying to show everyone how overly starchy Thanksgiving is.  So I asked, “Can we do away with the mashed potatoes or make them more interesting with some roasted garlic or cauliflower puree?”  I’m sure you can guess how that went.


Someone asked me the other day what is my favorite part of the Thanksgiving meal.  I’ll give you three seconds to guess.  Okay, time’s up.  The vegetables!  Too obvious, I know.  Actually, it’s really the salad that is the highlight of the meal for me because I can change it up every year and it’s the only way I get to have any fun at all.  The beautiful colors of the vegetables do a lot to balance out all that beige, not to mention balance out all the carbs.  I also love eating something raw with all that cooked food.  But from a logistical perspective, salads can be made without the use of a stove or oven, which is a saving grace on Thanksgiving.  And, as if it couldn’t get any better, salads, for the most part, can be prepped in advance.

This butternut squash salad is something I made for Thanksgiving a few years ago and I still make it often for entertaining or for potlucks during the fall.  It’s beautiful, healthful, delicious and showcases the season’s great produce.  I have a theory that fruits and vegetables that grow during the same season usually complement each other very well.

On that note, there aren’t too many fall salads that wouldn’t be more fabulous with the addition of a handful of pomegranate seeds.  In fact, I think every Thanksgiving salad I’ve made in the last 8 years has had pomegranate seeds scattered throughout.  My kids and I are obsessed with them.  It was a happy day in our house the day I came home from the farmer’s market with the first pomegranates of the season.  I’ve even taught my kids how to seed them — Mr. Picky, who is a Virgo, is rather meticulous about getting every last seed out.  We open the pomegranates under water and gently push the seeds away from the peel.  It’s actually quite therapeutic, but more importantly, it keeps me from making a trip to the dry cleaner.  Also, people tell me that the already seeded pomegranates always seem a bit soggy.  They’re certainly much more expensive and why would you pay your grocery store a premium when you’ve got kids to do the job?

butternut squash salad with pomegranates and toasted pumpkin seeds | pamela salzman

butternut squash salad with pomegranates and toasted pumpkin seeds | pamela salzman

5.0 from 1 reviews
Butternut Squash Salad with Pomegranates and Toasted Pumpkin Seeds
Author: 
Serves: 6-8
 
Ingredients
  • ⅓ cup raw hulled pumpkin seeds (pepitas) or chopped pecans
  • 3 Tablespoons unrefined, cold-pressed extra-virgin olive oil or unrefined melted coconut oil + 1 teaspoon olive oil for the pumpkin seeds
  • 1 3-pound butternut squash, peeled, seeded and cut into ¾ -inch dice
  • 1 Tablespoon fresh thyme leaves or 2 teaspoons chopped fresh rosemary (I accidentally left it out in this picture.)
  • 1 ½ teaspoons sea salt
  • freshly ground black pepper to taste
  • 8 ounces mixed baby greens
  • ½ cup fresh pomegranate seeds
  • Dressing:
  • 2 Tablespoons fresh lemon juice
  • 2 Tablespoons fresh pomegranate juice (or orange juice)
  • ½ teaspoon sea salt
  • A few twists of freshly ground black pepper
  • 2 teaspoons minced shallot
  • 2 teaspoons maple syrup or raw honey
  • 6-7 Tablespoons cup unrefined, cold-pressed extra-virgin olive oil
Instructions
  1. Preheat oven to 400 degrees.
  2. Place the pumpkin seeds in a skillet and toast over low heat until lightly browned. Drizzle with 1 teaspoon olive oil and a pinch of sea salt. Remove from heat and set aside. Try not to eat them all while you’re cooking everything else.
  3. Toss the squash with thyme and olive oil or coconut oil and place on 2 baking sheets. Season with sea salt and pepper. Roast for 35-40 minutes, turning once until tender and caramelized.
  4. For the dressing: in a small bowl combine lemon juice, pomegranate juice, shallot, maple syrup, sea salt and pepper. Whisk in olive oil until emulsified.
  5. Place salad greens on a platter and toss with enough dressing to coat lightly. Separately drizzle the butternut squash with some dressing and add to the greens. Sprinkle with the pomegranate seeds and pumpkin seeds. Taste for salt and pepper.
Notes
Dressing can be made a few days ahead and kept refrigerated.

Pumpkin seeds can be toasted the day before.

Salad greens can be washed and dried a few days in advance and rolled up in a damp kitchen towel or plastic bag and kept in the refrigerator.

Butternut squash can be cut up the day before and kept refrigerated.

Pomegranate can be seeded several days in advance and kept refrigerated.


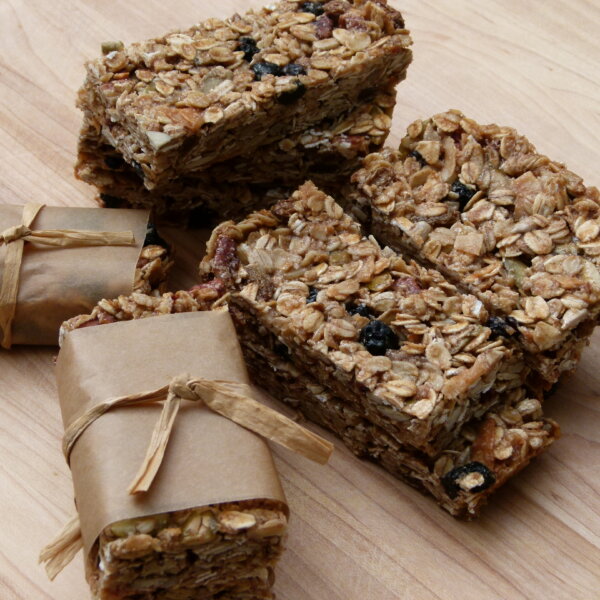
Healthy Granola Bars Recipe

Healthy Granola Bar

Has school started in your neck of the woods?  We’re back at it this week.  I get a little bummed when the kids go back to school.  I’ve really enjoyed spending more time with them and summer is so much less stressful, especially for my high schooler.  That and, despite what you might think, I don’t love making lunches at 6:30 am everyday, as well as trying to keep a substantial supply of well-balanced snacks for the kids and their friends.  You know I love to cook and it’s a major priority for me to feed myself and the kids well, but it’s definitely a challenging task which I know many of you try to tackle most days, too.

The fact is I don’t actually make all of the kids’ snacks, because I really don’t have that kind of time.   But there are a few that I can make quickly, easily and that are more delicious (and healthful) than what you can buy in a store.  I hope to post my guidelines next week for choosing a healthful snack, but making sure there’s some protein in there is super important, otherwise you run the risk of a blood sugar rollercoaster.  One snack that I guessed wouldn’t be too tricky to figure out was granola bars.  Last summer I tested granola bar recipes for about two months and had the tight jeans to prove it.  I wouldn’t call it a low-calorie snack mostly due to the nuts and seeds, but I if the kids need something to tide them over until dinnertime or get them through soccer practice, goldfish and a fruit roll-up aren’t going to cut it.  I am always going to look for something like these bars, which are made from real ingredients, contain protein and fiber and a minimal amount of sugar, plus a little love from Mom.

The problem is that these granola bars are so good, I have a hard time being in the house and not sneaking one or more when I’m not really even hungry.  They have most of the same flavors as my granola, but with a little butter.  What they don’t have is tons of refined sugar like so many granola bar recipes I see.  If you are dairy-free or vegan, you can definitely use coconut oil, but I have a soft spot for the combination of butter, pecans and a pinch of sea salt.  Yum!  Like granola, you can adjust this recipe to suit you.  (And yes, you can add chocolate chips.)  I like my granola bars a little on the thick side (see bottom photo), but if you like yours thinner and crunchy (see lead photo), you can use an 8 x 10 pan.  Try these out and if your family loves them, make a double batch and freeze them.  Because in my world, September not only means school, but soccer games, scouts meetings, study groups and playdates.  Need any more reasons to make these?

Healthy Granola Bars
Author: 
Serves: makes 8-12 bars, depending how you slice 'em
 
Ingredients
  • 2 cups old-fashioned rolled oats (not quick-cooking)
  • ¼ cup raw sunflower seeds
  • ¼ cup raw pumpkin seeds
  • ¼ cup unsweetened coconut flakes
  • ½ cup chopped raw nuts (pecans or almonds are good)
  • ¼ cup ground almond meal
  • 1 ¼ teaspoons cinnamon
  • ½ teaspoon sea salt
  • ½ cup unsulphured dried fruit (such as chopped apricots, cranberries, cherries, blueberries)
  • 3 Tablespoons unsalted butter, melted (my preference) or melted coconut oil
  • ½ cup brown rice syrup (or honey)
  • 1 teaspoon pure vanilla extract
Instructions
  1. Preheat oven to 350 degrees.
  2. If you like thick granola bars, grease an 8 or 9-inch square pan with butter or coconut oil and line with unbleached parchment paper (this will help get the bars out of the pan.) If you like them thinner, say ¾-inch thick, grease an 8x 11-inch pan.
  3. Place oats, seeds, coconut and nuts on large baking sheet and toast for 12-15 minutes. Do not allow anything to burn!
  4. In a large bowl combine almond meal, cinnamon, salt and dried fruit. When oat mixture is out of the oven, add to bowl. Mix the melted butter, brown rice syrup and vanilla together and pour over the oat mixture, stirring well to coat evenly.
  5. Pour mixture into pan and press down with a spoon, spatula or damp hands.
  6. Bake for about 20-25* minutes, or until lightly colored on top. The granola bar will be soft to the touch when it comes out of the oven, but will firm up as it cools. Allow to cool completely, at least 2 hours. Run a knife around the edge of the pan to loosen the bar. Invert the pan over a cutting board to remove. Cut into individual bars and eat or store in a covered container.**
Notes
*Baking it longer will result in a crispier, firmer bar, but it may be harder for little ones to chew easily.

**If the weather or your kitchen is warm, it’s better to store the bars in the refrigerator.


Â