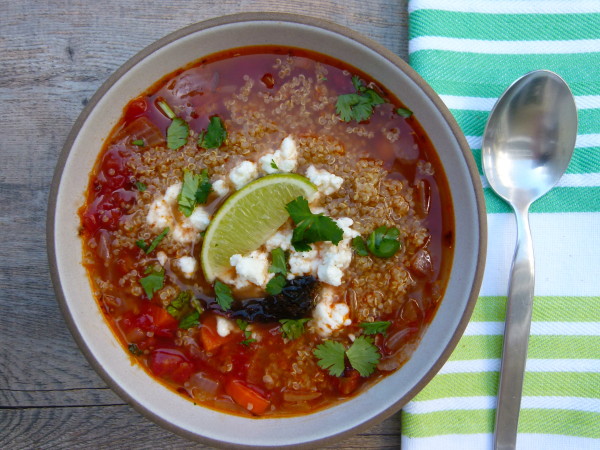
How to Make Caldo Tlalpeño Soup Recipe (with Quinoa!)

This caldo tlalpeño recipe is a hearty soup filled with amazing Mexican flavors, fresh veggies, aromatics, and chipotle chiles. Served with delicious garnishes, this filling and satisfying soup is great for colder days, months, or any time of year!


Caldo Tlalpeno Soup |Pamela Salzman


What Is Caldo Tlalpeño


Caldo Tlalpeño is a vibrant and hearty Mexican soup that is beloved for its complex flavors and comforting qualities. This Mexican dish is made with a base of rich chicken broth and features traditional ingredients like shredded chicken and a mix of vegetables such as carrots, zucchini, green beans, and chickpeas for added heartiness. It originated in Tlalpan, a borough of Mexico City, Mexico.


What sets Caldo Tlalpeño apart is the chipotle pepper, which infuses the soup with a distinctive smoky and spicy flavor. It is often garnished with fresh avocado, lime, and cilantro. Caldo Tlalpeño is not only a staple in Mexican cuisine but also a favorite soup for a nourishing meal during cold and rainy days.


What Makes This Recipe Great


I am always looking for new and different Mexican dishes to try on my family.  There are only so many fish taco and chicken fajita recipes that they’ll put up with. When I saw a recipe for Caldo Tlalpeño Soup, I knew right away that this would be a keeper.  There are so many variations on this soup, which I think of as a slightly spicy, smoky Mexican chicken soup.  


Chipotles, which are dried, smoked jalapeño peppers, are always the star of the show.   Without them, this would just be a chicken and vegetable soup.  Although the ingredients in Caldo Tlalpeño vary from region to region and restaurant to restaurant, you cannot make this soup without the chiles.  


I have also seen versions with diced zucchini, green beans, chayote, or rice.  Epazote is a traditional herb used in this soup, but it’s not easy for everyone to find, so I often use oregano in its place.  Not an exact, perfect sub, but good enough.


One of my favorite things about Mexican food is adding all those great toppings and condiments.  So many of my favorite dishes are incomplete without salsa, guacamole, cilantro radishes, or all of the above.  The topping bar is also my secret weapon with Mr. Picky.  He’ll eat almost anything if he is allowed to top it with corn tortilla chips or diced avocado. 


Caldo Tlalpeño is great on its own, but I make this a full meal with a little cooked quinoa (not at all traditional, but amazing here), a pinch of sheep’s milk feta (also nontraditional, but delish,) and a squeeze of lime and some fresh cilantro.  So light, fresh, healthful, and delicious.


Ingredient Notes


  • unrefined, cold-pressed, extra-virgin olive oil
  • yellow or white onion
  • carrots
  • garlic cloves
  • jar of diced tomatoes: I like Jovial tomatoes in glass jars. I don’t recommend fresh tomatoes as the jarred version adds more to the broth. 
  • whole dried chipotle chiles: Or 2 canned chipotles in adobo (I much prefer the dried chiles.
  • dried oregano
  • cooked chickpeas: Or one can, drained and rinsed. Also called garbanzo beans. 
  • sea salt 
  • chicken or vegetable stock: Preferably homemade, but storebought will work. 
  • baby leafy greens
  • optional accompaniments: Lime, fresh cilantro, crumbled cotija or feta cheese, cooked quinoa or rice, shredded and cooked chicken, and diced avocado.


Step-by-Step Instructions


saute the aromatics


In a large saucepan warm the olive oil over medium heat. Add the onion, carrots, and garlic and sauté until tender, about 6 minutes.


add tomatoes, oregano and chipotles


Add the tomatoes, chiles, and oregano and sauté for 2 minutes.


simmer until carrots are tender


Stir in the chickpeas, sea salt, and stock. Bring to a boil and lower to a simmer. Cook covered until carrots are tender, about 20 minutes.


Caldo Tlalpeno Soup


Stir in the greens and turn off the heat. Taste for salt and adjust accordingly. Pour into bowls and serve with suggested accompaniments if desired.


Caldo Tlalpeno Soup with a twist | Pamela Salzman


Expert Tips


  • 4 chiles make this soup about 2-3 on a heat scale of 1-10.   Eating them whole, however, is quite spicy.  You can dice them up or puree them with a little broth when the soup is finished and serve them with the other condiments/toppings for an extra kick.
  • While I made this soup without animal protein, you can always add cooked chicken breasts (leftover chicken or shredded chicken work well).

Serving Tips


To serve Caldo Tlalpeño, ladle the hot soup into individual bowls. Garnish each bowl with desired toppings including fresh avocado slices, chopped cilantro, and lime wedges on the side for squeezing. 


Optionally, add finely chopped onions, queso fresco, or crumbled Cotija for extra flavor. Serve with warm tortillas or crusty bread to complement the rich, smoky broth. 


Storage Tips


To store Caldo Tlalpeño, allow it to cool to room temperature, then transfer to an airtight container and refrigerate for up to 3-4 days, or freeze for up to 3 months. Reheat thoroughly and give it a good stir before serving.


caldo tlalpeno soup | pamela salzman


More Mexican-Inspired Recipes


If you give this recipe a try, snap a pic and tag @pamelasalzman on Instagram so I can see your beautiful creations. I also really appreciate readers taking the time to leave a star rating and review! Lastly, subscribe for free to my site for the latest recipes and updates.


For more delicious recipes and to learn how to be a better cook, check out my monthly online cooking classes. I have been teaching people for 15 years how to cook healthy food that their families love!  Join me!


This post may contain affiliate links


Get The Recipe


5.0 from 1 reviews
Caldo Tlalpeño Soup
Author: 
Serves: 6
 
This caldo tlalpeño recipe is a hearty soup filled with amazing Mexican flavors, fresh veggies, aromatics, and chipotle chiles. Served with delicious garnishes, this filling and satisfying soup is great for colder days, months, or any time of year!
Ingredients
  • 2 Tablespoons unrefined, cold-pressed, extra-virgin olive oil
  • 1 onion, diced
  • 2 large carrots, sliced into half-moons
  • 2 garlic cloves, finely chopped
  • 1 15-ounce jar diced tomatoes (I like Jovial tomatoes in glass jars.)
  • 4-6 whole dried chipotle chiles (use fewer for less heat*), or 2 canned chipotles in adobo (I much prefer the dried chiles.)
  • 1 teaspoon dried oregano
  • 1 ½ cups cooked chickpeas or 1 15-ounce can, drained and rinsed
  • Sea salt (1-3 teaspoons according to whether or not your stock is salted)
  • 6 cups chicken or vegetable stock, preferably homemade
  • 4 cups baby leafy greens
  • Optional accompaniments: lime, fresh cilantro, crumbled cojita or feta cheese, cooked quinoa or rice, shredded and cooked chicken, diced avocado
Instructions
  1. In a large saucepan warm the olive oil over medium heat. Add the onion, carrots and garlic and sauté until tender, about 6 minutes.
  2. Add the tomatoes, chiles, and oregano and sauté for 2 minutes.
  3. Stir in the chickpeas, sea salt and stock. Bring to a boil and lower to a simmer. Cook covered until carrots are tender, about 20 minutes.
  4. Stir in the greens and turn off the heat. Taste for salt and adjust accordingly. Serve with suggested accompaniments if desired.
Notes
Expert Tips

4 chiles make this soup about 2-3 on a heat scale of 1-10.   Eating them whole, however, is quite spicy.  You can dice them up or puree them with a little broth when the soup is finished and serve them with the other condiments/toppings for an extra kick.
While I made this soup without animal protein, you can always add cooked chicken breasts (leftover chicken or shredded chicken work well). 

Serving Tips

To serve Caldo Tlalpeño, ladle the hot soup into individual bowls. Garnish each bowl with desired toppings including fresh avocado slices, chopped cilantro, and lime wedges on the side for squeezing. 

Optionally, add finely chopped onions, queso fresco, or crumbled Cotija for extra flavor. Serve with warm tortillas or crusty bread to complement the rich, smoky broth. 

Storage Tips

To store Caldo Tlalpeño, allow it to cool to room temperature, then transfer to an airtight container and refrigerate for up to 3-4 days, or freeze for up to 3 months. Reheat thoroughly and give it a good stir before serving.


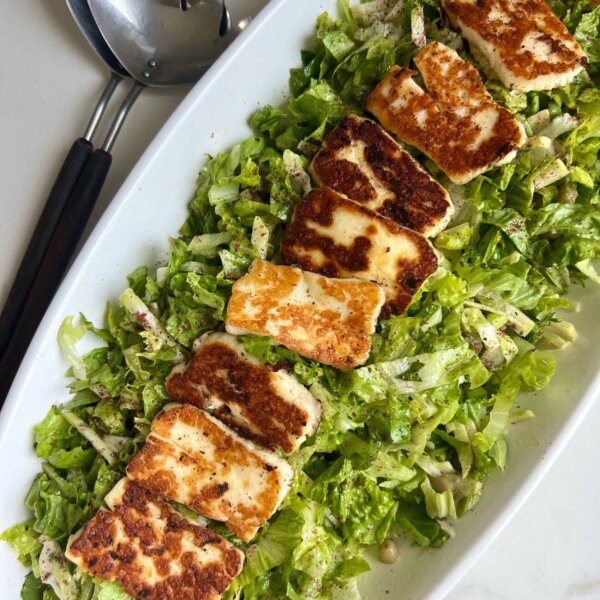
Grilled Halloumi Salad with Sumac Dressing

This Halloumi Salad features crispy grilled halloumi cheese atop a bed of fresh greens and veggies and topped with a homemade sumac dressing. A refreshing, delightful salad for any gathering or occasion. 


grilled halloumi salad in a white dish


What is Halloumi Cheese


Halloumi cheese is a traditional cheese originating from Cyprus, known for its unique texture and high melting point. This salty cheese is made from a mixture of goat’s milk and sheep’s milk and sometimes cow’s milk. It’s a firm cheese with a rubbery texture and develops a crispy crust when grilled or fried. 


The salty and tangy flavors make a delicious accompaniment to fresh veggies, herbs, and mild salad dressings. Add this to your regular rotation for a delicious appetizer or side salad. 


What Makes This Halloumi Salad Recipe Great


Halloumi is a delicious, unique, and overlooked cheese. It is terrific in a salad because it doesn’t fall apart when you cook it. It just gets soft with lots of texture from grilling it. 


Remember what I always say about salads – you don’t need to follow the recipe exactly and you can mix and match ingredients. Feel free to add additional ingredients and proteins as desired. This salad would also be great with pita chips crushed on top. 


It’s topped with a fresh and zesty sumac dressing that pairs perfectly with the fried halloumi! 


Ingredient Notes


recipe ingredients in their original packaging


Sumac Dressing

  • fresh lemon juice and zest
  • unrefined cold-pressed extra-virgin olive oil
  • sea salt or kosher salt, to taste
  • Freshly ground black pepper to taste
  • raw honey or pure maple syrup
  • ground sumac


Halloumi Salad Ingredients

  • romaine lettuce, chopped (or use your favorite greens)
  • radishes sliced thinly or julienned
  • dill pickles diced or a handful of cornichons chopped
  • fresh mint or dill, leaves only, chopped
  • container of Halloumi cheese: If you can’t find this cheese in grocery stores, feel free to sub goat cheese or feta or vegan feta (cold, not cooked).


Step-by-Step Instructions


numbered step by step photos showing how to make this recipe


  1. Combine all the dressing ingredients in a jar with a screw-top lid and shake until emulsified.
  2. Arrange the salad greens, radishes, pickles, and herbs in a large bowl or platter.
  3. Preheat a nonstick skillet or grill pan over medium-high heat. Pat the halloumi dry and slice it into ½-inch thick slices if it is not already sliced.  Make sure your grill pan is clean otherwise, the halloumi will stick.  Sear the halloumi until golden brown, about 2-3 minutes. Turn over and sear on the other side.
  4. Lightly drizzle the dressing atop the salad and toss until just combined. Arrange the warm and crispy halloumi on top and serve immediately.


halloumi grilling in a pan


Expert Tips


  • Dairy-free or Vegan: Swap in chickpeas or avocado for the halloumi. 
  • Added Protein: You can add extra proteins like cooked shredded chicken, cubed tofu, cooked legumes, or another protein source if desired. 
  • Additional Ingredients: As always with a salad, add your favorite ingredients. Some options include cucumbers, cherry tomatoes, red onion, green onion, baby spinach or spring mix, kalamata olives, fresh herbs, creamy avocado, red peppers, etc. 
  • Cooking Methods: You can grill the halloumi in a skillet over the stovetop, on a grill pan, or even on your outdoor grill. 


Serving Tips


Serve this salad lightly dressed with the sumac dressing with the grilled halloumi cheese atop the bed of greens and veggies. Drizzle additional dressing as desired. It works as an appetizer, or side dish for a gathering and accompanies any main dish really well. 


Storage Tips


This halloumi salad is best eaten immediately. If you have leftovers, I recommend storing the cheese separately from the salad in individual airtight containers for up to 48 hours. Store any leftover sumac salad dressing in a mason jar or container with a tight-fitting lid and store in the fridge for up to a week. 


a halloumi salad in a serving platter


More Favorite Salads

Mexican Cobb Salad

Wedge Salad with Creamy Dressing

Roasted Beet Greek Salad

Cauliflower Crunch Salad Recipe


If you give this recipe a try, snap a pic and tag @pamelasalzman on Instagram so I can see your beautiful creations. I also really appreciate readers taking the time to leave a star rating and review! Lastly, subscribe for free to my site for the latest recipes and updates.


For more delicious recipes and to learn how to be a better cook, check out my monthly online cooking classes. I have been teaching people for 15 years how to cook healthy food that their families love!  Join me!


This post may contain affiliate links


Get the Recipe


Seared Halloumi Salad with Sumac Dressing
Author: 
Serves: 4-6
 
This Halloumi Salad features crispy grilled halloumi cheese atop a bed of fresh greens and veggies and topped with a homemade sumac dressing. A refreshing, delightful salad for any gathering or occasion.
Ingredients
  • Sumac Dressing
  • zest of 1 lemon and the juice of ½ a lemon
  • ¼ cup unrefined cold-pressed extra-virgin olive oil
  • ¼ teaspoon sea salt, to taste
  • Freshly ground black pepper to taste
  • Drop of raw honey or pure maple syrup
  • ½ teaspoon ground sumac
  • Halloumi Salad
  • 1 head of romaine lettuce, chopped (or use your favorite greens)
  • A few radishes, sliced thinly or julienned
  • 2 dill pickles, diced or a handful of cornichons, chopped
  • A handful of fresh mint or dill, leaves only, chopped
  • 1 8-ounce container Halloumi cheese
Instructions
  1. Combine all the dressing ingredients in a jar with a screw-top lid and shake until emulsified.
  2. Arrange the salad greens, radishes, pickles, and herbs in a bowl or platter.
  3. Preheat a skillet or grill pan over medium-high heat. Pat the halloumi dry and slice it into ½-inch thick slices if it is not already sliced. Make sure your grill pan is clean otherwise, the halloumi will stick. Sear the halloumi until golden brown, about 2-3 minutes. Turn over and sear on the other side.
  4. Lightly dress the salad and toss until just combined. Arrange the warm halloumi on top and serve immediately.
Notes
Expert Tips

Dairy-free or Vegan: Swap in chickpeas or avocado for the halloumi.
Added Protein: You can add extra proteins like cooked shredded chicken, cubed tofu, or another protein source if desired.
Additional Ingredients: As always with a salad, add your favorite ingredients. Some options include cucumbers, cherry tomatoes, red onion, green onion, baby spinach or spring mix, kalamata olives, fresh herbs, creamy avocado, red peppers, etc.
Cooking Methods: You can grill the halloumi in a skillet over the stovetop, on a grill pan, or even on your outdoor grill.

Serving Tips

Serve this salad lightly dressed with the sumac dressing with the grilled halloumi cheese atop the bed of greens and veggies. Drizzle additional dressing as desired. It works as an appetizer, or side dish for a gathering and accompanies any main dish really well.

Storage Tips

This halloumi salad is best eaten immediately. If you have leftovers, I recommend storing the cheese separately from the salad in individual airtight containers for up to 48 hours. Store any leftover sumac salad dressing in a mason jar or container with a tight-fitting lid and store in the fridge for up to a week.

This post may contain affiliate links, thanks for the love!