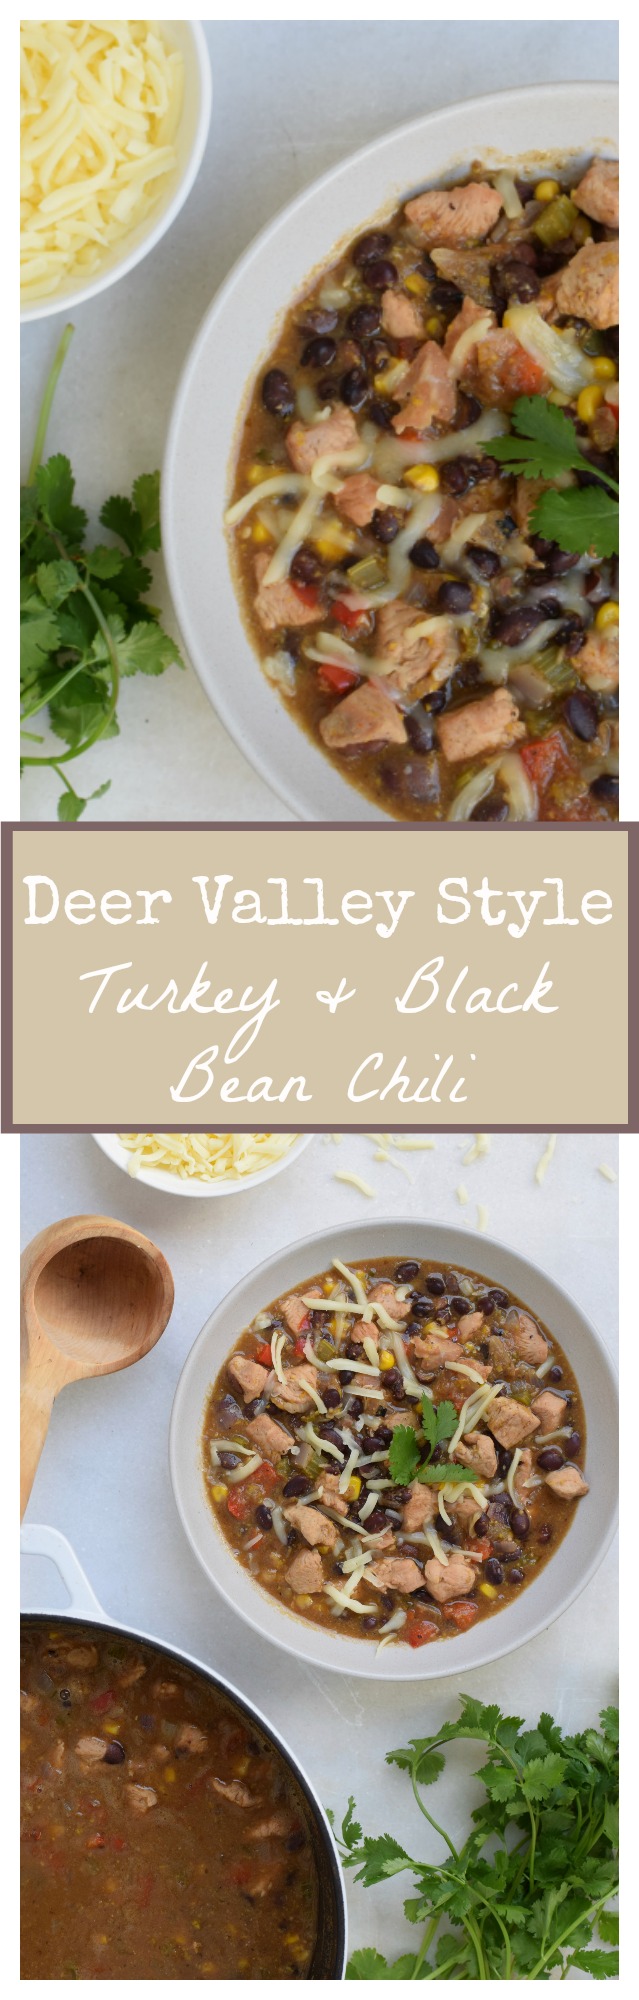
Deer Valley-Style Turkey and Black Bean Chili Recipe

Are we having fun yet?!  Good, good.  I have been running around the house yesterday and today like a busy bee, very excited that the big day is almost here.  I’m taking a quick breather from the Thanksgiving marathon just to touch base and check-in with you all.  Hope everything is going according to plan and that you’re enjoying the process.  What I am not doing today, however, is sharing a Thanksgiving recipe on the day before Thanksgiving because I know you are all planners and that ship has sailed!

Instead, I thought I would give all you super organized and efficient people a great way to use up any leftover turkey you might have on Friday.  I always make turkey stock and a simple turkey vegetable soup the day after.  I have also given in to chicken pot pie or shepherd’s pie with turkey.  But I also think it’s nice to make something on Friday that tastes NOTHING like the dinner you just spent a month thinking about!  It’s actually one of my strategies for getting everyone excited to eat leftovers even the day after Thanksgiving.

This recipe is inspired by the fabulous chili at the Deer Valley ski resort in Utah.  I first skied Deer Valley in 1994 when my husband and I were engaged.  He and his family have been going to the resort since it first opened over 30 years ago.  It is a really special place and we are fortunate to be able to go there a couple times each year with the kids.  Although I enjoy skiing and Deer Valley is absolutely stunning, I’m not super gung-ho about getting out there early and making the most of my day on the slopes.  I’m really in it for the food.  My favorite part about skiing is building up a good appetite and rewarding myself with a nice hearty lunch.  I actually start thinking about this turkey chili when I sit down on the chair lift for the first run of the day!

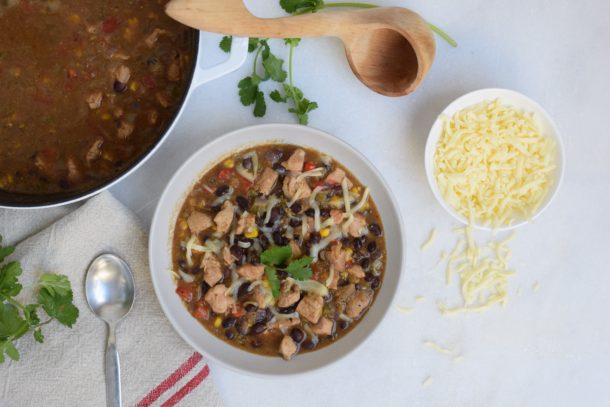
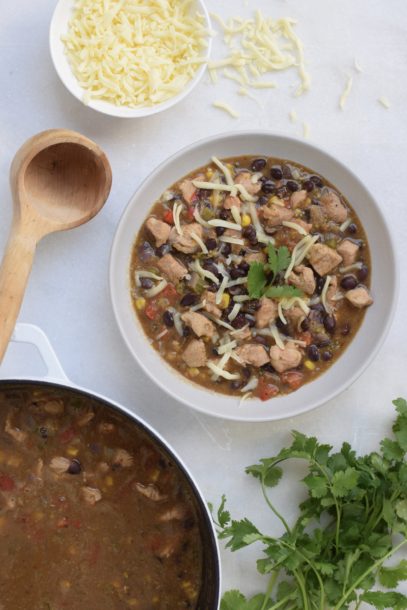
Turkey chili is one of the few items that the resort serves every single day.  I happen to notice the the lunchrooms also serve a roast turkey plate every single day.  Hmmm, could it be the kitchen needed to find a way to use up yesterday’s roast turkey?  Hmmm….  Anyway, we all love this chili because it’s lighter than a beef chili and a totally different take on the typical red, tomato-based ones that are so common.  This one is lighter and tastes fresher, perhaps because of all the delicious vegetables.   Regardless, all the signature shops on the mountain and many of the local grocery stores sell the special seasoning packet and the dried black beans in addition to the recipe so you can make it at home.  For $7 or $8 plus the cost of the turkey, vegetables and stock, you can make this pot of deliciousness at home.   Hmmm….$8 for 1/2 pound of dried beans and a few dried spices.  It wasn’t long before I decided I need to figure out what the heck was in that seasoning packet!

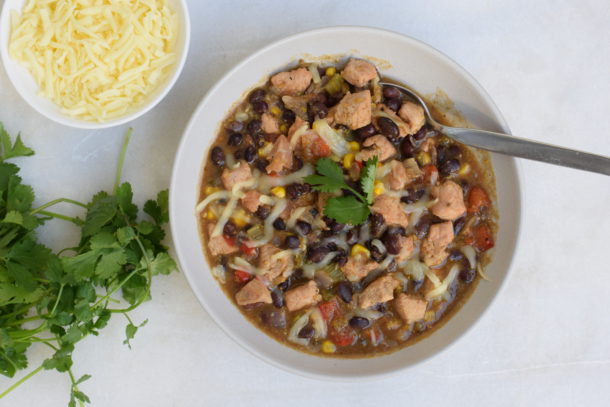
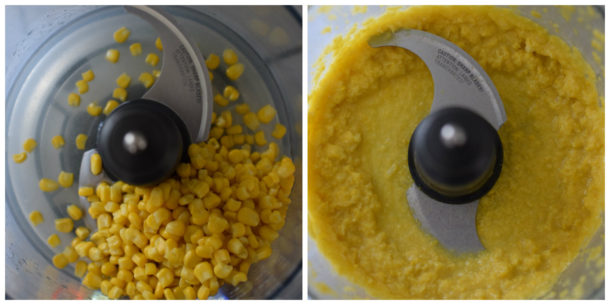
I can’t say this turkey chili is exactly like Deer Valley’s, but it’s close enough and I’m not sure my kids have noticed.  For sure I use half the amount of butter than the recipe calls for and I omitted the leeks, which I think don’t make or break this chili.  I also don’t use canned creamed corn, because ugh — canned and creamed and sugar don’t go with corn — so instead I just make a little corn puree.  The only ingredient you may not have lying around is masa, which is ground dried corn that’s been treated with lime.  It’s what corn tortillas and tamales are made from.  I have to say, it does thicken up the chili and give it a fabulous Southwestern corn flavor.  It’s also not an expensive ingredient, so I say definitely go for it.

Alrighty, dear readers, that’s all the time I have today. I am elbow-deep in sweet potatoes and butternut squash and my kids are starting to bicker about who gets to pick the music we listen to while we work.  Ahhh, sounds like Thanksgiving!  Hoping you all have a lovely holiday.  xoxo


5.0 from 3 reviews
Deer Valley-Style Turkey and Black Bean Chili
Author: 
Serves: 8
 
Ingredients
  • 4 Tablespoons unsalted butter (you can use oil, but it won’t be as good) -- vegans can use organic Earth Balance
  • 2 pounds boneless, skinless turkey breast, cut into 1-inch cubes or cooked turkey, cubed -- vegetarians and vegans can add 5 cups of additional vegetables and beans
  • 1 red onion, chopped
  • 1 cup chopped celery, about 3 stalks
  • 1 sweet red bell pepper, chopped
  • 1 jalapeno, seeded (or leave seeds for extra heat) and finely diced (optional)
  • 2 cloves garlic, finely diced
  • ¼ cup masa harina (more if you like a thick chili)
  • 2 ½ Tablespoons ground cumin
  • 2 Tablespoons ground coriander
  • 2 teaspoons dried oregano
  • 1 teaspoon cayenne (cut back if you don't like spicy)
  • 2 Tablespoons maple sugar or natural cane sugar
  • 2 teaspoons sea salt (double if you’re using unsalted stock)
  • freshly ground black pepper to taste
  • 4 ½ cups of chicken or turkey stock, divided* -- vegans can use vegetable stock
  • 2 ¼ cups frozen sweet corn, thawed (about 12 ounces)
  • 5 cups or 3 15-ounce ounce cans cooked black beans (drained and rinsed)
Instructions
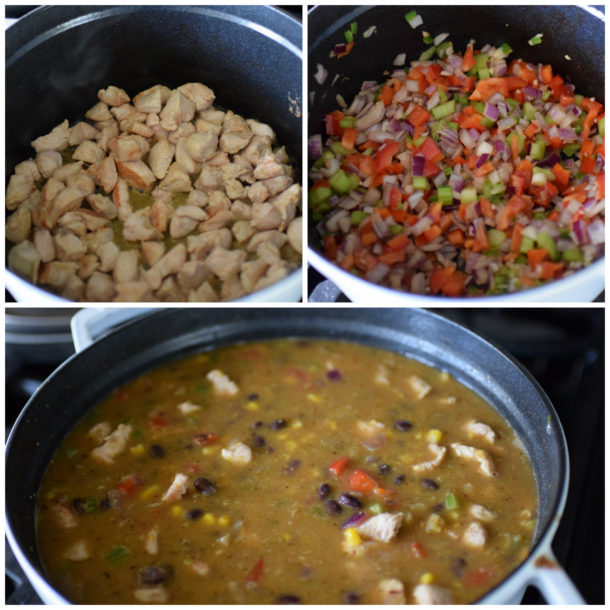
  1. Melt butter in a large pot. If using raw turkey, add half the turkey and sauté until lightly browned. Remove with a slotted spoon to a bowl. Repeat with the remaining turkey. If using cooked turkey, do not saute in butter, but add in step 3.
  2. Add the onion, pepper, celery, jalapeno, and garlic to the pot and sauté until tender, about 10 minutes.
  3. Add the masa harina, spices, sugar, salt and pepper to the pot and cook, stirring frequently for 5 minutes. Return turkey and any accumulated juices back to the pot.
  4. Add 4 cups stock, 1 cup corn and the beans to the pot. Take the remaining 1 ¼ cup of corn and puree with the remaining ½ cup stock in a food processor (a mini processor works too.) Add the pureed corn to the pot. Mix well and bring to boil over medium-high heat. Lower the heat to a simmer and cook, partially covered for 25 minutes. Serve with desired condiments (sour cream, cheese, minced onion, cilantro) or serve on top of a baked potato.
Notes
*If you only have stock in 32 oz. containers, no need to open a new one just for a ½ cup of stock. Puree corn in ½ cup water.


Deer Valley-Style Turkey and Black Bean Chili | Pamela Salzman

Red lentil dal recipe

I think Indian food is very misunderstood in this country.  Many people have the impression it’s overly spicy, heavy and greasy.  Perhaps it’s because there aren’t a plethora of great Indian restaurants here and very often the not-so-great ones do serve oily, creamy dishes.  Who knows, but that’s not what Indian food is all about.  I started experimenting with Indian-inspired recipes about a year ago and fell in love.

I am especially crazy about the many versions of Dal, which simply means “lentils.”  (By now you’ve figured out the name of this recipe is somewhat redundant, “Red Lentil Lentil.”)  The lentils used in Dal are not the brown or French lentils commonly eaten here, but a split lentil which almost looks like a lentil flake.  What is so fantastic about these lentils is that they cook up quickety-quick so they are perfect for a last minute meal.

What’s lucky for me is that Mr. Picky loves lentils.  Yeah, yeah, how can I call him picky if he eats lentils?  Because he won’t eat a hundred other things that most kids do eat!  Regardless, his palate has been developing slowly and I was thrilled when he tried brown lentils for the first time.  From that moment on, all lentils were fair game.  Sure enough, after I told him this dal was “lentils,” he shrugged his shoulders and said “OK, I’ll have some.”  Happy dance!

Dal is very nutritious (loaded with fiber, protein and iron) and easy to digest.  Since the lentils are split, they don’t hold their shape the way common lentils do.  In fact, they become kind of mushy which I find to be so comforting.  Mmmmmmm!  But like I mentioned, split lentils can be made so many different ways — from thin and watery to stick-a-fork-in-it-thick.  The lentils themselves have a very subtle flavor and benefit from some flavorful (and very anti-inflammatory) spices.  That doesn’t mean dal has to be hot spicy.  This version here is soupy, but not brothy, flavorful, but not overpowering — for me, it’s just right.  But the beauty of dal is that you can make this to suit your taste. Since the kids started school, I have been working quite a bit more and lately I have been feeling a little out of balance.  You know when you just need a comfy blanket and a little R&R?  Dal to the rescue!  

5.0 from 1 reviews
Red Lentil Dal
Author: 
Serves: 6
 
Ingredients
  • 1 ½ Tablespoons ghee
  • 1 ½ teaspoons mustard seeds
  • 2 large garlic cloves, minced
  • 1 ½ Tablespoons fresh grated ginger
  • 2 teaspoons ground turmeric
  • 1 ½ teaspoons ground coriander
  • ¾ teaspoon ground cumin
  • ¼ teaspoon onion powder
  • 1 small onion, diced
  • 1 carrot, diced
  • 1 large tomato, peeled, seeded and diced
  • 2-3 teaspoons sea salt (based on saltiness of stock)
  • 1 ½ cups red lentils (or any other split lentils)
  • 4 cups water or vegetable stock
  • Accompaniments: whole, plain yogurt, cucumber raita and/or naan
Instructions
  1. Melt ghee in a soup pot over medium heat.
  2. Add the mustard seeds and cook until they start to pop, about 1 minute.
  3. Add the garlic, ginger and remaining spices. Sauté for 1 minute, or until fragrant.
  4. Stir in the onion, carrot and tomato. Sprinkle with salt and cook until just tender.
  5. Add lentils and stir to coat with the vegetables and spices. Pour in the water or stock and bring to a boil. Lower heat to a simmer and cook until lentils are broken up, about 20 minutes. Taste for seasonings. Serve on its own or with a dollop of yogurt or raita.

Grain-Free Cauliflower Tabbouleh Recipe

We have had some interesting discussions in my classes lately about the latest findings concerning the presence of arsenic in rice.  Arsenic is a chemical element which occurs naturally in water, air, food, and soil.  This natural form is referred to as organic arsenic.  Arsenic is also the product of contamination from manmade fetilizers and pesticides, as well as burning coal and oil.  This inorganic arsenic is what is linked to certain cancers and has many people concerned.  Inorganic arsenic has found its way into may different foods through soil, as well as into our drinking water, but for some reason rice absorbs it much more than other foods.

Although I don’t take such reports lightly, the jury is still out on just how much arsenic is actually in rice since it varies from region to region (California-grown rice seems to contain less than rice grown in Arkansas, for example) and how much we should limit or not limit our rice consumption.  I’m generally not an alarmist in these situations, so I will be mindful of this information and continue to eat rice in moderation.  But it’s a good reminder of why it’s important to eat a well-balanced diet of a wide variety of whole foods (90% of the time, of course!).  I’m sure one can do research and find whatever it is we want to hear.  I like Dr. David Katz’s interesting point that cancer rates are generally low where rice consumption is highest.

But if you are concerned about your rice intake or you’re just looking to expand your horizons a little, have I got the recipe for you!  Cauliflower Tabbouleh uses barely steamed and grated cauliflower in place of the typical bulgur wheat, making this a grain-free,  gluten-free salad.  When the cauliflower is grated, it completely resembles rice in appearance and even texture a little.  It’s fun serving this tabbouleh to guests who usually have no idea what they’re eating and naturally assume it’s rice.  Cauliflower has a fairly subtle flavor, so you really pick up everything else that’s going on here with fresh herbs, juicy pomegranates and a sweet-earthy dressing.

Tabbouleh is traditionally a parsley salad with bits of bulgur wheat, onion, tomato and cucumber.  It’s such an awesome, healthful, fresh salad which I really enjoy when the weather is warm.  I make a really yummy version with quinoa that is one of my summer staples.  But this recipe with cauliflower is like an autumnal tabbouleh with some pomegranates for a sweet and juicy crunch.  Many “cauliflower rice” recipes call for the cauliflower to be raw, which I don’t enjoy as much as giving it a quick steam or blanche.  Raw cruciferous vegetables are also a tad harder to digest than lightly cooked.  Cauliflower is is very rich in fiber, phosphorus and potassium, and a very good source of Vitamin C, Vitamin K, Folate, and Manganese.  Plus the entire cruciferous family contains powerful anti-cancer compounds.

I just made this for Rosh Hashana lunch last week and served it with roast chicken and a few other salads.  The girls got it in their lunchboxes the next day mixed with a few spoonfuls of quinoa and one of them had some feta mixed in as well.  By the way, I am posting photos of the kids’ school lunches once a week on Facebook and Twitter in case you’re in a lunchbox rut.  I also love this cauliflower with Spice-Rubbed Salmon, grilled chicken kabobs, and even turkey burgers. More importantly, there are so many ways to have fun with this preparation of cauliflower.  I’m thinking about using it in place of rice for a vegetable fried rice, just for fun of course.    No one here is giving up rice that fast!

Grain-Free Cauliflower Tabbouleh
Author: 
Serves: 6-8
 
Ingredients
  • 1 head cauliflower, cut into florets
  • Kosher salt for cooking cauliflower
  • 2 cups diced celery, about 5 stalks
  • Seeds from 1 large pomegranate, about 1⅓ cups
  • ½ cup finely diced red onion or shallot (you can soak in ice water for 15 minutes to take the raw edge off)
  • ¼ cup chopped parsley leaves
  • 2 Tablespoons chopped fresh mint leaves
  • ¼ cup fresh lemon juice
  • ½ cup unrefined, cold-pressed, extra-virgin olive oil
  • ¾ teaspoon cinnamon
  • ¾ teaspoon cumin
  • ¾ teaspoon sea salt
  • ½ teaspoon of freshly ground black pepper or to taste
Instructions
  1. Prepare a large bowl with ice water. Place cauliflower in a large pot with an inch of water and a teaspoon of kosher salt. Bring to a boil and steam cauliflower for 3-4 minutes until crisp tender. Drain in a colander and immediately plunge cauliflower in ice water.
  2. Drain cauliflower and transfer to a clean kitchen towel to dry off a little.
  3. Fit the grater attachment in a food processor and gently grate/shred the cauliflower. It will look like barley or rice. Transfer to a serving bowl.
  4. Stir in remaining ingredients and toss to combine. Taste for seasonings, especially if you allow this to sit. You may need an extra pinch of salt.

Southwestern Quinoa Salad Recipe

Have you ever read a cookbook or food blog where an unbelievable, creative recipe was put together with “odds and ends” from the pantry or produce bin?  I am always in awe of people who can do that.  Those same people go grocery shopping without a list and simply buy what looks good and then create a meal around it.   I too can use bits of this or that and turn it into something fairly tasty, but it usually ends up as a frittata, Pantry Pasta, or some sort of fried rice dish.  Definitely enough to get an acceptable dinner on the table, but nothing that will win me any accolades.


One day a few years ago, I decided to try my hand at “throwing something together.”  I figured I had done this many a time at salad bars, I should be able to do this within the limitations of my own pantry and refrigerator.  Whereas I pride myself on keeping things simple,  on this particular day I got a little carried away.  It all started with some quinoa, corn and cilantro which sounded Southwestern to me.  Pretty soon I was dicing up red pepper, red onion and opening a can of black beans.  Just when I thought I was done, I spied a mango and that went into the mix, too. After squeezing in some lime juice, olive oil and cumin, I had myself one fresh and tasty salad that I could happily bring to a backyard barbeque or serve to guests, even that same day to my mother-in-law who is slightly skeptical of quinoa.

I’ve made this salad countless times since then and changed it up every time.  Red onion has been replaced with scallions or shallots.  Ripe avocado and toasted pumpkin seeds have found their way in on many an occasion.  When corn is crazy fresh and sweet, I just cut it off the cob raw and use it that way.  With Father’s Day coming up, I am thinking about including this on the menu, but I might just leave out the quinoa entirely since I made quinoa tabbouleh last year on Father’s Day.  Although my husband likes quinoa just fine, he doesn’t consider it very “manly.”  Please.  I keep trying to tell him how much protein it has — it’s like eating meat, but without the saturated fat and cholesterol.  But it’s his day and I aim to please!  So I think next weekend I’ll make this with extra corn and beans and thrown in some “manly” diced up grilled chicken.  Regardless, “creating” this salad was a good exercise for me in learning how to be flexible, but also gave me some confidence to use what I’ve got — in more ways than one.

5.0 from 1 reviews
Southwestern Quinoa Salad
Author: 
Serves: 6-8
 
Ingredients
  • 1 cup quinoa
  • 1 ½ cups cooked black beans, drained and rinsed if canned (1 can)
  • 1 ½ cups fresh or cooked corn (cut from 2 large ears)
  • ¾ cup diced red pepper (1 small pepper or ½ large)
  • ½ large red onion, diced (soaked in ice water if you want to cut the harsh onion flavor)
  • 1 jalapeno, seeded and minced (optional)
  • ¼ cup finely chopped cilantro
  • 1 teaspoon sea salt
  • ¾ teaspoon ground cumin
  • ⅓ cup fresh lime juice (about 1 ½ limes)
  • ⅓ cup unrefined, extra-virgin olive oil
Instructions
  1. Rinse quinoa in a bowl with water or place quinoa in a fine mesh sieve and rinse under cold water until water runs clear. Transfer to a saucepan and add a healthy pinch of sea salt and 1 ¾ cups of water. Bring to a boil and simmer until water is absorbed, about 15 minutes. Turn off the heat and place a kitchen towel over the pot. Place the lid over the towel and let sit covered for 5 -10 minutes.
  2. Transfer quinoa to a serving bowl, fluff with a fork and cool slightly. Add beans, corn, red pepper, onion, (optional) jalapeno and cilantro. Sprinkle with cumin and sea salt.
  3. In a small bowl combine lime juice and olive oil. Pour over salad and mix well. Taste for seasoning.
Notes
Options for substitutions/additions: Also delicious in this salad are sautéed zucchini, diced celery, diced fresh mango, sliced scallions, diced tomato or diced avocado.

Chickpea Burger Recipe

If I had to pick one cuisine to stick with for the rest of my life, it would be a tough a call.  But I could easily live off of Mediterranean food every day.  I love the emphasis on fresh vegetables, olive oil, legumes and whole grains, cheeses and fish.  Whether it’s Italian, Greek, or Israeli, this way of eating is definitely my comfort zone.  And living in Southern California makes cooking Mediterranean-style quite easy with an availability of similar varieties of fresh produce, nuts, dates and olives.

As I’ve mentioned before, one of my favorite things to do is to take a not-so-healthful food that I love and turn it into something I can enjoy regularly.  Many years ago I decided to try making falafel (the deep-fried Middle Eastern chickpea nuggets) a little less “deep-fried.”  (Ok, not everything Mediterranean is healthful.)  Many iterations later I found myself with a delightful, substantial chickpea burger which in turn began my obsession with veggie burgers.  I don’t love meat and poultry so much, although I think they are excellent sources of protein if you can find organic, pastured varieties.  But I do love hearty, flavorful vegetarian food that makes me feel satisfied, especially anything bean-based which is loaded with low-fat protein and tons of insoluble fiber.  I also like having recipes like this for entertaining when I always like to offer a vegetarian option (you’d be surprised how many people choose not to eat meat these days.)

These chickpea burgers are a favorite of mine and my whole family, even Mr. Picky who I am pleased to announce tried one for the first time last week with ketchup.  Do what you’ve gotta do, friends.  They are definitely a far cry from falafel, though.  In fact, the only ingredients that falafel and these chickpea burgers have in common are chickpeas and cumin.  But if I do it right, they’re crispy on the outside, moist on the inside and with flavors that remind of falafel.  I usually eat veggie burgers sans bun since I find that they are plenty starchy without adding bread.  But when serving them to family and friends, I offer warmed, whole wheat pita halves and an array of yummy toppings including sprouts, avocado, tomato slices, lettuce, cooked onion and most importantly, a creamy and refreshing sauce.  In my opinion, it’s all about the condiments!

Chickpea burgers (and veggie burgers, in general) are fabulous for entertaining and for busy weeknights since they are best formed in advance and refrigerated so they firm up a bit.  Out of the fridge, they cook up in minutes on a hot griddle or skillet.  Once you realize how tasty these are, you’ll make a double batch and freeze half.  If you freeze them, just don’t forget to place a piece of wax or parchment in between each patty so that they don’t stick together (ask me how I know this.)  These burgers may not take you back to your last visit to the Mediterranean, but I hope they’ll keep you from visiting the freezer section of your supermarket!  Enjoy~


View this post on Instagram


A post shared by Pamela Salzman (@pamelasalzman)


4.8 from 5 reviews
Chickpea Burgers
Author: 
Serves: makes 8 patties
 
Ingredients
  • 4 cups cooked chickpeas, drained and rinsed if canned
  • 2 large eggs, preferably free-range
  • 2 cloves garlic, minced
  • 2 teaspoons sea salt
  • 2 teaspoon ground cumin
  • ½ teaspoon cayenne pepper (optional)
  • zest of 2 small or 1 super big lemon
  • ¼ cup flour (whole grain flour, cornmeal or almond meal all work)
  • 6 Tablespoons (or a heaping ⅓ cup) chopped parsley
  • 2 carrots, grated
  • ½ red onion, small dice
  • Oil or ghee for sautéing
  • Yogurt-Tahini Sauce
  • ¾ cup plain yogurt (full fat or low fat)
  • 3 Tablespoons tahini
  • 1½ Tablespoons lemon juice
  • ½ cup chopped parsley, mint or a combo (my favorite)
  • ¼ - ½ teaspoon sea salt
  • Oil or ghee for sautéing
  • 4 6½ -inch whole wheat pitas, halved and warmed, if desired
  • Suggested accompaniments: sprouts, avocado, tomato, lettuce, grilled onions
Instructions
  1. Place the chickpeas, egg, garlic, salt, cumin, cayenne, lemon zest, flour and parsley in food processor. Pulse until a coarse mixture forms that holds together. It should be moist and sticky.
  2. Place chickpea mixture in a bowl and mix in grated carrot and red onion. Take a ½ cup of the mixture and firmly press it into a patty about 3 ½ inches in diameter and ¼ inch thick. You can also form these into mini-patties for appetizers. Place on a plate or a baking sheet and refrigerate for at least 30 minutes and up to overnight. Cover if refrigerating for more than a few hours.
  3. Heat a couple tablespoons of oil or ghee in a large skillet over medium heat until hot, but not smoking. Add patties to the skillet (do this in batches, if necessary) and cook until crisp and golden brown on the underside, about 6 minutes. Carefully turn over and cook until golden brown on the other side, about 3-5 minutes more.
  4. Serve with or without a warmed pita half or a hamburger bun and suggested toppings.


Mexican Chopped Salad Recipe


Very often I have an idea for a recipe and it takes me a few times to get it right.  In fact, usually it takes me more than a few times!  But once in a blue moon, I try something on the fly and I love it on the spot, like culinary love at first bite.  That’s what happened with this salad.  Last year I was putting together a Mexican-inspired menu for my April classes and I was trying to think of a fresh and easy salad to teach.  I wanted something clean and healthful with all the ingredients I love to use when I make Mexican food, but without it tasting like a taco salad.  I happen to adore chopped salads, so off I went with crisp romaine lettuce, red cabbage, cherry tomatoes, cucumbers, pinto beans, avocado and my favorite part, toasted pepitas (pumpkin seeds.)  I made a very light dressing with apple cider vinegar, orange juice and enough cumin to give it that south-of-the-border flavor.

On that day of recipe testing at home last year, I nearly ate the entire salad.  Whereas this salad may not win any awards for sophistication, what in the world is not to love?  Not only does this salad look gorgeous, it is addictive and crunchy and juicy and creamy.  You know how I love a crunchy-creamy combo.   Since then, I have made this salad virtually every time we were invited to a pot luck or backyard barbeque.  The beauty of this salad, besides being a giant bowl of antioxidants, vitamins and fiber, is that it can prepped almost entirely in advance.  Chopped veggies go into a serving bowl with dressing in a jar and avocados to be cut just before serving.  If you’re vegan, vegetarian or if you’re like me and you’re going to a party where you fear there might be non-organic meat, I think this can easily be a main course salad on it’s own.  The pinto beans and pumpkin seeds offer more than enough protein.  Although my husband is a bit of a carnivore and loves this salad with grilled chicken chopped in.  Shrimp works great, too.

Fast forward a year later when I taught this salad again a few days ago.   My assistant and I each grabbed a bit in a cup to go and crunched our way home, wishing we had had bigger cups.  I know you’ll love this salad just as much as I do.

mexican chopped salad | pamela salzman


mexican chopped salad | pamela salzman

If you’re looking for more Cinco de Mayo inspiration, check out these favorites:

4.0 from 1 reviews
Mexican Chopped Salad
Author: 
Serves: 6
 
Ingredients
  • Dressing (probably makes more than you need):
  • 3 Tablespoons freshly squeezed orange juice
  • 3 Tablespoons raw unpasteurized apple cider vinegar
  • ¾ teaspoon ground cumin
  • 1 ¼ teaspoons fine grain sea salt + additional to taste
  • a few grinds of black pepper
  • 1 Tablespoon raw honey
  • ½ cup unrefined, cold-pressed extra-virgin olive oil
  • 1 head butter or romaine lettuce, chopped, about 8 cups
  • 2 cups chopped red cabbage
  • 1½ cups or 1 15-ounce can cooked pinto beans, drained and rinsed
  • 2 cups diced cucumbers (I like Persian), unpeeled, large seeds scooped out
  • 1 pint cherry tomatoes, halved
  • 3 small avocados or 2 large, pitted, peeled and cubed
  • ½ cup pepitas – toasted in a dry skillet and drizzled with ½ teaspoon olive oil and a sprinkle of sea salt
Instructions
  1. Make the dressing: whisk first five ingredients in a small bowl. Add olive oil and whisk completely until emulsified. Season with additional salt and pepper to taste.
  2. Combine lettuce and cabbage in a large bowl. Add pinto beans, cucumber and cherry tomatoes. Toss with enough dressing to coat lightly. Drizzle a little dressing on avocados and gently mix into the salad. Sprinkle pepitas on top. If you have additional dressing, save in the refrigerator for another time.
Notes
There's enough dressing that you can probably add a bit more cabbage or other veggies.

If you cut back on the oil by about 2-3 Tablespoons, the dressing makes a great marinade for grilled chicken or shrimp. Both would be nice on top of the salad, although there is adequate protein from the beans and pepitas.


Muhammara recipe (turkish red bell pepper and walnut dip)


muhumara|pamela salzman

I know those holiday parties are coming up and I thought another hors d’oeuvre post would be helpful.  My good friend Cheryl gave me this recipe.  She is an outstanding cook and everything she makes is a home run.  I love the fact that this dip is mostly roasted red bell peppers and walnuts and it is easy-peasy to put together.  A bonus is that it tastes better if you make it ahead and we all know how much I like to prep in advance.   You can certainly use jarred roasted peppers or the ones that you can find in some deli cases, but I find (no surprise, I’m sure) that the ones you make at home taste so much better.  Maybe it’s all that love that goes into them!

muhummara|pamela salzman

muhummara|pamela salzman


A note about the pomegranate molasses:  I try not to use ingredient that are expensive, hard-to-find or that have a short shelf-life.  I found pomegranate molasses easily at my local Whole Foods and it cost only about $4.  Also, it lasts for a long time, so I didn’t hesitate to keep it on the ingredient list.  However, if you can’t find any and you don’t live close enough to me to borrow it, you can add a drop of raw honey and some extra lemon juice to mimic the tart-sweetness that pomegranate molasses brings to the dish.

muhummara|pamela salzman


Here I am serving it with endive leaves and gluten-free sweet potato chips, but feel free to go with the traditional pita or other raw vegetables.

muhammara recipe (turkish red bell pepper and walnut dip)
Author: 
Serves: 2 cups
 
Ingredients
  • 1 ½ cups raw walnuts
  • ½ cup fresh bread crumbs
  • 3 red bell peppers, roasted, peeled, seeded and chopped, about 1 ½ cups or 1 12-ounce jar
  • ¼ cup unrefined, cold-pressed extra-virgin olive oil, plus more to taste
  • 2 Tablespoons pomegranate molasses plus more to taste
  • 1 Tablespoon fresh lemon juice
  • A few shots of hot sauce or ¼ teaspoon ground red chiles, or to taste
  • 1 teaspoon sea salt
  • 1 teaspoon ground cumin
  • Toasted pita, your favorite chips or endive leaves
Instructions
  1. In the bowl of a food processor fitted with the metal blade, add the walnuts and bread crumbs. Process until finely chopped.
  2. Add the roasted peppers and olive oil. Process until smooth. Add the remaining ingredients (except the pita) and blend.
  3. Taste and adjust with more oil, molasses and/or salt.
  4. Refrigerate, covered until ready to serve. The flavors will come together as the dip sits. Serve with pita, chips or endive leaves.

Â