Thai (Grass-fed) Steak Salad Recipe (or with Chicken)


Thai Steak (or Chicken or Salmon) Salad Recipe | Pamela Salzman


Oh people.  We are on the brink of my favorite time of year.  A time of backyard barbeques, picnics at the beach, sand between my toes, fresh tomatoes and basil, peach pie, and long nights under starry skies.  Ahhhh, summer.  Beyond better weather and my favorite produce, life is just easier when the kids are out of school.  No homework, tests or book reports.  Sure, two out of my three have a summer reading list, but they always wait until the last week of summer to crack those books open, so it’s smooth sailing until then.

Because we live at the beach, we entertain most weekends in the summer, starting with Memorial Day which, being the East Coaster that I am, is the unofficial start of “the season.”  One of my favorite things to do right about now is start planning a few menus that I can rotate during the summer.  Whenever I am thinking of the ideal food to prepare — make ahead, room temperature and easy all come to mind.  Very often, we’ll go to the beach for the afternoon, come back to the house to freshen up before lingering over dinner in the backyard.  This doesn’t give me too much time to cook for a crowd, so I look for recipes which allow me to prep in the morning or the night before so I can do more assembling than cooking.

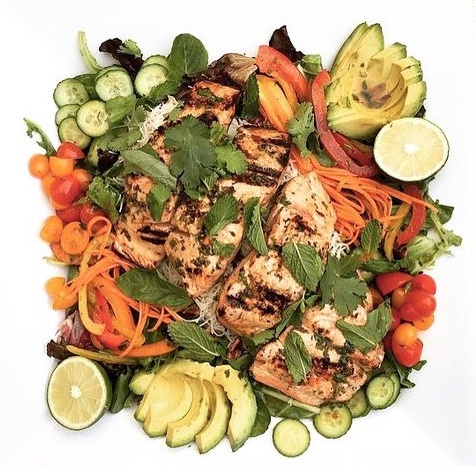
This Thai Steak Salad has never appeared on any of my summer menus since I just taught it a few months ago in my classes, but it will definitely be a regular this season.  There are so many reasons I love this salad — it’s light, I can vary it with chicken or tofu (even shrimp) and change up the vegetables according to what looks good, and there’s lots of prep in advance that I can do.  Oh, forgot to mention that my family loves it, too!  The first time I told my kids and husband they were eating “Thai” steak salad, I saw a bunch of sad faces.  “We don’t like Thai food.  It’s too spicy.  Or sour.”  “Guess what?  You’ve never had Thai food in your life!”  I only call this a “Thai” Steak Salad because of the combination of sweet, sour and sort of spicy in the marinade/dressing, plus the addition of cilantro and/or mint.  I have a feeling I am taking a lot of liberties with the word “Thai.”  I could probably get away with it if I added some fish sauce to the marinade.  Next time.  However, if I were to rename this recipe, I would call it Yummy, Fresh, Tangy, Gluten-free, Dairy-free, Vegan-adaptable, Paleo-friendly, Perfect for Summer Salad.  If you’re debating whether or not to veer from the standard burger fare this holiday, I have two words for you:  Pink Slime.


If you’ve been hanging out with me for the last year, you probably remember my post on how to reduce carcinogens when you grill.  Now’s a good time for a refresher.  Whereas you can definitely grill the steak or chicken here (I did grill the chicken), I prefer a more healthful way to cook the steak.  It’s a method I picked up from Cook’s Illustrated and it’s especially good for cooking grass-fed beef, which can get dried out if you’re not careful.  The only downside is that it takes a few minutes longer than grilling, but it’s a really tasty result and likely less carcinogenic.  No matter how you make this salad, it will surely be a delicious way to welcome in summer!


5.0 from 1 reviews
Thai Steak Salad Recipe
Author: 
Serves: 6
 
Ingredients
  • Marinade/Dressing:
  • ½ cup freshly squeezed lime juice
  • ½ cup unrefined olive oil, divided
  • 2 Tablespoons shoyu (or gluten-free tamari)
  • 6 Tablespoons packed fresh cilantro or mint leaves, chopped (or a combo)
  • 1-2 small cloves garlic, minced
  • ¼ teaspoon chili flakes or ½ teaspoon chili-garlic sauce
  • 1 Tablespoon raw honey
  • freshly ground black pepper to taste
  • 1 ½ pounds grass-fed top sirloin or flank steak, about 1-inch thick
  • sea salt to taste
  • 1 Tablespoon unrefined coconut oil or olive oil
  • 8 heaping cups salad greens, about 6-7 ounces
  • 2 shallots, thinly sliced
  • a few handfuls of seasonal veggies*: thinly sliced cucumber or sweet bell pepper, sprouts, julienned carrots, fresh mint leaves, fresh Thai basil leaves
Instructions
  1. Combine lime juice, 6 Tablespoons oil, shoyu, cilantro, garlic, hot pepper, honey, and pepper to taste in a small bowl. Whisk together and set aside.
  2. If steak is thicker than 1 inch, place between two sheets of plastic wrap and pound on both sides. Remove wrap and place meat in a shallow nonreactive dish that is just small enough to hold the meat. Pour HALF the marinade (about ⅔ cup) over the meat. Cover and marinate in the refrigerator for at least 1 hour or up to 12 hours (longer is better). Take the reserved marinade in the bowl and add 2 Tablespoons olive oil. Set this aside as your salad dressing.
  3. Pull the steak from the refrigerator about 30-60 minutes before cooking it. Preheat oven to 275 degrees or preheat a grill.
  4. Insert a wire rack inside a baking sheet and place the meat on top of the rack and sprinkle with a pinch of salt. Bake for 20-30 minutes for medium to medium-well.
  5. Heat the oil in a heavy skillet, preferably cast iron, over high heat. Transfer the steak to the skillet and sear for 2-3 minutes on each side for medium to medium-well. Alternatively, grill over medium heat for about 10 minutes for medium doneness.
  6. Transfer meat to a carving board and allow to rest for 10 minutes, covered.
  7. Assemble the salad greens on a platter and drizzle with half the dressing (about ⅓ cup), tossing to coat. Drizzle the shallots and vegetables with half the remaining dressing (about 2 ½ Tablespoons). Toss to coat and arrange on top of the salad. Taste for salt and add as needed.
  8. Slice meat thinly against the grain on a diagonal. Arrange slices of meat on top of the greens and drizzle with remaining dressing.
Notes
* I used 1 whole red bell pepper and 2 Persian cucumbers.

To prep in advance, marinate steak or chicken the night before. Keep dressing refrigerated. Wash and cut all vegetables and keep refrigerated until ready to assemble.


Green Rice Recipe (Arroz Verde)

I traditionally teach a Mexican-inspired menu during the month of April so that my students have some fun recipes to cook for their family and friends on Cinco de Mayo.  I am obsessed with Mexican food, so I really look forward to this time of year.   Of course, April has come to an end and sadly, so will my daily fish tacos.  I wish it were Cinco de Mayo every month!

I usually have no problem coming up with an entree for a Mexican-inspired meal, but sometimes the sides stump me.  Here’s a winner for Cinco de Mayo or any night.  This green rice was originally inspired by a recipe in one of my favorite cookbooks, Sunday Suppers at Lucques.  I’ve simplified the recipe a bit, but it is still unbelievably tasty and reminiscent of the green rice you may have had at a Mexican restaurant.  The color is pretty subtle, unlike the the spinach risotto recipe I posted last month, but green enough that no one will know if you made it with brown rice or white.  Pretty tricky!

There are so many things to love about this green rice.  For one, it’s delicious!  I adore basmati rice, which I think naturally tastes better than almost all other rices.  But in my opinion it’s hard to beat rice with garlic, butter and salt.  The flavor from the onions, pepper and cilantro are just a nice bonus.  Green rice is also very versatile.  Besides being the perfect side dish to fajitas, tacos or Mexican beans, this rice can easily be made into a vegetarian entree with the addition of some cooked pinto beans or sliced almonds.  Combined with some protein, green rice makes a perfect school lunch.  On the weekends, I’ll use leftovers in a burrito with beans.  Yum!  This recipe is also easy.  Don’t let the blender discourage you.  Think of it as a friend who will chop your cilantro and spinach into the bittiest pieces so you don’t have to.  Last but not least, whole grain brown rice with spinach, herbs and garlic — are good for you!

If you have eaters in the house who are green-averse, see if they’ll be more inclined to eat the rice with corn tortilla chips crumbled on top.  If not, add it to chicken and avocado soup, vegetable chili or freeze it for a rainy day.  Of course, you can do what I do and eat it for breakfast with some eggs and guacamole!

5.0 from 2 reviews
Green Rice Recipe (Arroz Verde)
Author: 
Serves: 4-6
 
Ingredients
  • ½ heaping cup cilantro (leaves and tender stems)
  • 1 cup tightly packed baby spinach leaves (stemmed if larger)
  • 2 ¾ cups water, chicken stock or vegetable stock
  • 1 ½ teaspoons sea salt
  • 1 Tablespoon unrefined extra-virgin olive oil
  • 2 Tablespoons unsalted butter
  • 1 ½ cups long-grain brown basmati rice*
  • ¼ cup green onion, finely chopped
  • 3 garlic cloves, finely chopped
  • 1 Poblano chili, stem and seeds discarded, diced (or if you have time, roasted, skin peeled, diced) or 1 green bell pepper, diced
Instructions
  1. Put the cilantro, spinach, and 1 ¼ cups of water in a blender and blend until pureed. Add the remaining 1 ½ cups of water and salt and blend until well combined.
  2. In a medium (3 qt) heavy-bottomed saucepan with a tight-fitting lid, heat oil and butter over medium heat. When butter is melted, add the rice and sauté, stirring about every 30 seconds, until it just begins to brown, 3-4 minutes. Add the onion, garlic and chili and cook 1-2 minutes, stirring constantly.
  3. Add the contents of the blender, stir well, turn heat to high and bring to a boil. Cover the pan, turn the heat to low, and simmer for 50 minutes. Fluff with a fork, cover, and cook another 5 minutes.
  4. Take the pan off the heat and let the rice steam in the covered pot for 10 minutes or until you are ready to serve.
Notes
If you use white rice, reduce cook time to 20 minutes.

Chicken and Avocado Soup

Even though I’m a big football fan and I love a good game (especially when my team wins), when it’s over, it’s over.  Whether the outcome of the game is favorable or unfavorable, life goes on and so do I.  So football is finished until next year, but eating happens multiple times a day everyday.  And today I am much more focused on what to do with Super Bowl leftovers!

Quinoa cornbread became breakfast.  Chili went into thermoses for lunch.  And topping bar items can make their way into frittatas, quesadillas or soup for dinner.  This particular soup was not my brain child, but as often happens in my life, my kids leave the house and are amazed by what they’re “missing.”  A while back my mother-in-law took them to Cafe Rio, a “fast casual dining establishment,” and they went bonkers for the Tortilla Soup.  It’s is a brothy and flavorful chicken stock-based soup with some vegetables and whatever add-ins you choose.  Whereas the younger two kids asked me if we could go there for dinner some night and have it again, my older daughter knew me better than that and suggested I try to copy the soup at home.  Great idea!

So one day my friend Cheryl and I went on a secret reconnaissance mission to the local Cafe Rio to check out the famous soup and see exactly how they do this thing.  Truthfully, their method is pretty genius and it’s the perfect soup to make at home for a family or a group.  The server adds into a cup your choice of chicken, guacamole, salsa, cheese, cilantro, and tortillas, and then ladles a flavorful chicken soup on top.  Yep, that’s it.  And except for being unbelievably salty, the soup was rather tasty.   You know how much I love a do-it-yourself situation (less work for me!)  Can you picture how easy this is if you have cooked chicken and salsa already made?  This comes together in minutes, I tell you, and everyone makes it the way they want.  You want it to be vegetarian?  No problem!  Just sub a great vegetable stock for the chicken stock and add in some pinto beans for protein.

Even though my intent was to copy Cafe Rio’s soup, I ended up making a couple of my own tweaks, such as using chopped avocado instead of guacamole (but definitely use the guac if you have it) and adding a squeeze of lime at the end.  I used poached chicken the day I took these photos and give you directions for that in the recipe, but I have used leftover grilled chicken or the meat from a whole roasted chicken, too.  And sometimes I add quinoa to mine if I’m not in the mood for chicken, and I love that, too.  But the method behind this soup is giving me all sorts of ideas for how to use up some tasty leftovers.  If you make the soup base as directed here, I have chopped up leftover enchiladas and added them for an “enchilada soup,” but I bet you could add in taco meat and some tortillas for a “taco soup.”  I’m excited by the possibilities, plus I think I just made my meal plan for the week!


5.0 from 1 reviews
Chicken and Avocado Soup
Author: 
Serves: 6
 
Ingredients
  • 1 or 2 large bone-in, skin-on chicken breast halves (depending on how much chicken you want in your soup)
  • ½ large onion, peeled
  • 1 Tablespoon additive-free kosher salt (such as Diamond Crystal)
  • A few peppercorns, crushed
  • A few garlic cloves, crushed
  • 2 Tablespoons unrefined, cold pressed, extra virgin olive oil
  • ½ large onion, diced
  • 3-4 scallions, thinly sliced
  • 3 medium carrots, diced
  • 2 stalks celery, diced
  • 1 jalapeno, seeded (if you don’t want too much heat) and diced (optional)
  • 1 clove garlic, finely chopped
  • 1 teaspoon ground cumin
  • 8 cups chicken stock, preferably homemade
  • 2 teaspoons sea salt (double this if you use unsalted stock)
  • freshly ground black pepper to taste
  • ½ cup pico de gallo (fresh tomato salsa)
  • 1-2 avocados, peeled and cut into chunks or guacamole
  • 1 lime, cut into 6 wedges (my favorite part!)
  • Other possible add-ins: tortilla chips, chopped cilantro, shredded cheese
Instructions
  1. Poach the chicken: Place the chicken breast, onion half (halved again), salt, pepper and garlic into a medium saucepan. Add enough cold water to cover the chicken. Bring to a boil over high heat and lower heat to a simmer. Simmer chicken for 25 minutes. Remove from heat and allow chicken to sit in the liquid until cool enough to handle.
  2. In a large pot, warm the oil over medium heat. Add the chopped onion, scallions, carrots, celery and jalapeno. Sauté until onions are tender, about 5 minutes. Add garlic and cumin and cook for 1 minute.
  3. Add the chicken stock, salt and pepper and bring to a boil. Lower heat and simmer until carrots are tender, about 4-5 minutes.
  4. Pull chicken from liquid and remove skin and bones. Shred chicken into bite-size pieces. You can divide chicken amongst the 6 individual bowls or add it all to the pot.
  5. Put a heaping spoonful of pico de gallo and avocado chunks/guacamole in each individual bowl and ladle soup on top. Squeeze lime on top and sprinkle with corn tortilla chips and fresh cilantro, if desired.


Roasted Vegetable and Black Bean Enchiladas Verdes (and a casserole version!)

A few weeks ago, six other families and mine planned to get together for a pot luck at my friend Lana’s house.  One of the families keeps kosher, so we decided to go with a fish and dairy meal.  I thought these vegetable enchiladas verdes would be a great vegetarian option.  At least it seemed like a good idea at the time, but that’s because I wasn’t remembering Mr. Picky’s haircut after school that day and his basketball practice from 4-5.  I think I was just craving enchiladas on the day I volunteered and not thinking it was a bonehead move to offer to make them for 35 people.

Beautiful veggies ready to roast

Homemade enchiladas are one of my absolute favorite things to eat.  But I’m not talking about the overly cheesy and soggy kind.  I love a good (GMO-free) corn tortilla wrapped around either some poached chicken or vegetables and beans and then smothered in fresh tomatillo sauce.  You can even hold the cheese.  We ski a few times each year in Deer Valley, Utah, which is known not only for its great ski runs, but for pretty good lunch on the mountain.  Once in a blue moon they serve the most divine roasted vegetable enchiladas, which is how this recipe was inspired.  I actually prefer vegetable enchiladas over ones with chicken and my husband says he doesn’t miss the meat at all.

Roasted Vegetables

I also prefer the “green” version over the red and I love making tomatillo sauce from scratch.  Have you ever seen one of these cuties?  One of my students thought the supermarket prewraps each tomatillo in these paper husks, but in fact, they grow that way.  Tomatillos are related to tomatoes, but they have a tangy, puckery, sourness that Mr. Picky doesn’t care for, so his enchiladas are made with no sauce for now.  You know what I say?  More for me!  If you eat dairy, that tanginess does go particularly well with cheese or sour cream.  Just saying.  I tried several methods for making tomatillo sauce and broiling them on a sheet pan was not only easy, but that little bit of char on the tomatillos added tons of flavor to the sauce.  You can also boil them, but boiling vegetables, especially ones high in Vitamin C, isn’t usually my first choice.

Tomatillos

I’m sure you can see from my pictures that dicing up 3 sheet pans of vegetables was a bit of work.  When I do this for my family, it’s no big deal.  But besides the vegetable prep, there is also the task of rolling each tortilla around a small amount of filling and nestling them side by side in a baking dish.  So the first pan started that way until I started cursing myself for not having volunteered a lasagne, the perfect potluck dish to feed a crowd.  LIGHTBULB!  Enchilada Lasagne!  At the rate I was going, there was no way we would make it to dinner even fashionably late.  So I took 6 corn tortillas and made one layer on the bottom of the baking dish, dumped half of the remaining filling on top plus a few sprinkles of cheese, put down another 6 tortillas in one layer and covered the whole thing with tomatillo sauce and a bit more cheese.  2 minutes. Done.  Am I a genius or an idiot?  Toss-up.

Tomatillos Ready to be Broiled

Charred tomatillos and jalapenos

There are so many delicious vegetables you can use, or use up if you have a bunch of random odds and ends in the fridge.  This time around I used butternut squash, sweet bell pepper, shiitake mushrooms, asparagus and red onions, but I have also added sweet potatoes, zucchini, and carrots.  I’ve never used sauteed or blanched greens, such as spinach or Swiss chard, but I think I will the next time around.  I was going to post this recipe next month, but it occurred to me that you all may be entertaining for the Super Bowl this weekend and my new discovery of the Enchilada Casserole would be the perfect thing to serve a crowd.  Here are a few ways to make this even easier for you:

  • Use pre-made enchilada sauce — but only if you have access to a good one or if you can’t find fresh tomatillos.
  • Make your own sauce, but do it the day before.
  • Dice and roast your vegetables the day before or first thing in the morning.  Keep them in a covered container in the fridge until you are ready to assemble your enchiladas.
  • Make the casserole version.  It will take sooooo much less time, especially if you are making more than one pan of it.
  • Assemble it in the morning.  That will give you time to clean up the family room and whip up some guacamole before your guests arrive.
  • Freeze it.  Thaw it out and bake for a delicious dinner another busy night.
Tomatillo sauce ingredients in the blender
About to roll

Are you planning on having people over for Super Bowl Sunday?  Other great options can be Vegetable Chili served over brown rice, quinoa or millet; a Taco bar; a Fajita bar; a Baked Potato bar; and of course, Guacamole and Baked Tortilla Chips.  As you can see, I am happy to cook before the opening kick-off, but then everybody needs to fend for themselves so I can concentrate on the game.  Go Giants!  By special request, my famous cornbread recipe coming up on Friday!

 enchilada casserole | pamela salzman


View this post on Instagram


A post shared by Pamela Salzman (@pamelasalzman)


5.0 from 4 reviews
Roasted Vegetable and Black Bean Enchiladas Verdes (and a casserole version!)
Author: 
Serves: 6
 
Ingredients
  • 5-6 cups mixed vegetables, such as butternut squash, zucchini, sweet bell pepper, red onion, mushrooms, apsaragus, cut into ½-inch cubes
  • Olive oil for drizzling
  • Sea salt and freshly ground black pepper
  • 1 ½ cups cooked black beans or 1 15-ounce can, drained and rinsed
  • Sauce:
  • 20 medium tomatillos, about 2 ¼ pounds, husked and washed
  • 1 jalapeno, stem removed (will make the sauce a 5 on a heat scale of 1 to 10)
  • ½ small onion, peeled
  • 3 garlic cloves
  • 10 sprigs cilantro
  • 1 Tablespoon sea salt
  • 3 Tablespoons olive oil
  • 12 corn tortillas
  • grated cheese, (such as Monterey Jack) if desired or crumbled queso fresco
Instructions
  1. To roast vegetables: Preheat the oven to 375 degrees. Place the vegetables on a parchment-lined baking sheet. Drizzle with oil and toss to coat evenly. Sprinkle with salt and pepper. Roast until tender, but not over-cooked, about 25 minutes. Add the black beans to the vegetables and mix together or put everything into a bowl to combine.
  2. Place all the tomatillos and the jalapeno on a baking sheet. No need to line with parchment paper. Change the oven to broil. Place under the broiler for about 10 minutes, turning over after 5 minutes until tomatillos are lighter in color and contain a few brown spots. Change oven to 350 degrees if baking the enchiladas right away.
  3. Transfer the tomatillos to a blender or a food processor with the jalapeno, 3 garlic cloves, ½ onion, cilantro and sea salt. Process until smooth. You should have 4 cups of sauce.
  4. Heat a skillet over medium heat and warm the olive oil. Add the tomatillo sauce and simmer 5 minutes.
  5. In the meantime, warm the tortillas on a griddle or skillet on both sides until softened.
  6. Pour 1 cup of sauce on the bottom of a 13x9-inch baking dish. Place about ⅓ cup of vegetables down the middle of a tortilla and roll tightly. Place seam-side down in the baking dish. Repeat with each tortilla. Cover all the rolled tortillas with remaining sauce. Sprinkle with grated cheese, if desired. Bake until heated through and cheese is melted, about 10-12 minutes. Serve immediately.
  7. Casserole version: Pour 1 cup of sauce on the bottom of a 13 x 9-inch baking dish. Place 6 corn tortillas in one layer on top of the sauce. Spread all of the vegetables and beans on top of the tortillas. Sprinkle with cheese, if desired. Arrange another 6 corn tortillas over the vegetable mixture in one layer. Pour enough sauce to cover well and sprinkle with more cheese, if desired. Bake until heated through and cheese is melted.
Notes
Leftovers? Chop up the enchiladas and add to a pot of chicken broth. Heat and serve. Enchilada Soup!


Roasted Vegetable and Black Bean Enchiladas Verdes | Pamela Salzman


Hummus 4 ways

I was talking with my summer intern Hannah about how much I love hummus and how easy it is to make.  I think I have been making my own hummus since before she was born, but the last couple years I have felt hummus boredom so I’ve had a little fun experimenting with different flavors.   Hannah was intrigued since she thought hummus was like puff pastry, which NO ONE makes from scratch.  Well, I knew we had a cooking lesson on our hands!

Hummus is a Middle Eastern dip made from cooked chickpeas (a.k.a. garbanzo beans) pureed with tahini (a paste made from ground up sesame seeds), garlic, lemon juice, and salt.  I add a little liquid from the pot (or can) of cooked chickpeas and some people add olive oil.  Sure you can add cumin or hot sauce, but essentially that’s it.  I maintain that hummus tastes so much better when I make my beans from scratch, although really you can use canned and it will still be fabulous.  But what kind of a cooking lesson would this be if we used chickpeas from a can?  So I started soaking a ton of dried chickpeas that day, cooked them for 90 minutes the next morning and we began our hummus factory.

I had an idea to make several of my favorite flavors just for kicks, so we also roasted a couple beets, a red bell pepper and cut some cilantro from the garden.  After we made our first batch, which was the traditional kind, Hannah looked at me in disbelief.  “That’s it?! ”  Yep.  That’s it.  “If people knew how easy it was to make hummus, they would never buy it!”  I’m so glad that thought was put out there to the universe.

After that, we made hot pink hummus with a roasted beet, which I agreed would be super cute for a (girl) baby shower or a bachelorette party (Hannah’s idea.)  Cilantro hummus turned out a lovely pale green with a fresh herby flavor.  Lastly, my favorite was roasted red pepper hummus to which I added a little smoked paprika and a dash of cayenne.  We tried all the flavors with raw carrot, cucumber and sweet bell pepper slices, as well as some gluten-free chips.  But I also love the red pepper version on veggie burgers and the cilantro one on a turkey sandwich.  The beet hummus is for pure shock value since despite adding a roasted beet, it just picks up a subtle sweetness and really tastes a lot like the traditional.  You can never have enough healthful dips for summer entertaining.  With July 4th around the corner, there’s no better time to add some pizzaz to an old classic!

Traditional Hummus
Author: 
 
Ingredients
  • 3 cups cooked chickpeas, if canned, drained and rinsed, liquid reserved*
  • 3 garlic cloves
  • ½ cup sesame tahini
  • 4-5 Tablespoons freshly squeezed lemon juice
  • 6 Tablespoons chickpea liquid
  • 1 teaspoon plus a pinch sea salt
Instructions
  1. Place all the ingredients in a food processor fitted with the steel blade and process until the hummus is smooth. Taste for seasoning and texture.
  2. I like it very smooth and creamy, so I let the food processor run for a few minutes. I also prefer to eat it immediately at room temperature, but if you will be refrigerating it, you can add a little extra chickpea liquid since the hummus will thicken after it has been refrigerated.


: : : : : : : : : : : : : : : : : : : : : : : : : : : : : : : : : : : : : : : : : : : : : : : : : : : : : : : : : : : : : : : : : : : : : : : : : : : : : : : : : : : : : : : : : : : : : : : : : : : : : : : : : : : : : : : : : : : : : : : : :


Variations:

Beet Hummus: add 1 large roasted and peeled red beet to Traditional Hummus ingredients in food processor.  Blend until thoroughly combined.


Cilantro Hummus: add 24 sprigs of cilantro and a few dashes of cayenne pepper to Traditional Hummus ingredients in food processor.  You can use either lemon juice or lime juice.  Blend until thoroughly combined.  Feel free to use more cilantro.


Roasted Red Pepper Hummus: add 1-2 teaspoons smoked paprika, a few dashes cayenne pepper and 1 large roasted, peeled and seeded sweet red bell pepper to Traditional Hummus ingredients in food processor.  Reduce lemon juice to 1 Tablespoon and sea salt to ¾ teaspoon.  Blend until thoroughly combined.  Taste to adjust seasonings.

Avocado, jicama and mango salad recipe

Mexico is close to Southern California, right?  They share a border for goodness sake.  Dare I say Mexico is almost local?  Well, this is convincing I do with myself during April and May.  Why? Because it’s mango season in Mexico and I am MAD for mangos.  Yes, we grow mangos in Southern California, but the season is waaaaaay too short for me and the kids. So I’m basically a hypocrite for a few months to satisfy my addiction to a luscious, fleshy, sweet fruit while the other 10 months of the year I turn my nose at melons in the winter or produce from South America.  I’m downright indignant when I see Chilean plums in February.  Can’t you people wait a few measly months until they’re in season here??

Listen, I’m no Barbara Kingsolver and in as much as I admire her quest to go truly local for a year, except for coffee, I buy plenty of goods that are outside of the 100 mile-radius from where I live.  Those foods include flours, grains and fish from Alaska.  But there are many reasons I believe in buying local produce.  In general:

  • local is fresher, which very often means better taste and higher nutritional value.
  • I like supporting local farms and local businesses.
  • local usually equates to eating seasonally which is a more healthful and more balanced way to stay in harmony with nature.  We are given exactly what we need to eat at just the right time of the year.  For example, melons and cucumbers are cooling foods and are very appropriate to eat during the summer months.  In contrast, pumpkin and butternut squash have a warming thermal nature and help us out in the winter.
  • buying local can have a lighter environmental impact versus importing produce.

But at the moment, I am buying 10 mangos every week for snacks, mixing them with yogurt, blending them in smoothies and using them in this scrumptious salad.  You know how I feel about a good dressing and this one is a favorite.  I actually like it just as much as a dip for crudite.  There is a bit of cilantro in the dressing, but I have had many cilantro-haters come over to the other side after trying this dressing.  Choose a crisp lettuce such as a romaine or butter lettuce and feel free to come up with your own creation.  Other possibilities include tomatoes, cucumbers, cooked pinto beans, grilled shrimp or chicken, toasted pepitas (hulled pumpkin seeds).

While I’m coming clean about the mangos, did I mention the jicama is from Mexico, too?

Avocado, Jicama and Mango Salad
Author: 
Serves: 6
 
Ingredients
  • Dressing:
  • 1 ½ Tablespoons freshly squeezed lime juice
  • 1 ½ Tablespoons freshly squeezed lemon juice
  • 1 Tablespoon raw honey
  • 1 teaspoon fine grain sea salt plus more to taste
  • Freshly ground black pepper to taste
  • ¾ teaspoon ground cumin
  • ¾ cup cilantro leaves and tender stems (lightly packed)
  • ½ cup unrefined, cold pressed extra-virgin olive oil
  • 1 head romaine lettuce, thinly sliced, about 8 cups
  • 2 ripe avocados, peeled, pitted, cut into ½-inch cubes
  • ½ medium jicama, julienned or cut into ½-inch cubes
  • 1 mango, peeled, pitted and cut into ½-inch cubes
  • Crispy tortilla strips (optional) see below
Instructions
  1. In a blender combine lime and lemon juices, honey, salt, pepper and cumin. Add the cilantro and blend. With the motor running, pour in the olive oil in a slow, steady stream and blend until emulsified.
  2. Arrange the lettuce on a large platter and drizzle enough dressing to coat lightly. Place avocado in a bowl and gently toss with enough dressing to coat lightly. Arrange avocado on top of lettuce. Repeat with the jicama and mango. Sprinkle with crispy tortilla strips.

CRISPY TORTILLA STRIPS


1 Tablespoon unrefined olive oil

3 6-inch corn tortillas

Fine grain sea salt or additive-free kosher salt


Preheat oven to 350 degrees.  Brush the oil over both sides of the tortillas.  Stack the tortillas on top of each other and cut the stack in half.  Then cut the halves crosswise into 1/8-inch thick strips.

Spread the tortillas on a heavy, rimmed baking sheet (lined with parchment if desired) and arrange them evenly.  Sprinkle with salt and bake, tossing occasionally for 20 minutes or until golden brown and crisp.

Transfer to a paper towel-lined plate and cool.

Â