Roasted cinnamon pears with dark chocolate sauce

Cinnamon Roasted Pears with Dark Chocolate Sauce | Pamela Salzman

Cinnamon Roasted Pears with Dark Chocolate Sauce | Pamela Salzman

If you’re like most people, you’re probably thinking you’ve got one last hurrah before the parties come to an end and the decorations go back in storage.  A final splurge before you return to your normal routine.  One last dance with the devil before resuming your life of miso and greens.  If you’ve been messing around with too much sugar this holiday season, there’s no point beating yourself up over it.  Hopefully it was worth it, but hopefully it doesn’t send you down that slippery slope of daily dessert.  I’ve got one last treat for you, but nothing you need to feel guilty about.  In fact, these roasted pears just might rock your new year’s eve.

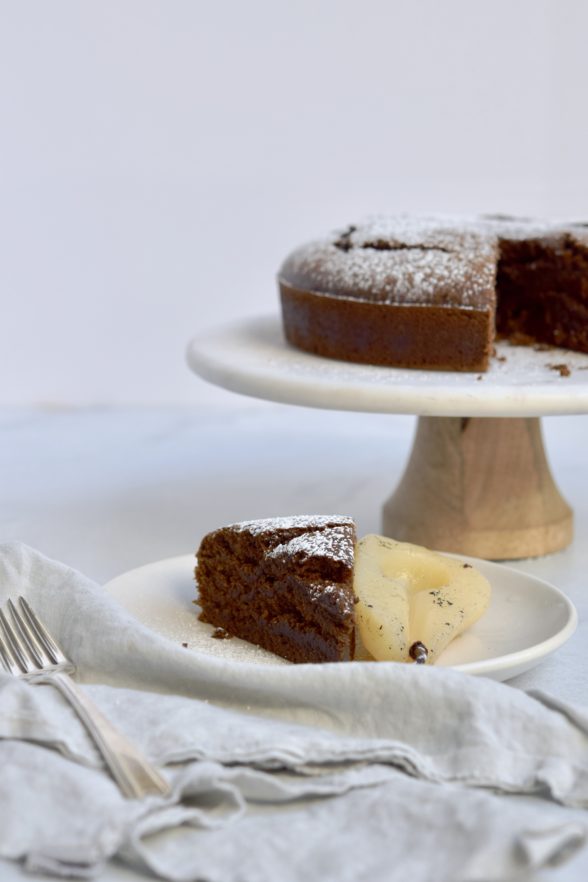
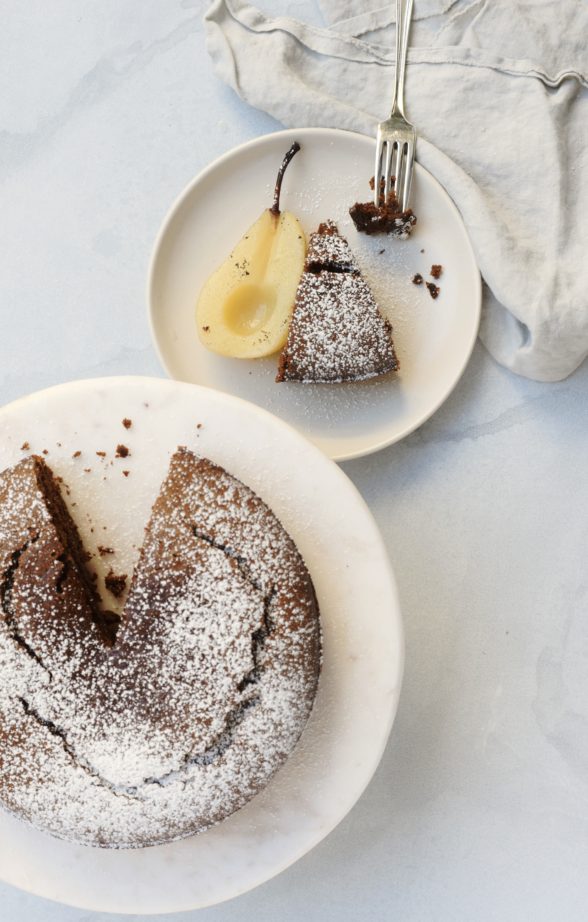
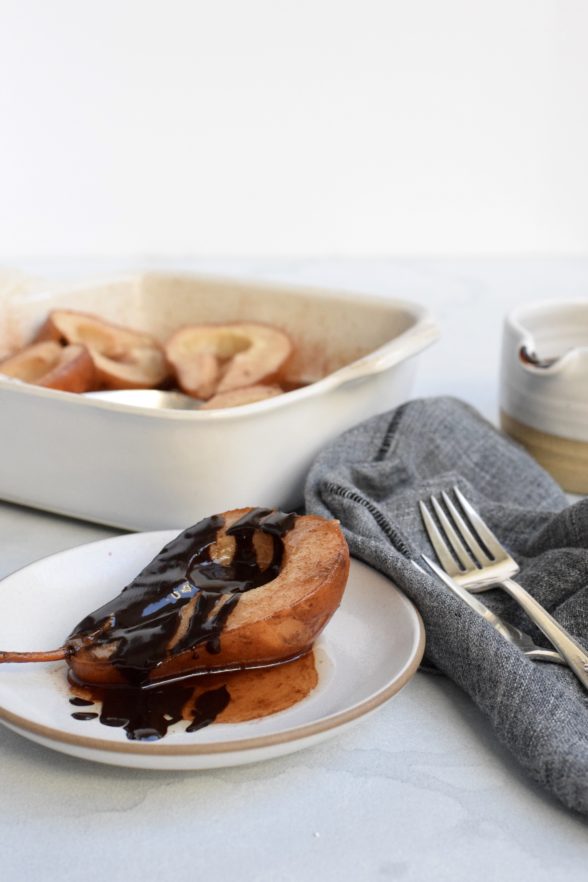
Why don’t pears get more attention?  There are so many delicious varieties and the fragrance of a perfectly ripe pear is completely intoxicating.  Plus, I think they are sooooo beautiful.  I love pear crisps, pear upside-down cake or just simply sauteed pears on top of waffles or pancakes.  But the pear dessert I make most often is simply roasted with a rich dark chocolate sauce or plain vanilla ice cream.  I’ve tried poached pears before, but the flavor is not quite as intense as roasted.  The best part is that these are easy enough to whip together as a last minute sophisticated dessert for a dinner party or just a cozy night at home in front of the fire playing Bananagrams

I love when the sweet end to a meal isn’t loaded with sugar and refined ingredients.  I especially feel that way about fruit desserts, which should taste like fruit and not just sweet.  These roasted pears are certainly fabulous enough to serve without the dark chocolate sauce, but good gracious, the sauce is just heaven.  It’s good to have a perfect chocolate sauce recipe in your back pocket since it can dress up everything from plain berries to ice cream to a simple cake.  Mr. Picky suggested he might even try Swiss chard if he could put this chocolate sauce on it.  I just might let him.  If dark chocolate isn’t sweet enough for your lovelies, you can use semi-sweet or milk chocolate instead.  But just keep in mind, the darker the chocolate the higher the percentage of cacao and the lower the sugar.

Cinnamon Roasted Pears with Dark Chocolate Sauce | Pamela Salzman


What will be your grand finale for 2011?  Whatever is it is, I hope it’s delicious.  Wishing you a happy and healthy 2012!

Cinnamon Roasted Pears with Dark Chocolate Sauce | Pamela Salzman

Roasted Cinnamon Pears with Dark Chocolate Sauce
Author: 
Serves: serves 6 (in the photos, I doubled the ingredients)
 
Ingredients
  • ⅓ cup pure Grade A maple syrup
  • ⅓ cup unsweetened apple juice
  • 3 Tablespoons unsalted butter
  • 1 teaspoon ground cinnamon
  • 3 firm, but ripe pears, such as Bosc or Bartlett
  • ¼ cup heavy cream
  • ¼ cup whole milk
  • 2 Tablespoons natural cane sugar or maple sugar
  • 1 Tablespoon unsalted butter
  • 4 ounces dark or bittersweet chocolate, coarsely chopped
  • ½ teaspoon pure vanilla extract
  • sliced almonds or chopped pecans for garnish (optional)
Instructions
  1. Preheat oven to 400 degrees.
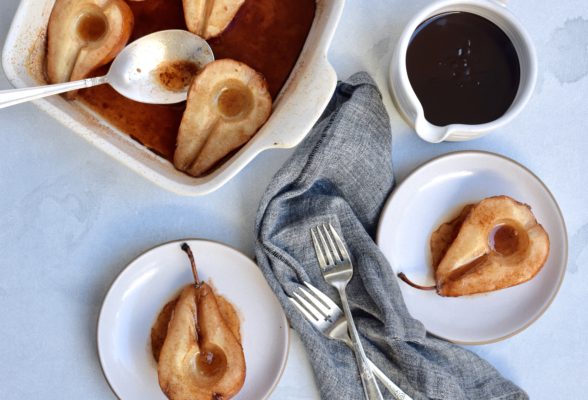
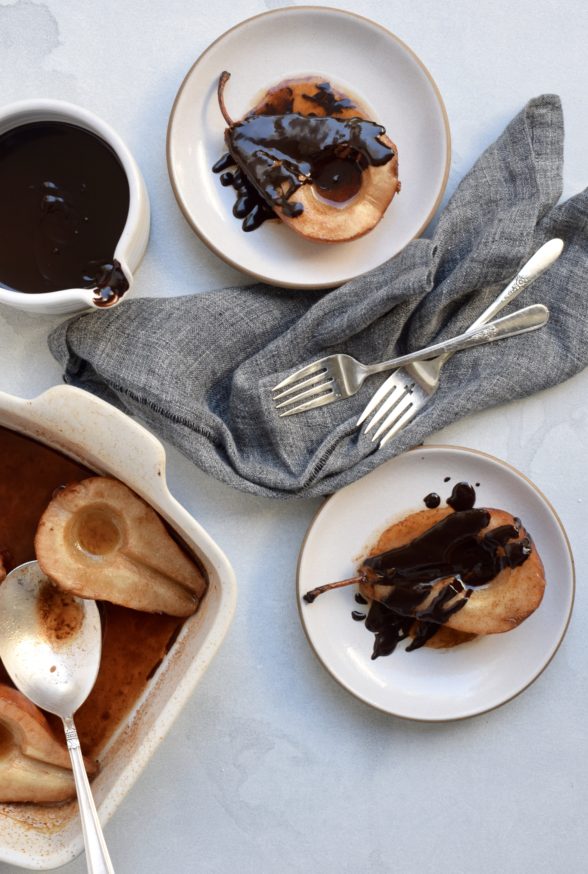
  2. Cut the pears in half through the stem, if possible. I take a knife and start an inch above the stem and slice through the stem, so both halves get a piece of stem – looks pretty! Then take the knife and slice the pear all the way in half, following the original cut. Remove the core with a round metal measuring spoon. Arrange the pears cut side up in an 8 or 9-inch square glass or ceramic baking dish.
  3. In a small saucepan over medium low heat, whisk together maple syrup, apple juice, butter and cinnamon until butter is melted.
  4. Pour the sauce over the pears. Bake for about 30 minutes, or until the pears are tender. Baste occasionally with the pan juices.
  5. In a small saucepan over medium heat, warm together cream, milk, sugar and butter. Stir to dissolve sugar. Turn heat off and add chocolate and vanilla. Stir until chocolate is melted and sauce is smooth.
  6. Serve 1 pear half per person. Drizzle with chocolate sauce and garnish with sliced almonds or chopped pecans, if desired. Any remaining pear basting liquid is delicious over French toast or pancakes.

Farro and kale with roasted pears and turkey bacon


I hope your Christmas was merry.  We have been sharing a lovely week with my family in New York.   My mother really outdid herself and gave me Christmas day off, which was a gift unto itself.  If you read my post last week, you may remember the multitude of Christmas Eve traditions that continue to thrive in my family.   I was obsessing about our tradition where everyone brings a a fish dish to dinner except those who are pregnant, who can bring an (easy-to-make) salad instead.  So I did some detective work the week before the holiday and I was assured by all the newlyweds and those with more than 2 children that there would be no salad-making this year.   Hmmph.  All fish and pasta makes a very unbalanced meal according to yours truly, so I took it upon myself to start a new tradition whereby allowing a very NOT pregnant me to bring a salad.  Although making Brussels Sprout Salad by myself for 80 people was not taking the easy way out.  I was counting on my sisters and daughters to help, but they disappeared on me to go start a 1,000 piece puzzle.  Regardless, the sprouts were a huge hit, even with those who claim to hate Brussels sprouts (really?) and I was happy to provide something green and fresh for the meal.

But low and behold, just as everyone was comfortably wedged into his or her seat and practically finished eating, my cousin Marie pulled off a good one.  In a move of pure drama, she waltzed into the dining room untraditionally late with a giant wooden bowl and, you guessed it, asked “salad anyone?”  Well, let me tell you there’s nothing more a big Italian family likes than the thought of becoming bigger.  The squeals and cheers were deafening, especially to my husband seated 2 inches from me.  The applause lasted for a solid ten minutes.  More wine was poured and toasts were offered.  Still my favorite night of the year.

But at this point, I have had my fill of pasta and bread, cookies and wine.  I want my regular food back.  I want my whole grains and my BFF kale.  I want to make one of my favorite dishes, Farro and Kale with Roasted Pears and Turkey Bacon.  Vegetarians, don’t leave me here.  Just drop the bacon and we’ll stay friends.  This is too good to miss.  I love to pair this with a hearty salad of mixed greens, shaved fennel, and walnuts.  Ahhhhh…..almost meatless Monday.  Happy day.

I want you to make this and when you do, just make a little salad or a simple side of roasted vegetables.  If you need to, you can sub barley for the farro, and your favorite green for the kale, although isn’t kale your favorite?  Speaking of favorites, I can’t believe I have yet to post a recipe with my favorite fall fruit, pears.  Why is it that apples get all the attention at this time of year?  I think pears are so underappreciated, so versatile and so delicious.  I’m rooting for pears!  I’ll even post a simple, but luscious pear dessert on Friday, just in time for your New Year’s Eve party.  Goodness.  So much to celebrate.

Farro and Kale with Roasted Pears and Turkey Bacon
Author: 
Serves: 8-10
 
Ingredients
  • 3 firm but ripe pears (about 1 ½ pounds), cored and cut into ¾-inch cubes (I used Bartlett)
  • 3 Tablespoons olive oil, divided
  • 1 teaspoon chopped thyme
  • Sea salt
  • Freshly ground black pepper
  • ½ pound turkey bacon
  • 2 cups uncooked farro
  • 1 onion, thinly sliced
  • ⅔ cup dry white wine (or chicken stock)
  • ¾ pound Tuscan kale (or kale of your choice), stems removed and roughly chopped, about 8 cups
  • 3-4 Tablespoons lemon juice
  • 2 Tablespoons unsalted butter
Instructions
  1. Preheat the oven to 425 degrees. In a large bowl, gently toss the pears with 1 Tablespoon oil and 1 teaspoon thyme. Spread the pears out in a single layer on a parchment-lined baking sheet and sprinkle with ¼ teaspoon sea salt and several grinds of black pepper. Roast, turning occasionally until golden brown and fragrant, about 25 minutes. Remove and allow to cool.
  2. On a large parchment-lined baking sheet, arrange the turkey bacon slices. Bake at 425 degrees until top is crisp. Turn once and cook the other side until crisp, about 15 minutes total. Remove from oven and allow to sit until cool enough to handle. Then chop coarsely.
  3. Rinse the farro and place in a large pot with a pinch of sea salt and enough water to cover by at least 2 inches. Bring water to a boil and simmer until tender, about 30 minutes. Drain well!
  4. Meanwhile, heat the remaining 2 Tablespoons oil in a large skillet over medium heat. Add the onion, a sprinkling of sea salt and black pepper and cook, stirring often, until golden brown, about 10 minutes. Remove the pan from the heat and stir in the wine. Return the pan to medium heat. Cook until most of the wine is absorbed, about 2 minutes, stirring often and removing any bits of flavor on the bottom of the pan. Stir in the kale and season with salt and pepper. Cover and cook until the kale is just tender and still vibrant green, about 7 minutes. Stir halfway.
  5. In a large serving bowl, combine farro with lemon juice and butter. Stir in the kale and turkey bacon. Gently fold in the pears. Taste for seasoning and serve immediately.

Spinach and feta strata

You know I’m a fan of the do-ahead breakfast for busy (and early) weekday mornings.  But holidays and weekend brunches are also the perfect time to prepare a fabulous breakfast the night before.  On Christmas morning, the kids love to come down in their pj’s and see what Santa left for them and I don’t want to be stuck in the kitchen missing out on all the “oohs” and “ahhs.”  It’s also a great feeling to be able to relax after a late night of Christmas Eve revelry and still put a hot breakfast on the table for everyone.  Breakfast strata to the rescue!

A strata is technically a layered casserole, which mine is not since I just mix everything together in a bowl and pour it into a casserole dish.  This recipe is more of a savory bread pudding to which I add lots of spinach and in the summertime, ripe tomatoes.  In my quest for efficiency in the kitchen, I love stratas for using up stale bread and leftover vegetables from last night’s dinner.  In these photos I used a multi-seeded bread, which is not the norm for me, but we loved it.  Usually I buy a whole spelt bread from Le Pain Quotidien or a rustic whole grain bread from Whole Foods.  As for vegetables, you can add anything you would put in a frittata.  No spinach?  No problem!  Take those roasted or sauteed vegetables from last night and add them here.   I’ve used broccoli, cauliflower, every leafy green there is, mushrooms, zucchini and cherry tomatoes.  A couple of pieces of cooked turkey bacon or sausage links sitting in the fridge?  They’re welcome in this strata.

I’ve made a gluten-free strata with gluten-free bread and I’ve also made it dairy-free with hemp milk and a cashew-based cheese.  Sadly, I haven’t figured out a substitute for the eggs for those with egg allergies.  Don’t be afraid to freeze this, either.  Provided you freeze the strata well-wrapped, it will taste exactly the same.  We had about 50 people over for brunch the morning after my daughter’s bat mitzvah, and I had made and frozen several stratas 2 weeks earlier.  It was such a gift to myself to just pop them in the oven the morning of and not to have to cook, especially since I couldn’t walk from dancing all night.  So whether you’ve been “partying” at the shopping mall for the last few weeks or you’re just cooked out, give yourself and your loved ones this one last gift.

Merry Christmas to all of you celebrating!

Spinach and Feta Strata
Author: 
Serves: 8 or you can make 16 mini-stratas in a muffin tin or ramekins
 
Ingredients
  • 2 Tablespoons unrefined, cold pressed, extra virgin olive oil
  • 1 large onion, diced
  • 10 ounces fresh spinach leaves
  • 8 large eggs
  • 2 ½ cups whole milk or plain, unsweetened hemp milk
  • 1 ¼ teaspoons sea salt
  • ½ teaspoon ground pepper
  • 6 ounces feta cheese, crumbled
  • 1 cup shredded mozzarella
  • 2 large tomatoes (when in season), seeded (if desired) and diced
  • 8 cups of whole wheat, spelt or sourdough bread, cut into 1-inch cubes (I used Whole Foods' "Seeduction" bread here)
  • Butter or olive oil for greasing baking dish
Instructions
  1. Warm the olive oil in a large skillet over medium heat. Add the onion and sauté until tender, about 4-5 minutes. Add the spinach and cook until wilted, a few more minutes.
  2. In a large bowl, beat the eggs with the milk, sea salt and pepper. Stir in the cheeses, tomato (if using), bread and spinach-onion mixture.
  3. Lightly grease a 13 x 9 –inch baking dish and pour the strata mixture into the dish. Cover and refrigerate overnight.
  4. Preheat oven to 375 degrees. Uncover baking dish and bake for 45-55 minutes or until egg mixture is set and top is golden brown.
Notes
Can be frozen if wrapped tightly. Thaw in the refrigerator before baking. I’ve done it and you can’t tell at all that it’s been frozen.

MINI-STRATAS: grease 16 individual ramekins or muffin tins. First layer bread, then vegetables and cheese. Last, pour beaten eggs mixed with milk, salt and pepper on top. Bake for 25-30 minutes.


Brussels sprout leaf salad recipe

I am a sucker for traditions most likely because I grew up with so many, most of which are still alive today.  In my family, Christmas Eve is the biggest night of the year.  Despite the fact that I moved from New York 20 years ago (gasp!), I have never missed it once.  And in all these years, it hasn’t changed much except for the fact that it has grown considerably from a sit-down dinner for 40 to a sit-down dinner for up to 80.  We’re so many people, that we even have a priest come to the house to perform mass in the living room.  Someone still dresses up as Santa and comes down the stairs after dinner to sit with the children who still believe.  There are a few hundred gifts to be given and carols to be sung.  It is truly a magical night.

As far as food goes, it’s the biggest potluck you have ever seen in your life.  Italian Christmas Eve dinners usually revolve around fish and ours is no different.  There are usually several versions of codfish, as well as eel, scallops, mussels, octopus and linguine with clam sauce.  Would it surprise you that my husband’s Christmas Eve tradition is to stop by Sal’s pizza before coming to dinner?  Thankfully I have a mother who loves vegetables as much as I do, but she’s usually the only one who makes any, except for salad.   The long-standing tradition on Christmas Eve is that if you are pregnant, you get a break.  You only need to bring a salad since that is much easier to make than almost anything else.  In years past, my aunts, and now my cousins and my sisters and I have announced our pregnancies by entering the dining room with a salad.  It’s always a very joyous moment.

Because I usually arrive on December 23rd and there are dozens of gifts from Amazon that need immediate wrapping, I usually make a pan of gingerbread to bring and call it a day.  But also my parents are usually monopolizing their small-ish kitchen with eel prepartion and that’s enough for me to stay the heck out of there.  This year I arrive on December 22nd and I have a whole extra 24 hours to play with, so I thought I would make something a little more interesting for Christmas Eve, something that showcases the kind of food I love to share.  I immediately thought of this Brussels sprout leaf salad, which is such a different and delicious way to eat this incredibly nutritious and tasty vegetable that seems to get roasted more than anything else.  I also think it’s just perfect for Christmastime because the green from the leaves and the red from the dried cherries are just so festive.  The blanched leaves do not taste much like brussels sprouts at all, but in fact very neutral.  The salad goes beautifully with turkey, pork, beef and fish.  I would normally not recommend making this salad for an enormous crowd since you have to core each sprout and separate all the leaves for blanching.  But I have it pretty well down to 30 seconds a sprout, with 2 pounds taking me about 20 minutes.  My sisters, my daughters and I can likely tackle 10 pounds of sprouts at the kitchen table and catch up on all the gossip.  We’ll do all the prep the day before, as well as make the vinaigrette and I’ll dress the salad just before serving on Christmas Eve.

So it looks like I’m starting a new tradition, which is that you can bring a salad if you want, especially if you are trying to get your family to eat more healthfully.  But for the record, I am absolutely, positively, most definitely NOT pregnant!

5.0 from 2 reviews
Brussels Sprout Leaf Salad
Author: 
Serves: 8
 
Ingredients
  • 2 pounds Brussels sprouts, washed, cored and leaves separated (discard the core)
  • 1 Tablespoon finely chopped shallot or 1 teaspoon minced garlic
  • 1 teaspoon lemon zest (do not omit this – it makes the salad!)
  • 2 Tablespoons lemon juice
  • 1 Tablespoon raw honey or maple syrup
  • 1 teaspoon whole grain or Dijon mustard
  • ½ cup unrefined, cold-pressed extra-virgin olive oil
  • 1 teaspoon sea salt
  • Freshly ground black pepper
  • 6 Tablespoons dried cherries or cranberries
  • 6 Tablespoons whole raw almonds, toasted and chopped or sliced
Instructions
  1. Prepare a large bowl of ice water. In a large pot of salted (about 1 Tablespoon kosher salt) boiling water, blanch the brussels sprout leaves just until they are a vibrant green and barely tender (less than 2 minutes). Drain and immediately submerge in the ice water to stop the cooking. Drain and dry well. You can do this in a salad spinner.
  2. In a small bowl, whisk together the shallot, lemon zest and juice, honey, mustard, sea salt and pepper. Continue whisking while slowly drizzling in the olive oil until the oil is emulsified or put everything in a screw-top jar and shake vigorously.
  3. In a large serving bowl, toss the Brussels sprout leaves, dried cherries, almonds and just enough vinaigrette to lightly moisten. Taste for seasoning and serve.
Notes
Hazelnuts or pecans can be substituted for the almonds.
Dried blueberries can be substituted for the dried cherries, so can pomegranate seeds.
Diced, roasted beets are a complementary addition.
Shaved Manchego cheese can be added, as done in the original.

Zucchini-potato latkes

So what does a nice Italian girl from New York make for her nice Jewish husband for Hanukkah?  Zucchini-potato latkes, of course!  Believe me, you don’t have to celebrate Hanukkah to enjoy these little patties.  Grated potatoes mixed with a little onion and lots of fresh zucchini all fried to crispiness.  Mr. Picky has declared that this is the only way he’ll eat zucchini.  So be it.  But uh oh.  That fried bit does make latkes an “occasional” food, which is why we only indulge in them a mere once or twice a year.  Even though frying is a rather unhealthful way to cook, I’ll do it since the latkes are so much more tasty that way.

What’s funny about my education in latke-making is that I learned what I know from an unlikely source — my Puerto Rican mother-in-law, who also did not grow up Jewish.  Darn that woman can make the best latkes in the world!  Although she wouldn’t dare put in any zucchini or sweet potatoes in hers, I have accumulated some great tips from her that I will share here:

  • Russet or Idaho baking potatoes have the highest starch content and the lowest moisture content, which is good for making crispy latkes. But Yukon Gold (medium starch) work great, too.
  • Wear disposable gloves so your hands don’t smell like potatoes and onions for a day.
  • Squeeze out excess water from the potatoes — again helps to keep them crispy and keep them from falling apart.
  • Use the shredding disc on the food processor to make this job a breeze.  I also shred my onions (and zucchini), but my mother-in-law chops the onions and pulses them with the metal blade to avoid getting any big pieces.
  • Don’t make them too big.  The interiors won’t get fully cooked and they may not hold their shape well.
  • Fry them in an inch of oil — this helps to get all sides crispy so they don’t fall apart.  (I can’t bring myself to cook in that much oil and that’s one reason my mother-in-law’s latkes are better than mine.)
Whatever you celebrate, here’s hoping your holidays are happy!

5.0 from 2 reviews
Zucchini-Potato Latkes
Author: 
Serves: makes 30 2 ½ -inch latkes or 20 3-inch latkes
 
Ingredients
  • 2 pounds medium zucchini, about 6, ends trimmed
  • 1 ½ pounds Russet potatoes, about 2, peeled or unpeeled, and cut to fit a food processor
  • 2 medium yellow onions, peeled and quartered
  • 3 large eggs, lightly beaten
  • 1 Tablespoon sea salt
  • A few grinds of black pepper
  • ½ - ¾ cup panko bread crumbs or matzo meal
  • Olive oil for frying (or a refined peanut oil or grapeseed oil has a higher smoke point, although not exactly healthful)
Instructions
  1. Shred the zucchini in a food processor fitted with the shredding attachment and place in a colander over a large bowl (my preferred method.) Toss with 1 tablespoon kosher salt and allow to drain for 30 minutes. Call your kids to the kitchen so they can watch the next step. Place the zucchini in a kitchen towel and squeeze out as much liquid as possible. There's a ton! Do not add salt to the mixture again. Or shred the zucchini with the potatoes and onions. You will get out more moisture though if you salt them first.
  2. In the bowl of a food processor fitted with the shredding attachment, shred the potatoes and onions. Again, squeeze out as much liquid as humanly possible. Let the mixture rest for a minute and squeeze again.
  3. Place all the shredded vegetables in a large bowl. Add the eggs, salt (do not add if you salted the zucchini early), pepper and bread crumbs to the vegetables and combine well.
  4. Heat the oil (I use olive) in 2 large skillets until hot, but not smoking. An inch of oil will give you the best results.
  5. Using about 2-3 tablespoons of the zucchini-potato mixture, form the latkes into 2 ½-inch pancakes. Flatten slightly and carefully place into the pan. When the edges are brown and crisp, turn them over and continue cooking until deep golden. I usually flatten them slightly in the pan when I flip.
  6. Lay paper towels on a cooling rack or brown paper bag. Transfer the latkes from the pan to the rack. Sprinkle with sea salt if desired. Serve immediately with applesauce or sour cream (if you must).
Notes
TO BAKE LATKES:

Preheat oven to 425 degrees. Brush a baking sheet with oil. Place formed (raw) latkes on baking sheet and brush tops with oil. Bake 10-15 minutes, or until undersides are golden. Flip latkes and bake another 10-15 minutes until golden on both sides. They won’t be as crispy as the traditional, but a good alternative if you don’t like to fry.

TO FREEZE AND REHEAT LATKES:

Cook, cool and freeze immediately. Reheat at 425 degrees for 10 minutes or until heated through.


Vegan gingerbread recipe

Vegan Gingerbread | Pamela Salzman

Vegan Gingerbread | Pamela Salzman

Nothing says “holiday” to me like the smell of gingerbread baking in the oven.  I am crazy about that combination of molasses and fragrant spices that are quintessential to gingerbread.  I have made lots of different baked goods with this characteristic flavor — gingerbread pancakes, waffles, cookies, biscotti, and of course, the classic gingerbread cake, my most favorite of all.  I even make a pan of gingerbread for Thanksgiving as my official signal that the holidays have begun.  But my feeling is if you’re going to make gingerbread, you really need to go for it.  I use a heavy hand with the spices, especially, you guessed it, GINGER.  This recipe, I have to admit, is DELICIOUS.  It’s exactly what I want it to be — high-quality ingredients like whole wheat pastry flour, coconut oil, maple syrup and molasses that come together to make a moist, dense, intensely flavorful cake.  Daughter #1 said to me recently, “who knew gingerbread could be this good?”  Love her.

Actually, my whole family loooves this cake, even Mr. Picky whom I have caught more than once in the last month in the pantry with the door closed sneaking extra gingerbread.  The cake always gets eaten rather quickly at our house.  In fact, I should really adapt the recipe to fit a much larger pan.  The only time my kids didn’t like this was when I used blackstrap molasses.  I wanted to see if they could taste the difference which they did and said, “no, thank you!”  Molasses is the by-product of refining sugar and is sold in grades according to how much it as been boiled.  “Blackstrap” molasses is the result of the last boiling and thus has the most intense flavor and the highest mineral content.  I figured this was a good thing, but molasses is rather bitter and blackstrap molasses is way too bitter for my kids.  So I gave up a little extra iron and potassium for “regular” unsulphured molasses that would taste good to them.

During the holidays, I’m in the business of making people happy, which in turn makes me happy.  And this gingerbread does both.  Enjoy!

vegan gingerbread recipe | pamela salzman

Vegan Gingerbread | Pamela Salzman

4.7 from 9 reviews
Vegan Gingerbread
Author: 
Serves: makes 18 muffins or 1 8x8-inch pan
 
Ingredients
  • ¾ cup unsulphured molasses (not blackstrap)
  • ¾ cup 100% pure maple syrup (Grade B is fine)
  • ½ cup unsweetened applesauce
  • ½ cup melted unrefined coconut oil or unsalted butter
  • 2 ½ cups whole wheat pastry flour or white whole wheat flour*
  • 1 ½ teaspoons baking soda
  • ½ teaspoon fine grain sea salt
  • 3 teaspoons (1 Tablespoon) ground ginger
  • 3 teaspoons (1 Tablespoon) ground cinnamon
  • ¾ teaspoon ground cloves
  • 1 cup hot water
  • 1 teaspoon powdered sugar for dusting (optional)
Instructions
  1. Preheat the oven to 350 degrees. Line a muffin tin with paper liners or grease and flour an 8-inch square baking dish.
  2. In a blender, combine the molasses, maple syrup, applesauce and coconut oil. Blend until smooth.
  3. In a large bowl, sift together the flour, baking soda, sea salt and spices.
  4. Pour the wet ingredients into the dry and mix until just combined. Stir in the hot water. Pour into the prepared pan.
  5. Bake 20-25 minutes for muffins or 35-50 minutes (ovens vary wildly) for an 8-inch cake, until a cake tester inserted in the center comes out clean. Allow to cool before serving. Sift powdered sugar over cake, if desired.
Notes
*Gluten-free version, substitute the following for the 2 ½ cups of wheat flour:

1⅞ cups brown rice flour (measure 2 cups, then take out 2 Tablespoons)

7 Tablespoons potato starch (measure ½ cup, then take out 1 Tablespoon)

2 ½ Tablespoons tapioca flour

1 ¼ teaspoon xanthan gum

Creamy white bean dip with roasted garlic

Do your kids ask you for things at the last possible second even though they have known about whatever it is they need for weeks?  My husband does this, too.  “If you knew last Friday that you would need to bring a wrapped gift for your party, why are you telling me as we’re getting into the car on the WAY to the party??”  It really messes up the walk I talk about being organized.

One of my daughters was going to a girl scout meeting which started at 6:00 pm, and guess what?  She announced at 5:25 that she needed to bring an hors d’oeuvre.  That 10 pre-teens would actually want to eat.  And “not like something so totally healthy either, Mom.”  Like cool!  Like let’s pretend we’re on an episode of Chopped!  But seriously, even though I like the idea of being able to whip something yummy together with stuff from my pantry in 20 minutes, it’s a little stressful.

Normally, my go-to would have been hummus, which I can make in 10 seconds and I know my daughter and her friends like it.  But of course, on this day I had no cooked chickpeas.  So you know what they say about necessity being the mother of invention.  I found some canned white beans in the pantry and added them to the food processor with a few other staples that generally taste good with white beans and we had ourselves a winner dip.  My daughter even said she liked it better than hummus.  At the time, I made it with a raw garlic clove and it was terrific, but another day when I wasn’t under the gun I tried it with a whole head of roasted garlic and looooooved it more.

I just made the bean dip again recently to bring to a birthday dinner with some health-conscious ladies and served it with some crudites as shown in the picture.  I stole the idea from Martha Stewart of putting the cut veggies in modern drinking glasses.  It always makes for a pretty presentation.  I also included a small bowl of balsamic vinegar and olive oil with a pinch of sea salt — another stolen idea, this time from an Italian restaurant.  We have also used the dip as a sandwich spread with grilled vegetables.  Fabulous with eggplant, sweet bell peppers and zucchini!

Sure I could have gone to the market on the way to the meeting and picked up a tub of salsa and a bag of chips, but thankfully I didn’t because then there would of been two of the same hors d’oeuvre at the meeting that night. (At least it’s not just my kid.)

Creamy White Bean Dip with Roasted Garlic
Author: 
 
Ingredients
  • 1 head of garlic, unpeeled to roast or 1 large clove raw garlic, peeled
  • 2 cups cooked white beans*, such as cannellini or Great Northern, drained and rinsed, if canned
  • ¼ cup cold-pressed, unrefined extra-virgin olive oil
  • 2 Tablespoons freshly squeezed lemon juice
  • 1 teaspoon minced fresh rosemary
  • Several dashes hot sauce
  • ½ teaspoon sea salt
  • a few grinds finely ground black pepper
Instructions
  1. Roast the garlic: preheat oven to 350 degrees. Slice off the top fifth of the head of unpeeled garlic. Add a drop of olive oil. Replace the top. Wrap with parchment paper and then aluminum foil. Bake for 1 hour. Discard foil and parchment.
  2. Take the top off of the garlic and squeeze the softened garlic out of the skins into the bowl of a food processor fitted with the metal blade. Add remaining ingredients and process until smooth and creamy. When I'm ready to serve it, I like to drizzle it with a touch of fruity olive oil. Can be made a day ahead and kept covered and refrigerated.
Notes
I like to serve this as a dip with crudités or blanched vegetables and/or with warm pita bread, chips or toasted slices of baguette. You can even assemble your own crostini with grilled baguette toasts and white bean spread topped with sautéed greens. It is also great as a sandwich spread.

To cook your beans from scratch, soak dried beans in lots of cold water for at least 6 hours or longer. Drain them. Put them in a pot with enough fresh water to cover by 4-6 inches. Bring to boil. Reduce to a simmer. Cook until tender, anywhere from 45 minutes to 1½ hours, depending on the age of the beans. I like to add a tablespoon of kosher salt to the beans and allow them to cool in their cooking liquid for 30-60 minutes, if possible, but it's not necessary. Drain and use immediately or store in the fridge for 3 days. Beans also freeze very well.

Spaghetti squash with kale and chickpeas

Did you participate in the low-carb craze of the 90’s?  If you did, you may have eaten a lot of spaghetti squash with tomato sauce trying to convince your carb-starved body that you were actually eating pasta. The body is no fool, though.  At least mine isn’t.  I ate lots of “spaghetti” for a good year, but never really felt like I was eating pasta and then I had a negative association with this pasta imposter.  The better attitude to take is to acknowledge that spaghetti squash is a delicious food unto itself and that replacing a processed food (pasta) with something whole and full of vitamins and minerals is a fantastic idea.  I had sworn off spaghetti squash for 15 years because I thought the only way to eat it was with marinara sauce and I had O.D.’d on that.  But my lovely summer intern, Hannah, had found this recipe that sparked my interest and I was back.


Spaghetti squash comes into season in the early fall and lasts through the early spring.  Like most winter squashes, spaghetti squash lasts quite a while off the vine without losing nutrients.  In fact, many winter squashes actually get a little sweeter when they’ve been allowed to “cure” on your countertop for a bit.  What is unique about spaghetti squash is that the flesh is not meaty like other winter squashes like butternut squash or pumpkin, for example, but instead stringy after it has been cooked.  It resembles spaghetti strands when you rake your fork through the flesh.  Pretty cool, actually.  The flavor of spaghetti squash is like the glass half empty-glass half full.  It has a very subtle flavor — really subtle — which means it tastes kind of bland, but it also means you’re not that limited with flavors you can use.

Funny enough, the trickiest part about cooking spaghetti squash is actually cutting it open.  I have tried numerous methods and the one that is hands-down the best is what I call the slot machine method.  You can see from the photos that I insert the tip of my big, sturdy chef’s knife into the flesh of the squash a few inches from the bottom and pull down.  Then I inch my way up the squash towards the middle and keep inserting and pulling down the knife.  This is the safest and easiest way to do it.  If you don’t want to try cutting it open and you have extra time, you can pierce the squash a few times with the tip of your knife so it doesn’t explode in the oven (ask me how I know this) and roast it whole.  This way it will soften up and be much easier to cut open, but you’re adding an extra 15-20 minutes to the cook time.  I prefer to roast the squash halves, which takes about 45 minutes.  You can also plunge the halves into a pot of boiling water for about 13 minutes if you’re in a rush, but I think you lose nutrients when you boil vegetables for a long time like that.  Also, it’s easier to overcook it and then the subtle flavor becomes even more subtle (as in, it tastes like water.)  I’m well aware that people also microwave spaghetti squash halves, but this is a site about NOT microwaving food, so you’ll have to figure that one out on your own.


Here I sauteed my BFF kale with garlic and a pinch of chili flakes to toss with the cooked squash strands and then I add cooked chickpeas.  But we’ve hung out enough that by now you know that you can substitute Swiss chard or spinach for the kale and white beans for the chickpeas.  Really the sky’s the limit with how you complement the squash.  Just make sure you add lots of flavor and don’t be stingy with the salt.  I added vegetable chili on top of it one day. Another time I tossed it with chunky braised root vegetables in a spicy tomato sauce.  Daughter #2 found some cooked spaghetti squash in the refrigerator and warmed it up and added olive oil, feta, olives and some leftover broccoli.  It was so darn good and I never had to convince anyone to try it because it was “just like pasta!”

5.0 from 1 reviews
Spaghetti Squash with Kale and Chickpeas
Author: 
Serves: 4-6 (or just me and my intern, both starving, standing over the stove)
 
Ingredients
  • 1 spaghetti squash, about 3½ pounds
  • 3 Tablespoons unrefined olive oil + more for drizzling the squash or unrefined coconut oil or ghee
  • Sea salt and freshly ground black pepper
  • 1 bunch kale, center rib removed, leaves chopped
  • 1 ½ cups cooked chickpeas (rinsed and drained, if canned)
  • 3 cloves garlic, finely chopped
  • ¼ teaspoon crushed red chili flakes or more to taste
  • Parmesan or Pecorino-Romano cheese shaved on top (optional)
Instructions
  1. Preheat oven to 400 degrees. Cut the spaghetti squash in half lengthwise and remove the seeds. Rub the inside of each half with a drizzle of olive oil and season with salt and freshly ground black pepper. Arrange cut-side down on a parchment-lined baking sheet and bake for 45 minutes until tender.
  2. Heat oil in a large skillet over medium. Add garlic and cook until fragrant, about 1 minute or less. Add chili flakes, stir for a few seconds and add chopped kale with a few pinches of sea salt. Sauté kale until the leaves are bright green, about 5 minutes. Add the chickpeas and cook until warmed through. Remove from heat.
  3. Remove squash from oven when it is cooked through and tender. Using a fork, pull the strands of squash from the peel so that it resembles…spaghetti! Place the strands into a serving bowl and add the kale-chickpea mixture. If you do the spaghetti squash in advance and it is no longer hot, add to the kale and chickpeas and sauté over medium heat until warmed through. Toss to combine and taste for seasoning. Since spaghetti squash is rather bland, you will need to add plenty of salt and pepper. Garnish with cheese if desired.