Tomato, Roasted Pepper and Basil Strata (with Leftover Hamburger Buns) Recipe

tomato, roasted pepper and basil strata recipe | pamela salzman

I hope you had a fantastic 4th of July weekend!  There’s a good chance if you hosted a party, that you have some leftover hamburger or hot dog buns lying around.  What were you planning on doing with them?  Bread crumbs?  Great idea.  Croutons?  Another great idea.  Putting them in the freezer for the next time you make burgers or dogs?  Good luck with that one.  My freezer is basically one-third buns.  They’re all freezer-burned too, because I was lazy and threw the bags in there and didn’t bother to wrap the buns tightly in foil first.  And my kids reject previously frozen buns.  They would rather eat a hot bog or a burger without a bun over one that has been previously frozen.  It’s kind of annoying since we’re a family of 5 and you can’t buy a bag of 5 buns.  And I cannot handle wasting food, even a silly hamburger bun.

sauteer red onion and garlic

So I came up with this strata using leftover hamburger buns that had been sitting in my freezer and that I absolutely knew would end up in the compost bin.  Stratas are kind of like savory bread puddings, more bread-y than an egg-y quiche or frittata .  I actually prefer a frittata, but my husband and kids love their bread!   I posted a strata on my site a few years ago with spinach, tomatoes and feta.  Super delicious and I love that you can put it together the night before to soak in the fridge and then you bake it in the morning easy peasy.

tomato, roasted pepper and basil strata | pamela salzman

I essentially took what I had — a large tomato, half a red onion, a handful of baby mozzarella balls and a jar of roasted peppers in the fridge, plus some basil from my patio, and combined them with eggs and milk and voila!  No one had any idea that I used leftover, previously frozen buns.  And no one had any idea they were all different, including a whole grain sprouted bun!  Of course, gluten-free buns work equally well.  A strata is so versatile that if you had some leftover roasted zucchini, you could throw it in there too.  Or a link of leftover sausage or a handful of corn kernels.  And if you wanted a higher proportion of eggs, go for it.  Just bake until the strata feels “set.”  So no liquid gushes out when you push on the center of the strata and it kind of bounces back a bit.

tomato, roasted pepper and basil strata | pamela salzman

tomato, roasted pepper and basil strata | pamela salzman

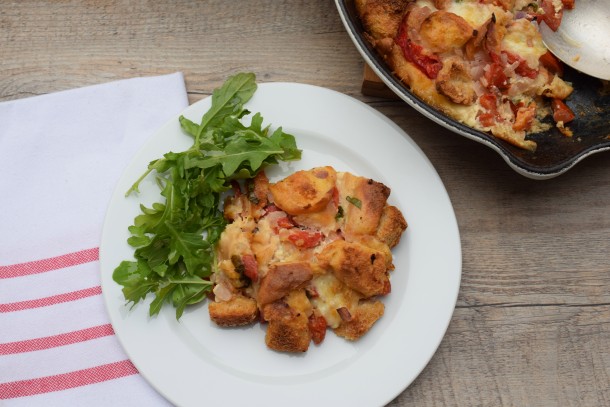
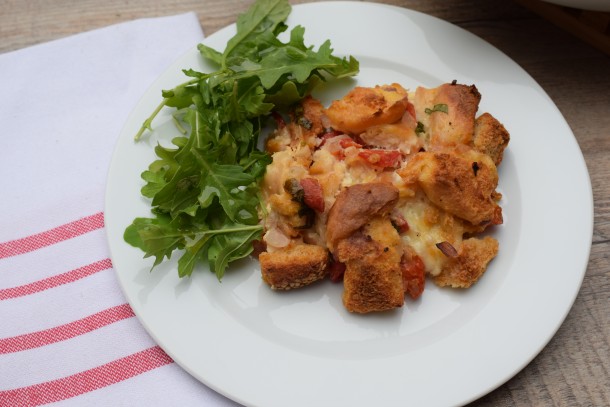
What’s also cool about this is that you can make it for breakfast, lunch or (Meatless Monday) dinner.  I served it in these photos with some lightly dressed arugula and I think that’s the best accompaniment or just a simple green salad.  But any non-starchy vegetable, like green beans or summer squash, would be great, too.  Because bread is the main ingredient, I wouldn’t serve another starch with a strata.  But I would serve it with a cold glass of rosé.  Happy summer!

tomato, roasted pepper and basil strata | pamela salzman

tomato, roasted pepper and basil strata | pamela salzman

tomato, roasted pepper and basil strata | pamela salzman

5.0 from 5 reviews
Tomato, Roasted Pepper and Basil Strata
Author: 
 
Ingredients
  • 1 Tablespoon unrefined, cold pressed, extra virgin olive oil, plus more for greasing skillet
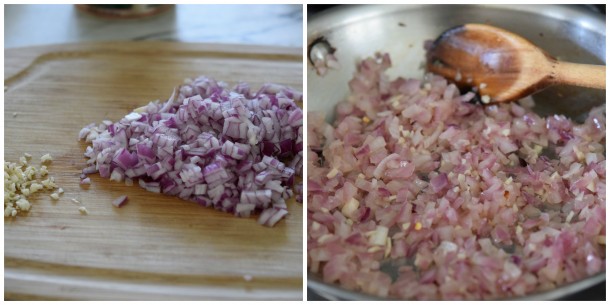
  • ½ large red onion, diced
  • 2 cloves of garlic, minced
  • a pinch of red pepper flakes
  • 4 large eggs
  • 1 cup whole milk or unsweetened, plain hemp milk or milk of choice
  • ¾ teaspoon sea salt (or 1 teaspoon if your mozzarella is unsalted)
  • ¼ teaspoon ground pepper
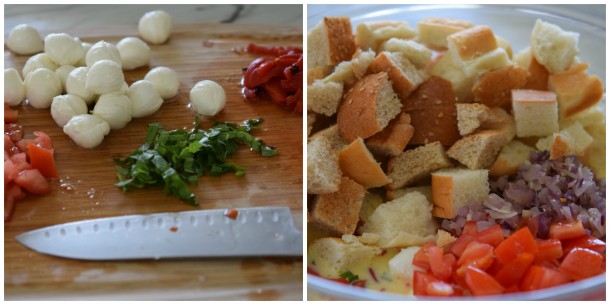
  • 6 ounces bocconcini (baby fresh mozzarella cheese), drained if in water
  • 1 large tomato, seeded (if desired) and diced
  • 1 roasted red or yellow bell pepper, sliced into thin strips
  • a handful of basil leaves, julienned
  • 5-6 ounces of whole wheat, spelt or sourdough bread, cut into 1-inch cubes, about 8 cups, preferably a little stale
  • For the Salad:
  • 6 ounces baby arugula
  • good aged balsamic vinegar
  • unrefined, cold pressed, extra virgin olive oil
  • sea salt
Instructions
  1. Warm the olive oil in a large skillet over medium heat. Add the onion and sauté until tender, about 3-4 minutes, add the garlic and red pepper flakes and sauté until fragrant, about 30-60 seconds, then remove from heat and set aside.
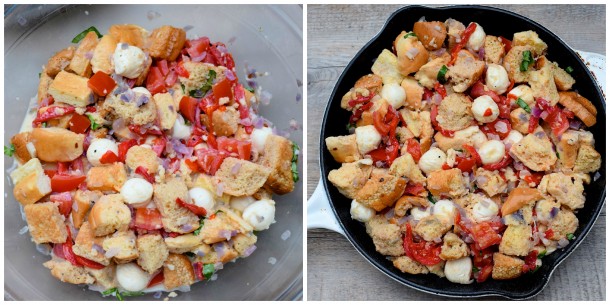
  2. In a large bowl, beat the eggs with the milk, sea salt and pepper. Stir in the bocconcini, tomato, roasted red pepper, basil, bread and onion-garlic mixture, cover with plastic wrap and refrigerate overnight. You don’t have to soak overnight, but I love the way the bread soaks up the mixture. Feel free to put it straight in the oven.
  3. If you soaked it overnight, remove the strata from the refrigerator and preheat oven to 375 degrees. Lightly grease a 10-inch skillet (or a 9-inch pie plate or equivalent) with olive oil and pour the strata mixture into the skillet.
  4. Bake for 40-50 minutes or until egg mixture is set and top is golden brown.
  5. Remove strata from oven and allow to cool slightly.
  6. While the strata is cooling, toss the arugula with a drizzle of balsamic vinegar and olive oil (just enough to coat) and sprinkle with salt.
  7. Top the strata with the arugula salad and serve, or cut the strata into serving size pieces and top each piece with arugula salad.
Notes
Unbaked strata can be frozen if wrapped tightly. Thaw in the refrigerator before baking, uncovered.

MINI-STRATAS: grease 4 individual ramekins or muffin tins. First layer bread then vegetables and cheese. Last, pour egg, milk, salt and pepper on top. Refrigerate overnight, if desired. Bake for 25-30 minutes.


Red, White and Blue Popsicles Recipe (fruit-based, all natural)

all-natural red, white and blue popsicles | pamela salzman

Everyone in my family has drunk my Kool-Aid, so to speak.  My husband and my teenage daughters all have bought into my way of eating for the most part, understanding the connection between what they eat and how they feel (and in the case of my daughters, how they look.)  Although my 11-year-old son, whom I lovingly refer to as Mr. Picky, has been a little slow coming around.  My son quietly wishes I was a “cool mom.”  You know, the kind that buys “unhealthy food,” as he calls it.

all-natural red, white and blue popsicles | pamela salzman

Believe me when I say that he is not deprived of treats.   I know enough not to be one of those parents who prohibits her children from eating a grain of sugar or a not-homemade graham cracker.  But there are certain food substances that do not cross my front door.  Ever.  One of those is artificial colors.  So when my son asks me “why can’t we have ____?” (insert disaster-packaged-food-marketed-to-kids), I usually go on about why those food-like impostors are bad for our health or I just say, “because I love you too much.”  And he rolls his eyes.  There is less eye-rolling than he did a year ago, but that still annoys him.

all-natural red, white and blue popsicles | pamela salzman

So just before dropping my sweet boy off at sleepaway camp for 13 whole days, my husband was reminding him to shower (going in a pool or a lake doesn’t count) and brush his teeth, use sunscreen and keep hydrated.  As soon as I opened my mouth, Mr. Picky looked at me and said, “Don’t worry, Mom.  I got it.  Don’t forget to eat protein.  No high-fructose corn syrup and not too much junk food.”   Of course, I was like, “What?  I wasn’t going to even mention food.  Have the best time!  Love you so much!”  Busted.

all-natural red, white and blue popsicles | pamela salzman

Because Mr. Picky will be at camp on the 4th of July, I surprised him the other day with these red, white and blue popsicles.  Of course they are all natural.  But really natural, not like the “natural” food companies liberally use when marketing many products.  I had no idea if they were going to turn out good or boring or what.  I mean after all, they’re made out of …fruit.   What a concept.  And some coconut milk sweetened with honey.  Zzzzzzzzzzz…….

blueberry puree

all-natural red, white and blue popsicles | pamela salzman

I personally think these are very exciting and the perfect answer to Bomb Pops, especially if you use these cool stainless steel popsicle molds which you can find here.  I tasted each mixture before freezing to make sure the sweetness was just right, otherwise these are very straightforward and you can make them today for the 4th if you want.

all-natural red, white and blue popsicles | pamela salzman

They were a huge hit with all my kids, including Mr. Picky!  My girls thought they tasted like a really fresh-tasting sorbet.  My son gave me such a nice compliment when he said, “Wow, Mom.  These are actually pretty good.”  And then he had a second one.   I miss him already.

all-natural red, white and blue popsicles | pamela salzman

Red, White and Blue Popsicles Recipe (fruit-based, all natural)
Author: 
 
Ingredients
  • 7 ounces hulled strawberries*
  • ½ cup full fat coconut milk ( I like Aroy-D)
  • ½ teaspoon pure vanilla extract
  • ½ Tablespoon honey (or more to taste)
  • 1 ½ cups blueberries*
Instructions
  1. Place strawberries in blender or food processor and blend until you achieve a liquid consistency. Pour into bottom third of popsicle mold. Insert stick. Place in freezer for approximately 1 hour, or until frozen solid.
  2. Combine coconut milk, vanilla and honey in a measuring cup or a bowl with a spout. Remove popsicle mold from the freezer and pour the coconut layer on top of the frozen strawberry layer leaving the last third of the mold empty. Place back in the freezer and freeze for about 30-45 minutes until coconut mixture is firm, but it doesn’t have to be frozen solid. Place popsicle sticks in coconut mixture and put back in the freezer until completely frozen.
  3. Place blueberries in a blender or food processor and blend until you achieve a liquid consistency. Remove popsicle mold from the freezer and pour blueberry mixture into top third of mold, over the frozen coconut mixture. Place back in the freezer for another hour or until completely frozen solid.
  4. To remove from popsicle mold, gently run mold under warm water to release.
Notes
*Make sure to taste your fruit mixture first, if your fruit isn’t super sweet or you prefer a sweeter popsicle, feel free to add honey (or sweetener of choice) to taste to the fruit mixtures.


Mediterranean Fish in Parchment recipe

You see that beautiful piece of fish down there?  That is my idea of a perfect dinner — simple, healthy, light, delicious, seasonal, easy-to-make.  If my family didn’t thrive on an ever-changing dinner menu, I would love to eat this twice a week with a fresh salad and a glass of rosé.  Perfect.

mediterranean fish in parchment

Fish in parchment is easier than it looks and one of the most healthful ways to cook fish.  I have taught and posted two other fish in parchment recipes which you may have tried, one with cilantro and ginger and the second with summer herbs.  Both are delicious and perfect when you want something light in the summer.

L1210229

L1210231

The basic idea when you’re cooking in parchment, is to use ingredients that all cook pretty quickly and at the same rate.  Make sure that parchment is tightly sealed and you’ll create a little steam oven in that packet.  I always make sure the fish is well-seasoned with salt and pepper and that I add a smidge of fat, either butter or olive oil for flavor, and then there are lots of possibilities.

L1210238

Once I see those first local tomatoes at the farmers market, I start going a little tomato-crazy.  I especially love cherry tomatoes because they are always so sweet.  In this recipe, you can’t beat the combination with the sautéed garlic, salty capers and olives and zingy white wine.  I would eat this with a simple rice pilaf or quinoa salad or a raw zucchini salad.  My family would probably love a little pasta with pesto to go with it.

med fish parchment collage 1

I have taught this recipe in my cooking classes many, many times and sometimes I added some raw baby spinach leaves under the fish.  The spinach wilts beautifully and tastes delicious with all the other ingredients.  Shaved zucchini slices would also be perfect, but you could also add vegetables to the packet like blanched (not raw) green beans or slivers of roasted peppers.

mediterranean fish in parchment

Of course, if there are ingredients in the recipe you don’t care for, feel free to omit.  After I finish going over a recipe in my class, I take a few minutes to talk about substitutions.  Questions about how to change the recipe are the most common questions that come up — how do I make this gluten-free? My husband won’t eat anything with onion.  I hate olives.  Etc, etc.  I give you permission to take out the olives if you want.

mediterranean fish in parchment

Summer is here, friends.  Let’s get cooking!

5.0 from 3 reviews
Mediterranean Fish in Parchment recipe
Author: 
Serves: serves 4
 
Ingredients
  • 1 Tablespoon unrefined, cold pressed, extra virgin olive oil
  • 3 cloves garlic, thinly sliced
  • ⅛ teaspoon red pepper flakes
  • 1 cup grape tomatoes, halved
  • 2 Tablespoons capers, drained
  • a handful of mixed fresh herbs (I like to use mostly parsley with a little basil and mint mixed in), if you have them or sprigs of fresh thyme
  • ½ teaspoon sea salt + extra for seasoning fish
  • a few grinds of freshly ground black pepper to taste + extra for seasoning fish
  • 4 filets of wild halibut or sole
  • 4 teaspoons unsalted butter or unrefined, cold-pressed extra-virgin olive oil
  • 8 teaspoons dry white wine
  • 4 12-inch squares of unbleached parchment
Instructions
  1. Preheat oven to 450 degrees. In a medium saucepan, heat 1 Tablespoon olive oil. Add sliced garlic, red pepper flakes and cook until the garlic is fragrant and almost golden brown, about 1 minute. Remove from heat and stir in tomatoes, capers and fresh herbs, salt and pepper.
  2. Arrange each piece of fish in the center of the parchment paper and sprinkle with a pinch of sea salt and pepper.
  3. Top each filet with a fourth of the tomato mixture, 1 teaspoon of butter or oil, and 2 teaspoons wine.
  4. Bring 2 opposite sides of the parchment together and fold. Continue to fold all the way down until you reach the fish. Twist both ends of the parchment so that it looks like a hard candy wrapper. Repeat for each piece of fish. Place each packet on a baking sheet and bake for 8-10 minutes based on the thickness of the fish.
  5. Transfer each packet to a plate and use caution when opening – the steam will be very hot!
Notes
Sometimes I like to add a handful of baby spinach leaves to the parchment before topping with the fish.


Whole grain mixed berry buckle recipe (gluten and dairy-free versions, too!)

whole grain mixed berry buckle | pamela salzman

I am so behind planning my Father’s Day menu!  I was just a lazy bones in Mexico last week and for some reason didn’t really have Father’s Day on the brain, but now here it is, coming up in 5 quick little days.   I have my father coming into town this weekend which is an extra special treat.  Most Father’s Day menus I’ve seen floating on the web all focus on the grill.  If I didn’t know any dads, I would assume from Pinterest that they are all obsessed with huge slabs of grilled steak.  And beer.  And maybe most of them are!  But that is not the way to my husband’s heart or my father’s.  And it’s probably better that way since my husband inherited off-the-charts cholesterol levels and my dad has had his share of arterial plaque.  Oy.  I think I’ll make a fruit dessert!!

lots of berries

Truth be told, my husband loves fruit desserts, especially pies and crisps.  And cobblers and crumbles.  And tarts.  Wink, wink.  In my May classes this year, I taught this absolutely delicious (and pretty clean fruit buckle.)  You have surely heard of the other desserts I mentioned, but most people have no idea what a buckle is.  And neither did I a year ago.  But my life was incomplete without it.

topping ingredients

A buckle is more cake-like than crisps and crumbles and cobblers.  In fact, I liken a buckle to a coffee cake but with double or triple the fruit.  Whereas I have seen pictures of buckles with varying amounts of fruit, all buckles have some sort of a streusel or textured topping, which makes the cake looked “buckled.”  I absolutely love fruit desserts because I absolutely love fresh fruit, but also because you can swap different fruit according to the season and make cool combinations of fruits, too.  I never over-sweeten fruit desserts because I like the true fruit flavor to shine through and not be muddled by too much sugar.  The most popular (and best) fruit to use in a buckle are blueberries.  Because the cake contains so much fruit, it can get a bit wet with too many peaches, strawberries or plums.  Blueberries aren’t overly juicy and they’re skins make them a little heartier.  In the recipe I photographed here, I used half blueberries, one quarter raspberries and one quarter blackberries.Continue reading

Whole grain and almond pulp pancakes recipe

Photography By Erica Hampton

I am kicking myself for all the almond pulp I have thrown away in my lifetime.  It honestly makes me crazy to think of how much perfectly good raw, soaked, organic almond pulp I wasted because I didn’t know it would be amazing in banana bread or pancakes, among other things.   I make so much almond milk and the only things I used to be able to think to do with the leftover pulp was to add it to smoothies and stir it into oatmeal.  Not that there’s anything wrong with that, but it just got boring after a bit.

wet ingredients

Then a light bulb went off in my head and I tried using the pulp (which is different from store-bought almond meal because it is wet) in banana bread and it was amazing!  Have you seen this recipe yet?  It’s was so delicious and after my first attempt baking with almond pulp, I assumed every cookie and cake recipe would turn out great.  Not the case.  I actually had a few failures using almond pulp.Continue reading

Baked Falafel Recipe

baked falafel | pamela salzman

One day I woke up and decided I had to have falafel.  Falafel are deep-fried balls of pulsed chickpeas blended with herbs, onion and garlic.  Sometimes they are made with a combination of broad beans and chickpeas and sometimes that contain a lot of herbs which make them rather green on the inside.  They’re so tasty and a great high-protein, vegetarian food that you can eat in a sandwich or on a salad or dipped into a sauce.  My family and I love falafel and one day I just had such a craving for them.  I wanted the works — pita bread, tahini sauce, lettuce, tomato and pickled radishes.

baked falafel | pamela salzman

But the fact that falafel are deep-fried is a major turn-off to me, especially food that is deep-fried in a restaurant, as opposed to at my house, because restaurants use and re-use the same low-quality oil over and over again.  Deep-fried foods are just a big plate of inflammation, bad for digestion, bad for the heart, bad for the blood, bad for the skin, just B.A.D.  Knowing how awful deep-fried foods are is a little bit of a curse because it’s hard for me to enjoy them, even in moderation.  But I wanted to make real, authentic falafel that I would un-authetically bake.  So naturally I went on Youtube to learn how to make them.  Sure there are plenty of blogs with falafel recipes, but a lot of these recipes are not the real deal.  For the real deal, I watched falafel-making videos from Israel and I learned everything I needed to know and then some!

raw soaked chickpeas

For example, falafel are made with raw, soaked chickpeas, not canned.  The texture is a bit crumbly, not a mashed potato patty.  There are no eggs in falafel.  And after watching a few videos of expert falafel-makers, I really wished I had a meat grinder (which is what most of them use) to process the all the ingredients into the perfect texture.  But my food processor was good enough and the next day (because I let my chickpeas soak 24 hours), we enjoyed very delicious, healthy baked falafel.  And although falafel has a bit of oiliness from frying, I didn’t even notice the absence of oil since I smothered the patties with a delicious tahini sauce.

pulse everything in the food processor


pulsed until it resembles couscous

My son, who is known to be a tad picky, devours anywhere from 6-10 falafel at dinner when I make them.  For sure he loves to eat them in pita, especially if the pita is homemade and warm from the oven (I used this Martha Stewart Living recipe with success.)  But he (and we) is just as happy wrapping a few falafel in a big lettuce leaf with some sauce.  Falafel make the perfect Meatless Monday dinner since they contain lots of protein from the chickpeas and the tahini sauce.  You can also make them spicier with an extra pinch of cayenne.  If I know I’m going to have a crazy afternoon, I’ll make the sauce and shape the falafel in the morning and bake them at the end of the day for a really easy dinner.  Add some lettuce and tomatoes for a simple dinner or go the extra mile with pickled vegetables, pita, and some grilled eggplant.

falafel

Even though I am really against deep frying and I had great results baking these, you can certainly “sauté” these falafel in a skillet with some olive oil until golden and crisp on both sides.  It is a much faster way to cook these and they will have a little bit more of an authentic greasiness.  But the baked version does it for me just fine.  I hope you’ll give them a try!

baked falafel | pamela salzman

baked falafel | pamela salzman


5.0 from 2 reviews
Baked Falafel Recipe
Author: 
Recipe type: makes 20-24 falafel
 
Ingredients
  • 1 ¾ cup dried chickpeas (do NOT use canned chickpeas)
  • 2 medium cloves garlic
  • 1 cup chopped onion (about 1 small onion)
  • 2 teaspoons ground cumin
  • 1 teaspoon ground coriander
  • pinch cayenne
  • 1 ¾ teaspoons sea salt
  • ½ teaspoon freshly ground black pepper
  • ½ teaspoon baking soda
  • 1 Tablespoon freshly squeezed lemon juice
  • ¾ cup chopped parsley (or mix with chopped cilantro)
  • ¼ cup whole wheat pastry flour or GF flour blend or chickpea flour
  • unrefined cold pressed extra-virgin olive oil for brushing the pan and the falafel


  • Sauce:

  • ½ cup tahini
  • ⅓ cup – ½ cup warm water to achieve right consistency and depending on the bitterness of the tahini
  • 1 medium garlic clove, minced
  • ½ teaspoon sea salt or to taste
  • 1 Tablespoon freshly squeezed lemon juice
Instructions
  1. Put dried chickpeas in a bowl and cover with water by a few inches. Soak 12-24 hours, making sure chickpeas stay completely submerged in water the entire time.
  2. Preheat oven to 375 degrees. Line a baking sheet with unbleached parchment paper and grease the paper with olive oil.
  3. Drain the chickpeas, and add to a food processor with garlic, onion, spices, salt and pepper, baking soda, lemon juice, parsley and flour. (Use a meat grinder if you have one.) Pulse the mixture, scraping down the sides as necessary, until it looks like couscous. The mixture will be quite crumbly.
  4. Form the mixture into about 20 balls, 1 ½ inches each. Press down on the tops to flatten them into thick patties. You can add a little extra flour if they are not holding together. Place them on the prepared baking sheet. Brush the tops with oil.
  5. Bake for 15 minutes on each side or until golden. You can fry them in oil, as well (not as healthy.)
  6. Blend all the sauce ingredients in a blender adjusting water to achieve right consistency. You want a thin sauce.
  7. Serve falafel with tahini sauce in a pita or lettuce leaves. Chopped tomato and cucumber salad is a nice accompaniment.


Spinach salad with grilled apricots and honey-mustard dressing recipe

spinach salad with grilled apricots and honey-mustard dressing | pamela salzman

What are you up to this weekend? Lots of plans? No plans? Is it finally good weather where you are? In classic Southern California beach tradition, our unseasonably warm winter has transitioned into a slightly chilly spring. Translation: it was 70 degrees two months ago and it’s 70 degrees today! Not quite bathing suit weather, but also not complaining at all, because I am not quite bathing suit-ready either if you know what I mean!  The unofficial start of summer is a double-edged sword, now isn’t it? Exciting because I can start dreaming of laying on the beach with magazines and watermelon while listening to the waves crashing at my feet.  But summer also means shorts and bikinis and I need to start kicking it into high gear.  Salads to the rescue!

honey-mustard dressing

When I put this spinach salad on my meal plan for this week, it dawned on me I had never posted it on the blog.  I taught the recipe several years ago in my classes and I realized I never got around to photographing it.  But it was really popular with my students and with my family too, so I thought better late than never and I think it’s perfect for Memorial Day weekend.  This is a very simple salad which you can make much more fancy or more substantial if you want. The basic bones of it is fresh baby spinach, stone fruit, nuts and a classic honey-mustard dressing.  You can add cooked chicken or goat cheese, radishes, shaved carrots, avocado, and/or sprouts if you want. The honey-mustard dressing is the first dressing Mr. Picky ever liked, so the recipe holds a place near and dear to my heart. Truth be told, he likes it more as a dip for raw veggies than as a salad dressing, but I’m cool with that.

grilling apricots

I think this salad would be great next to a burger, especially a turkey burger, or chicken with barbecue sauce. So if you’re entertaining this weekend or you need to bring a dish to a potluck, I think this salad would be perfect.  I also love the idea of balancing out a burger with something much more healthful like spinach salad with a clean dressing.  Even though kale salads have been in the spotlight the last few years, I think spinach is just as nutritious. Check out this comparison of nutrients from Prevention Magazine. Spinach is incredibly rich in iron, magnesium, potassium and Vitamin K, as well as the obvious Vitamin C and fiber. Most people find raw spinach a bit more palatable than raw kale. Kale however, has the advantage at a potluck since it holds up much better already dressed than spinach.  I have two fantastic kale salad recipes on my site if you’re interested:  one with a citrus dressing and one with a creamy lemon dressing.  Both favorites of mine.

sweet and spicy pecans

However you are spending your weekend, there is always room on your plate for something healthy!  Enjoy!

spinach salad with grilled apricots and honey-mustard dressing | pamela salzman

spinach salad with grilled apricots and honey-mustard dressing | pamela salzman

Spinach Salad with Grilled Apricots and Honey-Mustard Dressing
Author: 
Serves: 4-6
 
Ingredients
  • Dressing:
  • 1 ½ Tablespoons raw mild-flavored honey
  • 1 Tablespoon Dijon mustard
  • 1 ½ Tablespoons raw, unpasteurized apple cider vinegar
  • ¼ cup unrefined, cold-pressed extra virgin olive oil
  • pinch of salt and pepper to taste
  • 8 oz baby spinach leaves
  • Suggested add-ins:
  • 3 fresh peaches or apricots, ripe, but firm
  • Olive oil or melted coconut oil for brushing peaches/apricots
  • ¼ cup nuts such as sliced almonds or toasted pecans of walnuts (I used Trader Joe's Sweet & Spicy pecans in these photos)
Instructions
  1. To make dressing – place mustard, honey and vinegar in a mini-food processor or blender and process until combined. With the motor running, pour oil in a steady stream until emulsified. Add salt and pepper to taste. (You can also do this in a bowl with a whisk, just take care to fully incorporate the honey.)
  2. Preheat a grill to medium. Cut peaches in half and remove pit. Cut into quarters if they're large. Brush with oil and grill until just charred, about 3-5 minutes. You can grill the other side if you like.  I like to grill apricot halves and cut in half again after they're off the grill.
  3. Place spinach in a serving bowl or platter and toss with just enough dressing to coat lightly. Top with grilled fruit and nuts. Drizzle with any remaining dressing, if desired.

The best grilled marinated flank steak recipe

the best grilled marinated flank steak | pamela salzman

Such a bold claim I am making today with this flank steak recipe!  But that’s what Mr. Picky himself declared when I made this the first time many years ago.  And that’s what my nieces and nephews say when I cook this up for my family in the summertime.  As you know, I actually don’t even eat red meat, but I have tried this and I have to admit… it’s delicious!  I figured with Memorial Day weekend coming up (so excited to have a long weekend!), you might have invited a few friends over and are looking for the perfect grilled steak recipe.  This is it right here.  I also taught this in my classes a couple years ago and everyone loved it.  The ingredients are simple, you marinate it in the morning and it cooks up very quickly on the grill.  The marinade is what makes it so delicious and I especially love marinating grass-fed meat with a little soy sauce or tamari which really helps tenderize it.  Yum!

marinating the meat

As opposed to me, my family loves beef,  so I do cook it for them a few times a month.  I have talked about why I don’t think we should be overeating red meat on the blog before, and I have discussed my reasons for ONLY choosing grass-fed beef when I do buy it.  My opinion hasn’t changed at all.  When I do make animal protein for the family, it’s a small amount, usually 2-4 ounces.  Yes, even my husband eats that amount.  And if grass-fed isn’t available, I won’t buy corn-fed.  So if you’re going to eat beef — not a lot and make it grass-fed!

grilling flank steak and green onions

I have made this recipe two different ways.  In my classes, I pre-sliced the flank steak and marinated it already cut.  The advantage of this method is that it cooks super fast, about a minute per side and the marinade really gets throughout the meat.  If you’ve read my post about how to reduce your carcinogens when you grill, you’ll also remember one of the best strategies is to grill thin cuts so exposure to the grill is kept at a minimum.  Also, pre-cut meat is easier to serve during a cooking class because I don’t have to slice the meat when hungry people are waiting.  If you like rare beef however, you’re better off grilling the whole steak, letting it rest and then slicing it before serving.

or you can slice the steak before marinating

Whichever way you prepare it, here a few reminders about cooking steak:

  • flank steak can be hard to find because there aren’t too many “flanks”  on a cow.  Other acceptable subs are skirt steak, flap steak, or hanger steak.
  • don’t over marinate a thin cut like flank steak.  This marinade contains soy sauce which can make the meat mushy if you leave it in too long (like more than 12 hours.)
  • grass-fed contains less fat and therefore cooks more quickly;
  • grass-fed doesn’t stay as tender if it’s cooked well-done.  My answer for well-done grass-fee meat is to pour the juices from the cutting board on top of the meat and also serve it with a dressing or sauce to add moisture.
  • take the meat out of the fridge 30 minutes before to bring it to room temp so it cooks evenly;
  • always allow the cooked meat to rest, covered, for about 10 minutes before slicing so the juices redistribute themselves into the meat.  Don’t allow to rest too long, otherwise it will overcook (unless you want it well-done).
  • always cut against the grain for a more tender bite.  Look at the naturals lines in the meat and cut in the opposite direction.  If you cut with the grain, the meat will be chewy.

I generally serve this steak as is, but I don’t see why you couldn’t serve a salsa, an herb dressing or chopped grilled scallions on top.  Some good accompaniments are sautéed corn, wheat berry salad with lemon-tahini dressing, perfect spring salad, grilled artichokes, heirloom tomatoes with basil, roasted asparagus, just to suggest a few.

slice against the grain

the best grilled marinated flank steak | pamela salzman

The Best Grilled Marinated Flank Steak
Author: 
Serves: 6-8
 
Ingredients
  • ¼ cup shoyu (naturally brewed soy sauce) or GF tamari
  • 2 Tablespoons brown sugar
  • 2 Tablespoons dry white wine ( I also subbed rice vinegar once at it was still great)
  • 2 large garlic cloves, very finely chopped
  • 1 teaspoon toasted sesame oil*
  • 2 teaspoons unrefined, cold-pressed extra-virgin olive oil
  • pinch of crushed red pepper, or more to taste
  • 2 ½ pounds (or whatever you can get) grass-fed beef flank steak, cut across the grain on a diagonal into 1-inch thick slices or left whole (marinating can be longer if the steak is whole)
Instructions
  1. In a large, shallow dish, combine the soy sauce with the sugar, white wine, chopped garlic, toasted sesame oil olive oil and crushed red pepper, stirring to dissolve the sugar. Add the sliced flank steak and coat thoroughly in the marinade. Cover and refrigerate the steak for 4 hours or up to 8 hours.
  2. Heat a grill or a griddle over medium-high heat. Working in batches, grill the steak until the slices are browned and medium-rare, about 1-2 minutes per side. Transfer the steak to a serving platter and serve immediately.
  3. OR grill the whole steak for 2 ½ to 3 minutes on each side for medium-rare. 4 minutes on each side for medium-well. Transfer meat to a cutting board and cover. Allow to rest for 5-10 minutes before slicing AGAINST the grain. Serve.
Notes
*You can use 1 Tablespoon of sesame oil and omit the olive oil + add a little chopped fresh ginger for a more Asian flavor.