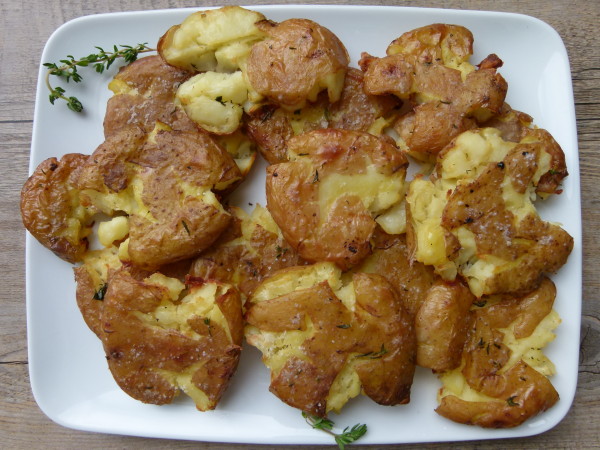
Roasted smashed potatoes recipe

roasted smashed potatoes by pamela salzman

Everyone thinks it’s so funny when I whine that I don’t get invited much to peoples’ houses for dinner.   There is an assumption that I’m an accomplished chef and I must have such high standards for eating therefore it’s too intimidating to have me over for dinner.  Ha!  Nothing could be farther from the truth.  I’m a home cook who never went to culinary school and I don’t ever make recipes with three sauces.  I could never work in a restaurant or hotel or be on one of those shows where you have to figure out what to do with octopus and cornflakes in 20 minutes.  Just for the record, I love simple food.  I don’t need anything fancy or chef-y.  I am very easy to please as long as it’s fresh and natural.  And I’ll bet that you are as good a cook, if not better than I am.  Anyone can have a food blog, friends!

red new potatoes

What I do love is sharing recipes that work for me, because I think we’re a lot alike.  And it makes me happy if more people are cooking at home, even if I’m not invited.  Wink, wink.  These roasted smashed potatoes are my favorite kind of recipe — uncomplicated, tasty, easy and healthful.  They go with whatever I’m serving and every single person in my family loves them.  If you’ve never made smashed potatoes, you are totally missing out.   They’re both fluffy on the inside and crispy on the outside and if you add enough salt, damn delicious.  I could just eat a half dozen of these and some scrambled eggs and call it a night.  If you invited me over for dinner and made these potatoes with scrambled eggs, I would be in heaven.  Yep, that’s all it takes.

pierce potato with paring knife to determine doneness

The other night at our dinner table, there were several ways to eat these.  My husband makes up for my dairy abstinence by melting cheese on everything, including these potatoes.  Mr. Picky dipped his in mustard and Daughter #2 topped hers with guacamole, salsa and sour cream.  Daughter #1 and I ate these plain and simple.  I’m going to start teaching the little miss how to make easy recipes like this because she’ll be off to college before I know it.  Sigh.  Wait, what am I talking about?  Yippee!

toss boiled potatoes in a little oil

These are divine out of the oven, but I don’t love potatoes reheated.  To do some of the work ahead of time, boil the potatoes and refrigerate them.  Then, smash them and roast them to crispy perfection.  What is great is that you’ll use the whole potato, since most of the nutrients are in the skin or just underneath the skin.  And if you follow the Body Ecology Diet, red new potatoes are the only potatoes permitted since they have the fewest sugars of any potato.  Just an FYI.  Of course, most of you are not on the Body Ecology Diet, so use whatever baby potatoes you can get your hands on, like Yukon Golds.

arrange the potatoes evenly spaced apart

put another baking sheet on top to flatten potatoes

press down on the baking sheet to flatten the potatoes

When I taught in France last year, I did some roasted potatoes in duck fat, which I know doesn’t sound healthful, but to be honest, I think animal fats can be good to cook with at high temperatures, unless you’re a vegetarian.  Unsaturated fats (vegetable oils) can oxidize at high temperatures (above 350 degrees) which create free radicals.  Yuck!  Those are pro-inflammatory compounds that will age you from the inside out.  Saturated fats don’t do that.  Listen, I use olive oil at higher temperatures sometimes if it’s the only fat that works, but you’re better off with coconut oil, ghee or duck fat, in this case.  Do what you’re comfortable with because you’ll love these no matter what!

roasted smashed potatoes by pamela salzman

roasted smashed potatoes by pamela salzman

4.5 from 2 reviews
Roasted Smashed Potatoes
Author: 
Serves: 6
 
Ingredients
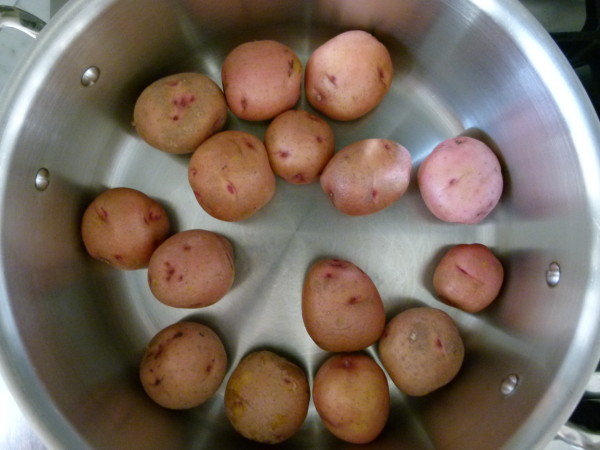
  • 2 pounds baby potatoes, such as red-skinned or Yukon Gold (about 15-18)
  • 1 Tablespoon kosher salt for boiling the potatoes
  • 4 Tablespoons fat of choice, divided (e.g. olive oil, duck fat, or ghee)
  • 1 teaspoon chopped fresh thyme or rosemary
  • ½ teaspoon sea salt
  • freshly ground black pepper to taste
Instructions
  1. Preheat the oven to 425 degrees.  Line a large rimmed baking sheet with parchment paper.
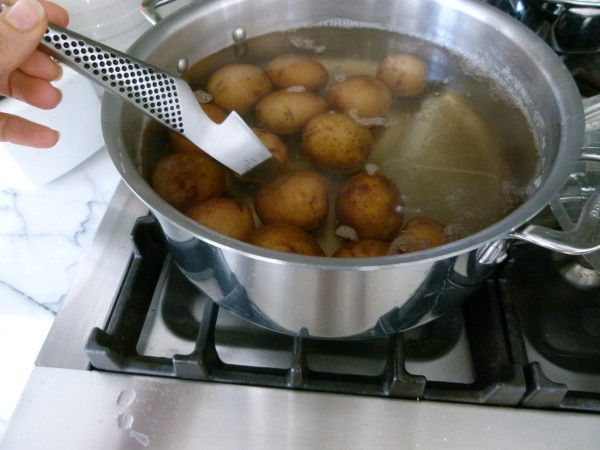
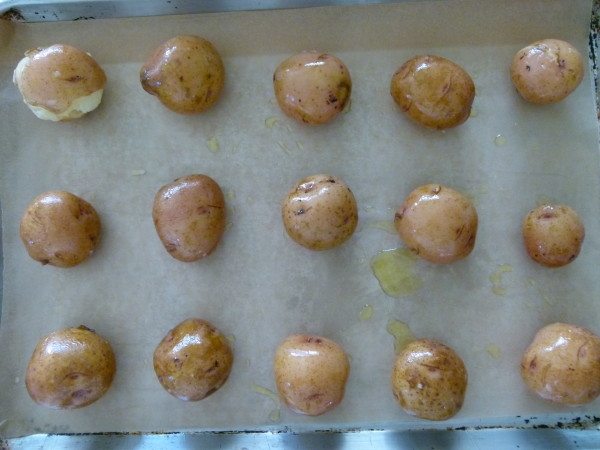
  2. Scrub the potatoes and place them in a large pot with 1 tablespoon of kosher salt.  Fill the pot three-fourths with cold water.   Place the pot on the stove over high heat.  Bring the water to a boil, lower to a simmer and cook until the potatoes are tender, about 20-25 minutes.  You should be able to insert the tip of a paring knife easily into the center of a potato.
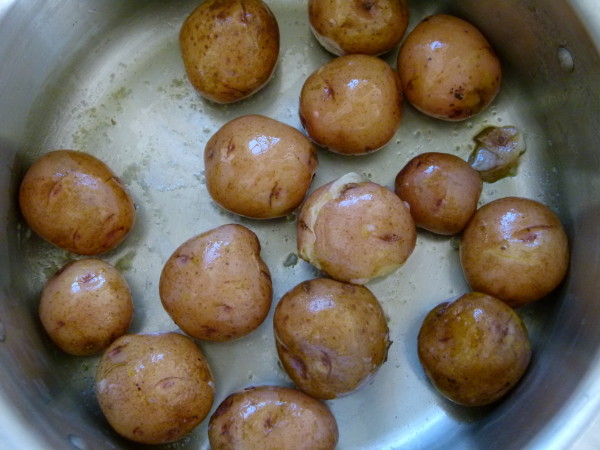
  3. Drain the potatoes in a colander and shake to get off as much moisture as possible.  Place the potatoes back into the pot and drizzle with 2 tablespoons of oil.  Roll them around to coat with the oil.
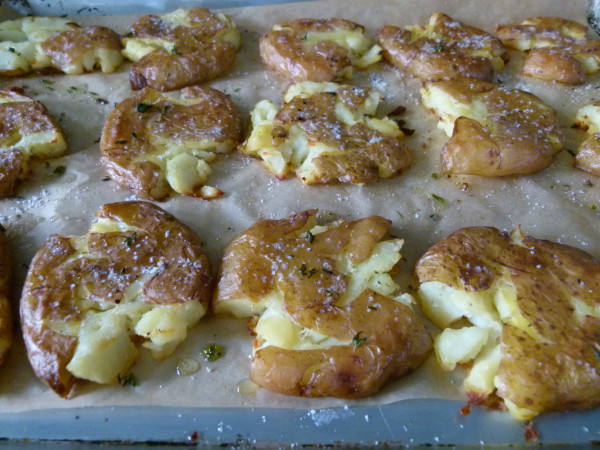
  4. Arrange the potatoes on the prepared baking sheet and evenly space them apart from each other.  Take another large rimmed baking sheet and position it right on top of the potatoes and press down, smashing the potatoes to about a half inch thick.  Remove the top baking sheet.
  5. Drizzle the remaining 2 tablespoons of oil on top of the potatoes and sprinkle with the chopped thyme and salt and pepper.
  6. Bake until potatoes are golden and crisp.  I took them out after 30 minutes, but you can go much longer if you want them really crispy.  Serve hot or warm.

How To Make Pie Crust

I am a total sucker for seasonal fruit desserts, and pies are no exception, especially in the summer and fall.  But we know each other well enough by now to know that I’m not a big dessert pusher.  I think overdoing sugar and refined foods like white flour can really compromise your health.  But,  during the holidays when the apples, pears and pumpkins are at their peak, I rationalize it all by adding a hefty dose of love to my pies!

What is nice about seasonal fruit desserts is that the fruit should be naturally sweet enough that we don’t need to add too many sweeteners to make them taste fabulous.  Typically, I use 4-6 Tablespoons of sweetener in a whole pie which can serve 8-10 people, and I don’t think that’s over the top.  Many cakes call for 2 cups of sugar just to provide you with a reference point.

Looking on the bright side, I love how “homemade” pies are.  The fruit is peeled and cut by hand, and if you make your own crust, that too is rolled and shaped by your loving hands.  In fact, I think pies look better and more special when they have that imperfect crimping and uneven glaze – a telltale sign that this came out of my kitchen.

Many people have told me that making pie crust looks intimidating.  But if you’ve ever made and rolled out cookie dough, it’s actually easier than that!  Even though I have a pie recipe posted on the site, I thought it would be helpful to include a step-by-step post for how to make pie crust.  Here are a few tips to help:

  • Necessary tools  You don’t need much, but a food processor or a pastry blender are very helpful.  If you have neither, I have used 2 knives with success.  On the other hand, besides an empty win bottle in a pinch, I haven’t found a good substitute for a rolling pin, which you’ll need to roll out the dough.
  • Cold Keeping everything cold is half the battle in making excellent dough.  If the butter warms up, it can make your dough too soft and it can melt on you.  Butter can be cut ahead and put back in the fridge.  Even your flour can be refrigerated.  And it is essential that the water you add is ice cold.  Some people like to make their pies in the morning, before the kitchen heats up.  And keeping this tip in mind, if you have to take a break from making your crust, or if your pie is ready to go in the oven but it seems a little soft and sticky, place everything into the refrigerator to firm it all up.
  • Butter  I know there are many people who can argue that a combination of butter and shortening or butter and lard make the tenderest, flakiest pie crusts, but you couldn’t pay me to eat Crisco or hydrogenated oils and I don’t have access to organic lard from grass-fed cows, so that’s not an option.  Organic butter is a natural, whole food and I’m ok with it in moderation.
  • Flour  Here’s the problem.  I hardly ever use white flour.  It’s refined and processed and basically a dead food with no nutrition.   I love using whole wheat pastry flour or white whole wheat flours whenever I can in place of white flour, but not in pastry dough.  Whole grain flours tend to result in a much drier, more crumbly dough which isn’t very easy to roll out.  It also tastes more “whole wheat-y” which my family doesn’t care for when they’re eating an apple pie.  If you must include some whole grain in your dessert, you can make the dough with half white and half whole wheat pastry flour.  I used to make half my pies like this for Thanksgiving and my sister-in-law and I were the only ones who would eat the wheat ones.  What’s the point of that?  Another option is to use white spelt flour, which is more water soluble than wheat flour, is a little more digestible and has a sweeter flavor.  White spelt flour makes very nice pastry.  If you just can’t go there, fruit crisp is always an option!
  • Water  Pie crust recipes should give you a range for how much water to use because it’s impossible for every cook to be working under the same conditions.  Moisture is something that will vary in the air, flour and butter that we use.  Always start with the lower range of water listed and increase as needed.
  • Don’t over mix  Pie crust is not like cake batter.  You actually do NOT want to completely blend the butter into the flour.  In fact, it is ideal if you have little pea-sized pieces of butter in your dough.   When the crust bakes in the oven, the heat will cause the moisture in the butter to steam up, creating the wonderful flakiness you want.
  • Give it a rest  This is a step you don’t want to skip since it accomplishes two important things.  Allowing your dough to chill out in the refrigerator helps the gluten in the dough relax so you don’t have tough pastry and it also firms up that butter again (see second tip above.)  30-60 minutes is enough time to do this, however you can absolutely refrigerate the dough for a couple of days or freeze it for a few months, if necessary.
  • Rolling it out  If your dough has been in the refrigerator for more than an hour, you may need to let it sit on the countertop for 15 or 20 minutes so that it will be easy for you to roll out.  If the dough starts cracking, it’s likely because it’s too cold.  Lightly flour your countertop and your rolling pin and start rolling from the center out, regularly checking to make sure your dough can always move around on your countertop without sticking.  If you really have a hard time rolling out the dough, you can stick it between two pieces of plastic wrap and roll it out that way.  To know if you’ve rolled it out enough, invert the pie plate over the rolled out dough.  If you have a good two inches beyond the rim of the plate, you’re good to go.
  • Moving the dough to a pie plate It sounds trickier than it is.  I usually gently fold the dough in half and transfer it to a pie plate that way, but you can also roll the dough around the rolling pin and then unroll it onto the pie plate.  Fit it into the plate.
  • Blind baking Sometimes a recipe will tell you to prebake the pie crust before filling it.  This is common with liquidy fillings such as custard or pumpkin, or if you cook the filling separately and you won’t be putting the pie in the oven.  With the crust inside a pie plate, prick the crust all over the place with a fork.  Place a piece of parchment paper on top of the crust and fill the parchment with pie weights or dried beans (the beans won’t be edible after you bake them, though.  Just keep them for the next pie.  I’ve been using the same dried beans since college –swear!)  This prevents the crust from puffing up.
  • Finshing  It doesn’t have to be perfect.  Do your best and have fun.  I seal the top and bottom crusts together and use my thumbs and pointer fingers from both hands to pinch the dough.  Or an easier method is use the tines of a fork and press the crust all along the rim of the plate.  Lastly I cut a couple slits in the center of the top crust so steam can escape and you won’t have a watery pie.  Glazing with an egg wash makes the pie look beautiful, but if egg is out of the question, you can use a little cream.

Although I have made many pies in my day, I still love learning how to do things better.  Please share your favorite tips and tricks for making pie crusts and pies.  I’d also love to hear what desserts you are all making for Thanksgiving!!!!


5.0 from 1 reviews
Pie Crust
Author: 
Serves: makes enough for a 9-inch double-crust pie
 
Ingredients
  • 2 ½ cups all-purpose flour or white spelt flour
  • 1 teaspoon cane sugar
  • 1 teaspoon sea salt
  • 2 sticks unsalted butter, cut into pieces
  • 5-8 Tablespoons ice water
Instructions
  1. Place the flour, sugar and salt in the bowl of a food processor fitted with the metal blade and pulse a couple times until blended.
  2. Add the butter to the flour and pulse until the mixture resembles small peas.
  3. Pour 5 Tablespoons of ice water on top of the flour mixture and pulse about 10 times. Avoiding the blade, carefully grab a small handful of dough and squeeze together. If the dough holds together without crumbling, it’s ready to be formed into a disc. If it’s too dry, pulse in another few teaspoons of ice water until dough holds together.
  4. Transfer dough to a piece of parchment and bring dough together to form a ball. Divide in half and shape into two disks. Wrap each disk in parchment and refrigerate at least 30 minutes at which point it will be ready to roll out. Or you can keep the dough refrigerated for 2-3 days, or in the freezer, well wrapped for 2-3 months.

The secret to great-tasting chicken

If you choose to eat animal protein, chances are you prepare chicken more than any other kind.  Chicken’s popularity is not surprising– it is very versatile to cook with, neutral in flavor, low in fat and more budget-friendly than beef or fish.  But I think chicken can sometimes be TOO neutral in flavor, i.e. tasteless.  And it can be TOO low in fat, such as with the breast meat and thus can end up getting dried out easily, especially when we’re being careful about cooking chicken all the way through.  After making mediocre chicken for many years, my life was changed once I learned a few simple tricks to making chicken taste a whole lot better.  Delicious, juicy chicken is in your future!

Quality:      I have done side-by-side taste comparisons with lots of different kinds of chickens and the best tasting bird I ever cooked was an organic, locally-raised pastured chicken by Healthy Family Farms.  There’s definitely a more pure, chicken-y flavor from birds that have been raised out in the open versus in cramped quarters.  And if it’s in your budget, I urge you to only buy organic meats.  Click here for a more in-depth comparison of the different options you may have for chicken.  Most people don’t have access to Kosher, organic, free-range chicken, but if you do, go for it and you can forgo all the pre-seasoning I’m about to recommend since kosher chicken has already been brined.

Salt:  The best thing you can do is to pre-season chicken with salt, especially a whole bird or thick bone-in, skin-on pieces.  Just sprinkling a little salt on top of your chicken right before cooking it will only season the surface.  But seasoning the chicken with salt well ahead of time or brining it in a salt-water solution will draw salt deep into the meat, resulting in a very tasty piece of chicken.  But also, and just as important, the salt changes the cells in the chicken meat so that they will draw and hold more moisture than the chicken had before.  So not only will the chicken be tastier, but it will be much juicier, too.  You kill two birds with one stone!  I did not just say that.  See below for instructions on how to dry brine and wet brine.

Timing:  Well-seasoned chicken needs some advance planning.  I sprinkle or dry rub kosher salt on chicken as soon as I get home from the market, rewrap it and put it in the refrigerator until I’m ready to cook it.  You can do this as much as two days ahead, but less than 2-4 hours ahead doesn’t produce quite the effect you’re looking for.  If you are pressed for time, (e.g. you get home from the market at 4:30 pm and you want to start cooking right away), then a wet brine is the perfect option since you can season bone-in pieces efficiently in 45 minutes.  Whole birds take longer.

Basic Wet Brine:  For 3 pounds of chicken pieces, in a large bowl dissolve 1/4 cup additive-free kosher salt (such as Diamond Crystal) in 1 cup hot water.  Whisk to dissolve.   Add 1 cup ice water and make sure the water is cool.  If not, add a few pieces of ice.  Place the chicken pieces in the brine and allow to soak for 45-90 minutes.  If you’re cooking the chicken right away, you can do this on the countertop.  Drain the chicken and pat dry with paper towels before cooking.  For a whole bird, use 1 cup kosher salt and 4 cups water.  Brine for 2-3 hours in the refrigerator.  I don’t normally brine cutlets, but many people do.  You only need to soak boneless, skinless cutlets for about 30 minutes.


Basic Dry Brine:  Sprinkle 3 pounds of bone-in chicken pieces with 1/2 Tablespoon additive-free kosher salt or sea salt or a heaping Tablespoon for a whole chicken.  Wrap and refrigerate until ready to use.  Do not rinse.

You can apply these tips to any chicken recipe you have (such as one of my favorites, Orange and Rosemary Glazed Chicken pictured above), but you may want to cut back on the salt in your recipe slightly since the chicken will already be salted.  Look out for a fabulous recipe next week for Baked Chicken with Artichokes and Capers.  So delicious and perfect for Easter or Passover!